Print this article Font size 16
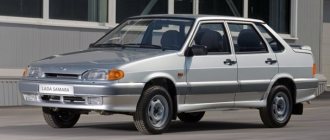
In fact, replacing brake discs on a VAZ 2114 is not a very complicated process. This work can be done with your own hands. This will take you about 5 hours with a competent and careful approach. There is no need to rush, as this can lead to more serious consequences.
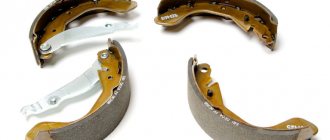
In addition to replacing discs, we recommend paying attention to the current condition of the pads. Usually they are changed at the same time.
What is a brake disc and why is it needed?
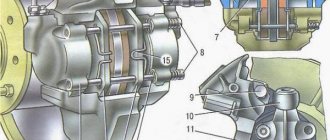
The brake disc is an element of the front wheel braking mechanism. It is made of steel and has the shape of a plate, the rim of which serves as a working surface. The protruding part (bottom) of the disk is attached to the hub.
The pads are located in close proximity to the working surface of the part. When we press on the brake pedal, they press against the disc, causing it to slow down. This is how the front wheels of the “fourteenth” brake.
Replacing rear discs
- We fix the front wheels with wheel chocks for safety purposes;
- Jack up the rear wheel and remove it;
- We unscrew the two mounting bolts and carefully remove the drum from its seat. If necessary, tap along the perimeter to loosen the fixation;
- We carry out troubleshooting of the cavity, friction linings, spacer bar, pressure spring, hand brake cable.
We complete the repair by installing a new drum. Subsequent maintenance after 30,000 km. If you have any difficulties with installation, read the instructions and watch the video on the Internet.
When disks need replacement
Replacing brake discs on a VAZ 2114 is not a routine type of work. Their service life, according to the manufacturer, is 100 thousand kilometers. This is provided that they are operated normally. But, as practice shows, they are enough for at most 70 thousand km, and only if the pads are changed on time.
Be that as it may, the driver needs to diagnose the condition of the discs at least once a quarter, and if excessive wear or damage is detected, take measures to replace them. Ignoring these recommendations can lead not only to the failure of other elements of the system, but also cause an emergency on the road.
VAZ 2114 brake discs must be replaced if:
- the thickness of at least one of them is less than 10.8 mm;
- there are grooves, chips, cracks on the working surface;
- the part is deformed due to mechanical damage.
How to replace front and rear brake discs yourself
Before starting work, we carry out comprehensive diagnostics; for these purposes, we visit a service station. However, the instruction manual does not prohibit servicing the machine at home. If you have no experience, it is still better to turn to the experts.
There are frequent cases of worsening damage after unprofessional intervention. For some VAZ owners, the factory warranty is a fundamental factor. Although the design of most units is simple, and the principle of operation is intuitive.
We carry out visual diagnostics from under the bottom of the car, inspect the hub mechanism for obvious, visible defects. Next, we hang the car with a hydraulic lift; if the latter is not available, then we will use a mechanical jack.
We lift the side of the car, remove the wheel, and carry out troubleshooting. We carefully inspect the disc, pads, and anti-vibration plates. If there are signs of wear or mechanical damage, replace them with new ones.
Sequence of actions when replacing disks yourself
- We place the car within the perimeter of the repair area, block the wheels with wheel chocks, and squeeze the parking brake;
- We engage first gear to prevent arbitrary rotation of the rear wheels;
- Unscrew the bolts and remove the wheel;
- We unscrew the nuts from the back side and remove the caliper from its seat;
- Use a clamp to compress the working cylinder as far as it will go, so that it relieves the pressure on the disc and pads;
- We remove the anti-vibration springs and caliper.
The dismantling is completed, then we inspect adjacent parts and mechanisms, carry out troubleshooting, and replace the elements with new ones.
We carefully inspect the hub, bearing, rod end, and ball joint.
Which disks to choose
If replacing brake discs on a VAZ 2114 is inevitable, you should take care to select them correctly. Remember, your safety depends on their quality. And be prepared for the fact that you will have to buy not one disc, but a set of two pieces. Under no circumstances should you change them one by one! Due to uneven wear of parts, the braking efficiency of each wheel will be different. This may cause you to lose control of the vehicle.
The standard front brake disc for the VAZ 2114 (R-13) goes on sale under catalog number 2108-3501070. The price of the set, depending on the manufacturer and modification, can vary from 1100 to 4000 rubles.
Replacing brake discs VAZ 2114 - ventilated or conventional
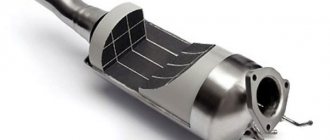
Recently, ventilated wheels have become very popular among car tuning enthusiasts. Their main difference from conventional ones is the presence of holes and grooves (grooves) on the working surface of the parts. This design allows you to significantly reduce heating during intense braking. Such discs cost from 2500 rubles per set.
Is it worth installing them? If you are not a supporter of sporty driving and sharp braking, there is no need to overpay. Feel free to install standard parts. If you participate in racing or are simply used to aggressive driving, the best solution would be to install ventilated discs. Installing them, of course, is more hassle, but you will immediately feel the difference with regular ones.
Go to a service station or change it yourself
Replacing the front brake discs of a VAZ 2114 at a service station will cost you at least 2,500 rubles. From a financial point of view, this is not cheap. If you have experience with hand tools, you can do the replacement yourself. This procedure will take 4-5 hours, but the money will stay at home.
Replacing VAZ 2114 brake discs with your own hands involves using the following tools and means:
- jack;
- wheel wrench;
- key to 17;
- key for 12;
- mallet or hammer and wooden block;
- liquid VD-40;
- a piece of wire (30-50 cm).
Checking the wear of discs and pads in the brake system
There are certain dimensions below which it is unacceptable to drive on existing brake units:
- Brake disc thickness – 10.8 mm
- Axial runout on the surface – 0.15 mm
- Overlay on the block – 1.5 mm
- Brake drum diameter – 201.5 mm
You cannot determine such dimensions by eye. Therefore, we jack up the fourteenth wheel, clean the entire unit from dirt, after removing the wheel, of course, and use a simple caliper to measure the thickness of the disc, pads and drum brake at the rear (if you have them). We compare all indicators with acceptable numbers.
Another important step is to check how the pads move: poke them with a screwdriver, if they move too hard, then they can clamp the disk, you need to change them, otherwise you will ruin them.
In general, it is good to remember the following parameters that require replacing the brake disc on a VAZ 2114:
- Invalid thickness value (erased)
- The pad linings are oily
- There is a gap between the pads and the base
- You hear a squeaking sound when you brake
- Hit the brake pedal
- If you have drum brakes at the rear, they can stick to the pads, which can lead to double replacement and expense.
- The brake cylinders (front and rear) may become damaged - there is an option to revive them with a WD tool, but this will only temporarily delay the replacement
As soon as any of the above happens, the brake discs need to be replaced.
It also happens that all the main brake components have been changed, including the brake pads, but the situation has not changed for the better. Then look at the accompanying components and adjacent spare parts: hub bearing, front wheel arms (they are also called daisies). It is not necessary, but it is very advisable to do a wheel alignment.
Self-repair of VAZ 2114 - replacement of brake discs
The order of work is as follows:
- We place the car on a flat horizontal platform. Turn on the parking brake. Support the rear wheels.
- Using a wheel wrench, unscrew the wheel bolts of one of the front wheels.
- We jack up the front part of the car body on the desired side. Unscrew the bolts completely. We remove the wheel.
- Turn the steering wheel to the side until it stops so that you can reach the caliper mounting bolts.
- Using a 17mm wrench, unscrew the bolts (2 pcs.) securing the caliper to the steering knuckle. We dismantle the brake mechanism assembly without disconnecting it from the brake hose. Using a piece of wire, we hang it, for example, on the shock absorber spring so that the brake hose does not twist.
- We use VD-40 liquid to treat the places where the disc is connected to the hub, as well as the mounting pins. We wait 10-15 minutes for the liquid to “work”.
- Using a 12mm wrench, unscrew the two pins securing the disk.
- Remove the disc from the hub. If it does not come off, carefully knock it down using a mallet or a mallet with a wooden spacer. The blows must be applied from the back of the disc closer to its center.
- When the disk is removed, clean the seat on the hub using a brush (dry rag). Additionally, you can treat it with VD-40 liquid.
- We install the new disk in place. Screw in and tighten the guide pins.
- We install the brake mechanism. We fix it with bolts.
- We mount the wheel.
- Remove the jack and tighten the wheel bolts.
- Similarly, we change the brake disc on the other wheel.
Before driving onto the road, it is recommended to check the operation of the braking system off the road. To do this, drive at low speed somewhere in the yard and evaluate the effectiveness of braking.
Replacement
Today, many people prefer to install ventilated brake discs on the VAZ 2114. This is a largely justified decision, since a special system allows them to be additionally cooled by air flows. Relevant for fans of fast driving and sharp braking. These systems are effective and durable, so it won’t hurt to spend money on them.
As for the replacement procedure, the main task here is to dismantle the old disks. Installing new ones later won’t be too difficult. Just be sure to remember or even write down which unit was located where and in what position, so that, by analogy, you can then assemble the “constructor” in the reverse order.
The brake discs on each wheel are removed in the same way. Therefore, follow the instructions.
- Place the car on as level a surface as possible, turn on the handbrake, and place supports under the wheels. This way you minimize the risk of the machine moving and causing injury to you.
- Raise one of the wheels using a jack and begin removing it. We think you know perfectly well how wheels are removed on a VAZ 2114.
- Next, loosen the brake cylinder a little.
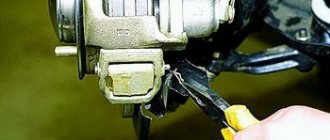
- Using a screwdriver, pry the boot off the upper guide of the brake pad.
- Now you need to remove the caliper and pads. To remove the caliper, use a 17 mm wrench. Before unscrewing the caliper itself, be sure to remove the brake hose fastener.
- Removal of the pads is carried out in a special way. We have prepared a separate special material for you about this.
- To prevent brake fluid from leaking out of the system, place a container under the hose. Anything that leaks out can be poured back in after replacing the disks.
- Proceed with a thorough cleaning of the work site. You will have to clean off all traces of dirt and remove rust on the brake surfaces. Just don't pick anything there. Use special highly effective washes.
- When using chemicals, be sure to think about your own protection. Wear gloves and avoid contact with skin and eyes.
- Treat all brake system components with the almighty WD40. Take special care under the hub bearings.
- The wheel pins are removed using a 8mm wrench. Just make sure that during this operation the disk does not move from its current position.
- Before removing the brake disc, lightly tap the surface of the unit. Just don't ram on the work surface.
- Remove the disc.
- Insert the new unit and proceed in the reverse order of dismantling.
- All elements must be thoroughly lubricated beforehand, especially the hubs. Treat the working surface of the new brake disc with a special product. This will degrease the unit.
- If the brake cylinders were replaced at the same time, bleeding the brake pedal will become a mandatory measure, without which it is strictly not recommended to operate the car.
- In a similar way, change the second front brake disc on your VAZ 2114.
This procedure has its own difficulties. Therefore, get ready for the fact that you, as a beginner, will have to spend not 5, but 6-8 hours.
Features of replacing standard disks with ventilated ones
If you decide to install ventilated discs, you should know that all their modifications are wider than the standard ones. Therefore, in addition to them, you will need to buy appropriate calipers, front pad guides, as well as protective covers. Purchasing all these elements separately is quite problematic. It's better to buy a set. The standard kit for two wheels includes: discs, calipers, pad guides and faceplates (casings). The price for such a set starts from 9,000 rubles.
The algorithm for replacing standard disks with ventilated ones is a little more complicated and will take 5-6 hours. Here you need to disconnect the brake hoses and remove the brake cylinders. And after the work is completed, you will also have to bleed the brakes.