Finally, a free weekend and a free garage! The drives have been lying in the garage for about 3 weeks now, waiting, waiting... and kept driving and clicking... because. the garage was occupied by a broken fit (Fit was sorted out and he left))))) It was the Nivasik’s turn for an actually planned replacement of the drives because After replacing the drive springs, they began to click when driving under load.
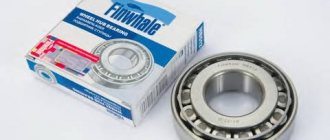
Drives: AR731 TRIALLI and AR730 TRIALLI. I was tormented for a long time about which one to choose, I wanted there to be tripods, it seemed like they wrote that there were tripods, but when the boot blew up to check the lubrication, I was alarmed that there was CV joint grease everywhere, although the CV joint is not suitable for tripods. Pulled it out, stuck in the ring... balls... arrrr... well, there’s nothing else to do anyway, you have to put it in (((
I added lubricants and assembled everything, the anthers seemed to be not bad, with plastic protection.
Then he took off the lower ball joints and moved his fists away.
I unscrewed the fastenings of the front gearbox and the drive bolts, they came out without any problems, if you don’t unscrew the gearbox, it’s unlikely that you’ll be able to pull out the right drive. Then I unscrewed the studs, applied some sealant under the gaskets and put them back together. I screwed in long ball bolts instead of studs to make it easier to remove the drive in the future.
The problem arose only when knocking the old drive out of the bearing... well, I didn’t want to go anywhere... I even flattened the teeth on the end while I was knocking it out...
I installed the oil seals 12019142B CORTECO and I don’t really want to play with Balakovo)
I filled the oil with ZIC synthetic 75w-90 and decided to experiment with the Fenom additive, I hope it doesn’t get worse xDDD
There is a bit of oil left, so I’m wondering whether it’s worth pouring it into the box, in theory it shouldn’t eat up the synchronizers, or should I take pure GL-4.
The oil in the front gearbox was black, and there was a magnetic back on the plug. There is a similar situation in the rear axle... apparently the previous owner didn’t really bother with servicing the car (although I realized this a long time ago from the condition of the car, just another fact).
In the transfer case, the oil was clean and transparent, but it did not flow readily, I assume that the mineral water was being filled in.) All that was left was to move the oil only in the box, but it was transparent, I looked when the engine was turned on.
The next plan is to replace the IAC and TPS. because I'm tired of stalling at the entrances to traffic lights. I bought a contactless Kaluzhsky 36.3855, I felt like I was reacting faster, although most likely it was just a self-hypnosis effect xDD
IAC Start Volt VSM 01203 is the cheapest because... I think I'll take the old one apart and clean it. The removed factory sensors are still visible because years of manufacture 2005 are written)))
I drove it for a while, and it seemed like it stopped stalling and began to react more clearly. The play when starting off has become smaller and there are no clicks, it has become even more comfortable to drive the Nivasik.
After the capitalization, the transfer case began to vibrate more strongly, I think when they removed the front universal joint, they did not put it in the old position. The industrial shaft was turning in neutral and there was no vibration from the transfer case. Of course, I would like to take a new CV joint front driveshaft, it seems to be more or less protected from dirt, etc., etc., but I’d better leave the rear one on the crosspieces. But the toad presses... he says he’s coming! xDD
Today, Niva front-wheel drives use 3 main types of internal CV joints: ball, tripoid and Lebro.
Beerfield, or ball CV joints
On Niva and Chevy Niva, the manufacturer installs internal Beerfield CV joints (constant velocity joints), which consist of a drive grenade (housing) and an internal cage of a separator with balls, rotating along the grooves. Hence the most common name for Bearfields - ball CV joints. A drive shaft is installed in the inner race, which connects it to the outer drive.
For a Nivavod that periodically drives off the asphalt, the factory CV joint is one of the most problematic components of the car.
Its design disadvantages are as follows:
- susceptible to loads arising during axial movement due to insufficient longitudinal travel;
- subject to wear at large CV joint angles;
- does not withstand large torsional moments;
- as a result, it “lives” for quite a short time.
All this creates a number of problems for farmers:
a) when, when the separator is destroyed, the balls spill out, the torque stops being transmitted from the gearbox to the wheels and goes to the CV joint grenade, which means the Niva’s front-wheel drive is completely disabled if a differential lock was not installed on your car. In other words, the car simply does not move. In off-road conditions, this is, if not a dead end, then a rather difficult situation.
b) Hence the first conclusion: you need to have spare parts and accessories with you. To install a new separator instead of a damaged stock one, you need to check that the position of the balls in the grooves corresponds to the factory layout. However, separators are not sold separately, and in order to repair the CV joint this way, you still need to get a “donor” somewhere. In addition, it is almost impossible to carry out such repairs in the field; it would be easier to completely replace the grenade.
c) Hence the second conclusion: a nivavod should always have left and right inner CV joints with it
d) Replacing a boot with CV joints is also a very labor-intensive task due to the need to control the position of the balls in the grooves. Therefore, many Niva drivers generally abandon front-wheel drive on a Niva type CV joint and switch to tripoid drives.
How to replace an outer CV joint
How to remove the inner CV joint on a Niva 21213 is more or less clear. Let's consider the process of replacing the outer CV joint. In order to replace the outer part of the pair in the assembly, it is necessary to completely remove the axle shaft with “grenades” from the car.
The sequence of such actions is as follows:
- First you need to lift the car. This can be done using a jack.
- Next, you need to install a stand - this is necessary in order to minimize the likelihood of accidents, so to speak, to be on the safe side in case the jack does not cope with its task.
- Then you also need to install the wheel chocks.
Thanks to these safety measures, any injury or damage will be avoided. The most important point is this: before lifting the body, it is imperative to loosen the hub nut. A socket and wrench extension may be required to carry out this work.
The further sequence of actions is as follows:
- Be sure to remove the front wheels.
- Next, you need to unscrew the lower mount that holds the front shock absorber.
- Then you need to move it as far as possible to the side. It is recommended to do this so that further work is not complicated.
- After these manipulations you need to secure it. In this case, you can use absolutely any available means.
After this stage, it is recommended to unscrew the bolts, and this should be done directly on the ball joint.
The next part of the work looks like this:
- You need to remove the nut on the hub.
- Then pull it towards you, and then remove the outer CV joint.
Instead of Beerfield - tripoids
Externally, tripoids are practically no different from ball CV joints. They are grenades with three grooves, but there is a significant design difference: instead of a separator with balls, a three-spike is installed here, on the spikes of which three rollers spin on needle bearings.
Tripoids are good because even if they break down in off-road conditions, they allow you to easily get to civilization (that is, the nearest service station).
The main disadvantage of tripoids is their small operating angles compared to CV joints. This is due to their design features. The maximum operating angle of such drives is 22 0, and the optimal one is no more than 4 0.
There is another important point: although if the optimal operating angle is exceeded, the tripoid will, of course, work, but with noticeable vibrations and jerks caused by the fact that the angular velocities of the tripoid parts will no longer coincide. And the larger the angle, the greater the discrepancy in angular velocities
As practice shows, at large angles the drive rod gets caught on the protrusions of the grenade grooves and premature wear of the needle bearing occurs, which manifests itself in significant play in the drives.
Front-wheel drive with Lebro CV joint
There is a third, and as practice shows, the optimal design option for an internal constant velocity joint - a CV joint of the Loebro type. They are included in the Niva front-wheel drive kit from IZH-TECHNO.
What are the features and advantages of this type of CV joint?
Firstly, due to its design, the Lebro CV joint has increased operating angles, which provides greater suspension travel with less vibration (compared to stock CV joints and tripods).
This distinguishes this type of CV joint from Tripod joints, the operating angles of which are significantly limited due to design features. At the same time, Lebro CV joints have a more reliable design compared to birfield ball CV joints.
Secondly, Lebro CV joints are reliable and durable. Niva front-wheel drive CV joints from IZH-TECHNO were tested for strength on a stand, where the wheel was preloaded in such a way as to simulate a load equivalent to the movement of a 2-ton car on asphalt. During the tests, the CV joints performed well: no crunching or breakdowns with a mileage of more than 50 thousand km!
Thirdly, they are easy to install. To replace the grenade, you only need to install the retaining ring of the inner CV joint and tighten the 6 fastening screws. The volume and duration of work is halved! Agree, for off-road conditions, where there are no conveniences for servicing the drives, this is an important factor.
To summarize the above, it should be noted that Lebro CV joints have proven themselves to be the optimal solution for Niva front-wheel drive, meeting the price-quality parameters.
Constant velocity joints (CV joints) of the Chevrolet Niva are an important part of the front-wheel drive. They are a swivel joint that transmits torque from the gearbox to the steered wheels without loss of power. In common parlance, these nodes are called "grenades". This is explained by their external similarity with the ammunition of the same name.
Front wheel drives Chevrolet Niva
- Repair manuals
- Repair manual for Chevrolet Niva 2002+.
- Front wheel drives
Design Features
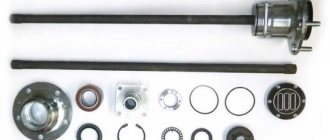
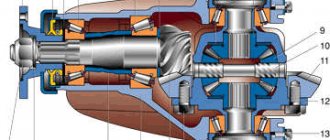
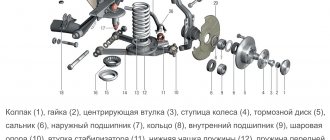
| Rice. 5.9. Front wheel drive: 1 – internal joint housing; 2 – clamp; 3 – clamp for securing the cover; 4 – wheel drive shaft; 5 – protective casing; 6 – protective cover; 7 – thrust ring of the cage; 8 – separator; 9 – clamp; 10 – ball; 11 – outer hinge cage; 12 – retaining ring; 13 – outer hinge body; 14 – casing clamp |
Torque is transmitted to the front wheels from the front axle gearbox through the right and left drives. Both drives are identical in design. Each drive consists of a shaft 4 (Fig) and two joints of equal angular velocities installed on its splined ends.
The internal joint housing 1 is connected to the side gear of the front axle reducer. The outer joint housing 13 is connected to the front wheel hub. The holder 11 is connected to the housing 13 through balls 10, which are located in the grooves of the housing and the holder.
The race is installed on the splines of the shaft 4, rests against the ring 7 and is fixed on the shaft with a retaining ring 12. In the compressed state, this ring freely passes through the splined connection of the race 11, which allows you to both connect and separate the hinge and the shaft.
The inner hinge body 1 differs from the outer hinge body 13 in that it has straight grooves.
| USEFUL ADVICE Drive joints are very durable, their design life is almost equal to the life of the car. However, during operation they are changed or repaired quite often. Such work is quite expensive and labor-intensive. To seriously save money, regularly check the condition of the protective covers of the hinges and immediately replace them at the slightest damage. If water or dust gets into the hinge through a damaged cover, it will fail after several hundred kilometers. The sealed joint wears out extremely slowly. |
Removing and installing front wheel drives
You will need: keys “13”, “17”, “27”, a wrench for the wheel nuts.
| 1. Disconnect the front driveshaft from the front axle gearbox (see “Removing and installing the driveshaft”). |
| 2. Raise the car and remove the front wheels. |
| 3. Disconnect the shock absorbers from the lower arms of the front suspension (see “Replacing the front suspension shock absorber”). |
| 4. Unscrew three nuts securing the bearing housings of the inner hinge of the right and left drives. | 5. Remove the bolt securing the right front axle gearbox bearing cover to the front suspension cross member. |
| 6. Unscrew the four nuts securing the suspension brackets of the front axle gearbox. | 7. Unscrew the nut and remove the bolt securing the left front axle gearbox bearing cover to the front suspension cross member. |
| 8. Raise the front axle gearbox and secure it in this position in any available way. | 9. Remove the front wheel hub cap and unscrew the hub nut. |
| USEFUL ADVICE The hub nut is tightened with a large torque. Therefore, we recommend using a head with a strong knob. |
| 10. Remove the nut and centering sleeve. | 11. Compress the suspension spring by jacking up the lower arm. Unscrew the three nuts and remove the ball joint bolts from the lever. |
| 12. Move the steering knuckle to the side. | 13. Disconnect the exhaust pipe from the exhaust manifold and exhaust gas converter and take it to the engine (this operation is not required to remove the left drive). |
| 14. Pull the gearbox back and... | 15. ...remove the right drive. |
| 16. Remove the left drive in the same way. |
| 17. Install the drives and all removed parts in the reverse order of removal. When tightening the wheel hub nuts, adjust the play in the bearings (see “Checking and adjusting the play in the front wheel hub bearings”). |
Disassembly and assembly of front wheel drives
If you hear knocking noises in the front-wheel drive while driving when turning the car, check the constant velocity joints. If, when rocking the drive shaft by hand, play is felt or the dirt-proof covers are torn, such a hinge must be replaced. There is practically no point in disassembling the hinge. This is labor-intensive work, and if the cover is torn, dirt that has gotten into the hinge has already rendered the hinge parts unusable. The hinge parts cannot be replaced individually, and therefore the best option is to replace the hinge assembly, as well as its dirt-proof cover. As a last resort, disassembly is allowed to replace the grease of the internal joint as it is less susceptible to water and road dirt. The appearance of traces of grease on the hinge indicates that the cover is torn.
You will need: a screwdriver, sliding pliers, a hammer.
| 1. Using a screwdriver and sliding pliers, remove the large and... | 2. ...small clamps from the inner joint cover. |
| 3. Slide the boot along the shaft. | 4. Knock the joint off the shaft using a hammer and a wooden spacer, striking the end of the cage. |
| 5. To disassemble the inner hinge, use a screwdriver to pry off the retaining ring of the cage. | 6. Remove the cage assembly with the separator and balls from the hinge. |
| WARNING Use any available means to mark the balls and grooves of the cage in order to install the balls in their original places. |
| 7. Using a screwdriver and pliers... | 8. ...remove the big one and... |
| 9. ...small clamps of the casing of the outer hinge cover. | 10. Slide the cover and... |
| 11. ... cover along the shaft. | 12. Knock the joint off the shaft using a hammer and a wooden spacer, striking the end of the cage. |
| 13. Remove the cover and casing from the shaft. |
| 14. Wash all metal parts with kerosene until the old grease is completely removed. |
| 15. Fill the hinge with CV joint grease-4 (the amount of grease for the outer hinge is 60 cm 3 for the internal one - 150 cm 3 ); |
| 16. Install the hinge and the removed parts in the reverse order of removal. |
↓ Comments ↓
1. Car structure
1.0 Car structure 1.1 General information about cars 1.2 Passport data 1.3 Car keys 1.4 Controls 1.5 Heating and ventilation 1.6 Doors 1.7 Seat belts 1.8 Adjusting the position of the front seats 1.9 Adjusting the steering wheel
2. Recommendations for use
2.0 Recommendations for operation 2.1 Safety rules and recommendations 2.2 Tools and accessories 2.3 Running in the car 2.4 Operating the car during the warranty period 2.5 Checking the car before leaving 2.6 Replacing the air filter entering the cabin 2.7 Using a jack 2.8 Towing the car
3. Problems along the way
3.0 Malfunctions along the way 3.1 The engine does not start 3.2 Malfunctions of the fuel injection system 3.3 No idle speed 3.4 Interruptions in engine operation 3.5 The car moves jerkily 3.6 The car accelerates poorly 3.7 The engine stalls while driving 3.8 The oil pressure has dropped
4. Engine
engine piston of the fourth cylinder to the TDC position of the compression stroke
5. Transmission
5.0 Transmission 5.1 Clutch 5.2 Possible malfunctions of the clutch, their causes and solutions 5.3 Gearbox 5.4 Possible malfunctions of the gearbox, their causes and solutions 5.5 Transfer case 5.6 Possible malfunctions of the transfer case, their causes and solutions 5.7 Driveshaft 5.8 Possible malfunctions of the driveshaft , their causes and solutions 5.9 Front wheel drives
6. Chassis
6.0 Chassis 6.1 Front suspension 6.2 Possible malfunctions of the front suspension, their causes and solutions 6.3 Rear suspension 6.4 Possible malfunctions of the rear suspension, their causes and solutions 6.5 Shock absorbers
7. Steering
7.0 Steering 7.1 Design features 7.2 Inspecting and checking the steering on the vehicle 7.3 Checking the tension and adjusting the power steering pump drive belt 7.4 Replacing the fluid in the power steering hydraulic system 7.5 Replacing the power steering hydraulic system reservoir 7.6 Bleeding the power steering system 7.7 Adjusting the gap in the roller engagement with worm 7.8 Removing and installing the steering wheel 7.9 Replacing steering shafts
8. Brake system
8.0 Brake system 8.1 Device features 8.2 Useful tips 8.3 Checking and adjusting the brake system 8.4 Replacing brake fluid 8.5 Bleeding the hydraulic brake system 8.6 Master brake cylinder 8.7 Vacuum brake booster 8.8 Pressure regulator 8.9 Replacing hoses and pipelines of the hydraulic brake system
9. Electrical equipment
9.0 Electrical equipment 9.1 Design features 9.2 Fuses and relays 9.3 Generator 9.4 Possible generator malfunctions, their causes and solutions 9.5 Starter 9.6 Possible starter malfunctions, their causes and solutions 9.7 Ignition switch (lock) 9.8 Replacement and maintenance of spark plugs 9.9 Engine control system
10. Body
10.0 Body 10.1 Design features 10.2 Removing and installing front fender liners 10.3 Removing and installing front fenders 10.4 Removing and installing decorative trims on the front fenders and doors 10.5 Replacing buffers 10.6 Removing and installing radiator trim 10.7 Removing and installing the hood 10.8 Removing, installing and adjusting the lock and hood lock drive 10.9 Tailgate
11. Vehicle options
11.0 Vehicle options 11.1 Clutch release master cylinder 11.2 Electromechanical power steering 11.3 Brake system
12. Car care
12.0 Car care 12.1 Checking the car before leaving 12.2 Washing the car
13. Purchase of spare parts
13.0 Purchasing spare parts 13.1 Engine oil 13.2 Greases 13.3 Coolants 13.4 Brake fluid
14. A trip to the service station
14.0 A trip to the service station 14.1 Useful tips
15. Winter operation of the car
15.0 Winter operation of a car 15.1 How to prepare a car for winter 15.2 Recommendations for starting the engine in severe frost 15.3 What is useful to buy for winter 15.4 Useful winter tips
16. Preparation for technical inspection
16.0 Preparation for technical inspection 16.1 Recommendations 16.2 List of malfunctions and conditions under which the operation of vehicles is prohibited 16.3 Changes to state standards regulating the maximum permissible content of harmful substances in the exhaust gases of vehicles 16.4 Standard form of diagnostic card for instrumental control points
17. Applications
17.0 Appendix 17.1 Appendix 1. Tightening torques for threaded connections 17.2 Appendix 2. Basic data for adjustments and control 17.3 Appendix 3. Fuels and lubricants and operating fluids 17.4 Appendix 4. Filling volumes 17.5 Appendix 5. Lamps used on vehicles 17.6 Appendix 6. 17.7 Appendix 7.
Design and operating principle
To drive the front wheels, two drive shafts (half shafts) are used, on which four CV joints are installed (2 internal and 2 external).
Structurally, they consist of the following parts:
- two cages (external and internal) in which grooves are made;
- bearing balls;
- separator.
The design is enclosed in a rubber corrugated boot, which prevents lubricant leakage and dirt from entering the bearing assembly.
The balls transmit torque between the cages and, moving along the grooves, ensure the operation of the unit when the angle between the axes of rotation changes.
For internal hinges, the bending angle can reach 30 degrees, and for external hinges, 60 degrees.
Note! In addition to driving the front wheels, CV joint gears are used in the intermediate and driveshafts of the Chevrolet Niva.
Parts and consumables:
To do this, you need to unfasten the clamp and remove the boot from the grenade. We take out the bolts and disconnect the ball from the lever. We move the steering knuckle to the side.
Next, disconnect the exhaust pipe from the exhaust manifold and the converter. Move the gearbox back a little and remove the drive.
We dismantle the left drive in the same way. At this point, the repair work on removing the front wheel drives on the Niva Chevrolet has been completed.
Make the necessary repairs, then install in the reverse order. The hub nut is tightened to a large torque.
Replacing the front axle gearbox and drives on a NIVA 2131 NIVA 4×4
Therefore, we recommend using a head with a strong knob. Remove the nut and centering sleeve.
Compress the suspension spring by jacking up the lower arm. Unscrew the three nuts and remove the ball joint bolts from the lever.
We remove the shank of the outer hinge housing of the right drive from the hub. Move the steering knuckle to the side.
Using a mounting spatula, pry the bearing cover of the internal joint housing and slide the cover off the gearbox studs.
Prices and manufacturers
The cost of CV joints on a Chevrolet Niva depends on the manufacturer and starts from 1,250 rubles.
These parts are produced by several companies:
- LADA is a Russian manufacturer that needs no introduction;
- Trialli is an Italian brand that supplies parts for brakes, drive and other vehicle systems;
- Pekar is a famous Russian plant that has been producing auto parts for almost 100 years;
- DMZ is a Dimitrovgrad mechanical plant that produces spare parts for Russian cars;
- Aurora is a Polish brand that unites spare parts manufacturers from different countries.
Manual for removing and replacing inner and outer CV joints on a Chevrolet Niva with your own hands
Detailed instructions for replacing the inner and outer CV joint boots on a Chevrolet Niva
Is it worth installing a driveshaft on CV joints on a Chevrolet Niva and how to do it yourself?
Grenade replacement
This unit consists of parts that are constantly in motion. As a result, they may burst or wear out , requiring replacement.
The device can only be repaired if the owner of the car has identified damage to the boot in time, and therefore foreign substances have not yet managed to get inside the mechanism.
But this happens quite rarely, since it is almost impossible to detect damage to the boot in time. It should also be said that the cost of the CV joint is not high, and therefore it can be purchased if necessary.
Video about restoring the Niva Chevrolet CV joint
Troubleshooting
You can determine the malfunction of the grenade yourself . To do this, while the car is moving, turn the steering wheel in any direction until it stops. In this case, the driver will hear a crunching sound in the area of the front wheel. In this case, you need to replace the hinge.
During the repair process, it is important to determine whether it is necessary to change both hinges or one, because such work is recommended to be carried out only in a comprehensive manner.
Video on how to determine if a grenade is faulty
Changing a grenade on a Niva Chevrolet with your own hands
To replace a grenade, you must first remove the old one. In the process, you will have to dismantle the axle shaft along with the CV joint (you can find a disassembly video on the Internet). Then the car owner must perform the following actions:
- Clamp the removed assembly in a vice.
- Knock the CV joint off the axle using a hammer and a socket.
- Clean all teeth on the axle gear.
- Install the new joint on the axle.
- Place the boot and secure it with clamps.
- Install the axle with CV joint on the car.
Remove the old boot.
Video about replacing a grenade on a Niva Chevrolet using a reverse hammer
Useful video
Watch an interesting video about disassembling a CV joint and identifying possible causes of the crunch:
The topic of the article is the outer CV joint of the Niva. It’s so simple and unpretentious, but informative)) Very often, services and manufacturers began to ask not only for something tuning, but simply for a high-quality standard. And a lot of questions are asked about front-wheel drive. I’ll try to talk separately about the anthers, inner and outer CV joints. What we supply for services, installation features, etc. The usual reminder, the CV joints of the field and the shnivy are the same. CV joint - constant velocity joint, in common parlance an external “grenade”.
Basic malfunctions of the Chevy drive grenade
There are 4 main signs that the constant velocity joint needs to be replaced or repaired:
- A crunching sound when driving slowly when turning, which intensifies as the wheel angle increases.
- Knocks or crunching sounds during a sharp (or not so sharp) start.
- Play in the hinge. It can be determined by shaking the axle shaft with your hands.
- Jerks when accelerating the car.
Malfunctions of CV joints occur as a result of manufacturing defects, incorrect installation of a part, lack of lubrication, driving at high speed over potholes, or natural wear of rubbing parts.
Checking the hinges is carried out in three stages:
- Turn the steering wheel completely and try to move away slowly. If a crunching sound is heard, it is necessary to change the “grenade”. In this case, the sound comes from the side where there is a problem.
- Raise the car on a lift or hang out the wheel from which you can hear a crunching sound. Visually check the integrity of the boot and make sure there is no play by shaking the axle shaft with force by hand.
- Raise both wheels of the front axle and engage reverse gear. A crunch indicates the need to replace the grenades.
If a breakdown is detected, the parts must be replaced with new ones.
External CV joint Niva, history
The main difference that the owner of a Niva or Chevrolet Niva should know. CV joints come in 22 or 24 splines, for cars with and without ABS. Grenades with 22 slots were installed mainly on carburetor fields. With the transition to injection and restyling in 2008, they were no longer produced. Then there are only 24 slots. The 22 slot grenades had two serious advantages. They were smaller in diameter and, as a result, there was more “meat” on the hub. Such a breakdown as a hat breaking off on the hub almost never happened. Second point. Old fields were exported to Europe in fairly large quantities, and there they spit on AvtoTAZ and made their own spare parts. I brought grenades from Loebro, SKF, GKN-Spidan, GLO - all of these are high-class manufacturers in the field of drives and CV joints. Unfortunately, none of these companies makes CV joints for 24-spline fields. There are a lot of bright boxes on the market, but most of them are brands made only for Russia. In the future we will only talk about CV joints with 24 splines.
External CV joint Niva, manufacturer's choice
I experimented a lot on this topic. And if a worthy alternative has been found for internal factory CV joints, there is practically none for external ones. Only factory ball joint. The most important thing, as usual in Russia, is that it was truly a factory part. Contents: CV joint, boot, two “latch” type clamps, retaining ring, nut. The only difference is the presence of a reference disc on the CV joints for cars with an ABS system (anti-lock braking system). When installing, I recommend washing the CV joint from the factory seal and filling it with a better quality lubricant. I’ll immediately explain why I think this must be done. Several times I opened the drive, on new machines, at subzero temperatures. Molybdenum grease was in the form of frozen lumps. In this situation, there is no need to talk about the lubricating properties and the rolling of the machine. As a result, increased wear of expensive parts and increased fuel consumption. The services serving the fields in the north of our homeland completely confirmed my assumptions.
external CV joint, view from the drive side
In general, it remains a mystery to me why cheap lubricant is used in an expensive part? Probably, at the plant this is considered savings, or perhaps it is called the fashionable word “import substitution.” Well, if we don’t have high-quality MODERN WIDE-RANGE temperature lubricants in our country, then why waste money on the end customer’s wallet. A question without an answer. A good inexpensive lubricant for CV joints, MultiMoS2, is included in the price list. Each CV joint requires no more than 100-110 grams. You can safely install the boot that comes with the CV joint. Good quality. Just don’t put plastic protection on top, it does more harm than good. There is a separate article on the site about anthers, which talks about these nuances. (The nuance from the French language is a subtle difference).
A grenade on a car is a constant velocity joint. The knot received this name because it looks like a military knot. It can also be called CV joint. With its help, torque is transmitted from the engine to the wheel in a car at different angles of rotation of the drive wheel.
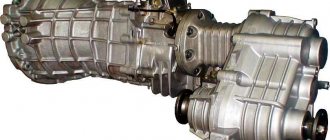
Front axle disconnect block with double-row bearing for Chevrolet Niva
What is needed to disable the front axle on a Chevrolet Niva? The off-road concept of the Chevy Niva is such that all-wheel drive operates all the time. Thus, when the car tries to get out of some difficult place, all four wheels will take part in this. This is where the name of the drive comes from – 4x4. True, if a motorist does not travel outside the city limits, but only drives in the city, on asphalt roads, then it will not always be necessary to use all-wheel drive.
What points should be taken into account about disabling front-wheel drive when it is not necessary, and what are the important features of its use.
What is all-wheel drive, and what is the mechanism of its functioning? Chevy Niva is considered an all-wheel drive SUV, intended, for the most part, for traveling in harsh conditions without roads. Driving in areas where there are no roads requires that the front axle be used. It would be more correct to say that both axles - rear and front - will work constantly, and their synchronization can be controlled using the transfer case. When one axle is turned off, the car will consume less fuel. But when it moves on a dry and level road, is it worth connecting an additional drive?
In this case, connecting the front axle will lead to increased fuel consumption by approximately 2.5 l/100 km. This is also a reason not to connect front-wheel drive unnecessarily. To avoid unnecessary fuel consumption, it is worth disabling the front axle on the Chevrolet Niva. But then you will have to avoid off-roads and roads on the surface of which there are various kinds of difficult-to-pass areas. But when entering such a road cannot be avoided, the bridge must be activated in advance. It follows from this that it is necessary to find out as much information as possible about how and why the front axle is disabled. But first, you should familiarize yourself with the drive disconnect mechanism on the Chevy Niva SUV.
Bridge disconnecting block
The main function of this block is to remove torsional torque from the driveshaft at the front. Which means the actual forced cessation of the use of the front axle. The development of this device belongs to specialists from Tolyatti. Chevy Niva is not equipped with such a block from the assembly line. You will have to purchase and install it yourself. You can control the device directly while in the cabin. For this purpose, it is necessary to engage the transfer case using a special lever. Without this mechanism, disabling the front drive is only possible if you remove the front driveshaft. This is exactly what the majority of Chevy Niv owners do. And there are such craftsmen who completely remove the rear driveshaft, in fact getting a car with front-wheel drive. It goes without saying that in the absence of any of the cardan shafts, it is prohibited to operate the car, because this will negatively affect a number of components of the car. Thus, breakdowns of the transfer case supports, shaft bearings located at the output, and even the cardan itself may occur. In addition, if you need to engage all-wheel drive, it will simply be impossible to do this without a universal joint. Therefore, when the car owner has decided to disable the bridge, this must be done using a special device called a shutdown unit. The above mechanism is, in fact, a clutch in the transfer case responsible for connecting the front cardan to the gearbox. You can control the shutdown unit from inside the car using a special lever located near the gearbox. Having decided to mount this device on your Niva Chevrolet, the first thing you need to do is purchase it. The installation procedure for this device includes a number of steps: · Unscrew the 5 nuts of the drive axle crankcase cover. · Remove the cover, shaft and coupling. · Mount the bridge block in place of the removed cover. Before installation, some car enthusiasts are faced with the fact that the clutch falls out. To return it back, you should turn the coupling towards the flange with a groove. · The transfer case returns to its proper place. · At the last stage, the transmission oil must be checked. And, if its level is low, then top it up to the appropriate level. The cost of such a block is about 7000-8000 rubles. But, after installing it, the driver will feel much more confident off-road and spend less fuel.
How to disable front-wheel drive Under the dashboard, in the car, there are two levers: 1. Its purpose is to change gears while driving; 2. Necessary to control the transfer case of a car. There is an opinion that you can deactivate the front axle with a second lever, but this is not true. From the assembly line, the Chevy Niva is equipped with all-wheel drive on all available wheels. And the lever located above the dashboard is necessary to control the position of the differential in the transfer case. If the locking lever is moved to the driver, the differential is locked, and by switching the lever back, you can put the disabled mechanism back into operation. When the differential is engaged, both cardans - rear and front - rotate with the same torque. And when the lock is turned off, their torque will be different. If you set a goal to reduce fuel consumption by turning off the drive, then it is worth installing a shutdown unit that locks the differential. After installing the axle shut-off unit, to stop the front axle, the transfer lever should be moved to the required position. The front axle, in this case, can already be activated and deactivated, both at those moments when idling is active and when the car is moving. It is worth noting the extremely fast switching on - similar to switching on the speed, it occurs in no more than two seconds. The shutdown block is a very useful device, whose effectiveness has been confirmed by the majority of Niv Chevy owners. Some, however, consider the cost of the device to be a significant drawback, but it pays off in fuel savings in about the first six months. Although, some car enthusiasts, guided by a great desire to save money, or simply not having the financial opportunity to purchase this mechanism, choose a “simple” option and remove the cardan. Of course, if the car does not go off-road. As follows from the reviews of such car owners who were not afraid to “conduct an experiment” on their own car, and drive an SUV without a cardan, there are, although not significant, violations in the car’s design. Therefore, recommending such a method may be fraught, and every motorist must make such a decision independently. But it is definitely worth concluding that the front axle disconnect unit is a device that, in addition to the benefits it brings, is also necessary.
What is a CV joint (grenade)
Internal grenade on Shniva
This part appeared at a time when manufacturers began producing cars with front-wheel drive. Initially, torque was transmitted to the drive wheel using a conventional cardan. At the same time, the service life of the hinge was short, since it was constantly working under load. This problem gave impetus to the invention of a special unit (CV joint), which could transmit torque to the wheels at different angles of rotation.
Grenade replacement
This unit consists of parts that are constantly in motion. As a result, they may burst or wear out , requiring replacement.
The device can only be repaired if the owner of the car has identified damage to the boot in time, and therefore foreign substances have not yet managed to get inside the mechanism.
But this happens quite rarely, since it is almost impossible to detect damage to the boot in time. It should also be said that the cost of the CV joint is not high, and therefore it can be purchased if necessary.
Video about restoring the Niva Chevrolet CV joint
Troubleshooting
You can determine the malfunction of the grenade yourself . To do this, while the car is moving, turn the steering wheel in any direction until it stops. In this case, the driver will hear a crunching sound in the area of the front wheel. In this case, you need to replace the hinge.
During the repair process, it is important to determine whether it is necessary to change both hinges or one, because such work is recommended to be carried out only in a comprehensive manner.
Video on how to determine if a grenade is faulty
Changing a grenade on a Niva Chevrolet with your own hands
To replace a grenade, you must first remove the old one. In the process, you will have to dismantle the axle shaft along with the CV joint (you can find a disassembly video on the Internet). Then the car owner must perform the following actions:
- Clamp the removed assembly in a vice.
- Remove the old boot.
- Knock the CV joint off the axle using a hammer and a socket.
- Clean all teeth on the axle gear.
- Install the new joint on the axle.
- Place the boot and secure it with clamps.
- Install the axle with CV joint on the car.
Video about replacing a grenade on a Niva Chevrolet using a reverse hammer
CV joint on Niva Chevrolet
With its help, torque is transmitted from the engine to the drive wheels. It's mostly front-wheel drive. Due to the CV joint, torque is transmitted uniformly, taking into account the fact that the wheel is at a different angle relative to the car.
On a Chevrolet, a grenade can be:
The topic of the article is the outer CV joint of the Niva. It’s so simple and unpretentious, but informative)) Very often, services and manufacturers began to ask not only for something tuning, but simply for a high-quality standard. And a lot of questions are asked about front-wheel drive. I’ll try to talk separately about the anthers, inner and outer CV joints. What we supply for services, installation features, etc. The usual reminder, the CV joints of the field and the shnivy are the same. CV joint - constant velocity joint, in common parlance an external “grenade”.
Replacing front-wheel drive Niva Chevrolet
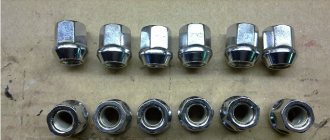
On the left is Trialli, set it and forget it. On the right is Avtovazovsky. The knock-knock-knock started when driving especially uphill and turning to the right. The sounds are getting louder. The symptom is known, we go to change it. Brief instructions for those who still doubt whether to change the studs in the bridge to bolts or not.
We remove the wheel, unscrew the lower ball joint, and use a suitable device to hang the fist with the hub-disc. I use a generator belt from Niva. I cling to the amma mount and 2 studs on the hub.
We unscrew the nut on the CV joint, remove the bushing to free up more thread length, and screw the nut back on. We tighten another nut on top and, clamping the nut onto the nut, unscrew the stud. I tried it, it turns out, even with the top nut half tightened. Photo for example. Or you can screw on one nut and hammer the threads on the end of the stud. A flattened thread will prevent the nut from twisting and the stud from coming out.
Unscrew the ear mounting bolts.
Unscrew the ski from the stabilizer. We don't touch the cardan.
We need to unscrew the left ear and the ski so that we can twist the bridge a little when pulling out the CV joint. We rotate the right ear along the axis upward. To prevent the drive from interfering, it can be removed. To do this, you need to unfasten the clamp and remove the boot from the grenade. There is a locking ring inside along the edge of the grenade. We pry it up and pull it out. Now carefully pull out the inner part by the drive and place it carefully on the lower cup. We put any glove on the grenade with balls so that they don’t fly apart and get dirty and pull it out between the shock absorber and the spring. If the CV joint is tripoidal, then we simply pull it out and wrap it in something to prevent it from getting dirty.
We pull out the CV joint, moving the bridge a little clockwise when looking from above and a little down.
It took me about half an hour to sort it out. Good luck to everyone on the road and off the road and silence in the cars)
External CV joint Niva, history
The main difference that the owner of a Niva or Chevrolet Niva should know. CV joints come in 22 or 24 splines, for cars with and without ABS. Grenades with 22 slots were installed mainly on carburetor fields. With the transition to injection and restyling in 2008, they were no longer produced. Then there are only 24 slots. The 22 slot grenades had two serious advantages. They were smaller in diameter and, as a result, there was more “meat” on the hub. Such a breakdown as a hat breaking off on the hub almost never happened. Second point. Old fields were exported to Europe in fairly large quantities, and there they spit on AvtoTAZ and made their own spare parts. I brought grenades from Loebro, SKF, GKN-Spidan, GLO - all of these are high-class manufacturers in the field of drives and CV joints. Unfortunately, none of these companies makes CV joints for 24-spline fields. There are a lot of bright boxes on the market, but most of them are brands made only for Russia. In the future we will only talk about CV joints with 24 splines.
External CV joint Niva, manufacturer's choice
I experimented a lot on this topic. And if a worthy alternative has been found for internal factory CV joints, there is practically none for external ones. Only factory ball joint. The most important thing, as usual in Russia, is that it was truly a factory part. Contents: CV joint, boot, two “latch” type clamps, retaining ring, nut. The only difference is the presence of a reference disc on the CV joints for cars with an ABS system (anti-lock braking system). When installing, I recommend washing the CV joint from the factory seal and filling it with a better quality lubricant. I’ll immediately explain why I think this must be done. Several times I opened the drive, on new machines, at subzero temperatures. Molybdenum grease was in the form of frozen lumps. In this situation, there is no need to talk about the lubricating properties and the rolling of the machine. As a result, increased wear of expensive parts and increased fuel consumption. The services serving the fields in the north of our homeland completely confirmed my assumptions.
external CV joint, view from the drive side
In general, it remains a mystery to me why cheap lubricant is used in an expensive part? Probably, at the plant this is considered savings, or perhaps it is called the fashionable word “import substitution.” Well, if we don’t have high-quality MODERN WIDE-RANGE temperature lubricants in our country, then why waste money on the end customer’s wallet. A question without an answer. A good inexpensive lubricant for CV joints, MultiMoS2, is included in the price list. Each CV joint requires no more than 100-110 grams. You can safely install the boot that comes with the CV joint. Good quality. Just don’t put plastic protection on top, it does more harm than good. There is a separate article on the site about anthers, which talks about these nuances. (The nuance from the French language is a subtle difference).
Gentlemen, please advise which front-wheel drive tires to take, we sell some vases and have C&Ps.