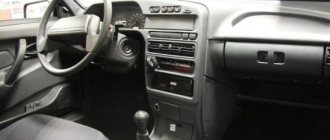
Description of the VAZ 2109 instrument panel (High panel): 1. Ignition switch, 2. Hazard warning switch, 3. Windshield wiper and washer switch lever, 4. Radio socket, 5. Central nozzles of the interior ventilation and heating system, 6. On-board computer ( installed as part of the package), 7. Instrument panel, 8. Glove box lid, 9. Side nozzles of the interior ventilation and heating system, 10. Loudspeaker trim, 11. Shelf, 12. Power window switches (installed as part of the package), 13. Cigarette lighter, 14 . Control panel for the interior ventilation and heating system, 15. Gear shift lever, 16. Parking brake lever, 17. Ashtray, 18. Carburetor choke handle, 19. Accelerator pedal, 20. Brake pedal, 21. Clutch pedal, 22. Horn switch, 23. Instrument lighting switch, 24. Hydraulic headlight leveler, 25. Front seat heating switch (installed as standard), 26. Rear fog lamp switch, 27. Fog lamp switch (installed as standard), 28. Heated glass switch tailgate, 29. Hood lock drive lever, 30. Turn signal and headlight switch lever, 31. External lighting switch, 32. Instrument cluster.
More information about the instrument cluster for the high panel (torpedo) VAZ 2109
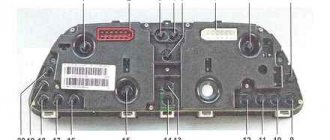
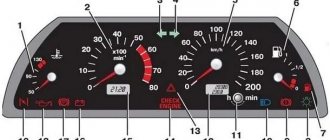
1. Speedometer, 2. Trip counter reset handle, 3. Trip counter, 4. Total mileage counter, 5. Fuel level indicator, 6. On-board control system light panel, 7. “TEST” display, 8. “Test” display STOP”, 9. Indicator lamp for failure of brake lamps and side lights, 10. Indicator lamp for low brake fluid level, 11. Indicator lamp for low coolant level, 12. Indicator lamp for front brake pad wear, 13. Indicator lamp for low level level in the washer reservoir, 14. Indicator lamp for low oil level in the engine crankcase, 15. Coolant temperature indicator, 16. Tachometer, 17. Indicator lamp for engaging the parking brake, 18. Indicator lamp “CHECK ENGINE” system injection, 19. Indicator lamp for closing the carburetor air damper, 20. Indicator lamp for reserve fuel remaining, 21. Indicator lamp for emergency oil pressure in the engine lubrication system, 22. Indicator lamp for turning on the right turn indicators, 23. Indicator lamp for battery charge, 24. Left turn indicator warning light, 25. Seat belt warning light, 26. Doors not closed warning light, 27. Side lights warning light, 28. High beam headlight warning light, 29. “CHECK ENGINE” warning light. engine”) toxicity reduction systems.
Step-by-step tuning steps
Before dismantling the VAZ 21099 panel, you will need to remove the terminals from the power supply by hand. Then the decorative steering wheel trim is removed. The nut should be unscrewed so that its end is flush with the similar element of the steering column shaft. You can’t turn it away right away. Then tuning the VAZ 21099 panel involves removing the steering wheel.
After unscrewing the 6 screws that secure the lower casing, you will need to remove it. The ignition switch trim is removed. The next step involves loosening the bolt that secures the base of the switches. The last element is removed from the shaft, and 2 blocks with the corresponding wires are disconnected.
In this case, you will need to label the washer and wiper switches. The block with wires is disconnected from the corresponding levers and direction indicators. The choke should be pulled out so that a draft occurs. At the same time, the handle of the first unit is pulled towards itself. Then the bolts securing the console trim are removed from the panel and the trim itself is removed.
The cigarette lighter cartridge and ashtray are pulled out of the socket. The VAZ torpedo is equipped with a heater fan that will need to be removed. To do this, it is recommended to use a screwdriver. The block and two wires are disconnected from the fan switch. They illuminate the europanel.
Tuning instrument panel
How to remove a high instrument panel VAZ - 2108, 09, 099 - Yakovlev Dmitry
Complete removal of the VAZ 2109 panel. Preparation for gluing. Part 1
You also need to disconnect the handles for the hydraulic headlight adjustment and the light switch. After unscrewing the nuts, the corresponding switch is pushed inside the panel. The side nozzles are removed with a screwdriver. The high panel provides for turning away the bolts for fixing the linings. The last elements are located on both sides of the torpedo.
Subsequent tuning is carried out taking into account the removal of the radio socket. Existing audio equipment is pre-dismantled. Then, using a screwdriver, the latches are removed and the cover is raised. The block and wires are disconnected from the cigarette lighter. A similar step is carried out in relation to the backlight and alarm switch.
Dashboard from a foreign car for a VAZ: which panel is suitable for a VAZ-2108/2109?
VAZ cars from the Samara family are still in demand on the secondary market and can often be found on the roads. VAZ-2108/09/099 and the VAZ-2114 created on their basis are quite normal cars, especially for their time.
Of course, their time has passed. But there are more than enough fans of these models. Not long ago I had a publication about converting a VAZ-2109 into a VAZ-2114 - this way the owners “update” their nines, but there are a large number of people who like the old design. The link to the publication will be at the end.
Also, controversy continues about the dashboards of these cars. Which panel is better? Old “low” or more modern “high”? Both sides are right in their own way, but it is worth recognizing that the Soviet “low” panel was more successful. It creaked less and the stove blew hot air well. The “high” panel with the stove has some problems. There is also a large publication about this and see it at the end of the article.
Photo source: www.flickr.com
But there are people who have solved the panel issue radically - they install panels from completely different cars. From foreigners, of course. Installing a panel from a foreign car is a qualitatively different level.
Is it easy to install?
No. Installing a panel from a foreign car is quite a complicated matter. But, if you think about everything well and figure it out, then it can be done. First of all, you need to find a panel that will fit in length.
The process of finding a suitable panel is quite complicated and people share information with each other about which panel will fit without much modification. By the way, in this article you will see the largest list of panels that are guaranteed to fit 09/08/099/14/.
The panel is unlikely to fit in the mounting locations, but this can be solved with all sorts of spacers.
Photo source: www.flickr.com
Another difficulty is to rewire the wiring for a foreign panel. This is all quite complicated. It will be difficult for a person who has not dealt with this. But remember the saying about perseverance and work.
Another challenge is aligning the heater ducts with the new panel. but this can be solved by purchasing plumbing plastic pipes. In some places they can be combined with standard air ducts, in others they can be made from scratch.
Main
The most important question is which panels from which foreign cars fit our Ladas. People have been installing foreign panels for a long time and there has been a fairly large list of foreign cars from which the panel can be taken.
Photo source: www.flickr.com
So, we can safely say that panels from the following cars can be installed on the Samara family as easily as possible:
- BMW E28
- BMW E30
- BMW E36
- Toyota Corolla 90
- Audi 80 B3
- Audi 100 C3
- Mazda 626
- Mazda 323F
- Mitsubishi Eclipse 2
- Mitsubishi Galant 2001
- Mitsubishi Galant 1980-1991.
- Opel Omega A/B
- Opel Vectra A/B
- Mercedes W210
Big list, isn't it? Surely it is not complete and there are still as many panels that can be installed, but I don’t know about them. This list contains only those that were actually created by craftsmen.
Price
Photo source: www.flickr.com
The panels themselves from these foreign cars are quite affordable. For example, I found a panel from a BMW E30 in good condition in my city for 6,000 rubles. This is a fully assembled panel with all instruments. If you need an empty panel, then it costs a ridiculous 1,500 rubles.
If you do it yourself, you can spend another thousand to redo the wiring. But it takes a lot of time. Reinstalling the panel takes a couple of hours, but connecting...
How to remove the instrument panel from a VAZ-2114
Before you finally remove the dashboard on the VAZ-2114, you need to understand the specific components that will have to be dismantled:
- a key component on which the BC is attached, a block of various devices, as well as all kinds of keys, switches and other components;
- a trim that is installed on the VAZ-2114 mainly for beauty, but also has air duct outlets;
- plugs;
- brackets;
- ashtray body;
- crossbars;
- shield;
- central bracket;
- console screens.
If you are going to remove the instrument panel from a VAZ-2114, you will have to remove all these elements separately. Moreover, each of them has its own fastening features and you will need to use different tools, since you will need to remove the shield and, for example, the brackets in different ways.
Tools and materials
To remove all the necessary elements, it is not at all necessary to have any expensive tools or special equipment. It is enough that the garage has a standard set of screwdrivers, as well as instructions for working with the VAZ-2114.
Sequence of operations when removing a torpedo from a VAZ-2114
In order to remove the instrument panel from a VAZ-2114, it is enough to do everything in accordance with the simple instructions given below:
- Using a Phillips screwdriver, remove the 3 screws securing the left console screen to the dashboard. It is recommended to get a short tool, as it is much more convenient.
- Carefully remove the lower part of the trim from the body bracket, removing the screen.
- Remove all screws securing the console screen to the panel. At the same time, do not forget to constantly belay the pad with your hand.
- Remove the screen. At the same time, be sure to ensure that it does not cling to any kind of cords.
- Disconnect the connectors to disconnect ground from the battery. If a radio is used in transport, then in this case it should also be separated from the main wires by removing the connecting block. If it is not in the car, it will be enough to remove the wires from the dashboard, making sure that they have a plug. Be sure to turn off the cigarette lighter and also remove the socket with the light bulb that illuminates the ashtray.
- Remove the handles from all levers that control the heating dampers. It is recommended to pry them off with a flathead screwdriver to make the procedure easier. There is a special protrusion on the lever, and when the handle is installed, it is combined with the lever through a special hole. That is why, when removing it, you should use a thin screwdriver to pick it up and lift it, freeing it from this protrusion.
- Remove the electric fan toggle switch (you just need to pull it out of the connector).
- Unscrew all the screws securing the VAZ-2114 dashboard to the brackets on both sides.
- Release the shield and trim by removing two self-tapping screws located in the window near the instrument unit;
- Take out the plug and remove the screw located behind it.
- Remove the two screws that hold the trim in place at the bottom, then pull it out.
- Label the wires to identify which switches they go to, then unplug them.
- Remove all bolts from the steering bracket.
- Unscrew the screws holding the lower bracket mount.
- Remove the light guide.
- Remove the element securing the heating control unit, and then remove the cartridges that are located behind it.
- Remove the decorative insert, removing any external components.
- Remove the hydraulic corrector lighting.
- Loosen all the fasteners of the panel, then remove the bolt with which it is secured to the crossbar, located on the left side.
- It remains to remove the VAZ-2114 torpedo.
Installation of a VAZ 2114 torpedo in a VAZ 2109
I was looking for this torpedo for a long time, because... Our city is small and it’s difficult to find. As a result, I bought it in Yaroslavl for 2000 rubles assembled
. I brought it home and the next day the installation process began. First I brought the frame itself into the salon
and screwed it on, it is attached with 4 bolts, in my opinion (I liked the fact that the fastenings there are metal, unlike the VP)
I screwed it on and tried to “shake” it, it sat as if nailed down). The brain itself attached it like this
This is what it looked like installed =)
Then I started to figure out the wiring, I’ll say right away that I didn’t have much experience before this. First I stuck everything into the CY, everything fit there with no problems, then all sorts of buttons and all that. The process went on without stopping, I was already looking forward to starting it up))) I don’t remember exactly right away or not, I bought a new ignition switch from a VAZ 2110 (I couldn’t attach the old one)). I installed everything, turn the key in the lock... the fuel pump does not turn on, I understand that most likely I did not connect the wiring to the brain, I see that it is. I started looking in the wiring for the connector going to the controller, found something similar (from the diagrams I figured out where it should come from), but for some reason it didn’t fit mine, later it turned out that this is the torpedo wiring from a car with Bosch 7.9.7 (right now I definitely don’t remember). This was the connector from the old wiring
and this one from new
Ryskaya found a diagram on the internet on how to cross these 2 wires. Here is the actual diagram (added)
and here is the pinout diagram of my old block and the new one
I tried it and the fuel pump “buzzed”. The key to start... does not turn the starter. I thought about it for a long time and didn’t understand why, so I gave up) Having arrived home, I started rummaging around on the Internet to solve this problem, as it later turned out there was some kind of problem with the relays, if you plug in the relay from the VAZ 2109, it doesn’t turn and I had to short-circuit the wires directly (right now That's how I go.) the stove connector also didn’t fit, but I easily redid it (I think no one would have any questions HOW when he saw the difference). Another problem was that the color of some wires in the diagram did not match reality (so it’s better to count all the wires, the numbers are the same for all). During the installation I learned to understand more or less electrical issues and use a tester.
The final stage of work
The high panel of the VAZ is dismantled carefully, since there are latches on the left that quickly break. After disconnecting the block from other elements, the entire instrument cluster is dismantled. The final step involves disconnecting the cable from the speedometer. If the Europanel is equipped with additional equipment, then you need to be even more careful. Tuning a torpedo involves disconnecting the block from the following units:
- on-board control system;
- ignition relay;
- remaining panel instruments;
- backlight lamps.
You will need to unscrew the screws for the lower fixation of the torpedo on both sides. Using a screwdriver, pull out the plug and unscrew the screws for the side fixation of the torpedo. The europanel is removed at the final stage. Installation of a new structure of this type is carried out in the reverse order. Upon completion of this procedure, the operation of the switches is checked.
Often, tuning a VAZ torpedo involves dismantling the plastic and removing the panel board. On the steering rack in How to remove and clean injectors on a VAZ 2110; How to check on a VAZ 2109. remove the golf dashboard 2 panel, when you remove about 2-3. In this case, you will need the following tools and materials:
- soldering iron;
- europanel or insert;
- ultraviolet light bulb;
- wires;
- light bulbs;
- cartridges;
- glue;
- marker.
Initially you will need to remove
old europanel, remove glass and existing trim. The insert and arrows are carefully pulled out. Particular attention should be paid to the new insert. It is recommended to make holes with some margin. This will prevent the arrows from sticking.
Further tuning is based on dismantling the standard backlight. This may break the plastic. Initially, the board is dismantled. Experts advise first drawing on paper the existing connection diagram and connections.
The standard lighting is replaced with neon lamps. Neon is glued to the panel. A plastic protection is fixed on top. In this case, you need to check whether this structure is securely held. How to properly remove a torpedo on a VAZ-2110 without damaging it: step-by-step instructions. The block with which the neon lighting is controlled should be glued to the europanel. To do this, you can use glue or double-sided tape.
Such tuning is easy to do with your own hands. An important point is the installation of the panel and the correct connection of its devices to the network. A detailed article with a video on how to replace the daytime running lights (DRL) lamp on a Lada Granta with your own hands, photos and videos, article numbers. For this, auto mechanics recommend using books on repair and operation of the VAZ 21099.
Modernization and modification of the instrument panel on the “Nine”: brilliant ideas
The dashboard in any car is one of the main components of the electrical circuit, used to monitor the condition of the main units. Since the tidy is practically the only component with which the driver most often visually interacts, many car owners are thinking about improving it. How to tune the VAZ 2109 dashboard and what is the pinout of the control panel, read below.
LED backlighting of the tidy on the “nine” with a low panel
The instrument cluster on the VAZ 21099 or 2109 is a fairly reliable unit. However, even this can fail over time.
The main malfunctions characteristic of the VAZ instrument panel:
- The lights on the instrument panel of the VAZ 2109 stopped lighting. If only a few light bulbs refuse to work, then most likely the reason lies in their burnout. If the instrument panel lighting stops working completely, then most likely the problem is a poor power supply. As practice shows, power problems are usually caused by either damaged wiring or oxidation of contacts at connections and connectors. If this is the case and the backlight does not light up due to oxidation, then you can get rid of this problem by cleaning the contacts or replacing them. If the problem lies in the lighting sources, then replacing the lamps will solve it.
- Another problem, oxidation on the circuit board, is common in older vehicles or vehicles with moisture present. Due to oxidation of the board, the backlight and some instruments may not work, in particular, fuel level and coolant temperature controllers, tachometer, etc. If the needles do not rise on the tachometer, speedometer, fuel consumption sensor and generator voltage, or they work chaotically, then you need to carry out a full check of the dashboard.
- VAZ 2109 cars are characterized by the problem of a non-working speedometer. As a rule, it appears as a result of wear of the cable connected to the box, or due to repairs to the device and its incorrect connection. If the cable is worn out, then you just need to replace it, there is nothing complicated about it. The main thing is to connect the cable correctly so that its tip fits exactly into the groove on the tidy speedometer.
- Damage to the board itself. Such a malfunction occurs quite rarely, but, nevertheless, it should not be forgotten. If the structural board fails, the shield will have to be repaired, but if this does not help, then it will need to be replaced.
Instrument panel pinout
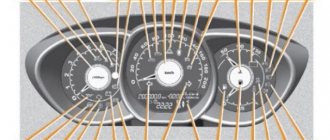
VAZ 2109, 21099 cars can use low and high center consoles, as well as Europanels. Depending on the type of torpedo, the combination of the instrument panel and its pinout, as well as the position of the indicators, will be different. Below are photos and symbols of components on instrument panels with different torpedoes.
Photo gallery “Designation of indicators on dashboards”
1. Pinout and designation of instrument indicators with a low panel 2. Pinout and designation of instrument indicators with a high panel 3. Pinout and designation of instrument indicators with a “European panel”
Panel tuning options
If you decide to tune your instrument panel, then most likely you will be interested in knowing what options exist for doing it. The tuning shield, as you know, pleases the driver’s eye, so this issue is relevant for many car owners.
Dismantling the shield
To tune the dashboard, you first need to remove the device itself.
To do this, you only need to disconnect eight fasteners; to do this, you can use a regular knife:
- First, the fastenings on the driver’s side are disconnected;
- then you need to release the latches located there, on top;
- after this you can disconnect the middle part of the tidy;
- the panel itself is dismantled (the author of the video is Artem Volivach).
Improvement and replacement of backlight
To perform backlight tuning on a VAZ 2109, the lighting sources must be replaced after removal; in this case, it is advisable to use diode bulbs, and if necessary, the scale itself can be modified.
The tuning procedure includes the following steps:
- First, dismantle the standard insert where the scales are located. Remove all the arrows and set them aside, then make corresponding holes for them in the new pads. To prevent the arrows from sticking when operating the instruments, the holes can be made wider.
- Next, you need to remove all the standard lighting sources - just dismantle the entire circuit and install diode devices instead of the old light bulbs. When installing new sources, observe the polarity, since if it is confused, this will lead to the inoperability of the device as a whole.
- Once the lamps are installed, you can begin to refine the scales. Take the new pads and, using fluorescent paint or a marker, paint the numbers on the scales. Such a marker or paint will be required so that when the instrument is illuminated with LEDs, the numbers glow more brightly and stand out.
- After the backlight tuning is completed, you will need to carefully install the circuit and install new overlays on top of it. When installing, be careful not to damage the panel elements.
“Instructions for replacing the speedometer cable on a VAZ 2109”
How to repair the speedometer on a “nine” if it stops working - visual instructions for replacing the cable at home are given in the video below (the author of the video is Vladimir Edwin).
The article was useful. Please share the information with your friends.
Source: https://avtozam.com/vaz/2109/tyuning-pribornoj-paneli/
How to do easy tuning of the VAZ-2109 dashboard with your own hands
During the modernization of the interior of the domestic “nine”, tuning its “tidy” becomes a truly indispensable element. Beautiful modifications can be done with your own hands. To do this, you will need to make a new dial on a computer using special design programs and printing the picture on a printer.
However, first you need to clearly think through the appearance of the dials for the car's tachometer and speedometer, as well as for all the sensors that remain. Once the dials are printed, they need to be laminated, and then you can start removing the instrument panel.
To dismantle it correctly, you must first remove the steering wheel pads and also mark the steering position relative to the shaft. Then carefully unscrew the fastening nut.
Next, you can remove the steering wheel and unscrew the screws that are located in the area of the car lower casing. After this, you will have to disassemble the steering column. When the instrument panel is removed, you should unscrew the arrows from the old speedometer and tachometer. Subsequently, they will be attached to the updated dials.
When tuning a VAZ 2109 with your own hands, you can also repaint the dials and hands in bright colors. Regular spray paint cans are suitable for this. At the same time, it is better to make the dial a rich black color.
You can make it matte using special products. In this case, the arrows need to be painted in bright pink or original red-burgundy tones. After the painted plates of the machine dial have dried, they are completed with an old or pre-prepared scale and removed hands.
In a situation where the owner wants to modernize the instrument panel in a more modern way, he should also use a special (original, as in the video) backlight. You can add an original touch using a fluorescent marker, but more on that below.
Do-it-yourself tuning of the VAZ 2109. Replacing the carburetor
The purpose of this work is one - to increase power. Here, as they say, one head is good, but two are better. One carburetor is not needed, two carburetors are needed. This technological modification gives the engine additional power. You can also treat the carburetor intake manifold. Chassis tuning is a separate topic and consists of two blocks: suspension tuning and brake tuning.
The suspension can be improved in three ways:
- Replace the old with the new. Update the mechanism in full. Simply install a proprietary, branded gas-oil shock absorber;
- Strengthen the rigidity of the machine by replacing parts;
- Cut the spring substantially and lower the suspension steeply.
Due to this upgrade, the car will gain additional stability and can be extremely grouped on turns.
Like all members of the large VAZ family, the “nine” has rear drum brakes. It makes sense to change them to disk ones.
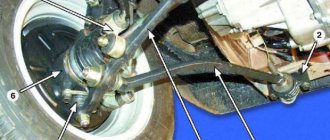
How to remove a torpedo on a VAZ 2109 low
- Remove the three heater control knobs.
- Remove the heater fan switch handle by pulling it toward you.
- Remove two screws securing the instrument panel console trim on both sides of the console.
- Slide the cover towards you.
- Disconnect the block with wires from the rear fog lamp switch.
- Disconnect two connectors with wires and one wire from the heated rear window switch.
- Disconnect the block with wires from the hazard warning switch.
- Remove the wiring harness from the exterior light switch.
- Disconnect the connector with the cigarette lighter illumination wires.
- Disconnect the connector with the cigarette lighter wires and remove the console trim.
- Remove the four screws securing the heater control panel.
- Remove the two screws securing the instrument cluster visor.
- Remove the instrument cluster visor.
- Compress the spring clips.
- Remove the instrument cluster housing from the panel.
- Unscrew the fastening nut and disconnect the cable from the speedometer.
- Disconnect the white block with wires from the instrument cluster.
- Remove the hose from the econometric fitting.
- Remove the cotter pin.
- Disconnect the trip odometer reset cable from the speedometer.
- Disconnect the red connector from the instrument cluster.
- Remove the handles for the headlight hydraulic adjustment and the instrument cluster lighting switch by pulling them towards you.
- Unscrew the nut securing the instrument cluster lighting switch.
- Unscrew the nut securing the headlight hydraulic corrector socket.
- Remove the steering wheel and steering column switches.
- Turn the ignition key to position “1” to turn off the anti-theft device, and disconnect the ignition switch wiring harness.
- Remove the two bolts and two nuts securing the steering column pipe.
- Remove the steering column pipe along with the ignition switch.
- Pull the carburetor choke handle towards you until a draft appears, and remove the handle from the rod.
- Remove the two screws securing the air damper guide rod to the instrument panel.
- Remove the screw that secures the instrument panel on the left side.
- Unscrew the screw of the lower fastening of the instrument panel on the left side.
- Remove the screw on the side securing the instrument panel on the right side.
- Unscrew the screw of the lower fastening of the instrument panel on the right side.
- Unscrew the screw securing the instrument panel in the glove box.
- Unscrew one screw securing the instrument panel console on both sides and remove the instrument panel.
Installing a low torpedo on a VAZ 2109 is carried out in the reverse order of removal.
If your car has a low dashboard, we recommend installing overlays on the VAZ 2109 panel, they will give the car interior a more modern look and ease of use of the dashboard as a whole.
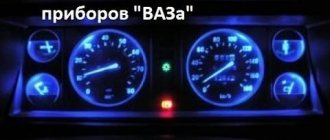
Instrument panel VAZ 2109
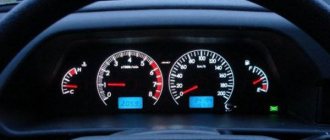
1. Speedometer - shows how fast the VAZ 2109 is moving, there is also a mechanical dial for daily and total mileage 2. Fuel level indicator and indicator 3. Coolant temperature indicator. Operating a vehicle with a faulty warning light is undesirable. 4. Tachometer. Shows engine speed
How to remove the visor of a high instrument panel without disassembling the entire panel
Sometimes there is a need to remove only one visor on the high instrument panel of a VAZ 2109 without removing the entire panel. Often this point is not described in the manuals; the emphasis is on dismantling the entire dashboard and disconnecting it from the car body. At the same time, to access the instrument cluster, for example, to install LEDs for dial illumination instead of standard lamps or install another instrument combination, there is no need to dismantle the entire instrument panel; it is enough to remove only one visor.
In this article we will look at how you can do this yourself.
Before starting any work on the vehicle's electrical wiring, it is necessary to disconnect the negative terminal from the battery to avoid possible short circuits in the wires.
Remove the headlight/low beam switch button from the panel using a screwdriver. The button is tight, you need to be careful not to damage it.
Disconnect its connector from the button.
In the same way, remove the emergency button. It will be more difficult to pull it out, we also need to be careful.
Disconnect its connector.
Using a Phillips screwdriver, unscrew the two screws securing the tidy console trim, also called the “beard.”
Having unscrewed the screws, we bend the beard down, holding it from below with another self-tapping screw.
We take out the radio and disconnect all its connectors, or the standard plug if you do not have a radio in your car.
There are 3 metal latches (2) on the top of the visor, and 2 plastic tabs (1) on the bottom edges. To remove the visor, you need to press them out one by one and release the instrument panel visor.
We start with the two top latches, use a screwdriver to press them through the niche for the radio, and slide the visor towards you. Caution is also necessary here as the latches are fragile and can come off.
Next, use a screwdriver to press out the two lower plastic fasteners of the visor and lift the visor up.
Raising the visor, unhook the third upper mounting bracket, located on the left. Well, having disconnected the electrical connectors of the cigarette lighter, its illumination and the emergency signal lamp, we release the visor.
That’s it, access to the instrument cluster is free, just don’t forget that the connectors and speedometer cable are holding it at the back. If you need to remove the instrument panel combination, for example, in order to illuminate the instrument scales from the inside, do not forget to turn off the whole thing.