Dashboard on a UAZ Patriot car
The dashboard is that piece of interior that not only warms the soul of the SUV owner, but also brings pleasure to the eyes. The more modern the dashboard looks, the more pleasant it is for the driver to drive the car - and that’s a fact! If the predecessor of the old UAZ had a very primitive dashboard, then the modern miracle creation of the Ulyanovsk automobile industry can boast of the interior decoration of the car's interior. What is the dashboard on an SUV, the main devices and additions, as well as tuning the device - we will look at all this in this material.
Tuning ideas
What tuning ideas can be implemented in dashboards on UAZ:
- Organizing LED lighting is the simplest option. You just need to change the standard installed bulbs in the tidy to LED ones.
- Using a tuned scale for tidy sensors. Such scales are applied directly on top of the standard scales with values. They are usually used because they are more modern in appearance. Installation of scales on the speedometer, tachometer and other sensors must be carried out by removing the needles from the instruments; such scales can be purchased either in a store or downloaded from the Internet.
- Covering the dashboard, in particular its outer part. This tuning method is more relevant if there is damage on the shield.
- Adding chrome rings to the scales.
- Installation of sports equipment. This option is the most difficult, since installing a tuned sports device will require altering the standard connection connectors. It may also be necessary to intervene in the operation of the control unit in order to synchronize the new device with it.
Appearance
The dashboard is nothing more than a panel on which various automobile components are located. The instrument panel is made primarily of black plastic. The panel body is removable, which is a plus when repair work is necessary. The ease of dismantling the panel makes it possible to tune it or upgrade other components.
The instrument panel on the UAZ Patriot SUV has a modern design that can be freely compared with foreign crossovers. Let's look at what is included in the instrument panel:
- Lighting control unit.
- Switch for turn signals and headlights.
- Window washer and wiper control.
- Regulating the frequency of operation of glass cleaners.
- Instruments for measuring speed, engine speed, amount of fuel in the tank, time, etc.
- Sound signal control.
- Heating and air conditioning control unit.
- Hazard switch.
- Ignition switch with built-in anti-theft system.
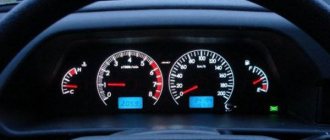
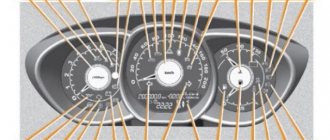
Instrument cluster
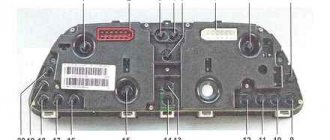
The instrument cluster on the UAZ Patriot SUV includes the following elements, indicators and signaling elements. Below is a diagram that shows the location of the element.
Diagram showing the instrument cluster of the UAZ Patriot SUV
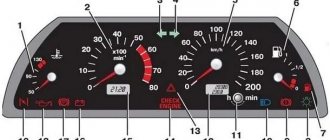
- engine temperature indicator;
- glow plug function indicator;
- light signaling of the oil indicator in the system;
- light alarm indicating the need to check the engine;
- engine cooler overheating alarm;
- tachometer;
- left turn indicator lamp and hazard warning lights;
- a lamp indicating that the doors are not completely closed;
- light alarm indicating low battery charge;
- brake system malfunction;
- a lamp indicating the activation of the anti-lock braking system;
- indicator of the applied parking brake;
- lamp indicating the front axle is engaged;
- right turn indicator lamp and hazard warning lights;
- speedometer or car speed indicator;
- lamp indicating the functioning of the rear foglights;
- outdoor lighting indicator;
- llama front fog light indicator;
- reduced fuel supply;
- high beam indicator;
- fuel quantity indicator;
- mileage reset;
- UAZ Patriot car mileage indicator;
- system time and voltage indicator;
- indicator operation switch.
The instrument cluster will help beginners understand certain indicator lights. So, knowing what an instrument cluster is, let’s look at why the backlight rheostat on a UAZ Patriot SUV may not work.
Why do the instrument lights not work?
If the instrument lighting does not work on an SUV, then before getting discouraged, you should look for the reason at the source itself. There is a regulator on the panel, which is a rheostat; it is used to control the panel backlight. To do this, move the rheostat to its highest position, and if the lights do not light up, then you will need to look a little deeper for the reasons.
When the instrument lighting does not work, you should check the serviceability of fuse number F1. If it is working, then you need to check the rheostat. If the rheostat has oxidized contacts, then no current passes through it and thus there is no backlight. You can short-circuit the contacts directly, and if the lights light up, then the reason is a faulty rheostat. To correct the breakdown, the rheostat should be replaced. Another malfunction may be burnt-out instrument lighting bulbs. If this happens, it becomes necessary to disassemble the panel and replace the light bulbs with new ones.
Panel lighting and tuning
If the UAZ Patriot model 3163 SUV has conventional incandescent light bulbs in the dashboard, then cars produced in 2010 have a new dashboard with LED lighting. Diode light bulbs are a new generation of lighting.
There is good news for owners of the first models of the UAZ Patriot SUV. If you are tired of the weak backlight of the instrument panel, or it has an unpleasant glow color, then this problem can be easily corrected by upgrading the light bulbs, or simply by tuning the device. So, lighting tuning involves replacing incandescent lamps with LEDs. How is panel tuning done? To do this, you need to remove the dashboard, disassemble it and replace conventional bulbs with LED ones. Be sure to pin out the plugs before disconnecting them, so that everything can be easily returned to its place upon completion of the work.
It is not recommended to purchase LEDs that are too bright, as they will simply interfere with the driver’s ability to drive in the evening.
We will consider tuning and the process of removing the dashboard in the following materials, and at this stage the torpedo and its appearance on the UAZ Patriot SUV is fully considered.
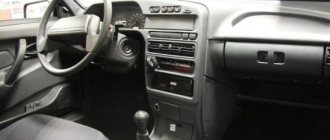
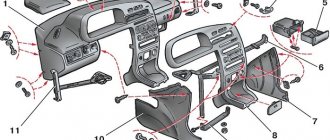
Instrument panel and controls UAZ Hunter 31516
- Repair manuals
- Repair manual for UAZ 31519 (Hunter) 2003.
- Instrument panel and controls
| . Instrument panel and controls |
The following instruments and controls are located on the instrument panel ( ).
1 – hydrocorrector of headlights
. By rotating the handle, depending on the load of the vehicle, the angle of the headlight beam is adjusted so that the low beam does not blind oncoming drivers.
2 – switch lever for headlights and turn indicators
. The switch lever can be in the following positions:
I - the direction indicators are off, the low beam headlights are on, if the exterior lighting switch 24 is in the second, fixed position;
II — left turn indicators are on (non-fixed position);
III — left turn indicators are on (fixed position);
IV — right turn indicators are on (non-fixed position);
V — right direction indicators are on (fixed position);
VI - by moving the lever towards you, the main beam of the headlights is turned on, regardless of the position of the headlight switch (non-fixed position);
VII - moving the lever away from you turns on the high beam headlights if the exterior lighting switch is in the second, fixed position (fixed position).
3 – sound signal buttons
. To turn on the horn, press one of the buttons on the steering wheel.
4 – switch lever for windshield and rear window wipers and washers
. The switch turns on electrical circuits when the ignition is on.
The switch lever can be moved to the following positions:
I — windshield wipers and washers are turned off;
II — intermittent operation of the windshield wiper is turned on (non-fixed position);
III — intermittent operation of the windshield wiper is turned on (fixed position);
IV — low speed windshield wiper is on;
V - high speed windshield wiper is on;
VI — by moving the lever toward you, the windshield washer is turned on (non-fixed position);
VII — by moving the lever away from you, the rear door glass cleaner is turned on (fixed position);
VIII — by moving the lever away from you, the rear door glass washer is additionally turned on (non-fixed position).
5 – speedometer
induction type shows at what speed the car is currently moving. The speedometer drive is electric, from a sensor installed on the transfer case housing.
6 – lighting brightness control
devices. When the outdoor lighting is turned on, rotate the knob to change the brightness of the instrument lighting.
7 – fuel level indicator in tanks with fuel reserve warning lamp
. The warning lamp lights up orange when the vehicle needs to be refueled to avoid interruptions in engine operation.
8 – coolant temperature indicator
.
9 – blocks of control and signal lamps
. In blocks (
) the following lamps are installed:
1 – warning light for the presence of water in the fuel. Lights up when the maximum permissible water level in the fine fuel filter is reached (used only on cars with a diesel engine);
2 – control lamp for turning on the glow plugs. Lights up when the glow plugs are turned on (used only on vehicles with a diesel engine);
3 – warning lamp of battery discharge. Lights up when the ignition is turned on. After starting the engine, the lamp should go out.
| . Blocks of control and signal lamps |
| Note It is permissible for the lamp to burn in idle mode immediately after starting the engine. In order for the generator to generate charging current, press the gas pedal once - the lamp should go out. |
Illumination of the lamp when the engine is running (except for the mode noted above) indicates a lack of charging current caused by a malfunction of the generator or voltage regulator, as well as weak tension or breakage of the generator drive belt;
4 – warning lamp for emergency overheating of the coolant;
| Warning: Driving a vehicle with the lamp on is prohibited. |
5 – warning lamp for emergency drop in oil pressure in the engine lubrication system. Lights up after turning on the ignition and goes out after starting the engine when the engine crankshaft speed increases;
| Warning: Driving a vehicle with the lamp on is prohibited. |
6 – warning lamp for emergency condition of the brake system. Lights up when there is a brake fluid leak due to depressurization of any circuit of the brake system;
| Warning: Driving a vehicle with the lamp on is prohibited. |
7 – indicator lamp for turning on the parking brake. Lights up when the ignition is on, if the car is slowed down by the parking brake;
8 – control lamp for turning on the direction indicators and hazard warning lights. Lights up with a flashing light when the direction indicators are turned on (synchronously with them);
9 – indicator lamp for high beam headlights. Indicates that the headlights are on high beam;
10 – “CHECK ENGINE” warning light. Lights up for 0.6 seconds when the ignition is turned on.
| Note If the CHECK ENGINE warning light is illuminated while the engine is running, it indicates a malfunction of the engine management system (fuel injection system). This does not mean that the engine must be stopped immediately: the engine control system switches to emergency modes, allowing the engine to operate in conditions close to normal. However, it is necessary to try to eliminate the cause of the malfunction as quickly as possible, since long-term operation of the car with the lamp on can lead to increased fuel consumption, deterioration of the vehicle’s traction characteristics and engine breakdowns. |
| 10 – oil pressure indicator. | 11 – voltmeter. With the ignition on and the engine not running, the voltmeter shows the voltage at the battery terminals, and with the engine running, the voltage supplied by the generator. |
12 – cigarette lighter
. Press the cartridge button - after about 15 seconds, the cigarette lighter automatically returns to its original position, ready for use. When the instrument lighting is turned on, the cigarette lighter socket is illuminated by a special lamp.
13 – fog light switch
. The fog lights are turned on by pressing the off button when the side lights are on; when you press the button again, the fog lights turn off.
14 – switch for fuel level indicator sensors in tanks.
15 – interior lighting switch
. When you press the button, the interior lamp turns on; when you press it again, the lamp turns off.
16 – heater valve.
17 – heater cover.
18 – dampers for the air flow pipes for the driver and front passenger footwells.
19 – gear shift lever
. The gear shift diagram is printed on the lever handle.
20 – front axle and downshift lever
. The gear shift diagram is marked on the lever handle:
2H - direct transmission, front axle disabled;
4H - direct transmission, front axle engaged;
N - neutral;
4L - front axle and reduction gear included.
21 – parking brake lever
. In order to brake the car with the parking brake, lift the lever all the way up - lamp 7 in the block of control and warning lamps will light up (see). To release the car, pull the lever up a little and press the button at the end of the lever handle, lower it all the way down - the warning light should go out.
22 – rear fog lamp switch
. When you press the switch button, the rear fog lamp turns on if the exterior lighting is on. When you press the button again, the rear fog light turns off.
23 – heater motor operating mode switch
. When you press the shoulder of the key to the first fixed position, the low speed of the electric fan is turned on, when pressed all the way, the high speed is turned on.
24 – external lighting switch
. By pressing the shoulder button to the first fixed position, the side lights are turned on, and to the second fixed position, additional headlights are turned on.
25 – hazard warning switch
. When you press the button, all direction indicators and the warning lamp in the button itself turn on. The hazard warning lights turn off when the button is pressed again.
26 – handle of the interior ventilation hatch.
27 – accelerator pedal.
28 – brake pedal.
29 – clutch pedal.
30 – hood lock drive handle.
31 – ignition switch (lock) (for gasoline engines) and instrument and starter switch (for diesel engines).
↓ Comments ↓
1. Car structure
1.0 Car structure 1.1 General information about the car 1.2 Passport data 1.3 Car keys 1.4 Instrument panel and controls 1.5 Heating and interior ventilation 1.6 Doors 1.7. Seats 1.8 Rear view mirrors 1.9 Interior lighting
2. Recommendations for use
2.0 Recommendations for use 2.1. Safety rules and recommendations 2.2 Recommendations for traffic safety 2.3. What you need to have in your car 2.4 Operating the car during the warranty period 2.5 Running in the car 2.6. Preparing the car for departure 2.7 Refueling the car 2.8 Using a jack 2.9 Towing the car
3. Problems along the way
3.0 Malfunctions along the way 3.1. The engine does not start 3.2 Malfunctions of the fuel injection system 3.3. Interruptions in engine operation 3.4. The car moves jerkily 3.5 The car accelerates poorly 3.6 The engine stalled while driving 3.7. Oil pressure dropped to 3.8. Engine overheating 3.9. The battery does not recharge 3.11. Extraneous knocking noises appeared 3.12. Problems with brakes 3.13. Wheel puncture
4. Maintenance
4.0 Maintenance 4.1. General provisions 4.2. Daily Maintenance (EO) 4.3. First maintenance (TO-1) 4.4. Second technical maintenance (TO-2) 4.5. Features of the first technical maintenance (TO-1) of cars with a diesel engine 4.6. Features of the second technical service (TO-2) for cars with a diesel engine
5. Engine
5.0 Engine 5.1 Design features 5.2 Possible engine malfunctions, their causes and solutions 5.3 Helpful tips 5.4 Checking compression in the cylinders 5.5 Removing and installing engine mudguards 5.6. Replacing the suspension supports of the power unit 5.7 Replacing the generator and water pump drive belt 5.8 Installing the piston of the first cylinder to the TDC position of the compression stroke 5.9 Replacing chains and gears of the gas distribution mechanism 5.13. Replacing engine seal parts 5.14. Engine cylinder head 5.16. Engine repair 5.17. Engine lubrication system 5.18. Engine cooling system 5.19. Exhaust system 5.20. Power system 5.21. Fuel vapor recovery system 5.22. Diesel engine design features
6. Transmission
6.0 Transmission 6.1. Clutch 6.2. Gearbox 6.3. Transfer case 6.4. Cardan transmission 6.5. Front axle 6.6. Rear axle
7. Chassis
7.0 Chassis 7.1. Front suspension 7.2. Rear suspension
8. Steering
8.0 Steering 8.1 Design features 8.2 Possible steering malfunctions, their causes and solutions 8.3. Steering column 8.4. Steering linkage 8.5. Steering gear
9. Brake system
9.0 Brake system 9.1 Design features 9.2 Possible malfunctions of the brake system, their causes and solutions 9.3 Bleeding the brake system hydraulic drive 9.4 Checking and adjusting the free play of the brake pedal 9.5. Main brake cylinder 9.6 Replacing the vacuum brake booster 9.7. Replacement of hoses and pipelines of the hydraulic brake drive 9.8. Front wheel brakes 9.9. Brake mechanisms of the rear wheels 9.10. Brake force regulator in the hydraulic drive of the rear brakes 9.11. Parking brake
10. Electrical equipment
10.0 Electrical equipment 10.1 Design features 10.2. Battery 10.3. Mounting blocks 10.4. Generator 10.5. Starter 10.6. Ignition switch (lock) 10.7. Electronic petrol engine control system (fuel injection system) 10.8. Ignition system of injection engines 10.9. Electronic diesel engine control system (fuel injection system) 10.10. Lighting, light and sound signaling 10.11. Windshield cleaner 10.12. Windshield washer reservoir 10.13. Tailgate glass cleaner 10.14. Tailgate glass washer reservoir 10.15. Electric motor of the heating and ventilation system fan 10.16. Cigarette lighter 10.17. Instrument cluster 10.18. Speedometer 10.19. Replacing sensors and switches
11. Body
11.0 Body 11.1 Design features 11.2. Removing and installing bumpers 11.3. Removing and installing wheel arch liners and mud flaps 11.4 Removing and installing front fenders 11.5 Removing and installing radiator trim 11.6 Removing and installing radiator trim 11.7 Removing and installing engine compartment mud flaps 11.8 Removing and installing floor hatch covers 11.9 Removing and installing the battery shelf 11.10. Hood 11.11. Side doors 11.12. Tailgate 11.14. Wind window 11.15. Hatch covers for filling pipes of fuel tanks 11.16. Seats 11.17. Mirrors 11.18. Interior fittings 11.19. Instrument panel 11.20. Heater 11.21. Body care
12. Tips for a novice auto mechanic
12.0 Tips for a novice auto mechanic 12.1. Safety precautions during repair work 12.2. Tools 12.3 Before you start 12.4. Restoring threaded connections 12.5 Tips for body repair
13. Purchase of spare parts
13.0 Purchasing spare parts 13.1 Engine oil 13.2 Greases 13.3 Coolants 13.4 Brake fluid 13.5 Fuel filter 13.6 Air filter 13.7 Engine lubrication system oil filter
14. A trip to the service station
14.0 A trip to the service station
15. Winter operation of the car
15.0 Winter operation of a car 15.1 How to prepare a car for winter 15.2 Recommendations for starting the engine in severe frost 15.3 What is useful to buy for winter 15.4 Useful winter tips
16. Preparation for technical inspection
16.0 Preparation for technical inspection 16.1 Recommendations 16.2 List of malfunctions and conditions under which the operation of vehicles is prohibited 16.3 Changes to state standards regulating the maximum permissible content of harmful substances in the exhaust gases of vehicles
17. Applications
17.0 Appendices 17.1 Appendix 1. Tightening torques for threaded connections 17.2 Appendix 2. Temperature range of application of motor oils 17.3 Appendix 3. Fuels and lubricants and operating fluids 17.4 Appendix 4. Lamps used on vehicles 17.5 Appendix 5. Special tools and accessories
18. Electrical diagrams
18.0 Electrical diagrams 18.1 Diagram 1. Connections of the engine control system mod. ZMZ-5143.10 18.2 Diagram 2. Connections of the engine control system mod. ZMZ-409 (Euro-2) 18.3 Diagram 3. Connections of the engine control system mod. ZMZ-409 (Euro-0) 18.4 Scheme 4. Electrical equipment of cars mod. 31519-095, 31519-195 18.5 Scheme 5. Electrical equipment of cars mod. 315195-025, 315195-125 18.6 Scheme 6. Electrical equipment of cars mod. 315195-023, 315195-123
Appearance and performance characteristics
The shield is made of black plastic. The convenient removable housing can be removed for troubleshooting and diagnostics. Even a beginner can remove the panel. Tuning of the part is possible. The design is stylish, like foreign “crossovers”.
On the shield are located:
- lighting control unit;
- buttons for switching turn signals;
- control buttons for windshield wipers and water supply for washing the windshield;
- regulators for window cleaners;
- devices measuring speed (speedometer), shaft rotation frequency;
- indicators of gasoline level in the tank;
- watch;
- buttons for beeping;
- heater and air conditioner control units;
- ignition switch with built-in anti-theft system;
- alarm buttons.
Panel lighting and tuning
The 3136 SUV has simple incandescent bulbs. Since 2010, instrument panels have been equipped with LED sources.
Owners of old UAZ models with weak, dim lighting have access to tuning. Low-power incandescent lamps are being replaced by diode lamps. To replace it, you will first have to unscrew and disassemble the panel. Before disconnecting, it is necessary to pin out the plugs, then after completion of the work, reinstallation will be easy. You should not purchase LEDs that are too bright: they will blind the driver at night and interfere with driving.
Instructions for dismantling the dashboard
You only need to dismantle it yourself if you have experience and skills in performing such work. If a motorist is not confident in his abilities, it is better to contact a car service employee.
Work on removing the shield should begin by removing the plastic elements. The cladding is secured with 4 screws, 2 of which are placed in the upper part, and 2 others in the lower part. These fasteners will have to be unscrewed using a screwdriver. Then the electrical wires are disconnected from the combination.
A panel extension is placed under the steering column. This element is attached with 3 screws. The mounting block cover is located there. The side plugs are secured using 3 screws.
To remove the trim, you will first have to remove the handles from the remote control that controls the heating system. To do this, unscrew the screws located under the handles. Afterwards, the lining is removed from the device. The box for small items and the ashtray are removed from their nests. The fasteners are unscrewed on both sides.
To remove the upper luggage compartment of the shield, you need to unscrew 4 screws. You can find them under the top cover. The lower compartment is removed by unscrewing 6 fasteners that fit under the bottom cover. You also need to remove the additional luggage rack. It is secured with 3 screws.
The panel itself is removed when all the plastic parts are detached. You will have to unscrew the nuts through the openings in the shield, unscrew the bolts on the side surfaces, access to which is hidden by plugs.
Dashboard of UAZ Hunter
Anyone who knows the interior of a car from the inside will be pretty surprised. Well, where can you put leather on the dashboard of a UAZ Hunter? After all, everything there is so ascetic. Just bare metal. Everything is correct. First you will have to install an overlay panel, for example, “Victoria-2”, and then decorate it with leather or vinyl. That is, there are two options:
- Buy and install a ready-made panel.
- Make your own dashboard.
Of course, it’s easiest to buy a ready-made instrument panel for the UAZ Hunter. This eliminates a lot of unnecessary steps.
But when making this part with your own hands, you can fully realize all your wildest fantasies. Of course, if you have a designer streak.
"Victoria-2" - dashboard from the store
There will not be a description of the installation process of this part on the UAZ Hunter. This is a rather extensive and separate topic. Just a small characteristic and price issue.
So, this product is made of plastic with fiberglass. The color is usually black. The devices are organically placed in the upper part. In general, everything is clearly visible in the photo. According to estimates from experienced UAZ Hunter owners, the average price of such a panel is 3,500 rubles. In principle, not very expensive.
Attention! The material from which this part is made, in principle, looks quite solid. Therefore, you should first decide whether to cover Victoria with leather or not.
Make it yourself
Here, too, there will be no detailed instructions for manufacturing the described part. The main thing is the materials used for its manufacture. This is usually:
Each author uses his imagination and ability to work with materials to the fullest, so the shapes of homemade instrument panels for the UAZ Hunter can have the most bizarre shapes.
Important! The main thing is that wood and plywood are best suited for covering this part with leather.
Select material for work
And now, the panel is installed in its place. Now you need to think about how to cover it. There are two possibilities.
- Genuine Leather.
- Artificial vinyl.
- Alcantara is self-adhesive.
What to choose? Here it is worth thinking about the following things. Leather, of course, looks more respectable, and what can I say more beautiful, but the cost of this material is much higher.
Vinyl is much cheaper and easier to process, although less prestigious. What should I do? One more nuance. UAZ Hunter SUV. A car for going out into the field. After hunting or fishing, when overcoming difficult areas, in any case, dirt and moisture will get on the panel. Frequent treatment with elements of moisture causes both leather and vinyl to become unusable. So you should immediately count on the possible replacement of the entire casing. Based on these data and your financial capabilities, you need to resolve this issue.
Well, Alcantara. This is an artificial material, patented in Italy, although invented by the Japanese. This is faux suede. Honestly, it’s the most convenient to use and quite decent-looking option.
What you will need
If vinyl or leather is chosen for the work, then you will have to prepare the following set:
- glue;
- scissors;
- stationery knife;
- brush;
- mounting hair dryer (or at least a simple one).
This is a complete set for working with the mentioned materials.
Attention! Alcantara mainly has a self-adhesive layer, so a sharp knife is enough.
Possible faults
The backlight may stop lighting. To correct such a malfunction, you must first move the rheostat to its highest position. This part is located on the panel. If the lights do not light up, you will have to check fuse F1. In cases where the part is not damaged, inspect the rheostat contacts. If they oxidize, current stops flowing, causing the lighting system to malfunction. The rheostat will have to be replaced. The light bulbs themselves can burn out. In such a situation, replace them with new ones.
If the speed meter does not work, the needle deviates, or the distance traveled is not counted, first check the panel in test mode. If the speedometer test passes normally, the connecting connector is disconnected from the speed sensor and the presence of voltage is checked using a light bulb. If the indicators are normal, you should connect 1 more wire to pin 2. Quickly connecting and opening it with pin 3 will cause the speedometer needle to deflect. If this phenomenon is not observed, the device is faulty. In such a situation, it is only possible to replace the panel.
If the arrow moves, remove the speed sensor and restore the connector connection. Tighten the drive shaft yourself. The arrow may deviate when driving, even if the distance traveled is not counted or the daily data reset is not possible. In such situations, the cause of the violation is a breakdown of the reset button or a breakdown in communication with the indicator. You can get rid of such damage by replacing the panel.
Sometimes the speedometer incorrectly determines the speed of movement. You can check the accuracy of the readings by turning off the meter and applying a 12 V signal from the square pulse generator to the 2nd pin of the connector. Observe the smooth movement of the arrow, the presence of fluctuations and jumps. If the device operates incorrectly, replace it.
The tachometer can also break. If there is a malfunction, the needle begins to jam and move irregularly. The broken part will have to be replaced with a new one. The malfunction can also be localized in the control unit.
The fuel level indicator may show incorrect information, become stuck, or not work at all. Most often the element has to be changed.
If the gauge readings begin to float while driving, the problem in most cases lies in the poor quality of the combination contact with the battery negative.
Sometimes the operation of some of the alarms is disrupted. Individual lamps may fail. In such situations, burnt out LEDs are replaced. If the backlight does not appear after replacement, the panel should be replaced.
Malfunctions of the UAZ Patriot instrument cluster
The devices and the panel as a whole do not often cause problems for owners, because they are quite reliable and can last the entire life of the car. But there are times when the dashboard on a UAZ Patriot stops functioning.
Most appliances don't work
In this case, the lighting in the cabin and outside does not turn on, the indicators and warning lights do not light up, and the pointer arrows do not move on the instruments. The engine may not be able to start at all. There are two reasons for this malfunction.
- The main panel (microcircuit) is out of order,
- There are serious problems with the electronic control unit (sensor data is not displayed on the instrument panel).
To troubleshoot a problem, you must have the skills and knowledge to repair electrical equipment and electronics. And if they are not there, it is better to turn to specialists, preferably highly qualified ones.
The backlight does not light up
To control it in UAZ Patriot cars, a special regulator is used, which is structurally a rheostat. To ensure maximum brightness of the backlight of the shield, you should move the slider to the very top. The backlight may not work most often due to a failed fuse F. But even in this case, before changing it, you need to eliminate the cause of the burnout.
The second common factor in regulator failure: oxidation often forms on the rheostat contacts, causing no voltage to flow. Sometimes part of the backlight or several bulbs may not work. In this case, the lighting sources burned out. To eliminate such malfunctions, you should completely remove the shield and replace the burnt out elements.
Sensors don't work
Often a malfunction may occur with instrument readings (speedometer, tachometer, etc.), namely their absence. If all the sensors on the panel do not work at once, the reason may be a malfunction of the electronics (ECU). If one of the pointers does not work, you should look for the reason in the desired node. For example, the coolant temperature gauge does not work. The sensor that measures and transmits current temperature data to the dashboard should be checked for functionality.
If the devices do not work, and all the indicators meanwhile work properly, then such situations are called “freezing” of the devices, caused by a low battery charge level. This picture is observed when starting the engine; usually these attempts are unsuccessful. In such cases, the on-board computer cannot detect failures and errors, and therefore is not able to find the cause of the problem. The problem can be solved simply: just turn off the power to the vehicle's on-board network.
This can be done in several accessible ways
| Actions | results |
| The simplest is to remove the negative terminal of the battery for one or two minutes. | This will reset the readings and reset the ECU with the dashboard board. |
| Another method of de-energizing is somewhat inconvenient. You need to open the mounting block. | It is located next to the battery. Then you need to pull out the 5 Amp fuse, it is responsible for supplying voltage to the instrument cluster. Then you need to put the fuse in place. |
| The third method is even more difficult. You need to disconnect the terminal blocks from the instrument board. | But for this it is necessary to dismantle it, which greatly complicates the process. |
If, when switching the ignition key to the first position and then after starting the engine, only the warning lamp indicators light up (sensors and two small screens do not work), and de-energizing the system by removing the negative terminal of the battery does not help either - in this case, testing should be carried out to determine the operability of the electronic fees. This is not difficult to do. You need to turn off the ignition, press and hold the odometer reset button, turn on the ignition and release the button.
When the board is in good condition, the dashboard test will start, the essence of which is that all the arrows will begin the path from the start to the end mark and back. This should be repeated three times. If during the test one or more arrows are stationary or move with a freeze, there is obviously a problem with the circuit board.
In any case, eliminating problems with the instrument panel on a UAZ Patriot will require knowledge of electrical engineering and skills in working with electrical equipment.
UAZ Hunter electrical diagram
Today, not a single vehicle can do without an electrical component, so the electrical circuit of the UAZ Hunter has been repeatedly modernized and refined. The result of the designers' efforts was a full-fledged product that meets European safety and quality standards. It is no coincidence that the brand received praise from fans and connoisseurs after the appearance of an updated modification of the UAZ-315195, which complies with Euro-5 standards, in 2014.
The brainchild of the Ulyanovsk plant is still popular in the market today. Most owners value the car for its reliable and trouble-free design, which pleases with its survivability and ability to overcome off-road conditions.
general information
Serial production of the UAZ “Hunter” modification began on November 19, 2003. The predecessors of the car, modifications: 3151, 31512, 31514, 31519, 3153 were produced from 1985 to 2007. The founder who laid down the principles of the all-terrain model, UAZ-469, was produced from 72 to 85. For most fans, the cessation of production of the car in 2014 was unexpected. However, a year later, the creation resumed, only the modification complied with the increased environmental standards of the Euro-5 class.
Electrical diagram of UAZ “Hunter” with fuel injection:
The wiring diagram of the UAZ Hunter is made according to the principle of one conductor, the second being the car body. Electrical circuits that control a power plant with several conductors are connected to the core only through the electronic unit. Communication with other consumers occurs through the ignition switch. The combination switch contains an interaction point and a mechanism that prevents theft. The circuit is safe because the on-board voltage does not exceed twelve volts.
The car console is equipped with devices for opening road lights and anti-fog lights. In addition, there are regulators for the operating mode of the electric fan of the stove. The following are combined into a single unit located on the switches under the steering wheel of the car: headlights, turn lamps, glass cleaners, and a cleaning fluid sprayer. Devices that consume more power are connected via electromagnet relays.
Connection diagram for motor control ZMZ-5143.10:
Tuning UAZ Hunter from the Moscow Off-Road Club
This is what the UAZ Hunter looked like in mid-October 2015.
The body is removed from the frame and raised
All wires are disconnected
All tubes are disconnected.
Cardan shafts removed
The back is clean and tidy