Removing and cleaning VAZ 2114 injectors
- 223 15 164k
- 151 2 127k
Injector performance calculator
Online injector performance calculator
Every car owner of an injection car sooner or later encounters problems in the fuel system and begins to think about cleaning the fuel injectors.
The task of the injector is to maintain the pressure created by the fuel pump and only at the right moment to open for a fraction of a second to allow the required amount of fuel to pass through.
There are a lot of different additives in the fuel, which during engine operation stick to the seat of the injector locking needle. As a result, the injector begins to spray fuel incorrectly or leak fuel when it should be closed. In such cases, it is necessary to clean the injectors or replace them.
The recommended period for cleaning injectors is 25,000 km - 30,000 km . Failure to properly maintain fuel injectors can lead to their complete failure, and then only replacement will be necessary.
There are several signs that indicate you need to at least remove and check the condition of the fuel injectors. Next, a decision is made to clean or replace the elements.
Pay attention to the behavior of your car and specifically the engine. They will tell you if there is something wrong with the injectors. This may manifest itself as follows:
- The engine produces less power, the same acceleration efficiency is not felt;
- If the engine performs poorly or lacks power, fuel consumption still increases;
- Poor starting is not a rare sign of injector failure;
- If the engine does not hold idle speed well, the injectors may well be the cause;
- The amount of toxic components in exhaust gases increases;
- At idle the speed increases.
Without removing the injectors, you can indirectly check them for leaks (or leaks). The video shows an example: you need to unscrew and lift the fuel rail, apply pressure and see if a leak appears. The check is the simplest and only for an obvious malfunction, however, if you suspect the injectors, it won’t hurt to do this.
Symptoms for replacement
Removed injectors
In fact, there are quite a lot of reasons why injectors may not work well. And below are the most common symptoms:
- Difficulty starting the engine in any weather;
- The engine is running erratically;
- The engine stalls at idle;
- High crankshaft rotation speed at idle speed;
- Loss of power, poor response to the accelerator pedal;
- When you press the gas, shocks or dips may appear;
- High gas consumption;
If the nozzle is dirty or damaged, it should be replaced or cleaned. There is no point in repairing it. It should also be noted that today injectors cannot last even 100 thousand km .
We clean the injectors with our own hands using carburetor cleaning fluid
Checking old injectors
Before replacing injectors, it is recommended to check them. This will allow you to determine whether it is working or not.
The test is carried out on a removed fuel rail, on a special stand.
Such a check can be done in almost any service.
Checking injectors on a bench
You can also check not all injectors at once, but each one separately. To do this, you will need to apply current to the part and install a container with fuel on it. When current is applied, the valve will operate and gasoline will spray out through the nozzle. But such a check is inaccurate and will still need to be checked at a stand.
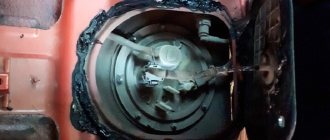
The process of removing the fuel rail (+photo)
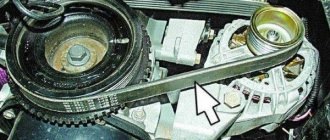
General view of the fuel rail
Before proceeding directly to the dismantling process, you need to understand that you will have to remove the injectors, and therefore you can simultaneously diagnose and clean this unit. So, let's consider the sequence of actions that are aimed at removing the fuel rail:
- Remove the minus terminal from the battery.
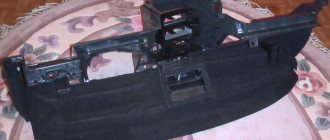
- We are dismantling the receiver.
Unscrew the clamp and remove the crankcase ventilation hose
Unscrew the oil circulation pipes
Removed the oil dipstick
Having disconnected the connectors, we disconnect the ramp from the on-board network
After unscrewing the fastening screws, we dismantle the fuel pipe bracket
Unscrew the screws by 5 and remove the ramp
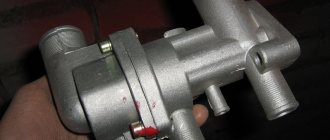
Unscrew the fastenings of the fuel supply regulator and remove it
Reasons for withdrawal
There are several reasons for removing the fuel rail from the car:
- Cleaning injectors.
- Replacement or repair of the ramp itself.
- Removing the valve cover.
- Carrying out diagnostic and repair operations that involve engine disassembly.
- Other operations where removal of the ramp is required.
Fuel rail mounting diagram
Preparing to replace injectors
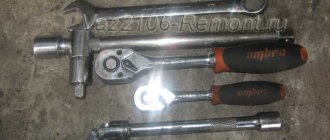
The process of dismantling the injector requires a tool, regardless of the location of the injectors in the vehicle's fuel system. Disassembly differs depending on the vehicle model and the type of fuel injection. In most cases, to replace injectors you will need the following tool:
- Ratchet wrench and socket set;
- Power pliers and pliers;
- Set of keys and screwdrivers;
- Carbcleaner for cleaning the engine;
- Rags or rags.
A modern injector is a complex electromagnetic device that is usually installed on the fuel rail. There are other variations of the injection system, which requires studying the characteristics of the car. When performing such work, the wiring and injector tube need to be handled carefully to prevent damage. Removing the injector for the first time may require outside help, and when replacing it, it is necessary to write a new code into the control unit.
- Remove the negative terminal from the battery.
- Remove all connectors from the injectors.
- Connect the multimeter probes to the injector contacts.
- 11-15 Ohms on the multimeter indicate that the injector is working, and if it is more or less, it needs to be replaced.
The reason for the loss of injector performance is most often foreign impurities in the fuel. The quality of Russian gasoline is not at a high level and the sprayers do not work as expected. Repairing them is not effective due to the design features. Therefore, replacing all injectors and sealing gaskets is the only alternative option.
How to remove the fuel rail of VAZ 2114, 2115 injectors - step-by-step instructions
1. First, you need to relieve the pressure in the fuel system; to do this, you need to turn off the fuel pump. To quickly turn off the fuel pump, simply remove the fuse that is responsible for this device from the socket in the fuse block. Next, you need to start the engine and let it run until it stalls. If you don’t want to go to the fuses, then you can try to turn off the power to the fuel pump in another way, for example, by disconnecting the fuel pump power supply.
2. Next, turn off the ignition.
3. Disconnect the negative terminal of the battery.
4. Disconnect the air receiver hose, as well as the vacuum hose from the pressure regulator.
5. Using a wrench set to “17” (some have a wrench set to “22”), unscrew the fittings and move the tubes to the side.
6. Then disconnect the fuel rail power wires.
7. Next, remove the clamping bar securing the fuel pipes.
8. Take the hexagon at “5” and use it to unscrew the two bolts securing the fuel rail.
9. Remove the injectors from their sockets, while slightly pulling the ramp along the axis.
10. Now you can remove the fuel rail from the car. Be extremely careful and careful not to damage the contacts of the injector connectors and sprayers. Make sure that nothing, such as dirt or dust, gets into the channels or fuel lines.
11. When unscrewing the union nut, hold the fitting using a second wrench.
12. Cleaning the ramp from dirt should be done exclusively with a special liquid for cleaning fuel cells (ABRO, WD-40).
This completes the removal procedure, all that remains is to carry out repair work, replace faulty parts and reassemble everything in reverse order. Thank you for your attention, see you again at VAZ Repair!
Typically, the engine fuel rail is dismantled if it is necessary to remove injectors or in other cases of engine repair.
- First of all, relieve the fuel pressure in the fuel line.
- Then you need to remove the receiver.
Using a 17mm wrench, unscrew the fitting of the fuel supply tube to the ramp. We also unscrew the fuel drain pipe from the hose.- Then we remove the hose tips from the tubes and remove the O-rings from them. Damaged rings need to be replaced.
- Remove the hose from the fuel pressure regulator pipe.
- Disconnect the wiring harness connectors from the injectors.
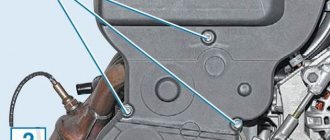
- Using a 5mm hex wrench, unscrew the 2 bolts securing the fuel rail to the intake manifold.
- Remove the fuel rail assembly with injectors. There may be residual fuel in the fuel rail.
Let's disassemble the fuel rail:
- Using a screwdriver, move the injector retainer along the fuel rail.
- We remove the nozzle.
- In the same way, remove the remaining three injectors.
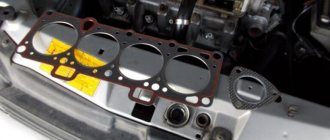
- We check the O-rings at the junction of the injectors with the fuel rail. Damaged rings need to be replaced.
- Remove the injector clamps from the fuel rail.
- Remove the fuel pressure regulator.
- Using a 24mm wrench, unscrew the nut of the fuel supply pipe and remove the end of the pipe and the fuel rail. Checking the O-rings.
- If necessary, use the cap from the wheel nipple to unscrew the spool of the diagnostic fitting.
- We assemble and install the fuel rail in place in the reverse order. Before installation, lubricate all O-rings with a thin layer of oil.
To remove and install the fuel rail of the K7M engine, perform the following operations.
You will need: TORX TZO wrench, flat blade screwdriver, side cutters.
1. Reduce the pressure in the supply system. 2. Disconnect the wire from the negative terminal of the battery. 3. Remove the air filter housing. 4. Squeeze the clips and disconnect the wiring harness blocks from the injectors.
5. Move the wiring harness to the side.
6. Remove the two fuel rail mounting bolts
7. Remove the ramp by removing the injectors from the holes in the inlet pipe and without disconnecting the pipeline from the ramp.
If any injector remains in the intake pipe when removing the ramp, be sure to replace the retainer for that injector. 8. To disconnect the fuel line, cut the plastic safety clamp.
9. Squeeze the retaining ring and disconnect the pipeline from the fuel rail.
If necessary, press out the fasteners with a screwdriver.
Replace rubber pipe O-rings with new ones each time the connection is disassembled.
10. Remove the fuel rail assembly with injectors.
11. Install the fuel rail in the reverse order of removal. 12. Start the engine and check the tightness of the pipe connections and injector seals.
Diagnostics of removed injectors
- Activate the battery by connecting the negative terminal.
- Connect the fuel supply pipe and power supply block to the removed ramp.
- Install the ramp in such a way that equal containers can be placed under each nozzle.
- An assistant is needed to turn the starter. The containers will be filled with fuel and poorly functioning injectors or those that are completely out of order will be revealed as the containers are filled.
- It is better to immediately replace a nozzle that is not working with a new one; washing the old one will not eliminate the problem for a long time. The same goes for sealing gaskets and power supply terminals.
- If the block is faulty, the injector will not function.
When diagnosing yourself, do not forget about fire safety!
Recommendations for cleaning injectors on a VAZ 2110
Dirty injectors
- It is recommended to remove the rubber sealing rings before the procedure and install new ones after cleaning. It is best to start cleaning each nozzle by clearing its nozzle of various deposits. Attention should also be paid to the funnel-shaped surface, on which coke-like resinous deposits can accumulate.
- After this, you can proceed to cleaning the fuel mixture supply channel. To open the fuel supply solenoid valve, a power source is required, preferably not exceeding 5-7V. To do this, you can use an adjustable, stabilized voltage source or a mobile phone charger. A car battery is also suitable, but in this case, voltage must be supplied to the injector through an incandescent lamp, which acts as a current damper to eliminate the possibility that the injector winding will be burned.
- The supply of electricity is carried out through two wires, in the gap of one of which it is necessary to install a button that closes and opens the network, turning it on and off, we will simulate the operation of an injector in an engine under the influence of pulsed electricity.
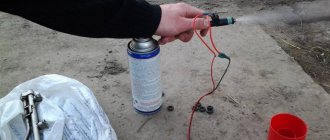
Cleaning
- As equipment for supplying cleaning liquid to the nozzle channel, you can use a can containing liquid intended for cleaning the carburetor.
- To tightly connect the canister nozzle with the nozzle, you can use a rubber tube, which must be securely fixed using a plastic clamp or any other available fastener on the canister nozzle and on the nozzle.
- When everything is ready, you can start applying electricity to open the nozzle, while simultaneously pressing the canister to supply the washing liquid. After some time, the jet of cleaner coming out through the fuel sprayer should become uniform and clearly visible, which indicates successful removal of carbon deposits. At this point, the cleaning procedure is considered completed.