01/19/2021 16,977 VAZ Chevrolet Niva
Author: Ivan Baranov
Not a single modern car today can do without a dashboard, which allows the driver to promptly learn about the status of the main components and systems. Thanks to this, the car owner will always be able to repair incorrectly functioning devices in a timely manner and prevent more serious malfunctions in the future. From this material you can find out what the dashboard of a Niva Chevrolet car is, what malfunctions are typical for it and how to diagnose and replace the dashboard.
[Hide]
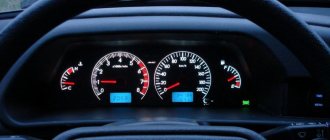
Symbol designations on the Chevrolet Niva instrument panel
The stock 2004 version has a number of mechanical gauges and analogue icons. In the photo above the panel elements are numbered. The symbols are described below.
| Number | Meaning |
| 3/4 | Standard turn signals also illuminate when the hazard lights are activated. |
| 7 | Indicator of the minimum amount of fuel in the tank. Refuel. |
| 8 | This indicator indicates that the side lights are on. |
| 9 | The brake system is in disrepair. The system needs to be diagnosed. |
| 10 | The high beam of the head optics is on. |
| 12 | Digital mileage indicator, general on top – daily on bottom. |
| 13 | This indication indicates that there is a problem with the engine. In this case, you need to immediately go to the service station. |
| 14 | Emergency light indicator. |
| 15 | Digital display – daily time indicator. Also, during self-diagnosis, an error code is displayed here. |
| 16 | The battery is low. Check the generator and its drive belt. |
| 17 | Handbrake activation lamp. |
| 18 | The oil pressure in the crankcase is too low. |
| 19 | Reserve indicator. |
There is also an additional row of light bulbs on the dashboard, located outside the dashboard.
Here the description of the indicators looks like this.
| Number | Purpose |
| 1 | Empty |
| 2 | The center differential lock is activated. |
| 3 | The immobilizer is activated. |
| 4 | There are problems with the operation of the ABS module; the entire device needs to be checked completely. |
| 5/7 | Backup lamps. |
Panel buttons
Push-button switches are located to the right of the instrument panel. The following description is given in order from left to right.
- Emergency stop button.
- Rear door glass defroster.
- Switch for front and rear (located next to each other) fog lights. If they are installed on the car.
- Variably may be responsible for turning on the windshield washer/cleaner.
- The last slot contains a standard plug for an additional device.
Exclamation mark on the Shnivy tidy: what does it mean
Indicates problems in the car's electronic systems. Check for additional indicators that light up at the same time. Often this is accompanied by the car not starting.
Drivers mainly look for reasons in nodes:
- starter;
- ignition system;
- braking module;
- car wiring.
SRS on the Chevrolet Niva dashboard
If the indicator on the Shnivy dashboard lights up, it only indicates that there are problems in the car’s security system. Check the airbags, belt sensors and wiring.
Light bulb designations
3. Indicator lamp for turning on the direction indicators on the left side
. Lights up with a green blinking light when the left turn signal is turned on.
4. Indicator lamp for turning on the direction indicators on the starboard side
. Lights up with a green blinking light when the right turn signal is turned on.
7. Fuel reserve warning lamp
. If the fuel reserve indicator light comes on, refuel the vehicle as soon as possible. The arrow points to the right side of the car, on which the gas filler flap is located.
8. Indicator lamp for turning on the side light
. Lights up green when the exterior lighting is turned on.
9. Warning lamp for emergency condition of the service brake system
. Lights up red when the fluid level in the hydraulic brake reservoir drops below the “MIN” mark, as well as when the starter is turned on to monitor the serviceability of the lamp itself. Attention. It is prohibited to operate the vehicle with the warning lamp for the emergency condition of the service brake system constantly on.
10. Indicator lamp for turning on the high beam headlights
. Lights up blue when the high beam headlights are turned on.
13. Differential lock indicator lamp
. Lights up yellow when the differential lock is engaged.
14. Check Engine warning light
. When the lamp lights up when the ignition is turned on, it indicates a self-test of the system. If there is no malfunction, the lamp goes out after the engine starts. Attention. If any defect is detected in the system, the lamp lights constantly. To determine the cause, read the error using diagnostic equipment.
16. Battery charge indicator lamp
. Lights up red when the ignition is turned on and goes out after the engine starts. The lamp burning or glowing at full intensity while the engine is running indicates a lack of charging current caused by a malfunction of the generator or voltage regulator, as well as weak tension (or breakage) of the generator drive belt.
17. Parking brake indicator lamp
. Lights up red when the parking brake is applied.
18. Warning lamp for insufficient oil pressure
. Lights up red when the ignition is turned on and goes out after the engine starts. Attention. When the engine is running, a constant light or flashing warning light indicates insufficient pressure in the engine lubrication system. Further operation of the vehicle with the warning light on is prohibited.
19. Immobilizer operation indicator
.
You will find other background information on Chevrolet Niva (LADA) here.
Keywords: Niva instrument panel
+3
Share on social networks:
Found an error? Select it and press Ctrl+Enter..
Errors on the Shnivy panel
When performing self-diagnosis of the BC, the following faults may appear on the display.
| Number | Decoding |
| 0 | There are no problems in the system. |
| 1 | The ECU controller is faulty. |
| 2 | Fuel level indicator is broken. |
| 4/8 | High or low voltage inside the on-board network. Check that the generator set is operating correctly. |
| 12 | The warning lamp diagnostic circuit is faulty. |
| 13 | Open circuit DK1 |
| 14/15 | High/low signal level from DTOZH. |
| 16/17 | High/low voltage inside the on-board network. Here the distributor and battery are checked. |
| 19 | The DPKV is transmitting the wrong signal. |
| 21/22 | Likewise for TPS. |
| 23 | The intake air temperature sensor is reporting incorrect data. |
| 24 | Open circuit of the vehicle speed meter. |
| 25 | DD produces erroneous information. |
| 27/28 | Potentiometer CO – increased/lowered value. |
| 33/34 | The absolute pressure sensor is faulty. |
| 35 | The XX regulator is faulty or does not work correctly. |
| 41 | Phase sensor - incorrect signal. |
| 42 | The ignition control circuit is damaged. |
| 43 | DD – errors in the operation of the highway. |
| 44 | The fuel mixture is too lean. |
| 45 | Opposite meaning. |
| 49 | Loss of vacuum in the fuel line. Check the line for leaks. |
| 51 | The PROM is faulty. |
| 52 | RAM failure or circuit malfunction. |
| 53 | Increased voltage in the circuit. |
| 54 | The octane corrector is torn or out of order. |
| 55 | ECU circuit error. |
| 61 | Oxygen sensor degradation. |
Most errors can be caused by the overlap of several problems. For example, 8+2=10.
Malfunctions
The PCB is an electronic unit and therefore may fail in the event of a short circuit or open circuit in the power supply. If you encounter one of the problems, then the first thing you should pay attention to is what signs appeared:
- The engine starts and runs, but the panel shows no signs of life. In this situation, there may be no contact on the device connectors. This can be corrected in the following way: you need to disconnect the pads and clean the contacts; this problem can arise when there is an increased level of moisture, for example in winter.
- The tachometer and speedometer stopped working. This may also appear if there is a break in the power supply or if there are problems with the operation of the temperature and fuel level sensor.
- The light bulbs have stopped burning, but all the elements are working as expected, in this case there may be problems in the power wires or in the lamps themselves
Shnivy tidy does not work: reasons
Usually this is damage to the module's power circuit, moisture/condensation on the board, or mechanical damage caused by improper repair.
The problem is simple when studied in detail, and can be easily eliminated without the help of specialists.
The shield does not light up
If it just goes out (the backlight has failed), check the corresponding fuse inside the mounting block. Next you need to follow the wires towards the tidy. Here the condition of the contact groups and the presence of oxidation on the terminals are checked. If there are such problems, the problems should be eliminated.
If only some of the light bulbs stop lighting, dismantle the device and check the lighting elements directly for damage.
Shnivy's shield is blinking
A typical problem in cars that are driven on rough terrain or broken roads. A symptom of trouble is that the device periodically goes out while driving or blinks quickly.
Check the wiring and connecting terminals for possible damage or loose contacts.
Instrument needles Strings stuck
In such a situation, check the systems.
- Fuse and power circuits of the interior lighting line. The design of the network is such that the power is crossed, which causes problems.
- Mass disappears on the connected elements of the on-board circuits.
Do-it-yourself Chevrolet Niva tuning
The new design and some technical options of the Niva Chevrolet did not make the car the pinnacle of technological thought, but at the same time it left enormous opportunities for external tuning of the Chevrolet Niva, as well as improving its practical characteristics.
Most often, tuning fields are carried out for off-road use. This is not a complex technological process; it is enough to install the following elements on the car:
- Power kit. Includes a heavy-duty front bumper made from bent steel tubing with a platform for a winch. Making this product is not difficult, you only need to have tools and equipment for working with metal: a pipe bender, a grinder, a welding machine
- Off-road tuning of a Chevrolet Niva necessarily involves replacing standard wheels and tires. The following sizes are perfect here: 1. 215/75/ R15. 2. 205/70/ R16. 3. 205/80/ R16. The first numbers are the tire size, its height and width, the designation after the letter R is the rim diameter. For the last two values, modifications to the front wheel arches may be necessary. Everything here will depend on the width of the tire.
- Installation of a snorkel - an exhaust pipe that goes to the roof. This is necessary if the Niva Chevrolet will be used in extreme off-road conditions.
- A separate item is the installation of a winch on a Chevrolet Niva. Do not assume that this equipment is only necessary for those who participate in competitions. This practical equipment will be an excellent helper during outdoor recreation, as well as in the country and fishing. It is enough to install an electric winch and the car will not care; it will be able to pull itself out of a hole or ditch, and will also help others. The equipment body can be hidden under a homemade metal casing.
Tuning a Chevrolet Niva for off-road use can be complemented with protective, military paint, matte or glossy. This requires certain knowledge. The repainting process is quite labor-intensive and requires an appropriate mark in the technical documentation, so painting is not a mandatory element of tuning 2123 Chevrolet Niva.
How to remove the tidy
Follow the simple procedure.
- Disconnect the car. Usually users remove the battery terminal, but you can remove the power fuse.
- Next you need to remove the steering casing. This is done by unscrewing the five mounting screws.
- Next, the steering wheel and its switches are removed.
- Now you need to unscrew all the fastening bolts that hold the tidy in place.
- After this, you need to carefully lift the panel from its seat and disconnect all contacts of the shield wires.
- Now you can completely remove the part from the machine.
Reassembling the unit is performed in reverse order.
Tuning headlights on a Chevrolet Niva
Tuning Chevrolet Niva optics is aimed not only at creating a non-standard appearance, but also at improving their light, as well as visibility at a distance. You can buy and install advanced headlight modifications or work with standard options:
- Installation of additional LED lenses on dimensions
- Installation of rotary modules and additional LEDs
- Change in color, tone, texture, headlight substrate
- Chip installation
- Installation of reflectors
- Replacing standard lamps with high-performance LED lamps
Tuning the rear lights of a Chevrolet Niva is done according to the same principle, plus you can use specialized overlays.
Below you can watch a video on how to install fog lights on a Chevrolet Niva with your own hands.
A few words about warning lamps
Why are indicator lights needed on the instrument panel? With their help, Chevrolet Niva gives the driver signals that a failure has occurred in one of the systems. It looks like this:
- a lamp in the form of an oil can indicates that there is insufficient pressure in the engine lubrication system (may be due to damage to the crankcase, a malfunction of the oil pump or the sensor itself);
- the light with the image of the battery turns on when the battery stops receiving charging from the battery (the voltage regulator may fail or there may be an open circuit in the generator circuit);
- a lamp in the form of a circle with an exclamation mark inside lights up when the level of brake fluid in the expansion tank drops below normal (it is better not to continue driving until you find out the cause of the fluid leak);
- a light bulb in the form of a schematic engine - “CHECK” may indicate the failure of any sensor, malfunctions in the operation of systems and mechanisms (accurate diagnosis is carried out after reading and decoding the error code);
- a signal indicator in the form of a thermometer located on top of the scale of the coolant temperature meter lights up if it heats up above normal (failure of the radiator fan, temperature sensor, thermostat).
According to the previous scheme, we disassemble the Niva’s dashboard and unscrew all the light bulbs, there are 18 of them in total, and they are all the same, and replace them with LEDs.
You can also replace the light bulbs in the stove, there are only 2 of them. To do this, remove all the knobs and remove the panel, change the light bulbs. Put everything back together and check for functionality. This another simple tuning will cost you about 400 rubles. and 40 minutes of work.
Description and location
The dashboard (dashboard) is a kind of screen, looking at which the driver receives the necessary information about the operation of a particular vehicle system.
Without it, it would be difficult to control driving speed, mileage, oil pressure or coolant temperature. In this article we will look at the standard instrument panel of the Chevrolet Niva in terms of its design, information content, and common problems. In addition, we will talk about tuning models of devices installed on these cars.
https://www.youtube.com/watch?v=8SA6UDywpn8
What is the instrument panel we are considering? Chevrolet Niva is equipped with a shield that meets all modern requirements. It is convenient enough and moderately informative so that the driver, without being distracted from the process of driving the car, has the opportunity to know about all work processes and can prevent malfunctions in time.
What can you tell by looking at the described instrument panel? Chevrolet Niva, despite the participation of foreign designers in the development of the car, remained close to its relatives. This is a typical VAZ shield, not much different from those installed on the new Samaras. And, to be honest, reviews about it do not evoke positive emotions.
The instrument panel on the Niva is quite convenient and informative; it is located on the driver’s side above the steering column. This arrangement helps the driver not to be distracted during the trip and monitor the readings of all sensors without turning his head.
Let's take a closer look at the design of the shield, as well as what each device is responsible for:
- A sensor that helps control the temperature of the refrigerant. As the engine heats up, the needle begins to rise. You need to make sure that the needle does not cross the red zone; if this happens, the engine has overheated.
- Tachometer, this element measures crankshaft speed
- Left turn signal
- Right turn signal
- Speedometer informs the driver about the speed of movement. It is connected electrically to the transfer case
- Shows the level of gasoline in the tank
- Responsible for the fuel reserve in the tank, and is activated when there are about 6 liters left in it
- parking lights
- Responsible for the braking system, and lights up in case of any malfunction
- High beam
- Thanks to it, you can reset the daily mileage readings, as well as switch to the clock and temperature
- Shows daily mileage
- Check Engine, it always lights up when the ignition is turned on, after which it should go out immediately; if it continues to light, this warns that there is a malfunction in the engine.
- Alarm
- On this screen you can see the time and temperature
- Warns that the battery is not charging, this may be due to the fact that the generator or voltage regulator has failed
- Informs that the handbrake is on
- An indicator that shows that there is low pressure in the engine. If after starting the car it does not go out and continues to burn, then this may indicate that there is not enough oil in the engine or low pressure.
- Is a backup
Display – TFT LCD with RGB backlight. 3.2″ (240x320) Displays up to 5 parameters simultaneously. Updated design. Reset ECU errors. Working with parking sensors. Software Update.
Display - LCD graphic 128×64 Installation - in a standard place. Black background white symbols. Autolight. Working with the partner. Reset ECU errors.
For VAZ 2110, Lada Samara, Chevy Niva. Display - graphic with RGB (128x64) Installation - in place of the standard EPC. Reset ECU errors. Autolight. Tropic.
Display – LCD graphic 128×64 Black background white characters. Autolight. Installation is a regular place. Software Update. Working with parking sensors. Reset ECU errors.
Display - LCD graphic 128×64 Installation - in a standard place. Black background white numbers. Software Update. Working with the partner. Reset ECU errors.
For Lada Samara, VAZ 2110, Chevy Niva. Display - PLED graphic (128x64). Installation - in the standard location of the EPC. Reset ECU errors.
Display: TFT with RGB backlight. Installation - in place of the standard EPC. Autolight. Tropic. Watch. Encoder. Reset ECU errors.
For Lada Samara, VAZ 2110, Chevy Niva. Display - PLED graphic (128x64). Installation - in the standard location of the EPC. Reset ECU errors. Autolight.
Also interesting: Where is the Chevrolet Niva starter relay located?
Display - LCD graphic 128×64 Installation - in a standard place. Black background white symbols. Working with EPG. Working with the partner. Reset ECU errors.
Display - LCD graphic 128×64 Installation - in a standard place. Black background white numbers. Working with the partner. Reset ECU errors.
If you are planning to change the instrument cluster on a Chevrolet Niva, you have a choice - whether to buy a new factory combination, produced since 2021, the old model panel until 2021. or "tuning". It hardly makes sense to install an old panel with a “ten” design on a car - it’s too outdated, and it’s not easy to find it on sale.
The instrument cluster includes many elements.
In accordance with the diagram above, the shield structure is as follows:
- The coolant temperature control sensor, the arrow on it rises as the engine warms up. The controller needle should not be allowed to move into the red zone, as this will indicate overheating of the power unit.
- A tachometer is a device that measures the number of revolutions of the engine crankshaft.
- The left turn signal activation symbol, made in the form of a green arrow, appears when the corresponding indicator on the steering column switch is turned on. If the light blinks faster than usual, this may indicate a burnt out bulb.
- Right turn signal.
- Speedometer, this device allows the driver to know how fast the vehicle is moving. The speedometer is connected to the transfer case via an electric drive.
- Gasoline fuel level controller; the Chevy Niva uses an electromagnetic device that functions only when the ignition is activated. When the ignition is turned off, the controller needle moves down the scale.
- The fuel reserve indicator in the gas tank appears on the dashboard when the fuel level in the system is about 4-6.5 liters.
- The side light activation lamp appears on the dashboard when the corresponding optics are turned on.
- The brake system emergency symbol appears if the brake fluid level in the expansion tank has dropped to a critical level.
- High beam indicator.
- A key that allows you to reset the daily mileage readings. You can also use this button to switch to the clock or outside temperature sensor.
- A screen that displays the total and daily mileage of the vehicle.
- The Check Engine indicator indicates the need for engine diagnostics. It should always appear when the ignition is turned on, and disappear after starting the engine. If this light remains on while driving, the engine management system needs to be checked.
- Light alarm activation lamp.
- Symbol of time and temperature; you can switch from one mode to another using button 11.
- Battery low indicator, this light should always appear when the ignition is turned on and disappear after the engine is started. If the indicator is always on, this indicates that there is no charging current in the on-board network. This may be due to a failure of the voltage regulator or generator unit, or the lamp may light up if the tension of the generator strap is insufficient or breaks.
- Handbrake activation symbol. If your Niva Chevy is on the handbrake, the indicator will light up when you turn on the ignition and start the engine.
- Indicator of emergency low pressure of engine fluid. It should always appear when the ignition is activated. If it lights up after turning on the engine, this indicates low pressure in the system or a lack of engine fluid.
- Reserve indicator (video author – Artem S).
We remove the instrument cluster to replace backlight lamps or control lamps or to replace the instrument panel itself.
Usually, in case of failure, the instrument cluster is replaced with a new one.
Disconnect the negative terminal of the battery
- use a screwdriver to pry off the switch
— remove the switch from the instrument panel panel
— disconnect the wire block from the switch
Then, set the steering column to its lowest position
Using a Phillips screwdriver, unscrew the two screws of the upper fastening of the instrument panel panel
Using the same screwdriver, unscrew the three screws of the lower fastening of the instrument panel by three turns.
Use a screwdriver to pry up and remove the plug located at the bottom right of the instrument panel
Use a screwdriver to pry up and remove the plug located on the top right of the instrument panel
Use a Phillips screwdriver to unscrew the two screws securing the instrument panel
Use a screwdriver to pry off the central plug
We take out the central plug
We move the edge of the instrument panel panel, overcoming the resistance of the latch and sliding the panel to the right
We move the shield away from the instrument panel
Mark the location of the wire blocks
We disconnect the blocks from the switches located on the panel
Also interesting: Niva Chevrolet gasoline consumption per 100 km
Removing the instrument panel panel
Using a Phillips screwdriver, unscrew the two screws securing the instrument cluster on the right side
Unscrew the two screws on the left side
Tilt the instrument cluster and move it away from the instrument panel.
Disconnect the two wire blocks from the instrument cluster connectors
Removing the instrument cluster
To replace backlight bulbs or control lamps, turn the socket counterclockwise and remove the socket with the lamp.
Remove the lamp from the socket and replace it with a new one
We replace the remaining lamps in the same way.
Install the instrument cluster in reverse order