The need to remove and replace the dashboard on a VAZ 2110 car may arise when repairing devices and parts located under its surface. In particular, it is with the removal of the dashboard that the car’s air intakes are inspected. Sometimes they can become clogged and prevent your heating or air conditioning systems from working properly. The process of removing and replacing the dashboard on a VAZ 2110 is not particularly simple. To carry it out, you will need to be patient and master the skills of masterly working with instruments.
In today's article we will tell you how to remove, replace, install, modify and improve the dashboard on a VAZ 2110 with your own hands. In addition to all this, we will give you a photo report of the work done and show you an interesting thematic video.
What should be considered when replacing a torpedo on a VAZ 2110
Replacing the torpedo on a VAZ 2110 will not only add some charm to the car, but can greatly improve the ride comfort not only for the passenger, but also for the driver. After all, you can replace the dashboard with a torpedo. When replacing it, the following points should be taken into account:
- What exactly does the car owner want to achieve with a replacement? This could be an increase in space in the cabin in front of the front seat.
- Just to give, so to speak, an expensive look to the car.
- Organize a place to install additional devices - radios, screens, and so on.
In any case, you can get the most beneficial effect from such an undertaking.
The first thing to consider when selecting a torpedo for a VAZ 2110 is its size and the shape of the car’s interior.
It is also worth considering the category of people, passengers, who will be in the car. This will sometimes improve the safety of the vehicle.
Once the type of torpedo is determined, it is worth thinking about what additional functions it should perform. This could be the installation of additional equipment, space for mobile phones, space for a car audio system - speakers, or a radio.
The next stage is choosing a coating. It is best to get it as universal as possible and try to install torpedoes with the following coatings:
- Plastic. The torpedo is made entirely of plastic without unnecessary inserts.
- Plastic with wooden or leather inserts.
These are the two most popular types of torpedoes for the VAZ 2110, which are the most practical to use and will best suit almost any type of interior.
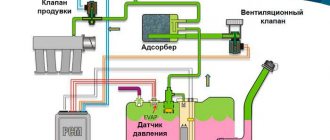
Soundproofing panel VAZ 2110
To soundproof the “tens” dashboard, they mainly use bitoplast, modelin, sealant and even polyurethane foam. Bitoplast and modelin are used to cover plastic panels on a disassembled dashboard, which eliminates squeaks and improves sound insulation. Something like this in the photo below -
Bitoplast is glued with a special glue; when installed in place in the right places, this material is compressed where necessary. It is recommended to paste over the panel naturally from the inside.
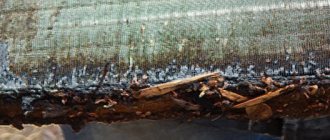
Some craftsmen turn the front panel into an impregnable fortress for vibrations and squeaks using ordinary mounting foam. However, it is not recommended to use such a radical method without some experience. As a result, this is what sticks out from under the torpedo -
In addition to soundproofing the VAZ 2110 panel, it is necessary to carry out a similar procedure with the floor, roof, and doors. Such comprehensive sound insulation will ensure maximum acoustic comfort in the cabin.
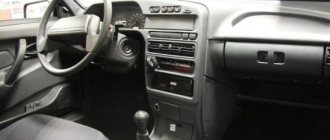
In conclusion, I would like to say that there are two panels installed on the “ten”, old and new models. Photos of the old version can be found at the beginning of our article. A photo of the new version of the panel is attached below.
The most interesting thing is that a new-style panel or a Europanel for the “ten” can be installed instead of the old-style panel. In principle, they are interchangeable, but it is worth considering that along with the installation of a new panel, you will have to install a new instrument panel assembly, another ACS unit (automatic control system for interior heating) and add an electric heater damper drive. The mounting points of the old and new panels themselves are the same, so there are no problems with installation.
How to remove the dashboard on a VAZ 2110 with your own hands - step-by-step instructions + photo report
In order to remove a torpedo on a VAZ 2110, you must perform the following procedure:
- Unscrew 2 screws on the right and 2 on the left on the central tunnel.
- Next, remove the covers on both sides.
- Remove the plug near the handbrake.
- Unscrew the screws on the left and right of the central tunnel.
- Unscrew the screws at the back of the central tunnel.
- Removing the plastic of the central tunnel.
- Disconnecting the cigarette lighter wires. Mark so as not to get confused when connecting to the assembly.
- Remove the gearshift knob cover.
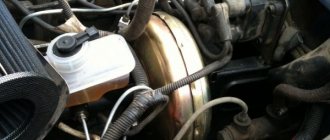
- Using a wrench, unscrew the interior heating air duct.
- Removing the air duct.
- Unscrew the fastenings of the central panel from the front.
- Unscrew the fastenings of the central panel at the back.
- We finally remove the panel.
- We unscrew the screws of the glove compartment.
- We remove the glove compartment.
- Disconnect the glove box light wires.
- We unscrew the screws inside the space in place of the glove compartment.
- Unscrew the remaining screws on the sides of the torpedo.
- Unscrew the torpedo bolts as follows as in the photo.
- Removing the air duct.
- Unscrew the nut on the dashboard under the air duct.
- We lower the torpedo from the pins.
- We disconnect the wires from the front panel and mark them so as not to get confused during assembly.
As you noticed, if you follow our instructions, the process becomes much easier. You can remove the VAZ 2110, 2111, 2112 torpedo with your own hands, but it is better to do it with an assistant.
Components
When purchasing, you will receive what is included in the kit, namely:
- Europlate;
- Inserts for switches (buttons) of devices;
- Finishing on the device panel;
- Since the composition of your devices may differ from those whose installation is provided structurally, there should also be 6 plugs, they can be inserted instead of buttons;
- The buttons themselves and two pads for them:
How to remove the entire dashboard europanel on a VAZ 2110, 11, 12
Enjoy watching everyone, I hope my video helped someone with their choice or technical issues) Spare parts.
Replacing backlight bulbs for VAZ 2112
This video will help you understand the panel
devices.
Dual – for low beam and dimensions;
To turn on the fog lights;
- Air ducts;
- Block and wiring harness designed to connect a double button for side lights and low beam;
- Brackets securing the instrument panel.
In addition, if you are not entirely satisfied with this combination, and you need more buttons for other devices, then they, as well as the pads for them, can be purchased separately.
Installing a torpedo on a VAZ 2110 - step-by-step instructions
In order to install the instrument panel of a VAZ 2110 (torpedo), you must perform the following steps:
- Install the instrument panel so that the guide pins fit into the holes on the instrument panel.
- At the same time, move the steering column adjustment knob into the hole on the instrument panel.
- Using a screwdriver, drive the threaded rods into the holes on both sides of the panel.
- Install the foot warmer air duct so that the air duct fits into the hole in the air distributor housing.
- Connect all terminals to wires in reverse order. Secure the panel and reinstall all components that were removed during disassembly. After completing the work, check the operation of all devices.
Let's prepare a new dashboard trim for installation
To do this, we cut off the remaining material of the Euro lining. There is no need to cut out any space under the dashboard, otherwise there will be a gap between the control column and the trim. In this place you simply need to make 2 cuts on the sides so that this part of the lining can be slightly bent as needed. Also, there is no need to cut off 10 mm from the sides of the lining in the area of the side air ducts; these places must be adjusted to the location.
We measure the panel overlay and adjust it as necessary. At this step, it is recommended to use anti-creak (soundproofing the panel). This way, you will insure yourself against squeaks in the future.
To install the dashboard in the Euro trim, you can use one of the methods:
- Use fasteners from the Euro lining kit.
- Use fasteners from an old lining (from drilling).
- We connect connectors and Europanel keys according to the instructions:
When the overlay is ready, let's try to install it. Fastening the Europlate in positions 1-7 of the diagram. We fix 35mm screws on top, which are then hidden under a plastic cover.
The advantage of this method is time. If you dismantled the panel, then you will spend no more than 3 hours changing the lining. If this is the first time you are faced with a similar type of work, then about five hours.
Improvement and tuning of the dashboard on the VAZ 2110
One of the most popular ways to improve the dashboard on a VAZ 2110 is its sound insulation. In order to do this, you must perform the following steps:
- We remove the tidy, I already told you how to do this earlier
- Next we foam, but under no circumstances should you pile up a huge pile of foam at once, it won’t dry out in a week.
- Don’t forget to try it on so that later it doesn’t turn out that your steering wheel touches it, or it’s just too high.
- In principle, all the work consists of two things, you cut, foam, cut again and so on many times.
- Next, we apply the cheapest putty we could find.
- Next we cover the dashboard with Shumka.
- We install the torpedo back.
You can modify the dashboard of a VAZ 2110 in different ways, someone covers it with leather, someone inserts an LCD monitor into it, in tuning a car it all depends on you and your fantasies and desires.
What types of overlays are there?
If you specifically need a Euro overlay, then there are two options:
- Euro-1 rubber, another name for which is Caprice. It has the same composition of devices as the VAZ 2110, the only thing is that there is no shelf on the passenger side;
Panel trim VAZ 2110 Euro-1
Panel trim VAZ 2110 Euro-2
There is also a Euro-3 overlay on sale. But it is for later and more advanced VAZ cars - Priora, Kalina. The fact is that in this version more devices are provided, for example, there is a unit for climate control, which is not observed in the 10th. Although, in principle, if desired, installing this option is also possible.
Panel trim VAZ 2110 Euro-3
It doesn’t matter which of the European overlays mentioned is a high-quality product, unless, of course, it is a cheap fake. It is softer and even, as the manufacturers say, less dangerous, like the ancient one. In addition, after its installation, the supply of warm air to the side windows should improve.
How to install the trim without disassembling the dashboard
Detailed instructions: repairing and replacing locks in the doors of a VAZ 2110 car
Any dashboard on a VAZ 2110 consists of several parts, but the Euro panel is only a cover on the top of the dashboard. And just so as not to completely disassemble the instrument panel, you can replace only its upper part.
Replacement is carried out as follows:
- Remove the instrument panel.
- Open the glove compartment, unscrew several screws inside it.
- Next, you need to pull out the ECU and unscrew the screws behind it.
- Loosen the fuse panel.
- Then you need to unscrew the screws that hold the panel on top. And after that you can remove the old trim.
Reasons for disassembly
So, we have already almost indicated the first reason - I don’t like it. This may also be necessary in the following cases:
- For tuning. That is, when we try with all possible forces to correct the “face” of the car, which everyone sitting in the cabin is staring at, that is, the torpedo. To improve comfort and overall aesthetic appearance, you can install new linings, of which there are quite a few types today. The following linings are perfect for the VAZ 2110: • Euro 1, also known as Caprice. It looks nice, but it doesn't have a shelf on the passenger side;
• Euro 2 – similar to the previous one, but with a passenger shelf;
• There are trims that are installed directly on top of the instrument panel. Installing them yourself is not at all difficult. Among these, one of the most popular is Chestnut;
Panel trim VAZ 2110 Kashtan
Panel trim VAZ 2110 Kashtan
Panel trim VAZ 2110 Kashtan
• In addition, you can order an exclusive trim that makes the interior similar to that of the Nissan Primera, with the instrument panel in the center.
Trim Chestnut panel VAZ 2110 (dashboard in the center)
Trim Chestnut panel VAZ 2110 (dashboard in the center)
- In order to get to the wiring, change some wire in it, or maybe a complete replacement of the entire wiring harness is necessary;
- To install a new stereo or video system, as well as supply other equipment that is necessary, but not provided for by the designers;
- Replace, fix or clean air ducts;
- When you need wind and noise insulation, since the standard one on the VAZ 2110 leaves much to be desired. Let’s not argue that tens of them are always making noise and rattling, and I really want to get rid of it.
Interior sizing Bimast Bomb
Sizing with Splen on top of Bimast
Interior sizing Bimast Bomb
Perhaps car owners will also find other reasons to replace the dashboard.
Dismantling technology - main aspects of work and its sequence
When removing the instrument panel on models of the VAZ family, including the 2114, it is important to take your time, noting the relative positions of individual parts and components. The work must be carried out in the following sequence:
- We de-energize the system, for which we remove the negative terminal from the battery;
- We dismantle the steering wheel and steering column switches;
- Remove the top tunnel lining from the floor covering;
- Open the glove compartment and unscrew the two mounting bolts, then turn off the lighting in the glove compartment and remove it;
- We remove the mounting block and the cover from it;
- We remove the switch from the hydraulic manifold, remove its mount and take it out from the back side so that it hangs on the rods;
- We recess the plastic latch inside and remove the upper side nozzle. We perform a similar operation on the other side;
- We unscrew the fastening elements: above the upper side nozzles, the lower fastening screws, in the niche of the mounting block, on both sides of the console, in the niche for the glove box and the fastening from the front element of the sealing stand, after which we immediately remove it;
- We remove the decorative trims from both sides, having previously picked up the pistons that secure them;
- We release the fastening clamp connecting the wires near the ignition switch and disconnect the existing block with the wires;
- Disconnect the connector under the dashboard;
- We remove the green-black wire with a terminal from the return block of the switch;
- Remove the fasteners from the controller block bracket and disconnect the three ground wires;
- We disconnect the pads on the harness, which is located near the accelerator pedal;
- Using a screwdriver, we disconnect the black and green immobilizer blocks;
- We disconnect the pads from the contacts responsible for the operation of the brake signal;
- We cut the clamp that secures the wires in the safety niche and the compartment with the relay block;
- We disconnect the pads that are located under the dashboard on the left, after which we remove it from the studs and remove it from the passenger compartment.
Installing the Euro trim without removing the dashboard
In this option, you need to have a drill and screws on hand.
Rely on the lining mounting diagram and start in order:
- Remove the dashboard.
- Open the glove compartment and unscrew the three screws from the inside (positions 1,2,3 in the diagram). Trying to unscrew the screw (pos. 9) from the inside near the windshield is difficult, but doable.
- Remove the 4 keys (next to the control module) and unscrew the screws from the inside (pos. 4.5)
- Unscrew or loosen the fastening by adjusting the backlight (pos.

- Open the fuse module and unscrew 2 screws from the inside (pos. 6 and 7)
- Now the panel overlay is held in place only by screws, positions 10 and 11. They cannot be unscrewed, so we break them out or lift the overlay by the right edge and cut them off with a file. (Note: the Euro trim will cover the entire top of the panel up to the windshield, so you don’t have to worry about the appearance when you cut or break the screws)
- Remove the old dashboard trim.