There is nothing perfect in the world. This becomes especially clear when it comes to modifying (upgrading) the stove on a VAZ 2110. No one wants to freeze in a car in winter, not to mention the windows covered with ice. Upgrading the VAZ 2110 stove becomes for motorists not just a momentary whim, but a cruel necessity dictated by the harsh Russian frosts.
Modification of the VAZ 2110 stove
In order to withstand the imperfections of the world in the form of the VAZ 2110 heating system, it will be enough to arm yourself with a tube of silicone or sealant, polyurethane foam, simple plumbing tools, and also a certain amount of patience. Without theoretical foundations, of course, there is no way either.
- Modifying the stove, simple techniques
- Refinement of the air duct system of the VAZ furnace, dismantling the standard installation
- Sealing the cracks in the front panel of the torpedo air ducts
- Modernization of the VAZ stove damper
- Modernization of the heating system for rear seats and driver's feet in VAZ cars
- Refinement of the thermostat and its connection diagram
- conclusions
Modifying the stove, simple techniques
Modernizing the VAZ 2110-2112 stove is a thorough and multifaceted process. If you don’t have the time or opportunity to fully remodel the stove system, but you need a positive result in the shortest possible time and with minimal effort, because winter is almost upon us, you can try to listen to the following advice.
- 1. The easiest way to increase the air flow of the heater for heating the feet of the front seats in the cabin is by blocking the heater ducts for the rear ones. Any tool at your disposal will do. Thus, you sacrifice the comfort of your passengers, but is this really important if, for example, you prefer to drive alone;
- 2. A similar result can be achieved by blocking the air channels of the central deflector oven by cutting a suitable plug from a sheet of aluminum. Obviously, in this case, the heat flow directed to the side windows and other furnace ducts in the car increases.
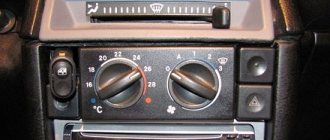
Stove damper tens
- 3. Often, standard VAZ 2110 door seals are not enough for reliable sound and heat insulation. Simply gluing additional insulating tape around the perimeter (for example, from K-Flex) can significantly improve the comfort inside the VAZ interior with minimal time and money investments;
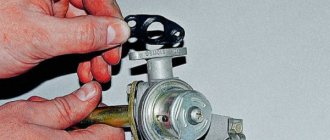
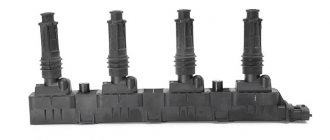
- 4. Replacing the 5-hole thermostat with a more modern 6-hole thermostat, which controls the engine cooling and heating system in VAZ cars. These thermostats are completely interchangeable, so there should be no problems. A 6-hole thermostat is technologically more advanced, and therefore the heating of the stove radiator in a car will be more efficient. Such pleasure costs about 350 rubles.
Upgraded thermostat
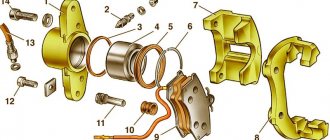
Repair and restoration of the stove damper
The deformed heater damper of the VAZ-2110 cannot be repaired; it only needs to be replaced. In this case, it is better to purchase a replacement metal part that is not so susceptible to temperature effects.
Whatever heater is installed on the VAZ-2110, to carry out repair work, the heater must be completely disassembled. In this case, the process of dismantling and disassembling depends on the design of the stove.
A positive aspect of the heater design on the VAZ - 2101 is its location - to get to it and the dampers you can from the engine compartment and you don’t have to remove the front panel.
Disassembling an old-style stove
For example, let's look at how to disassemble an old-style heater:
- Remove the terminal from the battery.
- We remove the windshield wipers, the seal, remove the air intake near the windshield (“jabot”) from the car, in the process you will need to disconnect the windshield washer nozzle tubes.
- We dismantle the insulation that separates the stove body from the engine compartment.
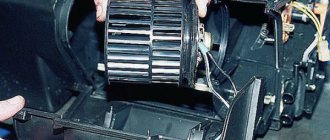
- We remove the gear motor.
- We divide the housing of the stove and air filter into two halves. To do this, unscrew the coupling bolts around the perimeter of the housings and remove the mounting brackets.
- Disconnect the fan power wires.
- Remove the outer half of the air filter and heater housing (along with the fan).
- We dismantle the inner part of the fan housing.
After this you will have access to the dampers. If you are only planning to repair or replace the heater dampers, there is no need to drain the antifreeze, since the heater radiator will remain in place and will not be removed.
Before removing the dampers, carefully inspect and remember their position and the way they are engaged. Further actions depend on the nature of the damage. Deformed damper parts cannot be repaired and only need to be replaced. As for damaged rods and levers, try to repair them or simply replace them. The damaged seal is replaced.
When assembling the stove, pay special attention to the engagement of the dampers. Do it as it was before disassembly, otherwise the dampers will not work correctly, which will affect the performance of the heater.
Disassembly and repair of a new type heater
The new model stoves are disassembled differently:
- disconnect the battery terminal, drain the antifreeze;
- dismantle the frill and insulation;
- disconnect the power wires of the fan and micromotor gearbox;
- unscrew the fasteners that secure the stove body to the body;
- disconnect the coolant supply pipes to the heater radiator;
- We remove the heater from the car along with the filter housing.
After this, we disassemble the stove body, dividing it into two halves, after first disconnecting the air filter housing and removing the mounting brackets. Next, we change or repair the damper, assemble the heater and install it on the car.
Note that the general algorithms of work are indicated above, but in reality, dismantling the stove is not so easy, since many fasteners are located in hard-to-reach places, sometimes you have to disconnect or remove elements that make it difficult or interfering with the removal of the unit.
Video: Why the VAZ 2110 stove does not heat up. Modification of the damper.
Sooner or later, any, even the most reliable and simple part in a car, wears out and requires replacement. First of all, this concerns technological and complex design elements. The VAZ-2110 heater radiator is just such an element of the interior cooling and heating system. If we have a copper radiator installed that is not standard, it can be successfully repaired and installed back. Regular DAAZ aluminum radiators, unfortunately, cannot be repaired. Therefore, today we will replace two heater radiators at once on the tenth family - the old and new models.
Refinement of the air duct system of the VAZ furnace, dismantling the standard installation
If you have a little time and desire, modifications to the VAZ 2110 stove can be done much more thoroughly, namely:
- sealing the cracks in the front panel of the torpedo air ducts;
- modernization of the car stove damper;
- modernization of the heating system for the rear seats and driver's feet, installation of corrugated heating ducts.
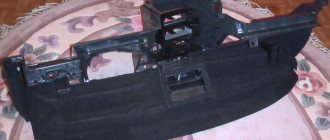
All this will certainly result in the desired result and significant heat transfer from the stove, but first you need to remove the dashboard along with the dashboard and heater air ducts, for which you need to:
- 1. Remove the floor tunnel lining cover and the interior heating air ducts of the VAZ 2110, and then the body itself, screwed with self-tapping screws to the bottom of your car;
- 2. To remove the instrument panel, you will first need to dismantle the glove box by unscrewing it from its hinges and turning off the glove box light;
- 3. Through the formed niche, unscrew the mounting bolts of the instrument panel;
- 4. Having unscrewed all the fastening screws of the panel in its upper and lower parts, as well as on the controller bracket, we can finally remove the instrument panel from the mounting studs;
- 5. In order to remove the panel from the car interior, you will need to disconnect the electrical connectors for connecting the devices.
Which heating radiator to choose?
The main source of heat in the car interior is the radiator, which modern manufacturers produce from two materials - copper or brass, and aluminum. Which heater radiator is better - copper or aluminum for a VAZ 2110 - 2112 remains to be seen, since not only the efficiency of the heater, but also comfortable driving in winter depends on this choice.
Advantages of an aluminum radiator
To find out which heater radiator is better to install on the seven, let’s make a comparative comparison. To do this, you need to find out all the advantages and disadvantages of the two types of stove heat exchangers. First, let's figure out what the pros and cons of aluminum units that are installed on classics from the factory.
- Cost is one of the main advantages of such devices, since it is precisely because of the low price that many choose models made of aluminum alloy. The price difference between copper (brass) and aluminum devices can be up to two times.
- Large selection - these models are more popular, despite some of their disadvantages. The reason for this popularity is their price, but you often have to make sure that it is better to buy a copper unit for the stove. Among the advantages, heat transfer should also be noted, however, practice shows that heat transfer rates are significantly inferior to brass devices.
It is important to know: For “ten and twelve” manufacturers do not produce three-row heat exchangers made of aluminum, which actually causes low heat transfer. Only two-row ones are produced.
Advantages of copper heater radiators VAZ 2110 - 2112
Now let’s find out why a copper stove radiator is better than an aluminum one. The advantages of these units include:
- Thermal conductivity - even if we take into account the fact that copper ones are only called such, since they contain much more brass than copper, they have high thermal conductivity. It is this indicator that is fundamental when choosing a heat exchanger from which you can get more heat to heat the interior.
- Easy to repair - even the slightest mechanical damage can be repaired at home. Moreover, after soldering work, the unit can last a long period of time (which also depends on the quality of the soldering). The entire radiator is made entirely of plastic without the use of plastic.
- Not only are the plates made of copper, or rather a brass alloy, but the body itself is also made of a similar material. This is a big advantage, because due to this design, operational parameters are increased.
Three-row versions of radiators are produced. This brings more heat into the cabin. With so many advantages, one wonders if these devices have any disadvantages.
It is necessary to note some disadvantages of the copper heat exchangers under consideration. They also exist, and sometimes play a decisive role in choosing the appropriate units. The main disadvantage is the cost, which is 2 times higher than the price of aluminum analogues. It is precisely because of the big difference in price that most car owners give preference to aluminum competitors, having never experienced copper heater radiators on a VAZ 2110 - 2112
We recommend: How to change the oil in a Hyundai Accent automatic transmission: photos and instructions
Sealing the cracks in the front panel of the torpedo air ducts
The main problem with good blowing of side windows is the presence of a large number of cracks in the dashboard air duct system, which should only be sealed, thereby reducing heat loss and significantly increasing the pressure of the air flow for blowing the side windows of the car.
Heater duct routing
You will need silicone or anti-squeak (modelin). We seal around the perimeter all the cracks in the upper and lower parts of the torpedo panel. Also, do not forget to “silicone” all the mounting holes. At this point, you can consider the first stage of work completed.
If the gear motor or heater is broken
In most cases, this element cannot be repaired; it is much easier to replace it. This is very simple to do, and now we will look at the sequence. If the VAZ-2110 stove does not heat well, the thermostat and pump have nothing to do with it, and there is no air lock, the air still blows cold or barely warm, then you will have to change the gearmotor. To do this, remove the windshield wipers and dismantle the frill (you need to unscrew three screws). Next, disconnect all the wires that go to the gearmotor and remove it. Then you simply connect the new part and, with the help of a friend, adjust the air entering the cabin.
Sometimes it makes sense to check the heater directly. It breaks quite rarely, but no one is immune from this. To verify whether it is malfunctioning or working properly, you must remove the main deflector. Then you need to straighten the fasteners. It is more convenient to move the flap from the side of the engine compartment. A large amount of scale, just like mechanical damage (crack, hole, etc.), indicates that replacement will be needed. Remember that if the VAZ-2110 stove (injector, 8 valves) does not heat well and the problem is in the radiator, then you will need to completely disassemble the stove in order to replace it. This is not so easy to do, but with due diligence and free time you can do it yourself.
Modernization of the VAZ stove damper
The problem with the stove damper is that the cracks in the housing are not properly sealed. As a result, regardless of the position of the damper, the flow of warm air is significantly lost, passing not where we would like it.
Furnace damper modernization
You can combat this by installing an additional seal (the same model and double-sided tape will serve you well). After removing the factory seal, completely glue the entire valve body, eliminating any gaps. You also tape the damper itself. Thus, you have significantly reduced losses in the air flow directed to the driver’s face, legs and windshield.
But to seal the gap at the beginning of the channel for blowing the driver's window, a conventional seal will not be enough. It is recommended to use polyurethane foam to reliably seal unwanted air channels, thereby eliminating significant losses.
How can you improve the VAZ-2110 stove
So, let's look at the situation when the interior of the "tens" is not heated efficiently enough. Accordingly, this problem should be eliminated. By and large, upgrading the stove of a VAZ-2110 car with your own hands is not a very difficult job, but it still cannot be done without a certain amount of time. Of course, you still need to have some skills, but almost anyone can do it. The main thing is to be patient and have the appropriate desire. In addition, to modernize the stove you will also need:
- sealant or silicone;
- polyurethane foam;
- simple locksmith tool.
You can, in particular, follow the simplest path with minimal effort. This option is the most optimal solution when the result needs to be obtained in the shortest possible time, but there is no time or desire to engage in a complete rework of the entire system.
In particular, the easiest way would be to simply block the stove ducts through which warm air is supplied to the rear passengers. Naturally, you sacrifice the comfort of those sitting behind you. But this option is fully justified if the driver almost always drives alone. This simple manipulation will increase the flow of warm air, heating the foot area in the front of the car.
The same result can be achieved using another simple method. In particular, the air channels of the central deflector of the stove should be blocked. To do this, you need to cut, for example, from an aluminum sheet, a plug of suitable size. By blocking the central deflector, you will thereby increase the flow of warm air directed to other furnace ducts of the car.
Another option for upgrading the VAZ “tenth series” stove is to replace the standard 5-hole thermostat with a more modern one, with 6 holes. In this case, you should not have any complications or problems. These thermostats are interchangeable. At the same time, the 6-hole version is more advanced from a technical point of view. For example, it helps to increase the heating efficiency of a stove radiator. And such a replacement will not be that expensive.
Now let's look at more labor-intensive upgrades to the "tens" stove. We are talking about improving the air ducts, and this will require removing the standard installation. Naturally, more time and effort will need to be spent on such work, however, the positive effect here is much more noticeable. In order to do everything thoroughly, you need to seal the cracks in the torpedo air ducts located on the front panel.
In addition, certain changes should be made to the design of the car's stove damper. It will also be necessary to upgrade the systems responsible for heating the rear passengers and the driver’s foot area. In particular, you will need to lay new heating ducts - this can be done using corrugation. As you can see, there really is something to work on. However, all the time and effort spent will more than pay off in the cold winter season when there is biting frost outside the window, and the car interior is warm and cozy.
So, let's get to work. First of all, you should remove the dashboard, dashboard and air ducts. Do not forget that before removing the instrument panel, you should unscrew the negative terminal from the battery. Next, we dismantle the cover of the floor tunnel lining, the air ducts of the heating system, and then the housing itself. The latter is easy to do - you just need to unscrew the screws. Before removing the dashboard, the glove box must be removed. There is also nothing complicated here, but everything needs to be done carefully so as not to break anything. Next, unscrew the bolts that secure the instrument panel, as well as all the mounting screws.
Modernization of the heating system for rear seats and driver's feet in VAZ cars
Laying corrugated heating ducts
As for the module for distributing air flow to the driver’s feet, front seat passenger and rear part of the cabin, this also has its own factory flaws. They are also associated with insufficient sealing of cracks. You can fight with modelin or silicone, as in the case of a torpedo, if you do not want to disturb the factory aesthetics of the parts.
Airflow for rear passengers' feet
It would be much simpler and more reliable to cut off the ill-fated Christmas tree that distributes air flows and use three separate 40 mm corrugated pipes for heating ducts. What do you gain in this case:
- you get reliable sealing of the channels;
- three corrugated hoses take up much less space, which greatly simplifies access to the VAZ 2110 electrical wiring system, located there (there are really a lot of wires and access to them is extremely difficult).
Corrugation gasket for heater
We also remove the partitions of the old air distribution system. We seal the hoses using polyurethane foam. It should also be taken into account that the textured internal coating of a corrugated hose can cause whistling and howling of air, so we do not make the pipelines very large.
How can you upgrade your VAZ-2110 stove yourself?
Owners of the “ten” often encounter various kinds of problems in the design of this car.
They can touch, in principle, any unit, including the stove. At the same time, when it’s winter outside, of course, no one wants to freeze while traveling. So we have to finish what the designers started, modernizing the stove in order to make it work more efficiently. Considering the harsh Russian climate, such improvements can safely be called a necessity, and not a whim of car enthusiasts. Generally speaking, the design solution of the VAZ-2110 stove can be described as quite successful.
But in order for this unit to work normally, it also requires high-quality assembly and the absence of effects in the components. At the same time, both the first and second are long-standing problems of the domestic automobile industry. So motorists have to fix factory defects on their own.
Refinement of the thermostat and its connection diagram
The previously discussed modernization of the VAZ 2110 stove by replacing a 5-hole thermostat with a 6-hole thermostat is not least related to the diameters of the bypass channels of the devices that regulate the flow of Antifreeze between the small cooling circuit and the radiator of the heating system.
The standard size of the bypass channel on a 6-hole thermostat is 11 mm, and on a 5-hole thermostat the hole is measured with a diameter of 16 mm. Regardless of what type of thermostat you have installed, you can always further adjust the flow of coolant. Thus, the interior of the VAZ 2110 will warm up better at idle engine speed.
It is recommended to use an aluminum pad to set the bypass diameter in the range from 4 to 6 mm. It is worth understanding that in this way we slightly increase the engine warm-up time. But the cabin will become really warmer.
When reinstalling the thermostat, swap the connections of the pipes coming from the expansion tank and coming from the radiator of your car's heater. Now there is no longer any need to cover the radiator with cardboard in winter; the VAZ 2110 heating system will work perfectly in any weather.
Design Features
For the VAZ 2110, it is possible to install two types of stoves - new and old. Regardless of the engine used (injection or carburetor), there are no fundamental differences in the designs of the stoves.
But what is the difference between the new and old type stoves? Let's try to figure it out.
- Radiator design. This is the main difference between the devices. Therefore, when replacing a radiator from an old one to a new one, be sure to take into account the installation nuances;
- The controller knob on stoves is slightly different. Old-style heaters have a main problem - they have been discontinued. They cannot be an analogue for 4 and 5 position controllers, which began to be equipped with dozens of them in the fall of 2003;
- The micro-gear motors for the stoves are different, starting in September of the same 2003. The difference lies in the shaft position sensors (resistors). Therefore, when making repairs, make sure that the devices are truly interchangeable and that you bought old-style resistors for your old stove, not new ones. Otherwise the gearmotor will not work.
We recommend: Daewoo Matiz - fuses and relays
conclusions
Thus, through far from the most complex manipulations, you can achieve a truly amazing effect. Just sealing the cracks of the VAZ 2110’s thermal channels can improve the temperature balance inside the interior of your car, not to mention a lot of simpler and more reliable methods.
Before you jump into upgrading your heating system, it’s still worth checking the operation of the stove itself. Do not forget to change the air filter of the VAZ 2110-2112 furnace every 15 thousand kilometers. Poor heating of the interior can also be caused by a faulty fan or a leaking coolant radiator.