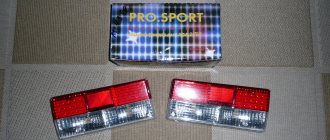
Three-level voltage regulator
Hello everyone, today I will tell you about the “three-level voltage regulator”.
From the moment I bought the car, the voltage in the on-board network constantly sagged and sagged quite a bit, in the summer it was normal, but frost came, I changed the battery every two weeks, it was completely discharged.
It was decided to take a working bush generator, install it and drive it. We installed it, the result is a little better, but the voltage in the on-board network still drains, especially when the rear heating is turned on.
Then I started scratching my... turnip =) After climbing around D2, I saw that almost everyone suffers from such garbage and I saw “three saving words” - this is a “three-level voltage regulator” from.
Armed with a pen and paper, I began to call the entire city of Voronezh in search of “TRN”, but after calling 30-40 stores and hearing in almost every store “We have them, but they sell out very quickly,” I almost lost hope in the search.
But still…
I found it at the BB store and it was the last one. I picked it up from the window.
Having installed “TRN” all the problems disappeared, namely:
Now I have it on MAX showing 14.8-14.7 at Bright Light. heater on, music and rear window heating
The joints have disappeared:
— The alarm began to open well in the mornings, before it was cold when I had to open it with a ruler.
— The low and high beams began to shine brighter. — All the light bulbs in the cabin and outside began to shine brighter. — The stove is in the first position, almost blows away the driver and passengers =) — The windows have become faster. — In the morning it starts the first time. — The battery is always charged!
I advise everyone! Put it on for 5 minutes!
Explanation of the additional fuse and relay block
VAZ-2114, 2115, 2113 cars of the first models with a carburetor have certain differences in the fuse module.
Old style block fuse and relay diagram
Table 2. Decoding of fuses and relays of block 2114-3722010-18
| Right side body marker light | ||
| F12 | 7,5 | Front right low beam headlight |
| F13 | 7,5 | Front left low beam headlight |
| F14 | 7,5 | Front left high beam headlight. Light indicator lamp. |
| F15 | 7,5 | Front right high beam lamp. |
| F16 | 15 | Body turn signals, relay-breaker for turn signals and hazard warning lights. Control relay and reverse lamps, indicator lamps for the on-board instrument control system, lamps for oil pressure, handbrake activation, brake fluid level, battery charge. On-board computer, engine generator winding. |
| F17-F20 | Spares | |
| № | Relay circuit | |
| K1 | Headlight cleaners | |
| K2 | Turn signals and hazard warning lights | |
| K3 | Windshield wiper | |
| K4 | Monitoring the serviceability of brake light lamps and side lamps | |
| K5 | Window lifters | |
| K6 | Sound signal | |
| K7 | Heated rear window | |
| K8 | High beam headlights | |
| K9 | Low beam headlights | |
| № | Current, A | Explanation of fuses |
| F9 | 7,5 | Right rear fog lamp |
| F8 | 7,5 | Left rear fog lamp |
| F1 | 10 | Front headlight cleaners at the moment of switching on, wiper contacts, headlight washer switch valve, headlight wiper switch relay contacts |
| F7 | 30 | Front headlight wipers during operation, winding of the relay for turning on the wipers, fuse for the interior heater, windshield washer, gearbox and timing controller for the rear window wiper, valves for turning on the front and rear washer, relay (winding) for turning on the engine cooling system, relay for turning on the rear window heating, glove box lighting, rear window heating control lamp |
| F16 | 15 | Turn signal indicators and activation of hazard warning lights in turn mode, indicator control lamp, reversing lights, gearbox and relay for activation of windshield washers, generator winding (at startup), control lamps for brake fluid, oil pressure, carburetor flap, hand brake. "STOP" display lamp, voltmeter and coolant temperature indicator |
| F3 | 10 | Interior lighting and rear brake light |
| F6 | 30 | Power windows, power windows on/off relay |
| F10 | 7,5 | License plate lights, engine compartment lamp, warning light on the dashboard (exterior lighting), instrument panel lights, cigarette lighter light, heating lever lights |
| F5 | 20 | Relay for turning on the cooling system fan (electric motor), sound signal. |
| F10 | 7,5 | Left front marker light Left rear marker light |
| F11 | 7,5 | Right front headlight, right rear |
| F2 | 10 | Hazard warning lamp, turn signals and hazard warning relay. |
| F4 | 20 | Rear heated glass, heating on, portable socket, cigarette lighter in the cabin |
| F15 | 7,5 | Front right high beam |
| F14 | 7,5 | Front left high beam Light switch |
| F13 | 7,5 | Left low beam |
| F12 | 7,5 | Right low beam |
| № | Relay circuit | |
| K1 | Headlight washers | |
| K2 | Hazard and turn signals | |
| K3 | Windshield wipers | |
| K4 | Monitoring the health of lamps | |
| K5 | Windows | |
| K6 | Sound signal | |
| K7 | Heated rear window | |
| K8 | High beam headlights | |
| K9 | Low beam headlights | |
To turn on the main systems of any car, the manufacturer has designed the installation of auxiliary fuses. As a rule, they are located in the center console area. Each auxiliary module consists of several important relays and fuses.
In this particular case, the box is located to the left of the glove compartment, behind the side trim of the center console. To quickly access the box, you need to remove part of the plastic protection. The protection is attached to Phillips bolts, so you need to prepare the appropriate screwdriver.
Location of additional fuse and relay box 2114, 2115, 2113
Table 3. Explanation of the additional fuse and relay block
| № | Current, A | Purpose (Fuses) |
| 1 | 15 | Main distribution relay |
| 2 | 15 | Controller power |
| 3 | 15 | Fuel pump |
| № | Purpose (Relay) | |
| K4 | Fuel pump | |
| K5 | Cooling fan | |
| K6 | Main system control relay | |
There are also options for other decryptions.
f3 - ECU (electronic control unit).
Relays that control the supply of current are present in the design of many vehicles. They are designed to perform a very important function - they turn on and off important electrical devices and mechanical systems of the vehicle. In simple terms, this is a device for supplying current to a required element.
Voltage regulator for VAZ 2114: purpose, cost and replacement procedure
The vehicle's electrical system is extremely important for its proper operation.
Electricity works from the very beginning: when you turn the key in the ignition switch of a VAZ car, the electric starter turns the crankshaft for the first time. But a car is not a wall clock in which the battery can be changed once every few months; a car battery needs constant recharging. This function is performed by a direct current generator, which takes part of the power from the engine to perform its work. But, like any complex unit, it can give certain errors, but so that the voltage spread does not exceed 0.1 - 0.3 V and the generator always has an output within 13 V, a special VAZ voltage regulator is installed. Today we will understand what its purpose is, its structure and possible problems in the operation of the car due to the relay.
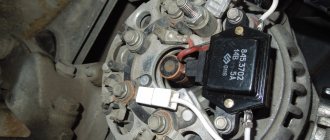
Voltage regulator VAZ (Three-level)
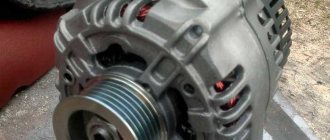
Generator
The generator is designed to generate electricity, which is so necessary for the stable operation of the vehicle's electrical equipment. Additionally, it performs the function of recharging the battery - with a discharged battery it will be impossible to start the engine. For the VAZ 2114 model, the nominal voltage of the electrical circuit is considered to be 12 Volts, but taking into account all consumers (lighting, ignition system, instruments, stove motor, windshield wiper motor, etc.) it should always be higher. Therefore, the voltage in the electrical circuit can range from 13.2 to 14.7 Volts. To maintain it at the required value, a regulator is installed in the generator circuit. Moreover, this device is present in any car, and not just on the 2114 model.
It is important for the car owner to know whether the generator produces the required current. Checking the functionality of the generator is primarily determined by the charging indicator located on the instrument panel inside the car. If the lamp lights up while the engine is running, then the generator circuit is faulty; diagnostics and, if necessary, repairs are required.
PURPOSE AND TECHNICAL DEVICE
The voltage regulator relay has a specific task - to stabilize the current in the vehicle’s on-board network at the same level. In his work, he takes into account the following factors:
- Load on the network (total electricity consumption of already switched on devices);
- Temperature around the car and in the engine compartment;
- Rotor speed of the generating device.
The voltage regulator of the VAZ 2114 generator is also required to monitor the voltage that comes out of the generator in order to maintain the normal operation of all devices, since disturbances in the electrical network can provoke inaccurate sensor readings, at a minimum. Technically, it works like this: in the event of noticeable disturbances, it constantly monitors the current on the battery, and at the right moment simply turns off or turns on the voltage that is fed into the excitation winding of the generator itself.
Voltage control and stabilization - operation of the regulator
WHAT TRANSMISSION IS SUITABLE FOR LADA
| Generator, article number | Automobile | TRG, article number |
| 26.3701, 37.3701, 371.3701, 372.3701 | VAZ-2107, -2108, -2109, -2110, OKA | 67.3702-01 |
| 3002.3771, 332.3771, 3202.3771, 3212.3771, 4302.3771, 94.3701, 9402.3701, 9422.3701, 3740.3771-38, 3743.3771-61, 3747.3771- 93, eld-a-21214, LG01214 | VAZ, GAZ | 67.3702-02 |
| 4052.3701, 409.3701, PRAMO “ISKRA” 5102.3771, -10, 5112.3771, -10, 5122.3771, -10, -30, 5142.3771, AAK 5727 | VAZ, GAZ, UAZ with generators PRAMO “ISKRA” 5102.3771, 5122.3771 | 67.3702-04 |
| G222 | VAZ-2104, -2105, -2107 | 67.3702-09 |
| 26.3701, 37.3701, 371.3701, 372.3701 | VAZ-2107, -2108, -2109, -2110, OKA | 67.3702-11 |
| 3002.3771, 332.3771, 3202.3771, 3212.3771, 4302.3771, 94.3701, 9402.3701, 9422.3701, 3740.3771-38, 3743.3771-61, 3747.3771- 93, eld-a-21214, LG01214 | VAZ, GAZ | 67.3702-12 |
| generators with an additional three diodes, the excitation winding of which is connected to the positive circuit | 673.3702 |
POSSIBLE PROBLEMS
If problems arise with the generator, for example, if the on-board voltage of the VAZ 2114 is low, then possible faults should be sorted out in the following sequence:
- Mechanical damage to the relay terminals;
- Oxidation of contacts;
- Complete absence or poor contact between the generator housing and the vehicle’s ground.
Therefore, if you have problems with the regulator, then the first thing you need to pay attention to is this terminal, which goes to ground.
Voltages must only be measured with the ignition on, or you will fail.
To make a correct comparison, you first need to measure the voltage at the positive terminal of the battery; it should be the same as at the regulator ground.
By the way, all electronic regulators that were invented back in Soviet times were free of most of these shortcomings. Their design was somewhat more perfect, but they were forgotten at one time and later moved away from their production.
Interpretation of fuses and relays of injection models
The main electrical fuse module 2114-3722010-60 is located under the front engine compartment. This arrangement allows for quick access to all electrical systems of the car.
Block location
Please note that the location of the electrical fuse module may depend on the type of equipment and year of manufacture of the vehicle. As a rule, this is the upper right part of the engine compartment, under the front windshield. The mounting block is made of plastic in the form of a rectangular box. To protect against accidental opening, the box is equipped with special latches.
To quickly remove the fuse, special plastic pliers are located on the plastic protection cover. With their help, you can very easily get any element. You need to grab the top edge of the plastic case with pliers and carefully lift the element.
For the convenience of the user, on the top plastic cover there is a complete diagram, made in the form of a schematic image, which shows all the electrical fuses and relays indicating the current strength (A).
Table 1. Explanation of fuses and relays 2114-3722010-60
Modern fuses vary in color depending on the number of amps.
The color distinction is made for ease of use and identification of the right fuse with the right resistance. There are also fuses available in black, grey, purple, white, orange and other colors. They all differ in the number of amperes that are registered on each product.
In each block, the manufacturer provides additional electrical fuses. They are designed to allow quick replacement of a burnt-out element. They are located at the bottom of the module and are marked with the names F17, F18, F19, F20. Each replacement element differs in color and number of amps.
If one of the electrical appliances in a vehicle breaks down, it is recommended that you first check the mounting block. To determine the burnt element, you need to completely turn off the engine and remove the key from the ignition. Using special pliers, carefully remove the burnt out module.
PRICE CATEGORIES
To find out the cost of a voltage regulator for a VAZ 2114, it is advisable to simply go to the nearest car market and ask, the price range may vary. This factor is influenced by the type of components and the region in which the store is located.
Typically, the price of a two-level standard regulator, which is installed at the factory in the VAZ 2114 and their families, can range from 300 to 1200 rubles, here the reason for the fluctuation depends on the quality and the specific manufacturer; more reliable and high-quality options will always be somewhat more expensive than their low-quality counterparts. As for three-level models, their price starts from 1,500 rubles, but their productivity is much greater. During the purchase, it is advisable to immediately ask the seller to check the functionality so that there are no problems in the future.
Replacement result
After replacement, errors may appear about a low battery charge or a malfunction of the generator; there is no need to immediately try to find the cause of the failure. This phenomenon is not uncommon, since new brushes have just begun to break in. After some time, everything will return to normal, and you can safely continue using the car.
Modern cars are equipped with a large amount of electrical equipment, both basic and additional. The source of current for its normal functioning is the battery. The battery is recharged when the engine is running by a generator set (also known as a generator).
THREE-LEVEL REGULATOR
Replacing the regulator with a new one in the event of a serious breakdown on your own is quite simple, the main thing is to install the brushes correctly. This option is also very common when drivers deliberately choose a three-level VAZ 2114 voltage regulator for their car. Its installation must be carried out correctly; here it is important to correctly rearrange the generator protective casing and switch the contacts on the terminals. It may be better to initially seek help from specialists so as not to damage the entire generator. Technically, it differs from a typical relay in that it has a more efficient voltage regulator that maintains the voltage at a stable level at all times, even under rapidly changing conditions. The factory has not yet come to install such a regulator, since this option is considered more expensive.
CHECKING THE WORK
How to use modes:
- Switch position “min” – for operation at high ambient temperatures (above 20ºС), as well as during operation in particularly difficult conditions (traffic in traffic jams, long climbs in the mountains, etc.);
- The middle position of the switch is for operation at ambient temperatures from 0ºС to 20ºС;
- The “max” switch position is for operation at low ambient temperatures (below 0ºC), as well as for recharging a discharged battery.
Without load
:
Average load (PTF, dimensions, music and heater fan at first speed)
:
Maximum load, maximum number of consumers activated
:
Will you be installing a three-level voltage regulator on your car? Take part in the survey and leave your feedback in the comments.
REPLACING THE REGULATOR WITH A NEW OWNER ON YOUR OWN
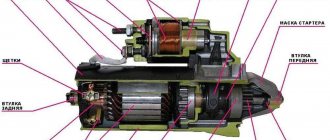
Now we need to figure out how to replace the VAZ 2114 voltage regulator. First, you need to understand that it itself is located inside the generator housing. Mechanically, it consists of a special armature, an electromagnet and a relay. To disassemble the generator and remove the regulator we will need the following necessary tools:
- Set of open-end wrenches;
- Various screwdrivers.
Typically, repairs involve a complete replacement, but the generator itself does not need to be completely removed from the car. However, first you need to remember to remove the terminals from the battery, 12 V is not much, but it will be unpleasant to get hit. After the car has been de-energized, you need to remove the caps from the generator terminals and unscrew them with a screwdriver. Now you need to carefully remove the protective casing from the generator; on the VAZ 2114 it is equipped with spring latches; it is important not to break them right away. Now the voltage regulator of the VAZ 2114 generator will be visible under the casing; you need to unscrew its fastenings and pull it out of the seats along with the brushes.
The next phase of our work will be to check its functionality. Now let’s figure out how to understand that the voltage regulator is not working, for this we will need the following components:
- Accumulator battery;
- Miscellaneous wires;
- An ordinary 12 volt lamp, anything from the car's network will do.
You need to immediately understand that checking the regulator should be carried out only together with the brushes.
The light bulb itself must be connected via wires to the generator brushes; the polarity of the wires does not matter. Now you need to figure out where the negative terminal of the battery is and connect it to the relay body, and the second one must be connected to the regulator terminals. If everything is done correctly, the bright light from the light bulb will be a sure sign that all elements are working properly. You also need to know that testing the functionality of a new regulator is carried out in exactly the same way. After the repair is completed, everything must be assembled strictly in the reverse order, and it is advisable to charge the battery during the repair so that it does not lose its charge.
Operating highlights
On VAZ 2114 cars, as well as similar models - 15th series, 8th, 9th, voltage regulators are installed, which are structurally combined with a brush mechanism. Let us recall that brushes are needed to transmit supply voltage to the contacts of the rotor winding. Therefore, the life of the regulator is limited by the service life of graphite brushes, which is not very long. Signs of device failure:
- Noticeable deterioration in lamp brightness.
- Battery discharge.
- The lamp with the battery icon on the dashboard lights up - a clear sign of a breakdown.
When replacing a standard voltage regulator on a VAZ 2114 car, you must perform the following steps:
- Disconnect the negative terminal from the battery.
- Disconnect the power wire of the field winding. Slim with a female connector. There will be no problems with this.
- Unscrew the two screws that secure the device body to the back cover of the generator.
- Install the new device in reverse order.
To check the functionality, you need to use a power source of 12 and 16 Volts. The first is, of course, the battery. The second is a pair of AA batteries connected in series with it. The power supply is connected to the plus and minus of the voltage regulator. The control lamp must be connected to the brushes. The malfunction can be diagnosed by the following symptoms:
- Without checking, measure the length of the brushes - it should be at least 5 mm.
- The lamp lights up at any supply voltage.
- The lamp does not light up at all.
Only replacing the device will help. It is worth noting that there is no point in making it yourself - the cost ranges from 200-300 rubles, and the service life is at least two years. But for difficult conditions, three-level regulators can be supplied with a special design. It’s worth talking about them at the conclusion of our article.
Three-level voltage regulator for a car
Not long ago, I learned about a three-level voltage regulator and decided to install it on my car, since with a standard regulator, which is installed as standard, the battery is not fully charged, and you have to periodically recharge it from a charger.
Why do you need a voltage regulator?
The output voltage of the generator depends on the speed and current supplied to its rotor. If you connect power to the rotor and do not control it, then as the speed increases, the voltage at its output terminals can rise so much that all electrical consumers on the car burn out.
Since the engine speed varies over a wide range, the output voltage can only be controlled by changing the current in the rotor winding. This is exactly what a voltage regulator does. It monitors the voltage at the generator output and if it is higher than required, it reduces the pulse width supplied to the rotor winding, and vice versa increases the pulse width when the voltage decreases.
The standard voltage regulator (using the VAZ 2107 as an example) produces 13.6 volts. And if you turn on the load, it will sag and the battery will not be able to fully charge. It will need to be periodically recharged from a charger, otherwise its service life will decrease.
After starting the car, the battery needs to recover the energy it gave to the starter. To do this, the engine needs to run for a certain time. When the generator voltage decreases, this time increases. Therefore, when driving short distances from work to home, the battery cannot be restored.
INSTALLATION AND CONNECTION INSTRUCTIONS
For Lada cars (except Vesta, XRAY)
, photo author:
1.
Remove the generator.
2.
Remove the plastic casing of the generator. To do this, first disconnect the generator excitation wire. Then unscrew the nut from the stud (key “10”) and move the power wire to the side. Next, 3 latches on the plastic casing are unfastened.
3.
Remove the standard voltage regulator from the generator. To do this, unscrew two screws (“8” key) and disconnect the wire.
4.
Install a three-level voltage regulator on the generator instead of the standard one.
5.
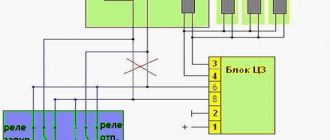
Output 2 wires for the control module. The module itself should be mounted in conditions of reliable contact with the “ground” and as far as possible from the possibility of moisture ingress. For example, on a hairpin near the right headlight.
For Lada Vesta, XRAY cars (with Valeo TG12C209 generator).
This generator is no different from the previous ones, the only difference is in the voltage regulator. It communicates with the engine ECU via a “lin” interface. The task of this “lin” is to avoid loss of throttle response at power modes. By installing the TRN, we cut off the ability to control the regulator using the ECU!
For this generator there is no ready-made solution in the form of a TRN yet, so the design will have to be modified.
Required:
- three-level voltage regulator (article 67.3702-01)
- 2-pin block 904576 NORD YADA
- generator voltage regulator (leave the standard one (if the brushes are live) or ARV1103AD)
- wire for powering the regulator (2 meters)
Procedure (author of modification):
1.
Remove the generator (instructions for Lada Vesta/XRAY).
2.
Remove the voltage regulator, open the cover and clean everything under it. Reinstall the cover.
3.
Isolate the negative brush from ground (for example, drill out the negative outlet, place washers). It is necessary to completely eliminate contact between the regulator and the generator.
4.
Solder the female connector to the brushes.
5.
Solder the male connector to the 3-level regulator. Also, connect an additional wire to the positive output, which is needed to power the regulator and rotor.
Connection diagram:
- Output “Ш” on the regulator goes to the negative brush.
- Output “+” – to the positive brush.
The “+” output needs to be supplied with 12V, which appears when the ignition is turned on:
Brush device
The generator brushes are also located inside the housing and perform a very important task - they are responsible for transmitting voltage between the slip rings. The brush assembly itself includes two small so-called brushes, which are made of graphite and pressed by several springs inside their seat. Since the brushes heat up quite strongly, they are covered on top with an aluminum cover, which is quite easily cooled by the oncoming air flow when the machine moves. If you need to replace the generator brushes on a VAZ 2114, then you don’t need to worry about the price; you can find the option of good brushes with a price of up to 200 rubles.
Reasons for changing brushes
In a car generator, most parts are constantly in motion, which causes friction and wear. The reasons for changing brushes may seem very varied, but this should be done during routine vehicle maintenance. On VAZ 2114 it is advisable to change them after 50 thousand kilometers traveled. But as a rule, few people remember about this event, and this breakdown comes as a big surprise to them. There are also markers that signal an imminent breakdown; we will arrange them in order of the most frequent possibility of occurrence:
- Inexplicable chaotic shutdown of various electrical equipment in the car.
- A noticeable decrease in the brightness of headlights and other lamps both inside the car and on the body.
- Battery that discharges too quickly and problems with voltage levels.
To check the functionality of the brushes, it is not even necessary to remove the entire generator from the car. To carry out diagnostics, it is enough to remove the negative terminal from the battery, remove the voltage regulator from it and visually evaluate how much the brushes protrude from their seat. If their size is less than five millimeters, then they must be urgently replaced with new ones, otherwise unforeseen consequences can be expected at any time.