Payment for goods and downloading of the book in electronic form (PDF format) is made on the website.
To do this, you need to find the book you are interested in and click on the “Buy” button. The price of the book is indicated on the button.
For convenience, the price on the website for residents of Russia, Belarus and Kazakhstan is presented in rubles.
For residents of Ukraine in hryvnias, and for all other countries - dollars.
After clicking on the “BUY” button, a payment window will open where you can select a payment system with which you can pay for the selected book using any bank card (Visa, MasterCard, MIR, etc.)
When you click on the “Pay by bank card” button, the Portmone payment system will open, which is the easiest way to make a payment.
In addition, the website offers four payment systems for payment:
- Yandex (payment from any bank cards, Yandex Money account, QIWI Wallet, terminals, etc.);
- Portmone (payment from any bank cards, Portmone account);
- PayPal (payment from any bank cards, PayPal account);
- WebMoney (payment from any bank cards, payment from WebMoney wallets).
Payment via Yandex Cashier
After selecting payment via Yandex, the Yandex Cashier payment system will launch, where you need to select a convenient payment method (bank card, QIWI, Yandex Money account, etc.)
After specifying payment details and confirming payment, payment for the goods will occur.
If you have a bank card in a currency other than the ruble, then the money will be debited from the card at the rate of the Central Bank of Russia at the time of the purchase.
This payment method is optimal for residents of Russia, Kazakhstan and Belarus.
Official website of the Yandex Kassa payment system https://kassa.yandex.ru
How to Remove the Door Trim of a VAZ 2114 Video
Basics of assembly and disassembly of entrance doors VAZ 2113-2114-2115
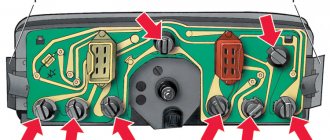
- Energy window entrance door
- 1 - window handle
- 2 - facing
- 3 - socket
- 4 - gasket
- 5 - window lift mechanism
- 6 - cable sheath
- 7 - roller
- 8 - glass
- 9 - sealant
- 10 - outer seal
- 11 - internal sealant
- 12 - clip
- 13 - circuit board lowering the glass
- 14 - cable
Press out socket 3 and trim window handle 1 until it comes out completely. Remove the handle and trim.
- Interior view of the front door
- 1 - button to disable the lock
- 2 - door trim
- 3 — armrest handle
- 4 — internal door handle
- 5 - outside rear view mirror
- 6 — door mounting bolts
- 7 - door opener
- 8 — power window switch
- 9 — pocket for door trim
- 10 - chop
- 11 - external door lock
After unscrewing the screws, remove the locomotive handle 3 and the door trim pocket. Using a screwdriver, remove the interior door handle trim 4. Unscrew the release button 1.
Remove the rear view mirror 5, the rear view regulator, the inner trim and remove the mirror by unscrewing the mounting screws.
How to remove the door trim of a VAZ 2114 rollers.
Payment via Portmone
After selecting payment through Portmone, the payment system will launch, where you need to select the payment method: bank card or Portmone account.
The price in the Portmone payment system is converted into dollars at the exchange rate of the Central Bank of the country where you are located.
If you have a bank card in a currency other than the dollar, then the money will be debited from the card at the rate of the Central Bank of your country at the time of the purchase.
After specifying payment details and confirming payment, payment for the goods will occur.
Official website of the Portmone payment system https://www.portmone.com
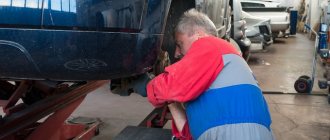
How to disassemble the door of a VAZ 2114 and remove the trim? Do-it-yourself front and back – EASY
Since VAZ cars are very popular in our country, I often receive questions from motorists regarding maintenance. Especially from owners of 2114, 2115 and sometimes 2113! For some reason, young people choose these particular options. And often very often, owners are interested in the following question - how to disassemble a door or remove the trim? For example, install acoustics, repair a window regulator, or simply glue it to improve sound insulation. Since I also had a VAZ 2114, and also disassembled the front and rear doors, today I want to “throw out” a small instruction that will help you in this matter...
THE CONTENT OF THE ARTICLE
I will try to answer all the questions at once, that is, removing both the front and rear door trims. In fact, there is nothing complicated here, the main thing is to strictly follow all the instructions.
Payment via PayPal
After selecting payment via PayPal, the PayPal payment system will launch, where you need to select the payment method: bank card or PayPal account.
If you already have a PayPal account, then you need to log into it and make a payment.
If you do not have a PayPal account and you want to pay using a bank card via PayPal, you need to click on the “Create an Account” button - shown with an arrow in the picture.
PayPal will then prompt you to select your country and provide your credit card information.
After specifying the information required to make the payment, you must click on the “Pay Now” button.
Official website of the PayPal payment system https://www.paypal.com
Remove the back cover
There is no point in repeating the main points; they are almost identical.
See:
In addition, the handle is disassembled and the cover is removed, the top fixing “bolt”. It's just not here. shelves and speakers.
Since there is no power window, that is. there is no gasket that needs to be disconnected. But here there is a regular window handle, as people call it. "oars" or disk on "muscle power". To take it apart, you need to twist it a little using a screwdriver. pull out the lower locking ring. After this, the pen will simply go away by itself.
We repeat the procedure with both the upholstery and the front door, only pulling it slightly. We remember the rivets.
Now a short video.
Something else I want to point out if you read the instructions. It is then recommended to completely change the rivets every time the upholstery is removed. they just lose their characteristics, the antennas fall off, unless I change the memory of 8 pieces on each skin. This threatens this. that on bumpy, rough roads there will be a rumble.
Payment via WebMoney
After selecting payment via WebMoney, the payment system will launch, where you need to select the payment method: bank card or WebMoney wallet.
If you already have a WebMoney wallet, then you need to log into it and make a payment.
If you do not have a WebMoney wallet and you want to pay in another way, you need to select any of the methods that WebMoney offers and make the payment
After specifying payment details and confirming payment, payment for the goods will occur.
Official website of the WebMoney payment system https://www.webmoney.ru/
A little advice from me
Guys, if they were just disassembling it about repairing a window regulator or installing speakers. My advice to you is that you can improve the design a little, namely, reduce its airflow. I advise you to read this article.
If you are not ready for such insulation, then you should apply ordinary thick cellophane to the metal, 0.3 mm is enough. We directly cut out the door according to the stencil and glue it to the metal (you can use double tape), after making holes for the handles and bolts. I have seen this on many foreign cars, they have it as a must!
What does this give us:
1) The door will not blow out as quickly during the cold period, which will give us a little more heat. The interior will warm up faster.
2) There will still be fewer crickets, because this layer will not allow plastic and metal to interact directly.
Personally tested on my former VAZ 2114, the interior is really warmer in winter.
I’ll finish here, I think it was useful for you, read our AUTOBLOG.
(
3 votes, average: 4.33 out of 5)
Downloading a book
After successfully completing the payment (by any method) and returning to the KrutilVertel store from the payment system website, you will be taken to the successful payment page:
On this page you need to indicate your e-mail, where access to download the book will be sent.
If you are already registered on our website, then simply follow the link to your personal account.
The book you purchased will be in your personal account, from where you can always download it.
Please note that after making the payment, you need to return back from the payment system website to the KrutilVertel website.
If for some reason you did not return back to the site and closed the payment system tab with a message about the successful completion of the payment, please let us know - we will send you a letter indicating access to download the book.
Disassembling the front door
1) First, we need to remove the main handle with which the door closes. We press out the decorative trim with a screwdriver, but be careful not to damage it. Next, unscrew the bolts, there are two of them, and remove the handle.
2) Then we remove the decorative trim of the unlocking handle, you know that kind of black plastic, we also pick it up with a screwdriver and pull it out, there are two latches there, be careful.
3) Then you need to remove the lower shelf, in which the window lift buttons are installed, there are two or three bolts there. The shelf comes out together with the power window cable, disconnect them and remove them.
4) Next, as a rule, comes the speaker, it is fastened with 2 - 4 bolts, to be honest, I have seen only one. We unscrew, there are cross-shaped bolts from the factory. Let's remove it.
5) In the upper part, unscrew the locking “latch”; it simply unscrews like a bolt.
6) Everything is removed, now we need to detach the upholstery itself, this is a little more complicated. You can pull the corners, or you can pick it up with a screwdriver and pull it towards you - the main thing is not to break it, we carefully try to separate it. If some rivets are broken (and this will be 100%), don’t worry, we bought new ones
At this point the “analysis” is completed, as you can see, there is nothing complicated and it is also considered that the front part is complex. Let's watch the video.
Everything is much easier at the back.
Problems when paying with bank cards
Sometimes difficulties may arise when paying with Visa/MasterCard bank cards. The most common of them:
- There is a restriction on the card for paying for online purchases
- A plastic card is not intended for making payments online.
- The plastic card is not activated for making payments online.
- There are not enough funds on the plastic card.
In order to solve these problems, you need to call or write to the technical support of the bank where you are served. Bank specialists will help you resolve them and make payments.
That's basically it. The entire process of paying for a book in PDF format on car repair on our website takes 1-2 minutes.
If you still have any questions, you can ask them using the feedback form, or write us an email at [email protected]
How to remove the door trim on a VAZ 2114 and 2115
Removing the trim on Lada Samara cars, such as the VAZ 2114 and 2115, is a fairly common task for many car owners, and they have to do this for completely different reasons, the main ones of which are given below:
- When soundproofing doors from the inside
- To repair or replace glass, lifts, or door opening and closing mechanisms
- For installing an acoustic system that does not fit in standard places on the casing
So, to remove the casing yourself, you will need a minimum of tools, namely:
- Flat and Phillips Blade Screwdriver
- Sharp and thin knife
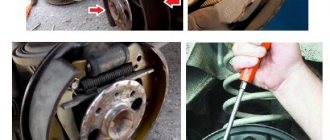
Removing the rear door trim
The sequence of actions for dismantling, or how to remove the rear door trim on a VAZ 2114 and mount it back.
- Using a flat-head screwdriver, press out the decorative molding of the door handle and remove it.
- Remove the door handle.
- Using a flat-head screwdriver, press and remove the door handle trim.
- After unscrewing the fastening screws, remove the inner part of the handle.
- Using a flat-head screwdriver, remove the door lock handle trim.
- Unscrew the cap of the door locking mechanism (lock) and remove it.
- Use a flat-head screwdriver to disconnect the 10 door trim fastening studs.
- Carefully remove the trim, moving it evenly away from the door.
Installation of the casing occurs in the reverse order.
After removing the trim, it is recommended to carry out anti-corrosion treatment and check the condition of the internal cavities of the door.
Removing the trim
If the door does not close, after removing the trim, you need to lubricate the rod of the central locking electric drive with silicone spray.
Sometimes you need to remove the trim from a door when it is jammed. In this case, space is made in the cabin for trim parts and work is carried out from the inside.
To improve sound and heat insulation, foil foam rubber is installed inside the casing. The pattern is made according to the pattern of the old casing. The material is cut with a margin of a few centimeters so that it can be folded. A hole is cut out for the handle. It should be slightly smaller in size than the handle itself. Insulation adhesive is selected depending on the type of material.
Sometimes, after removing the trim, decorative inserts are replaced. Typically, leatherette, Alcantara, carlet and tapestry fabrics are used for replacement.
Information on how to remove a VAZ 2114 door or door trim is required not only to change decorative panels or install sound insulation, but also to replace a power window or glass.
Replacing the window regulator
To replace the window regulator, you need an extension, a wrench and a 10 mm socket.
Having freed the front door from the trim, remove the 2 bolts securing the glass to the bar. Usually they are tightened tightly, so it is more convenient to use the head as a lever.
Remove three nuts securing the electric motor, one nut under the glass, two in the center and one nut at the bottom of the door.
After removing all the nuts, disconnect the power plug from the electric motor.
Replacing the window regulator
The window regulator is removed from the studs and taken out of the cavity into the technological hole in the center of the door. Installing the window regulator occurs in the reverse order.
After removing the structure, the electric motor is first checked. If it is faulty, it is replaced. If the cause of the breakdown is not obvious, replace the window regulator.
What does sound insulation provide?
Sound insulation allows you to solve the following problems:
- Significantly reduce the level of extraneous noise that enters the car interior from the street
- Completely eliminate squeaks and knocks produced by dashboard parts (see Soundproofing a car's dashboard is always necessary) and parts of decorative door trim
- Significantly improve the quality of musical sound in the cabin, which is especially noticeable when you have speakers built into the doors
Materials
On the VAZ 2114, door sound insulation is performed using the following materials:
- Vibroplast is a vibration-absorbing material used for soundproofing cars, suitable for use in any area of the car body, be it interior floors, doors or roof, engine compartment partition, body sides, trunk lid or hood
- Vibroplast is a flexible, elastic material made on the basis of a polymer (rubber mastic) self-adhesive composition, using aluminum foil
- The logo and embossing are applied to the top of the foil.
- The material is moisture-resistant, does not decompose over time and under the influence of environmental factors, it resists corrosion and provides good sealing of the coating when applied correctly
- Retains its properties in the temperature range -40 +100 degrees
- Installation can be easily done on complex surfaces with relief; no heating is required during installation if the ambient temperature is above +30
- Be sure to roll from the center of the piece outward to remove any air bubbles and ensure a tight fit and seal.
- Madeline is the material most beloved by most car enthusiasts, which allows you to compensate for friction, thereby eliminating the occurrence of unpleasant squeaks and other sounds, and its price is affordable for everyone
- This material is actually an “anti-creak”, but unlike Bitoplast, it is thinner, which allows it to be used where the gaps are very small, the thickness of madeline is about 1-1.5 millimeters
- The scheme for its installation is very simple - on any of the surfaces that rubs against another, you will need to stick a piece of this material so that this material is located between the surfaces, and they come into contact only through it
- Any creaks and extraneous knocks will immediately disappear; such a moment is indispensable in the soundproofing of any car, since creaks are present to one degree or another everywhere
- Accent - needle-pierced (porous) material based on foamed polyethylene
- It is due to this structure that it perfectly absorbs sounds.
- Widely used for soundproofing machines in any installation areas
- It is considered mandatory to use coatings of a similar group when acoustically tuning cars (doors, roof (see Sound insulation of a car roof is part of a set of actions to reduce noise in the cabin), hood, interior, trunk)
- The surface of the material is oil and petrol resistant, plus it has good durability, heat insulating and sound reflecting properties
Purpose of the cladding
To understand how to remove the door trim of a VAZ 2114, you need to find out the purpose of this automobile fragment. The fabric insert enhances the appearance of the interior. If stains, mechanical damage or abrasions appear on it, you will need to disassemble the inside of the door, remove the panel, and attach a new lining. Thanks to this element:
- the interior becomes more attractive;
- additional sound insulation is created;
- a speaker is installed in the facing fragment;
- electrical wiring and fasteners are hidden;
- The corners of the closed plastic panel and iron parts are softened.
Sheathing installation
You need to assemble the cladding along with the other parts in the same sequence as it was disassembled. After the fragment has completely dried, you must:
- Insert the column into the hole and mount it into the iron frame of the door.
- Connect the electronics.
- Secure the lining with clips to the card.
- Secure the handle with two bolts.
- Replace the plug.
If, before dismantling work begins, contamination is found inside the structure, it is cleaned out. At the same time, it’s worth checking the condition of the wires and tightening the window lift nuts to prevent the door from being disassembled in the near future.
Lada 2113 › Logbook › Refinement of VAZ 2113 doors
The article that inspired me to do this. So, the VAZ 2113 is, first of all, large doors, and as a result, large inner door trim. I'm tired of using standard fasteners. They are bad in principle, the trim doesn’t stick to the door properly, sometimes it creaks on the bumps, ugh. So, 3 hours of manual work (if I had done it a second time, it would have been done in an hour) and the job was done. What's the matter? Here I am telling you:
We go to the car market and buy: 1) Gazelle air intake pistons 3302-5301245
(bargain! Their price is 5-7r/piece) 2)
Pistons for fastening the trunk trim 21080-5402270/71
(we are only interested in “mothers”, we will use them as dowels for self-tapping screws) 3)
Self-tapping screws 4.9x38.1 with cylindrical heads
( the main thing is that the head of the screw fits into the air intake piston, the length of the screw should be approximately 38-43mm, for example I didn’t find 4.9x38.1, I found others 40mm long, they fit. And the top of the screw should be as in the picture, not thinner, so as to burst dowel properly)
I took only 18 pieces, 9 pieces for each door.
Total issue price is about 250 rubles. To the point, - we remove from the door the handle that goes at an angle, having first uncorked the caps under which there are screws, - we remove the lid behind the opening handle, it is without screws, just pull it carefully but with force, they are removed with the opening handle protruding, - from the bottom of the door along the edges pocket for small items, unscrew two bolts, - unscrew the cover from the door latch, - pull the trim towards you, it’s better to start from the top, having first opened the window, there will be something to grab onto, - remove the old fasteners, every single one, some of them will remain in doors, part on the trim,
— now our task is to insert the “dowels” that are circled in red in the photo above into the holes in the door,! but! first, you will need to wrap these dowels with electrical tape one and a half turns, since for example, for me, without electrical tape, they rotated freely in the door, and we need to make sure that they sit firmly in the door, so I, for example, wrapped them a little with electrical tape and screw them in with rotational movements holes and at the end slightly tapped with a hammer. Also pay attention to the fastener central at the top, there you will need to shorten the dowel a little, and as a result, the self-tapping screw will determine the location. So I made a picture and indicated on it the holes into which we need to attach the dowels. There are a total of 8 of them on the door (indicated in red), we will spend the 9th piston on another purpose. The arrow points to the hole where the dowel should NOT be inserted, I just showed what kind of holes we are interested in. In blue I indicated the points at which the handle and the pocket are then attached to the bottom, that is, through these points the trim is also attached to the door with self-tapping screws, but in the standard format, I indicated these points for purposes so that you understand why I chose these 8 holes for the dowels, and not any others. — next, take a 13mm drill and drill holes in the casing for the Gazelle caps. We drill not from the outside, but from the inside. There we have recesses into which the stock clips are inserted, so we drill them through. I had an ordinary screwdriver and it only takes 10mm drills, so I made 10mm holes and carefully drilled them out to the sides, the material there is quite soft, it didn’t cause any problems at this stage - we insert the pistons into all the resulting holes in the casing and screw the casing on to the door, carefully without any screwdrivers, using a regular screwdriver, pressing firmly on the self-tapping screw to prevent the dowel from turning, we close the caps with the caps. We're done with the doors.
My result (I haven’t done it for the plastic covers near the mirrors yet, I took 16 clips, I need to buy 2 more):
End. Tags: VAZ, Lada, 2113, 2114, 2115, fasteners, doors, doors, modification, trim, tuning, creaking, crickets, map.
Removing the door trim
Dismantling the door structure of the VAZ 2114 and removing the front door will require a set of equipment. To gain access to the panel, which is covered with material, the handle is unscrewed, the electrical wiring is disconnected, the speakers are removed and the clips are removed. Required tool:
You should take care of the place where the work will take place. It is recommended that this be an enclosed room, without drafts and with good lighting. Dismantling instructions:
- The plugs under which the connecting bolts are located are removed. The handle secured with two screws is unscrewed.
- The bracket leading to the window regulator is removed.
- The clips holding the panel come off. You will need to pull it towards you a little, but do not pull it out.
- The electrical wiring is disconnected: from the speakers and power windows. If it is not the rear door that needs to be dismantled, then the side view mirror wiring is disconnected.
- The decorative item with the covering is removed.
It is easier to remove the clips with a knife, but it is worth wrapping the blade with a rag so as not to accidentally scratch individual body parts. After this, it becomes possible to detach the fabric from the panel and replace the fabric.
Glass replacement
It is better to buy glass and a glass holder as a set for replacement.
To replace, you need an extension, a wrench, an 8 and 10 mm socket and an assistant.
The side glass is blocked with a screwdriver to prevent it from falling out. The door trim is removed. A felt-tip pen marks the places where the glass frame is attached to the door on the frame and on the door. The bolts securing the glass frame to the window regulator are turned out.
The window regulator bar must be fully raised. The cable on the roller from the bottom of the glass is dismantled. Then the seals (velvet covers) are carefully removed.
Hold the glass during this time so that it does not fall out. After removing the seals, the glass is lowered down about 10 cm, tilted to the side and removed from the groove.
Replacing the door glass of a VAZ 2114
The new glass is installed in the reverse order. Apply WD-40 or a similar lubricant to the glass frame, insert the glass and leave to dry. After the grease has dried, the glass is installed in the door. New glass is installed in the seals.
If the seals have become unusable, new ones are cut out of rubber, while the old ones are used as patterns.
The glass with seals is inserted into the groove, aligned and lowered into the stopper. The window lifter handle is lowered to its lowest position. The glass is fixed with bolts and the cable is installed in its original place.
The operation of the window regulator is checked and, if necessary, the cable tension and the position of the seals are changed.