If, when braking your VAZ-2114 car, the pedal suddenly goes to the floor, but the vacuum booster is working normally, and the pads are within acceptable limits, then the reason must be sought in the master brake cylinder. It is not worth repairing this part of the unit, since not only your safety depends on this system. Therefore, the best solution would be to replace the master brake cylinder of the VAZ-2114.
Replacing the master and working brake cylinders on VAZ cars
The effectiveness of a car's brakes depends on the condition of all its elements, and if there are any signs of malfunction in the brake system, repairs must be made.
Replacing a brake cylinder is a simple job, but extremely important; driving with faulty brakes is strictly prohibited. Diagnostics and repair of the brake system (TS) must be carried out in a timely manner; traffic safety depends on the serviceability of the brakes.
How to replace the brake cylinder on a VAZ 2113-VAZ 2115?
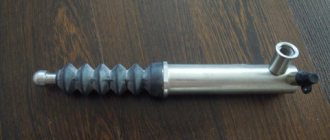
1. Remove the wheel first from the side on which you will change the cylinder (Read the article on “Replacing wheels on modern cars”, it describes how to properly remove the wheels), when the wheel is removed, remove the brake hose from the bracket to which it is attached (the location is indicated by a red arrow) and using a wrench, tear off the nut that secures the brake hose to the brake cylinder (see small photo).
2. Now the brake caliper bracket assembly with the cylinder will need to be removed, to do this you will have to unscrew two bolts, but when unscrewing them, hold the guide pins with a second key so that the bolts in the guides do not turn (see photo 1), after which the bolts are removed from the guide pins and the bracket assembly with the brake cylinder is removed from the caliper, but the bracket cannot be completely removed, and the fault is the brake hose, which will have to be disconnected from the brake cylinder. To do this, completely unscrew the hose mounting nut (While unscrewing, hold the nut with a wrench and rotate the caliper assembly in the brake cylinder by hand, counterclockwise) and disconnect the hose, as soon as you disconnect it, immediately plug the hose with some kind of plug so that the brake fluid does not pour out through it, then firmly tighten the brake cylinder with the caliper you need a vice, but you can do without them, in general you will have to unscrew the two bolts that attach the brake cylinder to the caliper, they need to be unscrewed with a hex key or hex heads, after unscrewing, the caliper and the cylinder must be separated.
Note! When the brake hose is disconnected from the cylinder, the copper o-ring will fall, you don’t have to worry about it at all and don’t look for it on the floor, because this ring will need to be replaced with a new one!
3. A new front brake cylinder is installed in the reverse order, the copper rings must be replaced with new ones. If you decide to try to repair the brake cylinder, then in this case, read the article entitled: “Repairing the caliper on a VAZ 2109.”
Note! We also recommend that you lubricate the brackets assembled with the brake cylinder and the guide fingers of the bolts before installing them; you need to lubricate them by removing the boot from them, as shown in the photo below, lubricate the fingers with UNIOL-1 grease, when you assemble everything, bleed the brakes on a family car with an assistant Samara 2, detailed bleeding instructions, are on our website under the title: “Bleeding brakes on a VAZ 2114”!
Additional video clip: Below is a video about replacing the brake cylinder with a new one, familiarize yourself with it and you will clearly understand how to replace it.
Note! If you don’t yet know how the brake system works and works, then in this case, be sure to study the interesting video that we posted just below, after watching it, you will immediately understand why brake fluid is needed and why the car stops braking when the fluid pours out!
The device of the VAZ brake system
The brake system of Togliatti-made cars is quite simple; the vehicle consists of the following main parts:
- pedals, which are pressed to achieve braking;
- brake master cylinder (MBC), it transmits the force of pressing the pedal through hydraulics to the working cylinders, respectively, to the wheels. GTZ VAZ - dual-circuit, the circuits are divided to transmit fluid pressure to the front and rear wheels;
- a vacuum booster that makes it easier to press the pedal;
- tubes that connect the elements of the vehicle;
- brake working cylinders (RTC);
- pads (drums) and discs;
- brake distributor (pressure regulator).
When you press the brake pedal, the piston in the brake fluid compressor compresses the brake fluid and transmits its pressure to the brake pedal. The pistons of the working cylinders are expanded under the influence of hydraulics, moving the pads towards the discs or drums. The movement of the wheels slows down, and thus the car slows down.
Symptoms of a problem
With a calm driving style and regular maintenance of the brake system, the GTZ will serve without interruption for many years. Cylinder output increases with frequent vehicle use in city traffic.
Useful : Replacing brake hoses on a VAZ 2114
Frequent and prolonged stops accelerate the wear process of the turbocharger, which is reflected in the manifestation of the following symptoms:
- When you press the brake pedal, the car stops slowly, although the fluid level and the condition of the discs and pads are normal;
- To effectively brake, you have to press the pedal with serious force;
- Short brake pedal travel is another sign of a worn cylinder;
- Sudden failure of the pedal and “grabbing” of the brake at the end of pressing;
- Incomplete disengagement of the calipers, which leads to friction of the pads on the discs.
The listed symptoms of a faulty master cylinder manifest themselves in different ways, but always mean there are problems with the braking system. The braking system in your car requires regular maintenance. Despite the simplicity of the design and reliability, diagnostics of the design should be carried out every maintenance. Regular replacement of pads, installation of new brake discs, replacement of fluid, elimination of leaks from pipes - all this ensures the smooth operation of the system as a whole. The GTZ plays a crucial role in this design, because Braking efficiency directly depends on the correct operation of the cylinder. In addition to the GTZ located under the hood of the car, there are other elements in the system that are responsible for stopping the car. Often, in addition to the main brake cylinder, it is necessary to replace the front brake cylinder on a VAZ 2114. It is located on each caliper and is responsible for actuating the pads.
A faulty front brake cylinder on a VAZ 2114 leads to a wedge in the mechanism and friction of structural parts. If the front TC fails, the car begins to move to the side when braking, and extraneous noise comes from the wheel.
Malfunctions occurring in the brakes
From time to time, various malfunctions occur in the vehicle, and the working and master cylinders also often fail. The following breakdowns occur at the RTC:
- the piston gets stuck in one of the positions;
- the inner surface wears out;
- The sealing cuffs fail (tear or swell).
The main sign of a faulty condition is the appearance of smudges (leaks) of brake fluid (FL) from the RTC. If the pads are worn down to bare metal, the pistons in the RTC extend too far, and as a result, the brake fluid may leak and the brakes will fail.
In the GTZ, the piston can also jam, the internal cavity of the mechanism can wear out or rust, and the cuffs can leak. Symptoms of a GTZ malfunction are as follows:
- when braking, the brake pedal (BP) “fails”, the effectiveness of pressing disappears, this usually happens when there is a small leak from the turbocharger;
- braking occurs at the very end of the pedal stroke, and you have to press the PT several times to brake;
- there are no brakes on the front or rear wheels, this happens if one of the GTZ circuits does not work.
You cannot drive with faulty working and master brake cylinders; the parts should be replaced immediately.
FAULTS
Symptoms of a malfunctioning TTS:
- The brake fluid leaves the reservoir;
- The rear drum is wet, fluid leakage is noticeable;
- The braking efficiency has disappeared, the pedal “takes” at the very end of the stroke, sometimes not from the first stroke.
Reasons for inoperability:
- Natural wear and tear;
- The cuffs are corroded due to mixing different types of brake fluid;
- Poor quality of the part;
- The pistons were squeezed out due to severe wear on the pads.
It happens that the pistons inside the housing become jammed. If this happens with the pistons spread apart, the car begins to constantly slow down and the drum overheats. You cannot drive with such a defect; the car must be urgently repaired.
There is one nuance that is worth focusing on. Often, when bleeding the brakes, mechanics break off the bleeder fitting on the cylinder when trying to unscrew them.
Even WD-40 doesn't help. This happens due to the fact that over time, the “pumping” begins to boil in the ZTC body. Therefore, before bleeding the brakes, you should have a supply of new replacement parts.
There is also a tricky way that will help you avoid breaking off the fitting. Before unscrewing, you must carefully (do not break the fitting with a hammer!), but thoroughly tap the housing around the bleeder fitting and try to move it out of place.
After this, without using much effort, we try to weaken the “pumping”. Doesn't work? Then tap again. Most likely, patience will be rewarded, and problems associated with unscheduled cylinder replacement will not arise.
Replacing the master brake cylinder
Replacing the GTZ on VAZ classic cars (2101-07) is not difficult; you can do this work yourself. To perform such an operation you will need the following tool:
- 10mm wrench (or special bleeder wrench);
- Phillips screwdriver;
- combination wrench for 13 (you can additionally use a head with a knob and a ratchet for convenience).
It is not necessary to use a pit or a lift to perform the work; replacement can be done outside in dry weather or in the garage. The work should be performed in the following sequence:
- unscrew the three brake pipes from the bottom of the device (key for ten);
- loosen the clamps of the two hoses (at the bottom of the GTZ), pull off the hoses;
- unscrew the two nuts securing the GTZ to the vacuum booster (you need a 13mm wrench or a socket with a wrench);
- We dismantle the part, install the new gas turbine unit in place, and reassemble it.
After the operation, you should add fluid to the vehicle reservoir, then be sure to bleed the brakes well.
Preparation and replacement
To remove the brake master cylinder you will need:
- brake cylinder;
- three keys (10, 13, 17);
- device for unscrewing fittings;
- pliers;
- metal brush (to clean contacts);
- rags;
- device for tensioning springs;
- brake fluid.
Before starting dismantling, you need to prepare a place where you can carefully lay out all the removed parts. When you first try to replace the turbocharger, be sure to remember the location of all elements removed from the car.
Repairing or replacing the master cylinder must begin by removing the negative terminal from the battery. Then you need to remove the remaining brake fluid. Then you need to place a rag under the bottom of the reservoir and slowly unscrew the brake pipes using an open-end wrench, while preventing fluid from leaking onto car parts. If the thread does not give in, apply WD-40 for a while or moisten the fittings with brake fluid and, using a 10mm wrench, remove the hoses. In order not to mix up the tubes, you need to mark them.
If everything went well, we begin dismantling the master cylinder. Using an 18mm wrench, unscrew the two nuts that secure it to the amplifier, disconnect the master brake cylinder and set it aside.
Next, take a new cylinder and install the reservoir on it. It is better to do this before installation, since it is inserted tightly, and it will be extremely difficult to insert it into place. After this, install in reverse order.
If the vacuum booster does not work properly, it must also be replaced. To do this, unscrew the fitting and turn it slightly to the side. Unscrew the hose from the check valve and pull out the locking pin from the passenger compartment side of the car. Using a 13mm wrench you need to unscrew 4 nuts, after which you can replace the old amplifier.
Replacing brake cylinder 2114
The work of replacing the GTZ on VAZ 2108-15 models is carried out approximately the same way, there are only some design differences.
We make the replacement as follows (using the example of the VAZ-2114):
- Unscrew the four tubes on the sides (two on the left and two on the right). It is better to use a special pipe wrench; you can roll up the edges of the nuts with an open-end wrench;
- unscrew two thirteen nuts securing the GTZ to the “vacuum”;
- We remove the old spare part and install a new one, not forgetting to bleed the brakes at the end of the work. At this point, the replacement of cylinder 2114 can be considered complete.
If in the GTZ 2114 the inner surface of the cylinder itself is not yet worn out, you can replace the insides of the mechanism by installing a new repair kit. The repair kit consists of four cuffs:
- three cuffs are the same, they are the same as on models 2101-07;
- one o-ring 2108.
Changing the repair kit is very simple:
- pour the liquid out of the GTZ;
- dismantle the plastic tank;
- unscrew the front stopper (made in the form of a plug);
- we take out all the contents (pistons, o-rings, springs), change the cuffs, and install the entire mechanism in the reverse order. Nothing should be mixed up here, otherwise the unit being repaired will not work.
Repairing the GTZ on VAZ models is not always advisable - if the mirror surface inside the mechanism is worn out, replacing the brake cylinder repair kit will not solve the problem, the GTZ will also leak. Most often, on VAZ cars, the entire master brake cylinder is replaced - a new assembled part costs around one thousand rubles, and the repair turns out to be unjustified.
Advice from professionals
- Before completely assembling all the parts into one whole, it is important to treat them with isopropyl alcohol, blow them off and wipe them with a rag.
- Do not allow parts to come into contact with kerosene, gasoline or other oils, as they can damage the integrity of the seals.
- Before replacing the main brake cylinder on a VAZ 2114, it is necessary to restore the working body of the unit in proper condition, remove oxidation, plaque and other contaminants.
- It is important to monitor the sealing of the mechanism and change the O-rings in a timely manner, even if they are still in good condition.
- All units must be lubricated with brake emulsion during assembly.
- It is imperative to change the sealing gaskets that are located under the screws.
- After replacing the main brake cylinder on a VAZ 2114, it is necessary to bleed the hydraulic brake drive to remove air from the system.
- When dismantling blocks with wires, it is necessary to close all openings in the main mechanism and pipeline to prevent dirt and dust from getting inside, or to protect yourself from liquid leakage.
- When disassembling the unit, it is first better to remove the barrel of the master cylinder, and then unscrew the locking screws, which will allow you to effectively and easily access all other components of the system.
- The most common cause of master cylinder failure is leakage of brake fluid, which indicates a faulty cuff of the unit. To see oil stains, you need to open the hood and look at the joint of the unit.
vote
Article rating
Replacing brake cylinder 2107
If the replacement operation on a VAZ classic is not performed on a car lift, it is more convenient to do the work sequentially - first on one side, then on the other side of the rear wheel. To perform the work, the vehicle must be placed on a level surface, then proceed as follows:
- We turn off the engine, set the car to speed, and put chocks under the front wheels. Don’t forget to fully release the handbrake;
- loosen the wheel nuts of the rear wheel, jack up the car and remove the wheel;
- To prevent the car from going anywhere, it is advisable to place a “tragus” next to the jack;
- remove the brake drum - use a 12 mm combination wrench to unscrew the two guides;
- the drum usually comes off tightly, so it should be tapped from behind with a hammer through a piece of wood. You cannot hit the part with an iron hammer; the drum can split;
- unscrew the brake pipe from behind the cylinder, also 2 ten bolts securing the RTC itself;
- pull out the cylinder, freeing it from the pads;
- We install the part prepared for replacement (it is important to get the pads into the slots on the RTC pistons, we fasten all the removed parts in their places;
After the work has been done, it is necessary to top up the fuel injection system reservoir and bleed the brakes.
Replacing the brake cylinder VAZ 2109
The RTC on the rear axle of the 2109 wheels is changed according to the same principle as on the VAZ classic; the wheel and drum are also removed, the tube and two cylinder fastenings are unscrewed with a ten key. It often happens that the tube and RTC bolts on the support disk boil; to remove them carefully, you need to spray the connections with WD-40, and wait 15-20 minutes before unscrewing. The brake pipe nut will be easier to unscrew if you gently tap the metal around it with a hammer. When tapping, it is important not to break the bleeder fitting.
Replacing brake cylinder 2109 is not a difficult task, and many drivers can do this work themselves.
Correct repair kit for VAZ 2114
Why is it correct, how can a repair kit be wrong? Maybe. Manufacturers of rubber products often assemble sets of gaskets, seals and cuffs according to a principle that only they understand. So, a repair kit for a brake cylinder can contain a dozen plugs, seals and other rubber bands that have nothing to do with the cylinder. And although their price is relatively low, there is still no point in buying a bunch of rubbish for the sake of a few cuffs.
The repair kit for the VAZ 2114 costs about 40 rubles, and includes:
- three pieces of o-rings with index 2101-350-2051;
- brake seal 2108 3505033r.
If the working surface of the cylinder is in order and has no corrosion or severe scratches, then the replacement takes place within half an hour along with bleeding the brakes.
Replacing the front brake cylinder
The following calipers are installed on the front wheels of VAZ cars:
- in a VAZ classic car, two front brake cylinders (FTC) are attached to the caliper brackets;
- on VAZ 2108-15 models, one PTC is installed on each side of the front axle.
Replacing the front cylinder 2109 is not difficult, it is also easy to do yourself:
- we put the car on a flat area (the work can be done without a pit and a lift), we put tackles under the rear wheels;
- jack up the car, take off the front wheel;
- unscrew the two caliper fasteners with a hexagon;
- loosen the brake hose nut;
- bend the locking washers on the upper and lower bolts, unscrew the cylinder fastenings to the caliper bracket
- we move the PTC to the side along with the bracket;
- disconnect the cylinder from the bracket, then from the hose so that the brake fluid does not leak; after disconnecting the PTC, it is better to immediately direct the hose upward;
- we install another, new spare part, and perform the assembly.
Replacing the brake cylinder cuff
If desired, on VAZ cars you can not change the entire rear working cylinders, but only replace the cuffs. To do this, you need to disassemble the RTC - remove the pistons and spring, remove the old cuffs from the pistons and install new ones. It is advisable to repair the RTC only if the cylinders did not last long, but they began to leak. The thing is that on VAZ cars the RTCs are very inexpensive, it is advisable to change the rear cylinders as a whole - replacing the cuffs is often unjustified.
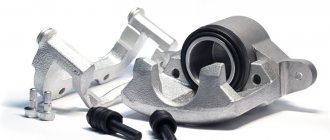
Where is the brake cylinder located in the caliper?
The easiest way to see the cylinder is when the caliper is removed from the car, but by simply pulling out the brake pads, the cylinder can be fully seen, the cylinder itself is sold and replaced as an assembly, it consists of several but very important things, firstly, the piston is located inside the cylinder and walking back and forth, thereby pressing and moving the brake pads away from the disc and of course the cylinder has a bleeder fitting, it is closed with a cap in the small photo with a blue arrow and the last element is indicated, this is the boot at the piston of the brake cylinder, it is indicated with a green arrow, thanks to it, the brake fluid is not squeezed out and into the cylinder, dirt, sand and moisture do not get in, they are very destructive for the cylinder and if they get inside, they will wash out all the lubricant (If it is water) or the lubricant will mix with sand (If sand gets in into the cylinder), and as a result the piston will barely move (braking efficiency will therefore drop).
Leveling up
After replacing any cylinder in the vehicle, it is necessary to bleed the brakes. Bleeding on any car always begins with the furthest wheel from the GTZ. On all VAZ cars, first of all, they start pumping the brakes from the rear right wheel, then move to the rear left, right front, and the front left wheel is pumped last. If the brake pedal takes at the very end or is hard, bleeding should be repeated, the work should be done according to the same scheme again.
Some tips
- If you start having problems with the brakes, first of all you need to carry out an external inspection of the vehicle: check the fluid level in the reservoir, make sure that the front/rear cylinders are not leaking. There should not even be stains of brake fluid in the brake hydraulics.
- “Brake fluid” must be filled with the same brand; it is recommended to completely replace the brake fluid at least once every two years.
- If faults are identified in the gas turbine engine, and it has already served for at least a year, it is more advisable to replace it completely than to repair it. The same can be said about the rear working cylinders.
- Before changing the turbocharger, the brake fluid should be removed from it; this operation is usually done using a syringe.
- Usually a leak in the master cylinder is not visible, but if there is any suspicion that this part is faulty, you should remove the main cylinder - there will be traces of leaks at the rear, and this indicates its faulty condition.
- If, during an external inspection, cracks were found on the brake hoses, it is better not to take risks and immediately replace the defective parts.
Didn't find the information you are looking for? on our forum.
Expert advice
- Before installing the parts, it is advisable to wipe them with alcohol and wipe them with a rag.
- It is undesirable to allow parts to come into contact with fuels and lubricants, as they corrode the seals.
- After replacing the turbocharger, it is imperative to bleed the hydraulic brakes, since without bleeding the system, air will remain in it, which will negatively affect the operation of the car.
- If the O-rings are in good condition, they should still be replaced during removal.
The most common cause of failure of the turbocharger is brake fluid leakage. In order to find and eliminate it in a timely manner, it is necessary to periodically monitor the joint of the brake cylinder.