How to change a brake disc on a Niva 21213
Hi all! After recently replacing the front hubs with all the bearings and seals, a metallic ringing appeared from the wheels when driving, it turned out to be brake discs, everything seemed to be according to the manual, I knocked out the studs with a hammer, drove the studs in with a sledgehammer - all this is nonsense, only the press decides everything. Well, in fact, I immediately bought new discs and pads, yes, whoever is going to change the discs, buy a pair of hub seals right away, so that later you don’t have to go looking for a convenience store to buy a seal, because most likely a scribe will come to them when removing the hub, as was the case with me .
Nothing special about the replacement, briefly the course of action: - tore off the wheel nuts and the CV joint nut, - jacked it up and removed the wheel, - unscrewed the caliper assembly, - using a pry bar and a hammer, removed the hub with the disk from the knuckle, - knocked out the wheel mounting studs, cleaned them with a metal brush, - the hub into a new disc or a disc onto the hub =) - pressed the pins in, - replaced the outer oil seal with a new one (the old one became unusable after removal), - put the hub and disc in place, - screwed the caliper in place, - installed new pads, — the wheel, the drive nut, tightened it on the murzilka, sealed it, — lowered it from the jack and tightened the wheel nuts
Removing the brake disc is also shown in detail here
1. Remove the wheel.
2. Remove the bolt from the lower brake shield.
3. Use a screwdriver to bend the screw stoppers of the front brake flap.
4. Remove the upper and lower bolts and brake pad guide.
5. Remove the front brake shield.
6. Remove the front caliper assembly.
7. . and hang it on a rope or wire, being careful not to twist or overtighten the brake hoses.
8. Remove the hub protective cap.
9. Unlock the hub nut.
10. Holding the hub from turning with a suitable wrench, unscrew the nut (at “27”).
11. Remove the flare nut.
12. Remove the brake disc and hub assembly.
13. Screw the nuts onto the studs so as not to spoil the threads of the studs, and knock out the studs.
14. Hit the edge of the hub with a hammer.
15. . Disconnect the hub and brake disc.
16. Install the new brake disc and the removed parts in the reverse order of removal. At the same time, do not forget to lock the bolts securing the guide pads by bending the locking lugs of the casing.
Before installing the disk, thoroughly clean the mating surfaces of the hub and disk from rust and scale, since even the smallest particle sandwiched between them will cause the disk to beat and vibrate during braking.
To press in the studs, you can use the wheel nuts. Screw them onto the ends of the studs through spacers (for example, you can use larger nuts) and tighten them evenly in a cross pattern until the studs are completely pressed into the disc and hub.
Lada 4×4 2121 Niva
To feel completely safe on the road, first of all, you need to be sure that the car’s braking system is in perfect working order. This means you can brake quickly and stop quickly without losing control.
Each car part has a certain service life, after which it must be replaced.
VAZ 2101-2107 (classic) - 9.0 mm VAZ 2108-21099 - 10.8 mm VAZ 2121-21213 (Niva) - 10.8 mm VAZ 1111 "Oka" - 8.0 mm VAZ 2110-2112 - 18 mm
If you are not sure that you can handle the replacement yourself, then it is better to entrust this matter to professionals.
It is necessary to constantly monitor the condition of the braking system, the main elements of which are brake discs, and all maintenance work should be trusted only to those people who have professional skills in this matter.
Important: brake discs must be replaced in pairs, and the brake pads, which are critical safety elements, must also be replaced with new ones. All work on replacing brake discs must be carried out strictly according to the instructions. In case of violation of the instructions, the seller disclaims all warranty obligations.
Removing old and installing new brake discs 1. Once the vehicle is securely stable, remove the wheel.
2. Remove the old brake pads and, using a special tool, press out the piston to make room for the new pads. Used brake pads cannot be used with new discs and must be disposed of.
3. Remove the brake frame together with the mount without disconnecting the brake hose, and install it so that it does not hang on the hose. Remove the worn brake disc.
4. The surface of the wheel hub must be thoroughly cleaned with a brush and suitable alcohol solvents to remove scuffs, rust, and dirt. Often, it is the dirty surface of the hub that causes beating and vibration of the brakes. A dirty hub and the resulting brake vibration cannot be considered a defect in the brake discs.
5. Be sure to check the hub runout. This must be done using a special device. A runout of no more than 0-0.1 mm is allowed. If you determine that the runout exceeds this value, then further work on replacing the brake discs is suspended in order to repair the hub.
6. Before installing discs, carefully remove any preservative coating using a suitable solvent. Install the brake discs
7. Before installing the wheel, check the runout of the brake disc. If all operations are performed correctly and carefully, the runout value will not exceed the permissible value (0.15 mm). See fig. 4. Larger runout results in vibrations during braking and increased brake pedal travel.
8. Reinstall the brake pads (preferably new ones) in the same way as they were removed, and screw the wheel into place.
ATTENTION! At first, until the brake pads rub against the disc, and this is approximately after a mileage of up to 500 km, you should not brake too sharply. Otherwise, local overheating zones and deformation may occur.
Niva's wheels are heating up - what to do in this case?
It happens that during operation the car wheels begin to heat up. This may indicate either their poor quality or breakdown.
Were you confused by the price of disc brakes and decided to buy a cheaper part? Then the heating problem can be solved very simply - replace the parts with better ones. In this case, you need to forget about saving. It is best if these are ventilated brake discs that match your “iron horse”.
Niva ventilated discs are parts with special holes and notches through which air passes and additional cooling occurs, preventing the brake disc from overheating. Such discs are very reliable, which has long been proven in practice. Most often, tire drivers choose brake discs from Brembo, Zimmerman, Delphi, Bosch and other manufacturers that have proven the quality of their products.
Having taken into account all the tips given above, you can be confident that the Niva, or rather its braking system, will never let you down and will work for your benefit for many years. This concludes the article about how to replace the front brake discs of a Chevrolet Niva. We can only hope that the new Chevrolet Niva will have fewer shortcomings and shortcomings in the braking system and that the designers will take into account the operating experience of the previous model. Good luck to everyone on the roads and safe driving.
Replacing the front brake disc
Removing the brake disc is also shown in detail here
1. Remove the wheel.
2. Remove the bolt from the lower brake shield.
3. Use a screwdriver to bend the screw stoppers of the front brake flap.
4. Remove the upper and lower bolts and brake pad guide.
5. Remove the front brake shield.
6. Remove the front caliper assembly.
7. . and hang it on a rope or wire, being careful not to twist or overtighten the brake hoses.
8. Remove the hub protective cap.
9. Unlock the hub nut.
10. Holding the hub from turning with a suitable wrench, unscrew the nut (at “27”).
11. Remove the flare nut.
12. Remove the brake disc and hub assembly.
13. Screw the nuts onto the studs so as not to spoil the threads of the studs, and knock out the studs.
14. Hit the edge of the hub with a hammer.
15. . Disconnect the hub and brake disc.
16. Install the new brake disc and the removed parts in the reverse order of removal. At the same time, do not forget to lock the bolts securing the guide pads by bending the locking lugs of the casing.
Before installing the disk, thoroughly clean the mating surfaces of the hub and disk from rust and scale, since even the smallest particle sandwiched between them will cause the disk to beat and vibrate during braking.
To press in the studs, you can use the wheel nuts. Screw them onto the ends of the studs through spacers (for example, you can use larger nuts) and tighten them evenly in a cross pattern until the studs are completely pressed into the disc and hub.
Installing ventilated discs
Installing ventilated mechanisms is one of the simplest modifications to the Chevrolet Niva. Ventilated discs more effectively dissipate the heat generated during braking. They are also larger in diameter, which allows them to cool faster and improve braking. They are very effective when braking from high speeds. Under these conditions, a conventional mechanism overheats, the car begins to rattle and the brake “fails.”
Replacing the rear brake pads of a Niva Chevrolet is not necessary - they are changed only when there are signs of wear. The installation process is similar to installing regular disks. The whole job will take about an hour.
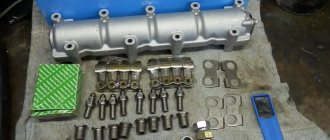
20.8. Disassembling the front brake mechanism
We hang and remove the front wheel.
Using a 10mm socket, unscrew the bolt securing the hose guide brackets...
...and remove the guides.
Using a 14mm socket, unscrew the bypass bolt of the brake hose of one circuit.
We remove the hose with the bypass bolt.
The hose fitting is sealed on both sides with copper washers.
Similarly, disconnect the brake hose of the other circuit.
Remove the cylinder block with the brake caliper (see Replacing the front brake pads).
We take out the brake pads.
Clamping the brake caliper in a vice with soft metal jaw linings, use a drift to remove the cylinder block retainer.
At the same time, we recess the cylinder block retainer with a rod with a diameter of 3–4 mm and, hitting the cylinder block with a hammer with a plastic striker, we begin to move the block along the guides of the brake caliper.
After moving the cylinder block by 1.5–2.0 mm, remove the rod. Using a hammer with a plastic striker or mallet, knock out the cylinder block from the caliper guides.
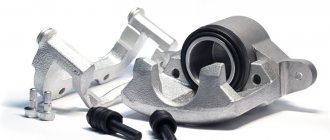
Cylinder block and brake caliper.
We remove the retainer and its spring from the socket of the brake cylinder block.
The retainer fits into the caliper hole and limits the movement of the cylinder block.
We assemble and install the front brake mechanism in the reverse order.
To facilitate assembly, use a file to remove the chamfers from the guides of the cylinder block.
Having sunk the latch into the block socket, insert the block into the grooves of the caliper. Using a hammer with a plastic striker, hammer the cylinder block until the retainer fits into the caliper hole. To remove the shoe guide...
...remove the upper clamping lever in the same way as the lower lever (see Replacing the front brake pads).
Using a 10mm socket, unscrew the bolt securing the front casing to the pad guide.
Using a chisel, loosen the two bolts securing the shoe guide to the steering knuckle.
Using a 17mm wrench, unscrew the bottom bolt.
It is more convenient to unscrew the top bolt with a head.
Remove the front cover...
...and the pad guide.
The brake disc and its protective casing can be dismantled only after removing the hub (see Replacing the hub bearings). When tightening the bypass bolts, note that the position of the brake hoses is determined by the guide brackets. We carry out the assembly in the reverse order and bleed the brake system (see Bleeding the brakes).
Copyright © 2007-2020 All rights reserved. All trademarks are property of their respective owners.
The procedure for replacing brake discs on a Niva:
First, jack up the car and unscrew all 5 wheel nuts:
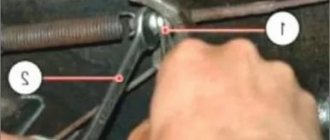
Then you will need to remove the brake pads. To do this, you will need pliers to remove the cotter pin from the clamp rod:
And again, use pliers to pull the rod outward to remove the caliper fixing plate. After this, lift the caliper up and remove the pads:
Then we take a 13mm wrench and unscrew the two bolts that secure the bracket, after spraying them with WD-40 lubricant.
And we remove the bracket from the brake disc with a slight movement of the hand, since nothing else holds it.
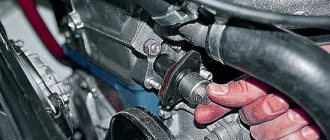
Before proceeding to the hub nut, first pry off the protective chrome cap with a screwdriver; you can even do this with light blows of a hammer on the end:
Now we take the knob and head and unscrew the hub nut, as shown in the photo below:
And after that, we freely remove the brake disc along with the hub from the seat from the CV joint:
Next, you can knock out the studs from the outside to the inside by lightly tapping them through a wooden spacer and disconnect the brake disc from the hub. To replace it, we take a new one and the installation order should be the reverse of the order in which all parts were removed.
Niva repair manuals: replacing the brake disc
You will need: keys “10”, “14”, “17”, “27” (preferably a head with a strong knob), pliers, drift, screwdriver, chisel, hammer.
1. Remove the wheel.
2. Remove the bolt securing the lower brake shield.
3. Use a chisel to bend the locking lugs of the front brake shield.
4. Remove the upper and lower bolts securing the front brake shield and brake pad guide.
5. Remove the front brake shield.
6. Remove the brake caliper assembly with the guide...
7. ...and hang it on a wire, while making sure that the brake hoses are not twisted or too tight.
8. Remove the hub protective cap.
9. Unlock the hub nut.
10. While holding the hub from turning with a suitable wrench, unscrew the nut.
11. Remove the flare nut.
12. Remove the brake disc and hub assembly.
13. Screw the nuts onto the studs so as not to damage the threads of the studs, and knock out the studs.
14. Hit the edge of the hub with a hammer.
15. . Disconnect the hub and brake disc.
16. Install the new brake disc and the removed parts in the reverse order of removal. At the same time, do not forget to lock the bolts securing the guide pads by bending the locking lugs of the casing.
Before installing the disk, thoroughly clean the mating surfaces of the hub and disk from rust and scale, since even the smallest particle squeezed between them will cause the disk to beat and vibrate during braking.
HELPFUL ADVICE
To repress previously pressed out studs, you can use the wheel nuts. Screw them onto the ends of the studs through spacers (larger nuts can be used as spacers) and tighten evenly crosswise until the studs are completely pressed into the disk and hub.
Replacing wheel bearings and brake discs
Replacing wheel bearings and brake discs
Post by muzolya » Mar 20, 2010, 4:02 pm
Hello everyone again)
I will change Thor. Disks.
1 — Tell me what difficulties and problems may arise?
2 — Will it be necessary to touch the wheel bearing?
Re: Changing brake discs.
Posted by ALK » Mar 20, 2010, 9:50 pm
replacing bearings... note that the disc is simply knocked off the hub. those. If you do not unscrew the hub nut, you can knock the disc off the bolts. however, I am not saying that this is how it should be done
Who knows what's going on behind the fence of the zoo? ©
Re: Changing brake discs.
Post by muzolya » Mar 20, 2010, 10:38 pm
Re: Changing brake discs.
Post by Suicide » March 21, 2010, 00:37
Re: Changing brake discs.
Post by ALK » March 21, 2010, 00:42
Who knows what's going on behind the fence of the zoo? ©
Re: Changing brake discs.
Post by muzolya » Mar 21, 2010, 02:06
Re: Changing brake discs.
Post by Suicide » March 21, 2010, 02:57
There are conical bolts. You can knock it inside the disk. But to push a week out of there =) Although, if they try REALLY hard so that not a single one fails..
For example, pull it off with a puller ala for brake drums, then carefully put a new one in place and press it in with nuts.
If you try without taking it apart, then yes.
And so, you put the car on supports, unscrew the ball and steering rods, the hub nut, take out the knuckle, hub, CV joint, knock out the disk... put everything back and adjust the bearings...
Re: Changing brake discs.
Post by Pilot » March 21, 2010, 03:12
Re: Changing brake discs.
Post by Suicide » March 21, 2010, 03:17
Re: Changing brake discs.
Post by Captain » Mar 21, 2010, 04:38
Re: Changing brake discs.
Post by muzolya » Mar 21, 2010, 04:47
Re: Changing brake discs.
Post by Captain » Mar 21, 2010, 04:58
Re: Changing brake discs.
Post by Suicide » March 21, 2010, 05:28
Re: Changing brake discs.
Post by Zhora » March 21, 2010, 1:23 pm
Re: Changing brake discs.
Post by Pilot » March 21, 2010, 2:36 pm
Suicide 1 nut that always unscrews or 3 bolts that always turn sour, which you have to install new ones every once in a while. Captain It's not very convenient to twist those bolts. Well, to me anyway. And so the head is high and normal. Again, they are secured by bending the plate. And here business is 1 minute extra.
Suicide Zhora I wrote it, with a sledgehammer on the lever. With 2-3 hits, anyone will pop up. Let’s not touch the ball anyway!
PS: 2 years of work in the service teaches you to do everything quickly, and not oh! with all sorts of nuts, washers and groovers with a diameter of 8 mm.
Re: Changing brake discs.
Post by Portada » Mar 21, 2010, 2:40 pm
Which APs should be used for replacement?
Now the time has come to change the TD, but the car owner does not have the money to go to a service center or he does not trust those who work in one service station for the entire small town. In this case, the car owner, if he is not too lazy, can replace the brake elements himself. The main thing is to buy original TDs.
Attention! If original brake discs are not available in auto stores in your city, then you can always order them from an online store, auto mechanics advise.
Article numbers of original brake discs on Niva Chevrolet:
- 21210-3501070-01;
- 21210350107001;
- 2121-3501070-01.
Knowing the TD article number, model and engine size of the Niva, you can select the necessary original brake elements.