In January, AVTOVAZ announced the start of sales of the updated LADA 4×4. The new SUV received a completely new instrument panel with a new climate system, more comfortable seats, the Era-GLONASS system, a number of styling and technical improvements, as well as an improved noise and vibration insulation package on the body panels. Let's find out how much quieter and more comfortable it has become in the interior of the updated Lada 4×4.
An expert from the magazine “Behind the Wheel” compared the noise level inside the cabin of the new Lada 4×4 2021 and the Lada 4×4 of the previous generation (generation).
How harmful is noise?
Noise surrounds us almost everywhere, most often we simply do not notice it, however, increased levels can be harmful:
- Noise is considered to be any extraneous sounds that reach your ears.
- Increased noise irritates and distracts the driver, causing rapid fatigue
- Fatigue and irritation often lead to accidents
- In addition, the driver’s reaction is reduced, which is associated with great risk on the road.
- Prolonged exposure to increased noise leads to a narrowing of blood vessels throughout the body.
- This can lead to headaches and increased blood pressure, as there is an increased load on the heart.
- Prolonged stress on the heart causes angina and even heart attack
- So noise is not just an annoying interruption to conversation or music, it is harmful to your well-being and health.
Standard soundproofing of the luggage compartment
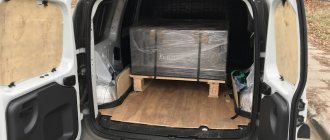
Almost the entire floor of the luggage compartment, including the back of the rear seat, is covered with finishing material such as carpet. The material is quite durable, easy to clean, and looks good. See photo below.
After dismantling the fastening elements from the back of the rear seat and removing the top layer, the following picture opens:
As you can see in the photo above (left), most of the luggage compartment floor is covered with a sound-proofing mat (felt laminated on top with a protective synthetic material) with a total thickness of approximately 15 mm. The photo on the right shows the inside of the mat. As an owner, this only made me happy. After this layer of sound insulation was removed, it turned out that the entire floor of the luggage compartment was covered with mastic, which was used as vibration insulation. Shown in the photo below.
It should be noted that the layer of mastic is not very large, about 1 - 1.5 mm. It covers the entire trunk floor, including under the overhead parts. The rust on the attachment part is due to my own oversight.
Thus, it can be noted that, in general, the factory sound insulation of the luggage compartment floor is made with high quality, using various vibration and noise insulating materials, and is a fairly solid three-layer “pie” (mastic, felt, carpet).
Taking into account the price range of this car, I think that not all budget foreign cars can boast of such insulation.
Now about what I was not happy with in terms of sound insulation in the luggage compartment. In order of importance:
Complete lack of vibration and noise insulation of arches, one of the main sources of noise. The photo below shows painted metal both on the arch itself and on the sides of the body and rear side members.
From the point of view of the effectiveness of vibration isolation of the trunk floor, the use of only mastic in the specified amount is more likely to be an anticorrosive agent than a vibration protection.
The factory-installed sound insulation (felt mat), although it covers most of the trunk floor area, is still not completely.
Based on what I saw (during operation, there seemed to be no obvious need to improve the sound insulation of the floor) I decided that additional sound insulation of the VAZ was required with my own hands. Below I will describe my procedure.
The following insulating materials were used for the work:
- Vibroplast Gold (StP)
- Vizomat MP (StP)
- Accent 15 LM KS (StP)
- Splen 3004 (StP)
- Stroyizol SD 90
- Adgilin.
In addition, the following tools were useful:
- Construction hair dryer (Professional, heating up to 350 degrees C, V = 3 speeds, P = 2.1 kW, U = 230 V)
- Tape measure, ruler, square
- Installation tools: scissors, knife, mounting tool, awl, screwdrivers, wrenches, etc.
Materials for work
Today, in pursuit of savings, many glue batting, linoleum or cheap building materials, without thinking that the absorption of sound and vibrations in such materials is extremely low, and toxicity can be high.
To perform the work, choose the following materials:
- Vibration absorber - created to dampen vibrations, its plastic structure converts vibration energy into heat, the basis of such materials is bitumen. However, this does not mean that construction bitumen is an equivalent replacement (Bimast or Vibroplast)
- Vibration reflector is a material that completely reflects all noise in the opposite direction (Splen); it can be offered as a noise absorber. If you are not planning on acoustics in the cabin and you don’t need a radio either, then this material is suitable for processing inside your cabin, otherwise take a sound absorber
- Sound absorber - the structure of this material dissipates noise, as if absorbing it (Accent, felt)
- Additional materials – Decolin – purely for decorative purposes, Madeline – muffles squeaks from friction of surfaces, Viek – aluminum foil, can be useful when processing doors
Sound insulation of the roof of Lada Niva (Lada Niva)
1st Layer.
The entire roof surface between the stiffening ribs is covered with
Shumoff M2 vibration insulation.
2nd Layer.
A thick noise and heat insulator
Practik Base 8 . 3rd Layer.
Plastic parts are covered with anti-squeak material.
We put on new gloves, take a clean tool and start disassembling the roof.
The roof is guaranteed to remain in its original, clean form and without any traces of disassembly.
We dismantle the standard sound insulation
We degrease the entire surface of the roof and begin installing the first layer.
For the first layer we use Shumoff M2 vibration isolation.
We glue it between the stiffening ribs and roll it carefully to avoid moisture or air getting into the poorly rolled areas, which can cause corrosion.
This layer will completely eliminate noise from rain and hail inside the car.
We degrease the surface, after which we glue a thick noise and heat insulator Practik Base 8 on top of the vibration insulation as a second layer.
Carefully roll the material with a plastic roller.
This layer will significantly improve the thermal insulation of the entire cabin.
Details about sound insulation
Sound insulation of the hood
The hood is the easiest part of the car to work on and the easiest place for beginners to practice:
- Open the hood, remove the factory insulation from the lid, if any.
- Then wash the surface thoroughly
- After drying, degrease, if you find rust, then you need to clean it, prime the metal and paint, otherwise corrosion will continue
- The first layer is vibrating material: cut out a piece, remove the film, warm it up, then apply it and roll it with a roller
- There is no need to glue the stiffeners, photo below
Vibration insulation treatment of the hood
- Now we degrease the surface again and stick on a sound reflector (for example, Splen), only in one single piece, covering the entire surface of the hood cover and the stiffeners too.
- It is better to use foil material, it is more resistant to high temperatures.
- In addition to sound reflection and, as a result, noise reduction, Spleen will also be a heat insulator, which will be very useful in winter (the engine warms up faster and cools down more slowly).
- In addition to the hood cover (see Soundproofing the hood without problems), the partition between the engine and the passenger compartment, the so-called engine shield, must be subjected to the same treatment.
- The main vibration and most of the engine noise pass through it, so you understand, it is impossible to exclude its processing
Roof
First, remove the ceiling trim with your own hands, to make it easier for you, call an assistant, then:
- Clean and wash the surface
- After this, degrease
- It is better to stick the vibration absorber with an assistant, so that he holds the material while you roll this material.
- It is recommended to take a thinner vibration and noise absorber for the roof - vibration material 2-3 millimeters thick, a noise absorber no thicker than five millimeters
- If you heavily weight the ceiling, the roof of the car may bend into the cabin
Cornfield ceiling with trim removed
- The order of gluing is the same as on the hood: vibration absorber, then sound absorber and return the trim to the ceiling; it’s easier and neater to do this with two people, without creases in the trim.
Salon
Niva sound insulation of the interior is probably the most difficult area and it takes a lot of time to process; it is better to allocate a whole day for this work:
- This is where all the tools come in handy - you need to unscrew all the seats, then remove the rugs and floor trim
Important: Collect the fasteners in a box or jar so as not to lose them, and do not seal the fastening holes during processing, otherwise it will be difficult to assemble the interior.
- It is important to eliminate rust: clean, prime and paint, the surface needs to be washed, the bottom is the dirtiest place
- Then degreasing
- The vibration absorber here can be placed 5-6 millimeters, and the noise absorber 10 millimeters
- The vibration absorber is placed on the wheel arches in two layers
- Then comes the assembly of the interior
Niva interior treated with vibration absorber, then noise absorber
Door processing
The instructions for processing all doors are the same:
- First, unscrew all the handles, panels and remove the trim
- Then degrease the surface through the technological holes; it is recommended to work with cloth gloves so as not to scratch your hands
- Insert the vibrating material in pieces through the same holes, roll it with a roller, if this is not possible, roll it with the handle of a hammer or a large screwdriver
- After gluing, check the proper operation of the window lift cables and handle rods so that they do not jam
Gluing the door panel with vibrating material
- Then these same holes are sealed. You can use a vibration absorber, you can use “Viek” - this foil was mentioned at the beginning of the article
- After processing the door should look like this:
Door after sealing technological holes
- Then the sound absorber is glued on top in a solid piece; it is also recommended to glue the sound absorber to the inside of the skin
- Along the edges of the door, where the trim comes into contact with the metal, you need to stick Madeleine, and around the handles too. Most of the squeaks should go away
- After that, screw the casing back, and don’t forget the handles
Basic moments
Niva is very noisy
Do-it-yourself soundproofing of the Niva is carried out using special materials:
- foamed noise-insulating open-cell material with a protective aluminized film, the thickness of which is 12 mm - this material reduces the noise of the Niva from the outside and has a low thermal conductivity coefficient. The noise absorption coefficient can reach 95% in the range of 1000 Hz - 2000 Hz,
- vibration-damping bitumen material with protective aluminum foil, the thickness of which is 2 mm. This material is resistant to aggressive environments,
- vibration-damping bitumen laminate - this is the most effective material from the Noisebuster range, the thickness of which is 4 mm,
- bituminized cardboard with a special vibration-damping layer, 1.5 mm thick,
- vibration-damping bitumen laminate, 2 mm thick.
Do-it-yourself soundproofing of the Niva 21213 interior is done using some tools: scissors, ruler, level, marker or chalk, glue, hand gloves and others.
It should be noted that during the operation of the Niva 2121, 21213 and 21214, the issue of sound insulation quality is transformed into the problem of thermal insulation of the interior of these models. This is explained by the long heating of the interior in the winter and poor air conditioning in the summer.
Hood treatment
Soundproofing of the Niva begins with finishing the hood, since this is the simplest design. The stages of work are given below:
- open the hood, remove the standard insulation;
- thoroughly wash the surface;
- the dry cover is degreased, areas with corrosion are cleaned, primed, and painted;
- Initially, the vibromaterial is laid (a piece is cut to size, the film is removed, the material is heated, applied in place and rolled with a roller);
- degrease the surface again, glue the sound reflector so that a single piece covers the entire part of the hood, including the stiffeners;
- many recommend using special foil because it is more temperature resistant;
- The engine partition (the shield between the engine and the passenger compartment) is treated in the same way.
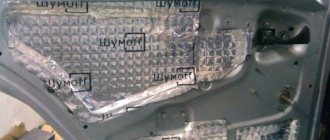
Sound insulation of NIVA interior
Sound insulation of the floor in Niva - tunnel, engine partition
I didn’t really like my native Shumka. I remove it and send it to the landfill.
The factory Shumka turned into such rubbish in six months. It all fell apart and was soaked in water. This piece was located along the driver's feet. he got the most out of life. If he had lain there for another year, there would definitely be frogs in the car. I throw it away without any doubt or regret
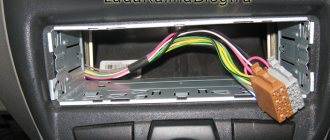
The dashboard was dismantled without much effort. Considering that I did this for the first time in my life.
Based on the remnants of threads from the original Shumka sticking to the body, we can draw a conclusion about its quality and application technology.
Gutted. It probably took 1.5 or 2 hours for all the work. Removing seats and other small items.
The process has begun. The material is SGM 2.3mm (the same as STP standardplast) convenient and practical. Vibration filter. 8mm SPLEN will be glued on top of it.
The process is underway. And ahead is the covering of the rear space. It will probably be very tedious and dreary. And today I am no longer strong and want to sleep. I managed to disassemble and cover everything with vibroplast except the torpedo.
Closer. The tunnel will be glued with another layer of SGM 2.3mm, since the store has run out of special Vizomat (the same SGM only thicker. Special material for particularly noisy areas of cars
It’s like gluing wallpaper in an apartment - it’s quick and convenient on smooth walls, but in corners and behind all sorts of radiators you have to fiddle around, squirming. You'll have to tinker with these tight spots. Stick pieces of caresses into all the curves.
Pasting Splen 8mm. Hn turned out to be not a very pliable material. You need to glue it right away - on the first try. Then you can’t tear it off, unlike 4mm splen - it doesn’t stretch across the surface at all. Most likely because it is glued together from two 4mm sheets, like a wafer, and not monolithic. I tried to sculpt it on flat surfaces, and, of course, on a tunnel.
I hope that the invested forces will live up to expectations, at least by 15 percent, reducing the audibility of the sonorous songs of the handout.
Well, it looks like it's ready. Without going into details, all that remains are the doors and the roof.
Sound insulation of doors and trunk lid
Well, in general, I finally found a garage where I can work on the Shumka Niva.
Since I already said I won’t invest a lot in the car, that’s why I kept the noise to a minimum:
● Doors in 2 layers: 3 sheets of STP (2m), a little bitoplast (contact points). ● Rear trunk door and trim: 4 sheets of STP (2m), 2 sheets of splen 4rka and bitoplast in contact areas.
First I covered it with stp, and then I decided to add 1 more layer of stp and 1 layer of splen up.
There were problems with Movil, namely the doors and trunk were treated very heavily with Movil, I had to wash Movil with white spirit. But in the corners I did not wash the movil and tried not to glue the seams on the movil.
Soundproofing NIVA - removing “crickets” with bitoplast
So, in the fall the floor tunnel was noisy: Vibration insulation - STP Bimast Bomb, Noise insulation - Splen 8mm in two layers. The doors were also made: Vibration insulation - STP Vibroplast Gold, Noise insulation - Splen 8mm. And floor: Vibro-STP Vibroplast Silver, Noise-Splen 8mm.
The effect was good! The door rattling disappeared and the acoustics sounded much richer. There was only one minus - there was no need to throw out the standard Shumka (I can’t say now why I threw it away), it would have been even better).
The main question that haunts us is: “Why do people use Spleen for sound insulation?”
I have come across a lot of posts here on Drive and on YouTube, a bunch of videos and guides on the topic of sound insulation - in most cases, people limit themselves to vibration isolation and put splen on top and call it sound insulation...
After all, it is a heat insulator, not a sound absorber.
No, it would be fine if the goal was to insulate the car... But for sound insulation.
In short, I was also wrong... and it was necessary to correct my mistakes.
To begin with, the following materials were purchased: - Vibroplast Vikar Premium 1.6mm - 11 sheets. — SPLEN 4 mm — 10 sheets. — Bitoplast MA15 K Gold — 6 sheets. — Hermeton 30 mm — 1 sheet.
Then, with the help of my friends, they gutted the car:
Then everything inside was washed from centuries-old dust and degreased with gasoline and acetone.
A layer of 8mm Splen was removed from the floor tunnel and a sheet of Hermeton 30mm was installed (!) This is what I understand - a sound absorber!
Touching him is a pleasure, by the way
The entire Spleen was also torn off from the door cards, its place was taken by Bitoplast MA15 K Gold. The cards were completely covered with it. Naturally, they won’t come back after such an upgrade. A handful of self-tapping screws and a screwdriver corrected the situation, the door cards are now firmly seated and do not even have a single chance to creak)) The doors close with a dull sound, which is quite unusual
This is what the door looks like from the inside at the moment.
Riddle - find 10 screws
Bitoplast itself has a similar structure to sealant
Further, the same material was used to cover all the plastic trims in the cabin: the rear side trims, the trims at the driver’s and passenger’s feet, and the trunk door trim.
The tailgate trim is clearly visible
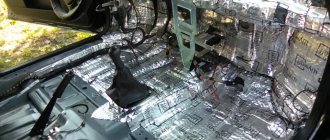
After working out the mistakes, we began vibration isolation of the remaining part of the cabin.
A little imagination, creativity and work with a construction hairdryer.))
4mm splen and standard sound insulation were laid on top of the Vibra.
At the subwoofer's place of residence, Bitoplast was also laid, it was also tightly screwed with self-tapping screws to the casing and the rod on which it lies.
The box, however, does not look marketable - it will be covered with carpet, the vinyl did not justify itself...
The trunk door was also completely soundproofed.
What we have as a result: - Nothing creaks anywhere, at all. All the crickets were smoked out... to be honest, there was a trunk full of them...)) - It became quieter inside... quieter than after the first attempt at soundproofing. — A noticeable fact is that now half the car does not play to the beat of the subwoofer. It's really nice to listen to music now. — With the music turned up to full volume and the car closed, NOT a single piece of hardware vibrates. Let’s not forget that this is a field, and, therefore, this fact speaks volumes. https://www.drive2.ru/l/288230376152114620/, https://www.drive2.ru/l/288230376152618809/, https://www.drive2.ru/l/4114540/
Interior tuning: replacing NIVA seats
Seats from Focus 2 for Niva Installing the driver's seat from Focus 2 in Niva Installation
Source: www.spike.su
What to do outside?
Noise insulation of the Chevy Niva or other modifications will be incomplete if you ignore the treatment of the outer part of the bottom. This is due to the fact that various sounds and noises pass through this element, including vibration of the transmission unit, operation of the muffler, and the ingress of road stones.
The specified part of the machine is processed by standard application of layers of material or by applying liquid noise insulation. In any case, you will need an overpass or a garage pit.
- The surface of the bottom of the car is washed with a directed stream of water under pressure.
- After drying, degreasing is carried out.
- Next, glue the prepared pieces of materials according to the instructions, or spray liquid “Shumka”.
- The second option is preferable because it is easier to apply to hard-to-reach places and has a longer service life.
- In addition, the liquid composition is significantly lighter than the sheet components, although more expensive. At the same time, the price will definitely pay off in the final quality.
After proper treatment of all parts of the car, the audibility of the rustling of tires, the knocking of stones, and the operation of the transmission and engine will disappear. Plastic fender liners, if available, are glued along the internal contour with a noise reflector of the “Spleen” type.
Source: newniva.ru
What makes the most noise in the field?
The car is noisy in almost every way. In the cabin you can hear the rumble of trim elements, the panel and the sound of the engine, which still has the unpleasant knock of the valve mechanism from the classics. The engine is especially loud in the summer, and if you drive with the windows open, it can sometimes be very annoying.
Another noisy part of the car is the arches. Fender liners are not standardly installed on these cars. The dealer offers them as extras. equipment. But the worst thing is that a good echo is created inside the arches, which appears during the noise of the tires on the track. However, this problem is not only Niva.
The noisiest part of the Niva is the transfer gearbox. It is responsible for changing gear ratios to higher and lower ones. The transfer case on the Niva is very noisy, and this is felt most of all on the highway.
Sound insulation of NIVA interior
Sound insulation of the floor in Niva - tunnel, engine partition
I didn’t really like my native Shumka. I remove it and send it to the landfill.
The factory Shumka turned into such rubbish in six months. It all fell apart and was soaked in water. This piece was located along the driver's feet. he got the most out of life. If he had lain there for another year, there would definitely be frogs in the car. I throw it away without any doubt or regret
The dashboard was dismantled without much effort. Considering that I did this for the first time in my life.
Based on the remnants of threads from the original Shumka sticking to the body, we can draw a conclusion about its quality and application technology.
Gutted. It probably took 1.5 or 2 hours for all the work. Removing seats and other small items.
The process has begun. The material is SGM 2.3mm (the same as STP standardplast) convenient and practical. Vibration filter. 8mm SPLEN will be glued on top of it.
The process is underway. And ahead is the covering of the rear space. It will probably be very tedious and dreary. And today I am no longer strong and want to sleep. I managed to disassemble and cover everything with vibroplast except the torpedo.
Closer. The tunnel will be glued with another layer of SGM 2.3mm, since the store has run out of special Vizomat (the same SGM only thicker. Special material for particularly noisy areas of cars
It’s like gluing wallpaper in an apartment - it’s quick and convenient on smooth walls, but in corners and behind all sorts of radiators you have to fiddle around, squirming. You'll have to tinker with these tight spots. Stick pieces of caresses into all the curves.
Pasting Splen 8mm. Hn turned out to be not a very pliable material. You need to glue it right away - on the first try. Then you can’t tear it off, unlike 4mm splen - it doesn’t stretch across the surface at all. Most likely because it is glued together from two 4mm sheets, like a wafer, and not monolithic. I tried to sculpt it on flat surfaces, and, of course, on a tunnel.
I hope that the invested forces will live up to expectations, at least by 15 percent, reducing the audibility of the sonorous songs of the handout.
Well, it looks like it's ready. Without going into details, all that remains are the doors and the roof.
Sound insulation of doors and trunk lid
Well, in general, I finally found a garage where I can work on the Shumka Niva.
Since I already said I won’t invest a lot in the car, that’s why I kept the noise to a minimum:
● Doors in 2 layers: 3 sheets of STP (2m), a little bitoplast (contact points). ● Rear trunk door and trim: 4 sheets of STP (2m), 2 sheets of splen 4rka and bitoplast in contact areas.
First I covered it with stp, and then I decided to add 1 more layer of stp and 1 layer of splen up.
There were problems with Movil, namely the doors and trunk were treated very heavily with Movil, I had to wash Movil with white spirit. But in the corners I did not wash the movil and tried not to glue the seams on the movil.
Soundproofing NIVA - removing “crickets” with bitoplast
So, in the fall the floor tunnel was noisy: Vibration insulation - STP Bimast Bomb, Noise insulation - Splen 8mm in two layers. The doors were also made: Vibration insulation - STP Vibroplast Gold, Noise insulation - Splen 8mm. And floor: Vibro-STP Vibroplast Silver, Noise-Splen 8mm.
The effect was good! The door rattling disappeared and the acoustics sounded much richer. There was only one minus - there was no need to throw out the standard Shumka (I can’t say now why I threw it away), it would have been even better).
The main question that haunts us is: “Why do people use Spleen for sound insulation?”
I have come across a lot of posts here on Drive and on YouTube, a bunch of videos and guides on the topic of sound insulation - in most cases, people limit themselves to vibration isolation and put splen on top and call it sound insulation...
After all, it is a heat insulator, not a sound absorber.
No, it would be fine if the goal was to insulate the car... But for sound insulation.
In short, I was also wrong... and it was necessary to correct my mistakes.
To begin with, the following materials were purchased: - Vibroplast Vikar Premium 1.6mm - 11 sheets. — SPLEN 4 mm — 10 sheets. — Bitoplast MA15 K Gold — 6 sheets. — Hermeton 30 mm — 1 sheet.
Then, with the help of my friends, they gutted the car:
Then everything inside was washed from centuries-old dust and degreased with gasoline and acetone.
A layer of 8mm Splen was removed from the floor tunnel and a sheet of Hermeton 30mm was installed (!) This is what I understand - a sound absorber!
Touching him is a pleasure, by the way
The entire Spleen was also torn off from the door cards, its place was taken by Bitoplast MA15 K Gold. The cards were completely covered with it. Naturally, they won’t come back after such an upgrade. A handful of self-tapping screws and a screwdriver corrected the situation, the door cards are now firmly seated and do not even have a single chance to creak)) The doors close with a dull sound, which is quite unusual
This is what the door looks like from the inside at the moment.
Riddle - find 10 screws
Bitoplast itself has a similar structure to sealant
Further, the same material was used to cover all the plastic trims in the cabin: the rear side trims, the trims at the driver’s and passenger’s feet, and the trunk door trim.
The tailgate trim is clearly visible
After working out the mistakes, we began vibration isolation of the remaining part of the cabin.
A little imagination, creativity and work with a construction hairdryer.))
4mm splen and standard sound insulation were laid on top of the Vibra.
At the subwoofer's place of residence, Bitoplast was also laid, it was also tightly screwed with self-tapping screws to the casing and the rod on which it lies.
The box, however, does not look marketable - it will be covered with carpet, the vinyl did not justify itself...
The trunk door was also completely soundproofed.
What we have as a result: - Nothing creaks anywhere, at all. All the crickets were smoked out... to be honest, there was a trunk full of them...)) - It became quieter inside... quieter than after the first attempt at soundproofing. — A noticeable fact is that now half the car does not play to the beat of the subwoofer. It's really nice to listen to music now. — With the music turned up to full volume and the car closed, NOT a single piece of hardware vibrates. Let’s not forget that this is a field, and, therefore, this fact speaks volumes. https://www.drive2.ru/l/288230376152114620/, https://www.drive2.ru/l/288230376152618809/, https://www.drive2.ru/l/4114540/
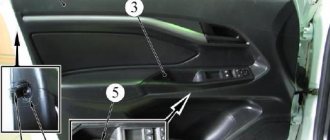
Standard soundproofing of car rear doors
After removing the plastic door trim, you can see what the factory has done in terms of soundproofing the doors.
The photo shows the factory sound insulation of the rear door, or to be precise, its almost complete absence. In detail: the dustproof film (black PE film) is covered in cuts and holes, it is attached to the door with adhesive tape, literally in three places. There is simply no need to talk about quality protection. It immediately became clear why the wind was blowing in the cabin. The vibration protection layer is quite large in area and is applied in the central part of the door. Shown in the photo below.
Conclusion: simple and clear. Sound and heat insulation of car doors is mandatory.