What is a rear stabilizer
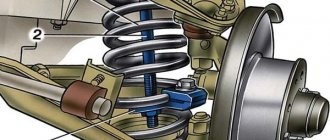
The rear stabilizer for the VAZ 2107 is a curved C-shaped rod installed next to the rear axle of the “seven”. The stabilizer is attached at four points. Two of them are located on the rear suspension arms, two more on the rear side members of the “seven”. These fasteners are ordinary eyes with dense rubber bushings inside (these bushings are the weak point of the entire structure).
The rear anti-roll bar for the VAZ 2107 is a conventional curved rod with fasteners
Today you can purchase a rear stabilizer and fasteners for it at any spare parts store. Some drivers prefer to make this device themselves, but this is a very labor-intensive process that requires certain skills that a novice car enthusiast simply does not have. That is why the replacement of bushings on a finished stabilizer will be discussed below.
Purpose of the rear stabilizer
The anti-roll bar on the “seven” performs two important functions at once:
- this device gives the driver the opportunity to control the tilt of the car’s chassis, while the force acting on the camber of the rear wheels practically does not increase;
- After installing the stabilizer, the tilt of the suspension between the axles of the car changes significantly. As a result, the driver is able to better control the car;
- The improvement in car control is especially noticeable on sharp turns. After installing the stabilizer, not only does the lateral roll of the car during such turns decrease, but you can also take them at a higher speed.
About the disadvantages of the rear stabilizer
Speaking about the advantages that the stabilizer provides, one cannot fail to mention the disadvantages that also exist. In general, the installation of a stabilizer still remains the subject of fierce debate among car enthusiasts. Opponents of installing stabilizers usually justify their position with the following points:
- Yes, after installing the rear stabilizer, lateral stability increases significantly. But this is a double-edged sword, since it is the high lateral stability that makes it much easier for the car to skid. This circumstance is good for those who engage in so-called drifting, but for an ordinary driver who finds himself on a slippery road, this is completely useless;
- If a car enthusiast decides to install a rear stabilizer on his “seven”, then he is strongly recommended to install a front one, and not a regular one, but a double one. This measure will help prevent excessive loosening of the car body;
- The cross-country ability of a car with stabilizers is reduced. On sharp turns, such a car often begins to cling to the soil or snow with its stabilizers.
It is easy to notice that the ground clearance of a VAZ 2107 with a stabilizer decreases, which affects cross-country ability
Thus, a driver who is thinking about installing stabilizers should weigh all the pros and cons as carefully as possible, and only after that make a final decision.
Purpose and design of the unit
VAZ 2101-07 cars use a front stabilizer, whose task is to distribute the load on the chassis when turning, keeping the car in a horizontal position. Without it, under the influence of various forces, the car body will begin to tilt strongly to one side, which, even at average speed, can lead to a coup.
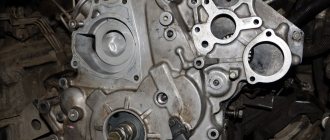
The main part of this unit is a long rod, shaped like the Latin letter U and made of steel with increased elasticity. Car springs are made from the same steel. The ends of the VAZ 2106 stabilizer are attached to the lower arms, and the middle part is attached to the front part of the body. The node consists of the following elements:
- barbell;
- mounting bracket - 6 pcs.;
- rubber bushings - 4 pcs.
At the points of attachment, rubber bushings are put on the rod, covered by brackets in the form of brackets, attached to 2 bolts. Although there are only 4 mounting points for the anti-roll bar, there are 6 brackets, since two parts are used in 2 places. These parts have different heights, and in the opening there is a rubber bushing.
When driving in a straight line, the VAZ 2107's lateral stability link is practically inactive. When turning, one lever begins to pull the end of the bar up, the second - down.
Resisting torsion, the rod does not give much movement to the levers in different directions and thereby keeps the car in a horizontal plane.
Signs of a broken rear stabilizer
It’s not difficult to guess that something is wrong with the rear stabilizer of the VAZ 2107. Here's what's observed:
- a characteristic grinding or creaking noise, which is especially clearly heard when entering a sharp turn at high speed;
- a significant increase in vehicle roll when cornering and a decrease in controllability when cornering;
- the appearance of play on the stabilizer. Play can be easily detected by placing the car in an inspection hole and simply shaking the stabilizer bar up and down;
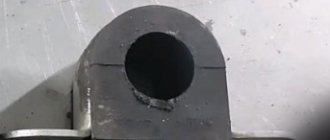
- destruction of bushings. The play mentioned above is almost always accompanied by the destruction of rubber bushings. They are squeezed out of their eyes, crack and completely cease to perform their functions.
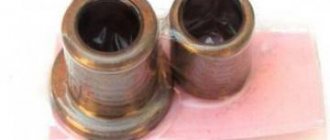
On the right is a worn stabilizer bushing, the hole in which is much larger than in the new bushing on the left
All of the above things indicate only one thing: it’s time to repair the stabilizer. In the vast majority of cases, repairing the rear stabilizer comes down to replacing damaged bushings, since the fasteners and rod rarely need repairs. Such a need may arise only in the event of serious mechanical damage, when the driver caught a large stone or curb with the stabilizer, for example.
How should the stabilizer be positioned?
A properly installed stabilizer should be able to twist under the influence of forces on the wheels, and it should do this even when the forces applied to the right and left wheels are directed at completely different angles.
On the "seven" rear stabilizers are installed only with rubber bushings
That is, stabilizers on passenger cars should never be directly welded to the frame; between the frame and the wheel mount there must always be some kind of intermediate link responsible for compensating for multidirectional forces. In the case of the VAZ 2107, such a link is dense rubber bushings, without which it is strictly not recommended to operate the stabilizer.
The stabilizer on the VAZ 2107 is usually attached at four key points
Why does the stabilizer bushing squeeze out?
As mentioned above, the bushings on the stabilizer serve to compensate for the forces on the wheels. These efforts can reach enormous values, especially when the car enters a sharp turn. Rubber, even of very high quality, systematically subjected to enormous alternating loads, inevitably becomes unusable. Severe frosts and reagents that are used to sprinkle roads in our country during icy conditions also contribute to the destruction of bushings.
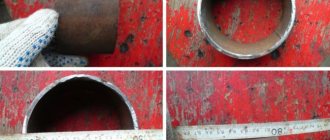
The rear stabilizer bushing is worn out, torn lengthwise and comes out of the clamp
It usually starts with cracking of the bushing surface. If the driver does not notice the problem in time, the cracks become deeper and the bushing gradually loses its rigidity. At the next sharp turn, this cracked bushing is squeezed out of the eye and does not return back to it, since the elasticity of the part is completely lost. After this, play appears on the stabilizer bar, the driver hears a creaking and grinding sound when entering a turn, and the car’s controllability decreases sharply.
About double stabilizers
Double stabilizers are installed only on the front wheels of the VAZ 2107. As the name suggests, there are already two bars in this device. They have the same C-shape and are located approximately four centimeters from each other. The mounting lugs in the double stabilizers are also paired. Otherwise, this design does not have any fundamental differences from the rear stabilizer.
Front stabilizers on the VAZ 2107 are usually made of two paired c-shaped rods
Why use two bars instead of one? The answer is obvious: to increase the overall stiffness of the suspension. The double front stabilizer copes with this task perfectly. But one cannot fail to note the problems that arise after its installation. The fact is that the front suspension on the classic “seven” is initially independent, that is, the position of one wheel does not in any way affect the position of the second. After installing a double stabilizer, this situation will change and the suspension will turn from independent to semi-independent: its working stroke will be significantly reduced, and in general the control of the car will become tougher.
Of course, the roll when entering turns with a double stabilizer will be reduced. But the driver should think: is he really ready to sacrifice personal comfort and cross-country ability of the car for the sake of its stability? And only after answering this question can you start working.
Node maintenance
During the operation of classic Zhiguli models, several malfunctions associated with stabilizing traction occur:
- wear of stabilizer bushings on VAZ 2107;
- breakage of the upper or lower pin on which the ends of the rod are screwed to the lever;
- separation of the U-shaped fastening strip welded to the lever at the factory.
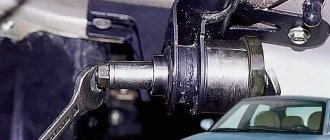
Broken studs are quite rare and are the result of metal fatigue. The malfunction is characterized by sharp rolls when turning, accompanied by loud metallic knocks. This unpleasant sound is produced by the released end of the rod clinging to the side of the lower arm. It’s quite easy to fix the damage, even while on the road in the middle of a field: a regular bolt and nut are put in place of the torn stud.
The fastening U-shaped strip of thick metal comes off very rarely. Which entails a labor-intensive process of replacing the lower arm, since welding it to the old one is useless, the part will very quickly break again. If any of these two troubles occur, it is possible to drive a car, but only very slowly, especially on turns.
The VAZ “classic” stabilizer bushings are replaced when they wear out approximately once every 20 thousand km. mileage Wear is clearly visible visually; you just have to look under the front of the car and make sure that the rubber bands are cracked and do not cover the traction properly. In advanced cases, bad bushings make themselves felt while driving, when the car sways and tilts dangerously.
To install new bushings, you will have to completely remove the VAZ stabilizer. It is most convenient to carry out work from the inspection hole, although if necessary, you can do without it. To disassemble and replace, you will need a pry bar, 2 13 mm wrenches and a powerful screwdriver. Replacement is carried out as follows:
- It is easiest to remove the rod when the springs are completely unloaded. Therefore, it is recommended to hang both front wheels of the car.
- Using a 13 mm wrench or socket, unscrew the nuts on all brackets.
- Using a pry bar, remove the brackets from the studs one by one.
- Remove the rod and use a sharp tool to mark the position of the old bushings, as well as the right and left sides.
- Old rubber bands can be cut off with a knife.
When finished, the rod must be thoroughly soaped (do not lubricate it with oil!) and new bushings must be tightened, and then the assembly must be assembled. When assembling, it is undesirable to confuse the right and left ends of the stabilizer, which is why marks were placed on them. In the end, you need to check the car while driving and go to a car service center to correct the wheel alignment of the front wheels.
Which stabilizer struts are best to choose?
Taking into account the fact that the stabilizer rod does not last long, many car enthusiasts seek to increase the service life of the part by searching for the best and most reliable options. In practice, it is important to understand that the service life of the rack is influenced by a large number of factors: the quality of the part, the model and make of the car, operating features and the condition of roads in the region, the general condition of the chassis, etc.
For example, the original on European roads may well last 50-60 thousand km, while in the CIS on bad roads the same part will last no more than 25-30 thousand km. At the same time, it is not always the case that an expensive “original” will necessarily last longer than high-quality analogues.
For this reason, stabilizer struts from Lemforder, CTR, SASIC or GMB can be distinguished. Moreover, for many models the mentioned companies supply parts to the assembly line. This means that buying analogues under your own brand allows you not to lose quality, but also not to overpay for the original.
The basic rule is that the parts must be branded (there are many fakes on the market), and also exactly suitable for a specific car model. Even the slightest change in length by 1-2 centimeters is not allowed when trying to install racks that at first glance may seem completely suitable. The fact is that such replacements will inevitably affect the operation of the entire suspension and the behavior of the car, and negatively.
Replacing stabilizer bushings
There is no need to remove the sway bar to replace the outer bushings. It is enough to remove the mounting brackets. Bracket connections are exposed to water and dirt. Therefore, in addition to a set of keys and a mount, you will need a tool that makes it easier to work with rusted threads. For example, WD-40.
The procedure for replacing the outer bushings is as follows:
- Treat the threads of the studs holding the brackets with an anti-rust agent.
- Unscrew the nuts and remove the brackets, remembering their location.
- Press the stabilizer up, inserting a pry bar between it and the lower arm.
Read more: How to clean a water tank
- Remove old bushings.
- Inspect the stabilizer at the bushing attachment points. If significant wear is noticeable, replace it with a new one.
- Put on new bushings.
- Install the brackets and tighten the nuts. It is better to tighten smoothly, in three stages, gradually increasing the force.
To replace the inner bushings, the anti-roll bar must be removed. To do this, you will have to unscrew the brackets at all four mounting points.