Launching the hidden - special functions of LADA Vesta
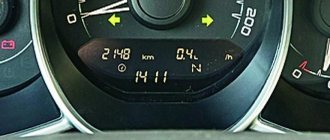
Lada Vesta is equipped with a modern on-board computer.
It has a small screen that is installed under the speedometer. Its purpose is to increase the efficiency of the power unit, synchronize and optimize the operation of units, reduce emissions and fuel consumption. The on-board computer displays the following data:
- parameters and standard settings;
- travel time, total mileage and mileage per trip;
- transmission, transmission prompter;
- costs and remaining fuel;
- clock, mains voltage, outside temperature;
- average speed, cruise control/speed limit indicators.
System settings allow you to navigate through the parameters and data of the car. The built-in trip computer has many necessary and useful functions that are not found in other machines. You can, for example, set the clock or open the bookmaker's secret menu. The onborder informs the driver about malfunctions.
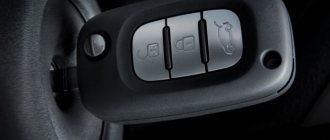
Changing the operating principle of the central locking
In the factory version, if you open the driver's door of a centrally locked car, the other 3 doors will also open. This is often used by criminals in parking lots and gas stations.
We propose to eliminate this shortcoming. You just need to activate the AntiHiJack function, and then when you open the driver's door from the inside, the others will remain closed. This will not create any inconvenience for passengers. The doors can be opened from the inside, but they will be locked from the outside.
Do these settings guarantee 100% protection for the car? No. But using a Lada Vesta configured in this way is much more comfortable and safer. This has already been confirmed by numerous car owners.
Activating hidden functions
DDT4all software is used, which transmits information from control units. Synchronization occurs when ELM327 is connected. This is a small adapter designed to work with the car system. Connection is made via Bluetooth or USB.
What is necessary
To scan a car you must perform the following operations:
- Python 2.7 and PyQt4 are installed (32/64 depending on the version of Python, depending on the version of Windows);
- install DDT4ALL (the program is constantly improving), unpack it to drive “C” in Python27\Scripts\ddt4all;
- install the latest DDT database and unpack it into the program installation folder;
- run ddt4all.py on the command line;
- In the main window, click search; after scanning is completed, blocks will be displayed on the left.
To install the software database, copy the special “ecus” directory from your database and move it to the root of the source code tree. After this, ddt4all.py is launched.
Connection and preparation for use
- You need to install DDT4ALL software on your computer, and connect the ELM327 transmitter to your car. In Vesta, the connector is located on the driver's side, closer to the door. It is located at the bottom of the dashboard.
- After starting the program, you need to select the COM port if the connection is via Bluetooth.
- Click “Connect”, after which a new window will open, where you need to click “Scan blocks” (button with a magnifying glass) and in the window that opens click “CAN”. You must wait while the program scans.
- After this, the blocks on the left side of the window are highlighted in green; below there will be a “Screens” menu, where the necessary actions are selected individually.
- Then, after selecting the required parameters, click the button with the image of Einstein on the top left (Expert mode) and click “Send”.
Launching the DDT4ALL program and working with it
Depending on the operating system, the application starts as follows:
- Application . Open “File” and click “Zip database”. Next you need to remove “ecus”.
- Terminal . Run “python parameters.py”, go to “zipconvert”. After that, move or delete "ecus".
- Linux . Write "python ddt4all.py".
- Windows . Run the file DDT4ALL.BAT.
Having written the “DDT2000 XML” file in the “JSON” format, it can then be edited. You can also create your own windows in the software, which will display ECU parameters.
Hidden menu MMC Lada XRAY
To exit to the “TEST MODE” menu you must:
- Open a window with the system version (Settings -> Scroll down -> System version).
- Consistently click on certain places on the radio screen.
- A dialog will appear in which you need to enter special codes that open access to the hidden capabilities of the system (for example, go to the desktop, display information about the versions of all components in the system, etc.).
Description of functions and procedures for their activation/deactivation
Using the program, Vesta owners can change various functions of the car. The car is optimized for the personal needs and desires of the driver. It is important to remember that the car owner makes any changes at his own risk. It is necessary to understand that the person who makes changes to the system knows exactly what and how to do. If a mistake is made, serious problems with the operation of the machine may occur. It is recommended to make a copy of the ECU system.
Follow Me Home function
"Follow Me Home" is a lighting function designed to illuminate the road after the car is locked. The headlights will remain on for some time after the engine is turned off so that the owner can get home. Initially, the function is not activated in Vesta.
The function is activated as follows:
- After launching the “DDT4ALL” program, select the port and adapter, check the box and then click “Connect”.
- In the new window, click the button with a magnifying glass and then the “CAN” button to search.
- On the left in a small window the blocks are highlighted in green, you need to select “EMM”, below in another small window “EMM_Lighting” and go to “EMM - Lighting - Configuration”.
- A menu will load on the right side of the large window, there you will need to change the value “Nbx_FOLLOW_ME_HOME_CF”, find the “WRITE” field and replace “0” with “1” there.
- Launch the “Expert” mode - located in the top menu, the second button with the image of Einstein on the left, then click “Send”, the button will be on the right side.
- After this, the value in the “READ” field should be displayed as the number “1”.
This completes all changes. But to activate the function, turn off the engine and then blink your high beams. After leaving the car, the headlights should glow for half a minute. You can blink the headlights twice and the light will stay on for 1 minute.
Other block settings change in a similar way.
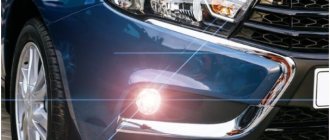
Cornering Front Fog Light
Until 2021, this function did not exist. After connecting it, the fog lights come on, but only when you turn the steering wheel. Requires DDT4ALL software and adapter:
- As in the previous case, launch the program, specify the adapter, check the “Connect” box.
- Click the button with a magnifying glass and activate the search via “CAN”.
- Then select “EMM”, then “EMM_Cornering - Configuration”, in the next menu there will be “Nbx_Cornering_CF”, change “0” to “1” in “WRITE”.
- Launch “Expert” and click “Send”, after which “READ” changes to one.
- In “Cxx_CorneringSpeed_CF” find “READ” the number is 40, so the backlight is activated at a speed of no more than 40 km/h, it can be changed with the “Send” button.
PTF is activated when the turn signal is turned on (including changing lanes), reverse gear and the steering wheel is turned.
Disabling automatic activation of the rear window wiper
New models have a function that automatically turns on the windshield wiper if you engage in reverse gear. This is not entirely rational, since the brush rubs on dry glass and scratches it. You can disable this function using the adapter and software:
- Launch the program and select the port, then the adapter, check the box, “Connect”.
- Click the button with a magnifying glass, press “CAN” (search).
- Select “BCM”, item “Rear Wiper - Configuration”.
- "LINKED_WITH_REVERSE_CF", select "FALSE" instead of "TRUE".
- “Expert” and click “Send”.
After this, the wiper will not start when driving in reverse. It can only be activated by switching the corresponding lever.
Signal function when working with a security system
Allows you to use an adapter and software to switch the alarm setting with horn accompaniment:
- Launch the software, select a port, go to the adapter, as in previous cases, check the box and click “Connect”.
- Press the button with a magnifying glass, start “CAN”, then “BCM”.
- Open the item “Alarm - Perimetric - Configuration”, there change the value “0” to “1” in “WRITE”, look in “BIPBIP_LOCK_CF”.
- “Expert” and then click “Send”.
Now, when the alarm is activated, the horn will sound.
Changing central locking parameters
You can change the following parameters:
- The “BCM” block (on the left), the “Doorlock” function (below the block) and in the same place “Doorlock - Configuration”.
- Enabling “AntiHiJack” in the line “ANTI_HIJACK_CF (-)”, specify the required value, click “TRUE”, “Send”. Initially, AntiHiJack is deactivated on the machine. If you activate it, then with one click on the key fob the car will be disarmed, and with a second click it will be unlocked. When opening a door from the inside, only one door will open, the others will be closed, provided the central locking is activated. You can deactivate the functions by selecting the “FALSE” command and then “Send”.
- Speed threshold for activating a signal about an unlocked door - go to “DOOR_WARNING_SPEED_THRESH_TP (km/h)”, specify the required speed on the right and click “Send”.
- Changing the speed threshold for automatic central locking - go to “LWS_SPEED_THRESH__CF (km/h)”, specify the required speed, click “Send”.
- Auto-arming timeout (triggered when the system is turned off by the key fob or if the door is not closed) for this period of time in “AUTO_RELOCK_TIMEOUT_CF (min)” specify the required number of minutes, then click “Send”.
Activation of functions via ELM327 and Ddt4all software
ps the article will be updated as new features appear.
What secret functions of LADA do you know?
By closely reading the articles of the owners on Drive (for which special thanks and respect to them), as well as communicating with news leaders in my city, I was able to activate for myself and my friends several functions that were useful in my opinion.
To do this, you need an Android smartphone, an ELM327 adapter version 1.5 (it will not work correctly with version 2.1), as well as the minimum required intelligence in order to be aware of what you will do and take responsibility for your actions. In other words, you will do everything further at your own peril and risk, and only you will be responsible for your actions.
Looking ahead, I will say that I tested all the software and scripts, links to which I will post below, on at least 5 machines, including mine, without any negative consequences.
Vesta can activate/deactivate the following functions, which are initially deactivated and are not available to the owner by standard means. In particular, these are the functions:
1) Disable/enable the mode of automatic activation of the rear wiper when reverse gear is engaged, if the front wiper was turned on for several minutes before that. For certain reasons that do not require explanation, this option is not available to owners of the Vesta sedan. It is enabled by default. I personally disabled this function to check the operation and turned it back on, because... I am completely satisfied with its presence. But I turned it off to a sufficient number of acquaintances at their request.
Read also: Chevrolet Cruze key firmware
2) Enable/disable a short-term sound signal when arming/disarming using the buttons of the standard key fob. Noticed disadvantages: the beep will sound when you press the arm/disarm button again. I note that for owners of Volga signals the sound will be short but loud.