The design of the clutch assembly in the Lada Kalina model requires adjustment of the cable drive over time. This need is dictated by the fact of natural abrasion of the linings on the driven disk and the very design features of the mechanism we are considering. During operation, the cable stretches, which also implies the need for adjustment. And many car owners are wondering: how to adjust the clutch?
The adjustment procedure itself is not a complicated action, therefore it is accessible to most Lada Kalina owners. In this article we will tell you how to adjust the clutch.
Clutch design and functionality
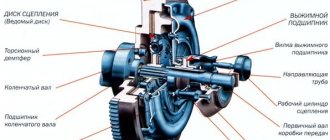
The unit belongs to a cohort of mechanisms whose functioning is based on dry friction. The clutch mechanism in this model is single-disc and requires a pressure spring, which is structurally designed as an integral part of the basket. The cable is used to release the clutch. This action is activated when the advising pedal assembly is pressed. The cable transmission has a ratcheting device that allows it to autonomously change its length in accordance with the level of wear of the driven disk linings. This solution allows for a tight fit of the release bearing to the spring petals. Inside the basket there is a driven disk, through which rotation is directly transmitted from the flywheel to the input shaft of the transmission unit.
Pressing the designated pedal causes the cable to tighten, causing the special fork to rotate. Its lower bushing is integrated into the clutch housing. The upper element of the part, which is also presented in the form of a sleeve, is removable. During rotation, the fork, through the clutch and release bearing, acts directly on the petals of the pressure spring, which in turn opens the driven disk from the flywheel. In this way, the process of disengaging the clutch is implemented, which is necessary to ensure the ability to change gear in a mechanical transmission unit.
If the pedal is fully released, the disk tightly adjacent to the flywheel transmits torque to the input transmission shaft to its full extent.
In some cases, deviations from the correct functioning of the clutch assembly are observed. Among the signs characterizing this negative phenomenon are the following:
- Increasing pedal travel when its value exceeds the regulated 146 mm.
- Engaging the gearbox with the clutch pedal fully depressed is accompanied by characteristic grinding sounds of the shafts in the transmission, which indicates incomplete disengagement of the clutch.
- Starting and subsequent operation of the Lada Kalina engine is accompanied by a howling sound coming from the clutch housing (release bearing wear).
- The beginning of movement is characterized by jerks and insufficient clarity of gear switching.
- Moving at 3-4 speeds, the owner presses the accelerator and observes the following picture: the speed of the power plant increases vigorously, and acceleration is accompanied by sluggishness. This indicates clutch “slippage,” that is, a loose fit of the disc to the flywheel, caused by increased wear of the linings or excessive cable tension.
All these signs overwhelmingly hint to the owner that it is necessary to adjust the cable drive. How to adjust the clutch? You should also be inclined to such a procedure after replacing the clutch mechanism, the compensator loses its functionality (lack of the ability to autonomously adjust the length) or the Lada Kalina car has been idle for a long time.
Diagnosis of clutch faults
Lada Kalina is equipped with a “dry” clutch with one disc and a central pressure spring. The disc is connected to the clutch pedal (CP) using a cable. The interaction is carried out using a cable, which is the weak point in the node. Adjustment is carried out using a ratchet mechanism, which is a rod with a thread and a control nut.
Clutch diagram for Lada Kalina
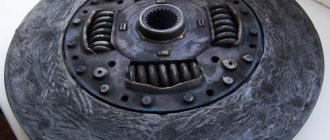
Over time, the linings on the disc wear out and become thinner. Wear largely depends on the driver's driving style. For those who like to tear it apart, the unit will not last long and will need to be repaired. Using a ratchet mechanism, insufficient thickness of the lining is eliminated by tightening the cable. This happens by turning the release fork, it forces the spring located in the bushing to compress. The spring acts on the tip clamps, releases it and, thus, tensions the cable.
Correct adjustment of cable length
Thanks to the ratchet mechanism, the length of the cable is automatically adjusted. But despite this, sometimes you have to adjust it manually.
There are obvious signs by which you can diagnose whether the clutch assembly needs to be adjusted, namely:
- problems when shifting gears;
- extraneous sounds when squeezing the PS: creaking, friction, clicks;
- the clutch does not disengage/engage completely;
- poor traction;
- jamming when moving the PS.
The video by Sergei Tsapyuk explains the reason for the pedal being too tight and how to fix the problem.
Using simple steps, you can identify other signs indicating that the clutch on the Lada Kalina needs to be adjusted:
- start the engine;
- press the PS several times, listening to the sounds, whether there are any creaks or clicks;
- press the pedal to the floor, release it and measure the distance from the floor to the pedal - full stroke PS: it should not exceed 14.6 cm, if you need to tighten the cable more;
We correct the operation of the mechanism
All of these factors that cause deviations in the effective operation of the clutch mechanism require immediate adjustment of the position of the cable drive in the Lada Kalina 2. Adjusting the clutch involves performing such a series of manipulations.
- We dismantle the air filter housing to provide access to the adjustment mechanism.
- Holding the tip, pull the cable to the maximum possible length.
- We use a caliper to measure the distance between the tip and the previously designated fork. The norm assumes a value of 27 mm.
- If a discrepancy is detected with the indicated gap value, then proceed as follows: turn the driver along the thread until the previously specified distance value is reached.
- Let go of the cable end and make sure that it is pressed tightly against the fork.
- Press the clutch pedal several times to activate the automatic length adjustment unit.
- Now we resort to measuring the indicated gap. If a deviation is detected again, then we perform these manipulations again. This completes the clutch cable adjustment.
When the clutch adjustment is completed, the clutch assembly in the Lada Kalina is sometimes able to remind itself of squeaks or noises. This can be caused by the leader rubbing against the surface of the fork. A lubricant that should be applied to the contact between the cable lug nut and the fork will help eliminate the annoying sound effect. Among other reasons, there may be a creaking of the pedal assembly bushing, as well as the deterioration of the sensor located there.
How to replace and adjust the clutch cable on a VAZ 1117-VAZ 1119?
Removal:
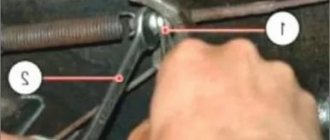
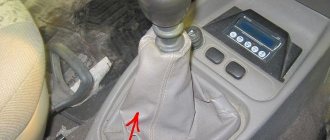
1) First, while inside the car, get to the clutch pedal and remove the stop of the cable sheath from the pedal bracket, this is done very simply, namely, take a wrench and use it to unscrew the nut securing the stop (see photo 1), as soon as the nut is is turned out, the stop is removed from the bracket stud (see photo 2), after which you have access to the clutch pin from which you will need to remove the stopper with pliers or a screwdriver (see photo 3), after the stopper is removed, remove it from the same finger housing of the mechanism for compensating wear of the driven disk linings (see photo 4).
2) Now remove the plastic bushing from the clutch pedal finger by hand (see photo 1), check its condition, it should not be deformed or heavily worn, otherwise replace it with a new bushing (Before installing the new bushing, lubricate it with Litol lubricant -24 or LSC-15), then remove the rubber seal of the cable sheath from the hole that it covers (see photo 2), then get out of the car and move into the engine compartment of the car to the box, having reached it, pull the tip of the clutch cable forward and then disengage it from the fork (see photo 3) and then unscrew the leash and remove it from the cable tip as shown in the fourth photo.
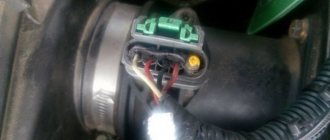
3) And finally, remove the cable from the bracket on the box, let’s immediately note the fact that the bracket on Lada Kalinas is solid and not split as shown in the photo below (The photo below just shows another car and it’s not the bracket, but the clutch fork that is shown there), so from this hole the cable will need to be taken out (the cable is indicated by a blue arrow) towards the car interior (in the direction indicated by a green arrow) and therefore you will bring the entire cable out into the car interior from the engine compartment and thereby completely remove it from car (When removing the cable, remove the guide sleeve of the clutch cable sheath).
Installation:
The installation of a new cable begins from the interior; to be more precise, at the beginning you will need to insert the cable from the interior into the engine compartment and then, while in the cabin, the housing of the wear compensation mechanism for the clutch disc linings will have to be placed on the clutch pin and secured with a locking bracket, after fastening The cable sheath stop will need to be installed in its place and the rubber seal of the cable sheath will need to be tucked into the hole while inside the car, and after that you can move into the engine compartment, where you will need to insert the cable through the bracket (see photo 1) and install the cable sheath guide sleeve , when the bushing is installed, a leash is twisted onto the lower tip of the clutch cable, and it must be twisted in such a way that the tip of the cable protrudes relative to the end of the leash by 0-1 mm, having achieved this protrusion, overcoming the force of the cable spring, pull it forward all the way, and when the cable is fully extended, take a caliper and, holding the tip of the cable in an extended position, measure the distance indicated by the letter “L” in photo 2, this distance should be “27 mm”, if the distance does not match, then rotate the leash on the tip of the cable until it was exactly like this, as soon as everything works out for you, install the tip of the cable in the groove of the clutch fork and release it, also make sure that under the action of the spring, the tip guide is installed on the clutch fork without a gap and finally press the clutch pedal two or three times re-measure the distance “L” and, if necessary, re-adjust the clutch cable on the car.
Note!
This distance, which is indicated by the letter “L”, is the adjustment distance that should be exactly like this if the cable is adjusted correctly, but also take into account the fact that the cables are different and if you come across a defect that can be either longer than the standard original cable, or shorter , then there won’t even be a distance of “27 mm” on it, so buy good parts from proven places and if you see that with such an adjustment the release bearing is already starting to work (That is, you are not pressing the clutch pedal, but the noise is from the release bearing already exists), then in this case you can neglect it and adjust the cable not according to the information that the factory writes, but precisely by your own selection!
Additional video:
Using the example of a VAZ 2110 car, you can see how the clutch cable is replaced in the video below, but just keep in mind the fact that on Lada Kalinas the cable is replaced a little differently, but after studying this article and watching the video, most likely you There will be no difficulties when replacing the cable.
Hello Georgy!
This happens on many cars, on Priors there is practically no such thing, although the clutch cable on them is absolutely identical except for one part, on the Priors cable there is a spring at one end, if you transfer it to your cable on which you do not have one, then there is a very high probability that the pedal will stop clicking and we also recommend lubricating the plastic bushing on the clutch pedal with lithol, it rubs with the bracket, you should immediately notice it if you look at the place where the clutch pedal is attached!
Leave a comment Cancel reply
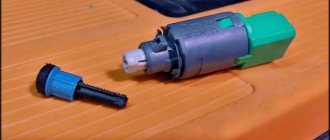
What if the sensor is faulty?
This component can only be installed with an electronic version of the accelerator pedal. The main function of the sensor is to control the operating modes of the Lada Kalina engine when switching gears in the transmission or starting movement.
If the sensor is faulty, the owner of the Lada Kalina 2 will be informed by the ECU about this fact by highlighting the “Check” symbol. The error code in this case is “0830”. The presence of a sensor failure is physically felt by the following signs:
- jerking of the Lada Kalina 2 car at the moment of switching gearbox stages;
- a sudden increase in speed (the engine is idling) when you press the clutch pedal assembly.
The designated element cannot be adjusted, so if functionality is lost, it must be replaced. The sensor is located above the pedal, or more precisely, under the steering shaft column. To replace, you should select an analogue with the code “1118-3720015” (also suitable for Priora and Granta).
The replacement procedure is characterized by inconvenience due to inaccessibility to the two screws by which the component is fixed to the pedal bracket.
- Dismantling involves removing the cable holder holder and the corresponding hole present on the pedal bracket.
- We also disconnect the block from the wiring harness under the instrument panel.
- You will need a screwdriver to remove the spring hook from the holder.
- Now unscrew the previously mentioned hard-to-reach screws.
- We remove the sensor with its holder and then install a new element.
We carry out the assembly process using the reverse algorithm.
Where is the fuel pump relay Kalina
Where is the speed sensor on Kalina
On-board computer for Kalina
Features of clutch adjustment
Vehicles Lada Priora, Kalina and Granta are equipped with clutch cables equipped with ratcheting devices. By their design, the cables are backlash-free, so their adjustment is theoretically not necessary, but in fact, the manufacturer recommends that car owners periodically adjust the device.
To correctly adjust the cable on Lada Kalina, Priora and Granta cars, prepare a screwdriver and a ruler (or caliper) and follow these steps:
- First you need to open the hood, after which the cable should be installed in its original position. To do this, you need to move the lower part of the cable a little forward, that is, in the direction of its movement, this must be done until it stops. When moving the cable, you may feel a slight force on the return spring; this should not scare you.
- Next, using a ruler or caliper, you should measure the distance. Which one is shown in the photo, you need to mark the distance from the beginning of the fork to the cable lead. To do this correctly, you must also hold the cable and fix it in one position. Take a measurement, ideally it should be 2.7 cm, but of course, if you are faced with the need to adjust on a Lada Priora, Kalina or Grant, then this distance will be either larger or smaller. Therefore, you should bring it to the required parameter; to do this, you need to rotate the cable lead in one direction or the other.
- After these steps, you will need to insert the tip of the cable into the groove of the fork, then the element itself can be released. Please note that there should be no gap at all.
- In general, the cable adjustment procedure is completed. Now you only need to press the pedal a few times to make sure everything is working properly. After several presses, measure the distance on the cable again; if necessary, adjust the device again.
Measuring distance and fixing the cable
No matter how new the clutch is, the owners of Lad Prior, Grant and Kalin periodically need to make adjustments to the pedals.
The need for adjustment may occur when:
- constant jerking when starting to move;
- the appearance of shocks when trying to turn on one or another speed;
- sinking of the pedal itself.
These symptoms indicate that the pedal needs to be adjusted correctly. Ideally, the clutch pedal should be located at the same level as the brake - then the full stroke should be about 12.5-13.5 cm, but in practice this figure can be increased to 16 cm. To correctly adjust the pedal, prepare two wrenches of the appropriate sizes.
- Using a wrench, loosen the cable lock nut, which is installed in the engine compartment.
- Next, you need to use another wrench to start tightening the second locknut, so you can correctly set the required gap. When the process is complete, the first locknut should be tightened until it stops.
Please note that if you set the pedal so that it is lower than the brake, then the grabbing will appear when the pedal just leaves the floor. Accordingly, if the brake pedal is lower, then the clutch will occur almost at the end. Ideally, these two pedals should be located at the same level (video by Time R).