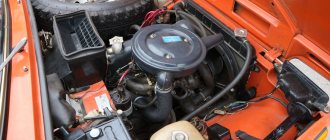
Clutch structure and mechanism
Today, most vehicles have a single-plate friction type clutch, which has two main components: a drive and a mechanism. The first is located on static parts of the body or frame. To briefly disconnect the engine crankshaft from the gearbox shaft, you need to press the clutch pedal all the way, “disengaging it.” When pressed, the rod directs pressure from the master cylinder piston to the working cylinder. The latter moves the force to the mechanism through the release fork and the pressure bearing. At the moment the pressure decreases, the drive return springs will return the elements to their original positions.
Most often, you can find several types of drives on cars:
- Hydraulic. The design includes a tube with high pressure of the working fluid, which powers all the mechanisms.
- Mechanical. The force with which the pedal is depressed is transmitted by a cable to the release fork.
- Electric. The electric motor drives the cable, which acts similarly to a mechanical drive.
- Pneumatic. Most often used on trucks, in order to reduce the required effort to release the pedal. The design includes a pneumatic booster, which affects the piston valves.
The clutch design in the crankcase consists of several discs: driven and pressure. The first is located on the gearbox shaft splines, and the second is on the flywheel housing. Separately, there are release levers on the ball joints, and the driven disk is pivotally connected to the structure.
The driven disc is statically secured between the crankshaft and the pressure plate when the clutch is completely disengaged. The coupled structure transmits torque from the crankshaft to the gearbox shaft. When the pedal is depressed, the thrust is transferred and the fork moves the clutch. The latter, using levers, moves the pressure plate.
What are the consequences of not adjusting the clutch?
Without timely adjustment, the following malfunctions will occur:
- The mechanism will begin to slip, which will result in inadequate transmission of torque from the crankshaft and flywheel to the drive axle and transmission. Even with the clutch pedal fully depressed, the car will either drive very slowly or will not be able to move at all. A burning smell will begin to be felt in the interior of a moving car due to overheating of the friction linings of the driven disk. The ride itself will probably be uneven, with jerks. This malfunction occurs due to the fact that the pedal does not have free play. This can easily be corrected by appropriate adjustment. However, the latter will not do much if there is severe wear on the crankshaft oil seals. In this case, the friction elements of the driven disk may become oily or worn out.
- The clutch “leads”, that is, the disengagement does not occur completely, or when the pedal is released, the friction disc does not move away from the flywheel. The malfunction manifests itself as difficult gear shifting, the appearance of impacts on gearbox gears and synchronizer teeth.
As a result, destruction of these elements is possible. Probable causes of this failure: excessive free play of the pedal, separation of the friction linings, misalignment of the driven disk, air entering the hydraulics.It is impossible to ignore both of the listed malfunctions; this threatens not only a decrease in the car’s controllability, but also increased wear of the friction linings of the driven disk. Among other things, the surfaces of the pressure plate and flywheel wear out quickly.
- Too late or, conversely, early clutch activation is observed. In the first case, the car will start moving only when the pedal is almost released, even if it goes down very slowly. The second option is manifested by the lack of free play of the pedal - the car starts moving when the driver has just started to release the clutch. Before adjustment, it is necessary to find out the exact distance between the floor and the pedal, as well as its free play.
Features of clutch in automatic and manual transmission
The clutch can be single or double disc. Depending on the principle of operation, it is divided into “wet” (in the presence of oil or lubricant) and “dry”. So, automatic transmissions most often have a multi-plate wet clutch.
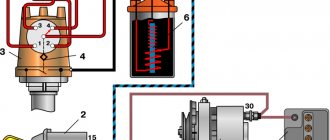
Due to the absence of a pedal, the force in the automatic transmission is transmitted by a servo drive, or actuator. The entire installation is controlled using a control unit and a hydraulic distributor. In a manual transmission, two types of clutch operate alternately. Actuators differ in their operating principle:
- Electric (otherwise known as a stepper motor). The control unit constantly receives data on engine speed, and at a certain speed the servo drive receives a corresponding signal. The transmission mechanism disconnects the crankshaft and input shaft.
- Hydraulic – hydraulic cylinder. In the drive mechanism, the oil pump transmits pressure to the distributor, under certain conditions to the servo drive. After changing gears, the pump force decreases.
Design and principle of operation of the clutch
To make it more clear, we will briefly describe the design of the clutch. This device is located in a housing installed between the power unit and the gearbox, with the flywheel coming into this housing from the engine side, and the drive shaft from the gearbox side. The end of this shaft fits into the flywheel to maintain alignment between the crankshaft and the drive shaft of the box.
The main element of the clutch is a basket with a drive disc located in it. This disk is spring-loaded, but has the ability to move longitudinally due to these springs, as well as levers. In passenger cars, the spring is combined with levers - a diaphragm spring.
The basket is rigidly attached to the flywheel using a bolt connection. A driven disk is placed between it and the flywheel. The axis for this disk is the gearbox shaft, and it is connected to it by means of splines along which the disk can move.
Briefly about the principle of operation. Since the basket with the drive disk is rigidly mounted on the flywheel, it fully absorbs the engine torque. But the basket is not connected to the box, so it does not convey this moment anywhere. But the driven disk is connected to the box, since it is mounted on the drive shaft. To transmit torque, you need to clamp, and firmly, the driven disk between the drive and the flywheel. The springs that press the drive disk are responsible for this.
If there is a need to separate the engine and gearbox, you need to act on the springs that press the drive disk. The force decreases, the disk, moving away, stops pressing the driven disk against the flywheel - torque transmission ceases.
That is, in order to disconnect the motor from the gearbox, you need to act on the springs of the drive disk. For this purpose, a release bearing is included in the design. It is located behind the basket on the flange of the gearbox drive shaft. Moving along this flange, it can act on the basket springs, but for this it needs force to overcome their resistance. This force is taken from the foot of the person who presses the clutch pedal. Its force is transmitted through the drive system to the bearing and it begins to work.
Reasons for adjusting the clutch pedal
It is important to understand that improper clutch operation may create virtually no problems when driving, but nevertheless it will significantly reduce the life of the clutch mechanism and gearbox. Over time, the discs wear out, which increases the clearance between the bearing and discs.
There are two main reasons why pedal adjustment is necessary:
- Replacing the clutch cable in a mechanical drive or replacing the slave cylinder. After such an intervention in the operating structure of the drive structure, adjustment is a mandatory procedure.
- Changing the pedal stroke. Excessive travel can occur as the friction linings wear out. To avoid negative consequences, it is better to regularly measure the working stroke.
In most foreign cars, adjustment is not required, since they have a self-regulating mechanism installed. The difference between the foreign-made design and the domestic one lies in some details of the ratchet mechanism.
A separate reason for adjustment is interruptions in the operation of the gearbox. If the desired gear does not engage, or is difficult to engage, the clutch is not pressed enough. Otherwise, the car may not move when the clutch is engaged. Then we can talk about a highly tensioned mechanical drive cable.
When the trip actuator needs checking
The free play of the clutch pedal must be checked and adjusted every 20 thousand km. This also needs to be done if the car starts to move at the very beginning or at the end of releasing the pedal. A correctly adjusted clutch release drive causes the car to start moving when the pedal is released approximately halfway.
This is interesting: Maintenance schedule for Nissan Qashqai: list of works
Adjustment of the drive with hydraulics and with a cable is slightly different. To adjust the hydraulic drive, as a rule, you need a pit or overpass. Cable adjustment is usually done in the engine compartment from above, simply by opening the hood.
How to check pedal free play
Clutch free play is the period of pedal movement from the moment it is pressed to the moment it is activated. You can notice that when you press the clutch, at first there is no proper resistance, and somewhere in the middle of the stroke an increase in rigidity appears.
If the vehicle starts moving immediately when you touch the pedal, then it is better to make the adjustment urgently, since there is no free play at all. Otherwise, the pedal can be pressed to the floor, but the car does not move.
Free play is required for all manual transmissions, since it indicates clearance between the fork, bearing and disc levers and prevents constant contact of the bearing with other elements of the mechanism. It is important to monitor the size of the free play, because if it is too large, full pressure will not be enough to transmit sufficient force to squeeze the drive disk.
A separate reason for checking free play is noise and jerking when interacting with the clutch. You can measure this indicator yourself using a ruler.
It is necessary to measure the perpendicular distance from the floor to the pressure pad. Next, when you gently press the pedal, you should measure the stroke until resistance first appears. The result must be checked against the data in the vehicle's operating manual.
The general average clutch stroke for a car is 160 mm. It is recommended to carry out preventive maintenance and adjustment every 20 thousand km.
Clutch adjustment on different brands of cars
For different cars, the distance for the combined pedal stroke may be different and this point must be clarified using the operating instructions. Let's look at the step-by-step adjustment procedure for different models.
VAZ-2108, 2109, 2199
The clutch adjustment procedure is as follows.
- Measure the distance between the bottom edge of the pedal and the floor with the pedal fully depressed. The optimal distance for these models is 18 - 20 cm.
- Press the pedal all the way with your hand and measure the distance from the floor to the bottom edge. The optimal value is 6 - 7 cm.
- Subtract the result of the second measurement from the first, in the end you should get 13 - 14 cm.
- Loosening or tightening the clutch is advisable if the value obtained by subtraction does not correspond to the norm.
- Hold the adjusting nut with one wrench and loosen the locknut with a second. Rotate the adjusting nut clockwise to increase pedal travel. The latter should move down.
- Take control measurements and tighten the locknut if you have achieved the required distance.
How to find out that the VAZ 2109 electrical circuit is faulty? Read about this in our author’s detailed and informative material.
"Lada Kalina"
The adjustment occurs as follows:
- Open the hood and unscrew the air filter housing bolts to remove it.
- Disconnect the mass air flow sensor and unscrew the clamp.
- Remove the cable as far as possible, holding it by the threaded end. Be prepared to overcome the resistance that the spring attached to the clutch pedal will provide.
- Use a caliper to measure the distance between the fork arm and the plastic leader. The resulting measurements should correspond to 2.7 cm.
- Use an open-end wrench to loosen or tighten the nut if you get a different result.
- Take repeated measurements by pressing the appropriate pedal.
- Reinstall the air filter.
VAZ-2107
Adjustment in this case requires the use of an overpass or pit. As a last resort, you can install the vehicle on supports using a jack:
- After adjusting the free play, you need to achieve a distance of 0.4-2 mm between the top position of the pedal and the stop. To adjust, if necessary, use a 10mm wrench and lightly unscrew the nut locking the limiter using rotational movements.
- The need to remove the protective shield arises if the engine system involves fuel injection.
- Clean the tappet threads of any dirt before applying the lubricant mixture.
- Check the stroke of the pusher as it affects the stroke of the release bearing. Push the fork back to the very end and measure the distance of the pusher stroke (4 - 5 mm). It is better to disconnect the spring from the lever in advance, otherwise you will have to apply force.
- Use a 17" wrench to adjust the pusher stroke. At the same time, hold the adjusting nut from turning. To loosen the locknut, use a 13mm wrench.
- Use the “8” key to fix the pusher and set the required distance to 4 - 5 mm using the “17” key.
- Lock the locknut and check the pedal travel. The distance between the moment of shutdown and its upper position should be 3 cm.
"Lada Priora"
In the case of the Lada Priora, you can use two methods to measure the position of the cable. In the first case, the reference point should be the clutch pedal travel (123 - 125 mm). In the second case, you can measure the length of the cable that exits the casing. 2.7 cm should be in the released state. In the vast majority of cases, drivers prefer the first method because it is more reliable.
VAZ-2114, 2115
For these models, the clutch adjustment is as follows:
- tighten the handbrake and remove the battery for maximum safety;
- locate the clutch cable in the engine compartment;
- loosen the cable end fixing nuts using two wrenches;
- achieve a distance of 125 - 135 mm by loosening or tightening the nuts;
- take the driver's seat and press the clutch pedal all the way at least three times;
- re-measure and adjust the clutch again if necessary.
We also recommend reading our specialist’s article, which talks about how to tighten the handbrake on Kalina.
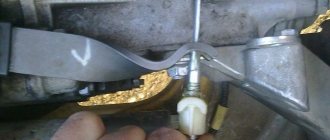
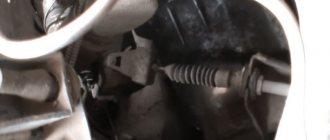
Checking the gap and adjusting the clutch fork
To check the operation of the clutch fork, you need to find the threaded bushings at the end of the clutch cable and measure the difference in the gap between them at rest and in the recessed position. The ruler must be placed near the cable and the edge of the housing. After the lever is pressed all the way, the distance is measured.
The second step is to pull out the lever and repeat the measurement. The indicators are compared against the manufacturer's data and, if necessary, adjusted. To do this, loosen the lock nut (VW has a wing nut) and turn it out as necessary, reducing or increasing the gap. After all the actions, firmly fix the clutch pedal and squeeze it several times. To check the effectiveness of the actions taken, the measurements must be repeated and the results compared.
Reasons for replacing and adjusting the VAZ 2107 clutch
Replacing a VAZ 2107 clutch is a rather labor-intensive and expensive process. Therefore, before replacing, you should consider adjusting the mechanism.
Clutch replacement
To install a new clutch, you will need an inspection hole, overpass or lift. It is important to detect in time the signs indicating the need to replace the clutch (it is impossible to replace it on the road), and take the car to a garage or car service center. Driving with a faulty clutch is very dangerous - you can get into an accident when crossing a railway crossing or a main road.
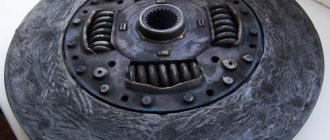
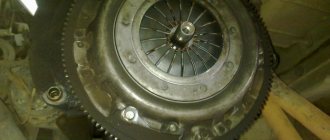
The VAZ 2107 clutch cannot be repaired, but is replaced as a kit, which includes a basket, driven disc and release bearing
The entire VAZ 2107 clutch is replaced, so auto shops sell a kit consisting of a driven disc, a basket and a release bearing. You should consider replacing the clutch in the following cases:
- the car climbs heavily uphill when the accelerator pedal is pressed all the way down, and you can smell a burning smell - these are signs of slipping of the driven part of the clutch;
- when the clutch is disengaged, noises appear in the area of the flywheel housing - this indicates a malfunction of the release bearing;
- when starting the car, it is difficult to engage first gear (the gearbox “growls”) - this is a sign that the clutch is not completely disengaged (the clutch is moving);
- when accelerating, the car begins to twitch, rattling sounds are heard - the reason for this is usually broken damper springs or loose sockets for them on the driven disk, deformation of segments or loose rivets on the hub.
Any noise, vibration, or whistle in the clutch area requires more detailed diagnostics and diagnosis.
Clutch adjustment
If the clutch pedal becomes too soft, falls down, and does not return to its original position, then most likely air has entered the system or the hydraulic drive adjustments have been disrupted. Clutch slipping after prolonged use usually indicates a failure of the clutch. It will probably have to be changed.
When adjusting the hydraulic clutch of a VAZ 2107, the regulated values of the gaps and the pedal stroke are set
If the clutch drives, that is, shifts gears with difficulty, in about half of the cases the reason is a discrepancy with the required values:
- play between the rod and the piston in the working cylinder;
- clearance between the release bearing and the fifth basket;
- free and working travel of the foot pedal.
How to check and adjust a hydraulic clutch
The operation of a mechanical and hydraulic drive has its own design differences. In this regard, in order to adjust the hydraulic clutch, it is necessary to check the total length from the pusher rod to the fork. According to the standards, it should be about 5 mm.
Then disconnect the spring from the working cylinder bracket. There is an adjustment nut on the rod, by unscrewing which you can change the stroke of the fork to the desired result. The general concepts of changing the working and free play may differ depending on the vehicle manufacturer. Before you begin self-adjustment, you need to read the manual for your vehicle or watch training videos:
As you can see, there are no particular difficulties in adjusting and setting the clutch. However, a beginner should carefully follow all instructions and advice from experts. To get the most effective result, it is better to first become familiar with the operating principle of the clutch mechanism.
Why do you need to adjust the clutch cable?
Adjusting the clutch cable is a necessary and important process in vehicle maintenance. It is carried out if there are problems with the pedal: its travel is more or less than necessary. In the first case, the clutch does not disengage completely. As a result, the flywheel continues to come into contact with the driven disc, thereby causing the friction linings to wear out.
In the second case, the driven disk is turned on partially. As a result, the vehicle's power decreases due to reduced torque during driving. In this case, the disk can be turned on quickly and during a soft release of the pedal, which leads to audible knocking in the transmission and twitching of the car.
If the cable is faulty, the pedal may become stuck. It may feel very difficult to press, as if there is resistance. However, if you apply significant force to the pedal, it will fall to the floor because the cable will break. In this case, it needs to be replaced.
Repeated clutch slipping is also an indication that the cable is in poor condition. “Slipping” is the moment of gear shifting to another position. For example, the car begins to roll in neutral because the clutch spontaneously engaged.
“Slipping” usually occurs when the motor is overloaded. For example, when increasing speed or on a climb.
If the cable is faulty, leakage will be the main indicator. Leaks may occur if it becomes detached or torn. In the first case, you just need to install it back. When the car moves jerkily, the cable does not perform its functions correctly enough.
We recommend
“How to change a clutch cable: step-by-step instructions” Read more
Vehicles regularly operated in negative conditions are more likely than others to wear out or break the cable. Although this can happen to any car, even if it has a small mileage. It also wears out during incorrect driving: when the speed is high and the start is abrupt, or while driving the driver constantly keeps his foot on the clutch, which leads to slipping and a malfunction.
When is clutch adjustment necessary?
It is not difficult to understand that the mechanism needs to be adjusted. The machine itself will tell you this. The following factors are clear signs of disorder of the unit.
- Pedal dips - when you press, you feel your foot drop to a certain level.
- Loss of elasticity under pressure.
- The car begins to move at the beginning or end of the pedal stroke.
- Loose lever or complete lack of working play.
- Difficulty shifting gears.
- Slipping of the clutch disc during acceleration and braking of the car.
Other deviations in the normal operation of the gearbox unit and unit are also acceptable.
Clutch adjustment options
If it is necessary to adjust the mechanism, the machine begins to behave inappropriately. The pedal sinks, changing gears becomes more difficult, jerking and jerking appear.
There are factory recommendations that establish strict tolerances for backlash.
What pedal stroke is considered normal?
In the correct position and in fully working order, the movement of the pedal until the mechanism disengages is 2.5-3.5 centimeters. The reference standard is established by the manufacturer and is considered a recommendation value.
Some car enthusiasts reconfigure the system to suit themselves, adjusting it within the range of 45-55 mm.
How to measure your car's pedal travel
Experienced craftsmen recommend measuring the stroke like this.
- A ruler is applied to the pedal at an angle of 90 degrees.
- Next, note the pedal height in centimeters.
- Press the lever until it stops.
- Make a mark on the ruler.
Measure the difference in values; normally, free play is limited to 25-35 mm.
Frequency of setting
There is no strictly established time interval for servicing the mechanism. The manufacturer insists that clutch adjustment is mandatory after performing any repair and service work related directly or indirectly to the device.
Eg:
- replacing the clutch disc/basket;
- pumping of highways;
- installation of new cylinders.
Setting up the VAZ 2106 clutch
You can check whether the clutch position on a VAZ 2106 is set correctly in this way.
- Place the car in neutral and warm up the engine to operating temperature. With the engine running, without touching the accelerator lever, turn on the “R” position. The response to the action should be a smooth movement of the lever without extraneous sounds or excessive force.
- During the operation of the car, all gearbox positions work clearly, there are no crashes, squeaks, or crunches.
- During sharp acceleration, the increase in engine speed is proportional to the acceleration. If the clutch disc slips, the engine starts to spin up without a manual transmission.
If any malfunctions or malfunctions are detected, it is necessary to perform more detailed diagnostics of the unit. You may need to replace the disk or repair the basket.
Let's sum it up
It is not difficult to adjust the free amplitude of the clutch pedal yourself. This requires minimal skills and a set of tools. For more information, we recommend that you refer to the operating instructions. It indicates the optimal parameters for full and free pedal travel. A well-adjusted clutch makes it possible to drive the car safely and comfortably. Gear shifts occur smoothly, without sudden movements or jerks. In addition, the car moves smoothly even at low speeds, which leads to less wear on the clutch.
Clutch adjustment Lada Kalina (Priora)
On Lada Priora and Kalina cars, a mechanical clutch drive is installed, the release is carried out by a cable. As the DS wears, the free play of the pedal increases, and then adjustment is required.
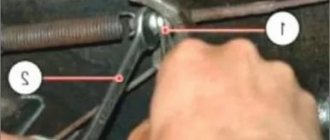
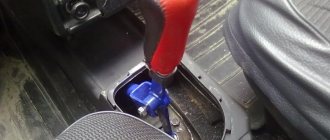
The cable adjustment on Lada models is done under the hood; it is carried out with two nuts that are attached to the gearbox bracket. We adjust the clutch as follows:
- dismantle the air filter housing, it prevents you from getting to the cable;
- loosen the nuts and tighten the cable, unscrew the nut in the picture below with the arrow, and tighten the other nut. Thus, we remove the increased stroke and bring it back to normal;
- After making sure that the pedal is pressed normally (the free play is adjusted), tighten the nuts with force.
Regulation of the VAZ 2110 vehicle is carried out in the same way as on the Lada Priora or Kalina; the clutch on the “nines” and “eights” is also adjusted.
How to Install a New Automatic Clutch Cable
Installing a new automatic cable can be quite difficult. In stores it is sold in the “cocked position” and, when performing some work related to the clutch, it should also be brought to this state.
Most drivers have noticed that black or white clamps, made of plastic and with a slot, hang on the cable located under the hood. At the same time, in the place where the cable “jacket” thickens, there are “ears” that fit perfectly into the slots of the clamp. However, there is a small problem: when the tension mechanism is in the loose state, the elements are located quite far from each other.
The method for adjusting the clutch cable when disconnected from the gearbox is not very complicated. You need to perform several movements. Grab the end of it with one hand, and hold the base of the “shirt” with the other. This is where the self-tensioning mechanism is located. You need to insert the cable to a depth of about 5 cm into the “shirt”, then pull it towards you. At the moment it is fully extended, the mechanism will begin the folding process.
In this situation, you will need the help of a friend or your skill. It is necessary to fix the device in the “cocked” position, placing the clamp on the “ears”.
If you just need to disconnect the cable and the box, then first you should press the pedal three or four times. Next, press the drive lever in the place where the cable fastening element is located. Press down towards the ground. That's it, the mechanism has worked out. Hold the lever with one hand and tighten the clamp with the other.
note
: If the lever does not want to go down, then the tensioner is faulty. The cable needs to be replaced.
Remember! You can remove the fixing clamp from the “ears” only when the new cable is completely installed.
How to replace a clutch cable
If the cable breaks, the movement of the machine becomes impossible. This problem can be solved by replacing this device. Before removing the unusable element, it is necessary to inspect and take appropriate measurements of the loose part of the lower end cable located next to the gearbox. Then check it visually between the mounting point and the clutch block or gearbox (type of gearbox). Next, we look for the place where it connects and carefully unhook it from the block or gearbox, pulling it into the car interior through the engine compartment.
If the need arises, you should remove the part of the floor that is located under the pedal to make replacement more convenient. Finally, disconnect the pedal and cable. After this, we remove the damper from the bracket located on the box. To install a new element, you need to perform all the steps in reverse order.
We first connect the new cable to the pedal. Then we tighten it back to the clutch block or gearbox and secure it. The last step is to install the floor under the pedals.
We recommend
“Clutch pedal sensor: functions and malfunctions” More details
The clutch cable has been replaced. Next, adjustment is needed. Professionals recommend performing these actions not only when a replacement has been made, but also every 15–17 thousand km. This advice is explained simply: the linings located on the clutch disc wear out over time and contribute to loosening of the pedal. As a result, adjustment of this element is simply necessary as a safety measure during operation of the machine.