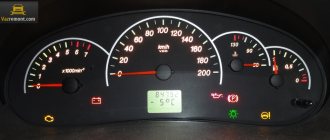
Elements of the VAZ 2106 panel and their purpose
During the trip, the driver must not only monitor the situation on the road, but look at the instruments to control how fast the car is moving, monitor the engine temperature, oil level and the presence of fuel in the gas tank.
It is located on the dashboard and contains a large number of elements, each of which is responsible for the operation of a specific component of the car.
The main elements are:
- speedometer;
- tachometer;
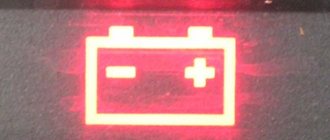
- battery charging indicator;
- engine temperature sensor;
- odometer;
- resettable mileage counter;
- oil level sensor;
- oil pressure gauge;
- fuel presence sensor.
In addition to instruments and sensors, the dashboard contains controls for emergency lighting, lights, direction indicators, and windshield wipers. In addition, the tidy also includes other switch levers, which can be seen in the diagram.
How to find faults in the instrument cluster of a VAZ 2106
Various instruments are mounted on the instrument panel and act as auxiliary sources of information for the owner about the technical component of the car, in the form of oil pressure, fuel level, coolant temperature and speed conditions.
Let's move on to looking at troubleshooting vehicle devices.
- In the event of a malfunction of the device that indicates the coolant temperature, where the arrow is at the beginning of the scale and does not move:
- If the indicator is always in the same state, then with the ignition off, remove the wire from the indicator sensor and connect the tip to the ground wire. If the indicator moves, then the temperature sensor is in a faulty state. If the arrow does not begin to deviate, then the instrument cluster is removed with the ignition on and the indicator is then connected to ground. When the arrows deviate, the wire that connects the sensor to the pointer will be faulty.
- If the arrow is in the “red” zone, then during working ignition it is necessary to disconnect the wire from the sensor. When the arrows return to their place, this indicates a sensor malfunction. If such an element is in place, then the wire will short to ground or the mechanism itself will malfunction.
To check the operation of the fuel level indicator, you must perform the following steps:
- When the pointer is located at the beginning of the scale and does not move, then with the ignition on, it is necessary to disconnect the wire from the “T” plug of the sensor and short it to ground. If the indicator does not deviate, then it is necessary to check the device and find the malfunction. This will require removing the instrument cluster. Then you will need to turn on the ignition and connect the “S” wire to ground. If the fuel level mechanism is in working order, the needle begins to move to the end of the scale.
- When the indicator shows a constant tank level, then in this case it will be necessary to disconnect the pink wire connected to the “T” from the indicator. And if the device malfunctions, the needle will drop to zero.
In order to check the oil pressure gauge, you must follow the steps above. The “HN” wires are connected to ground, or they are disconnected from the gray wire with black stripes going to the pressure sensor. The tachometer is checked on a special stand.
Typical malfunctions of the instrument panel
Deviation of the scale arrow indicates a malfunction of the device and damage to the wire that connects the sensor to the pointer.
The following malfunctions of the instrument panel elements are possible:
- the arrow on the scale of the coolant temperature sensor is constantly either in the initial position or in the red zone;
- the fuel gauge needle: does not leave the initial position even with a full tank, always lies at the end of the scale, moves jerkily and often returns to the beginning of the scale;
- The fuel reserve indicator light is constantly on or does not light up;
- The oil pressure indicator does not light up when the ignition is turned on, it lights up constantly, and goes out at high engine speeds;
- speedometer, tachometer faulty;
- The flexible speedometer drive is noisy.
Device malfunctions are eliminated by replacing sensors, contacts, devices, and restoring wiring.
possible malfunctions of VAZ 2106 control devices, their causes and solutions
Technique for troubleshooting devices When the coolant temperature gauge needle is constantly at the beginning of the scale, then with the ignition on, disconnect the wire from the gauge sensor and connect the tip of the wire to ground. If the arrow deviates, then the coolant temperature indicator sensor is faulty and needs to be replaced, and if it does not deviate, then remove the instrument panel and, with the ignition on, connect the indicator plug “V” to ground. The deviation of the arrow in this case will indicate the serviceability of the device and damage to the wire connecting the sensor to the pointer. If the arrow does not deviate, replace the temperature gauge. When the arrow of the coolant temperature gauge is constantly in the red zone, then with the ignition on, disconnect the wire from the sensor. If the sensor malfunctions, the needle should return to the beginning of the scale. If it remains in the red zone, then either the wire is shorted to ground or the device is damaged. The serviceability of the device can be checked by disconnecting the green wire (going to the sensor) from the indicator. When the ignition is on, the needle should be at the beginning of the scale. The method for checking the fuel level indicator is similar to that described above. It should be borne in mind that the “W” plug of the fuel level indicator sensor is connected to the wire that goes to the fuel reserve warning lamp, and the “T” plug is connected to the wire that goes to the gauge itself. If the arrow of the fuel level indicator is constantly at the beginning of the scale and does not deviate after the tip of the wire disconnected from the sensor plug “T” is shorted to ground, then check the device. To do this, remove the instrument panel and, with the ignition on, connect the indicator plug “S” to ground. If the device is working properly, the needle should deflect to the end of the scale. When the arrow of the fuel level indicator is constantly against o, the serviceability of the device is checked by disconnecting the pink wire from the indicator (going to the “T” plug of the sensor). In this case, with a working device, when the ignition is turned on, the arrow should be against the o. The method for checking the oil pressure indicator is similar to that described above. When troubleshooting, connect the “HN” plug of the indicator to ground or disconnect the gray wire with black stripes that goes to the oil pressure sensor from it.
| Cause of malfunction | Troubleshooting method |
| The coolant temperature gauge needle is constantly at the beginning of the scale | |
| The device is damaged Sensor faulty Wires are damaged or their tips are oxidized | Replace the device Replace the sensor Check wires, restore connections |
| The coolant temperature gauge arrow is constantly in the red zone | |
| The sensor is faulty. The wire going to the sensor is shorted to ground. | Replace sensor Check, eliminate short circuit |
| The fuel gauge needle is constantly at the beginning of the scale | |
| The device is damaged Wires are damaged or their tips are oxidized The sensor is damaged: the flexible sensor bus is broken; break in the resistor winding; weak contact of the resistor current collector; float leaking | Replace the device Check wires, restore connections Do the following: solder the bus or replace the sensor; replace the sensor; bend the contact; replace the float |
| The fuel gauge needle is constantly at the end of the scale | |
| The device is damaged The flexible sensor bus is connected to the fuel intake tube The connection wire to the sensor is shorted to ground | Replace the device Bend the tire Check and eliminate short circuit |
| The fuel gauge needle returns to the beginning of the scale when the tank is full | |
| The float travel limiter is installed incorrectly (the resistor winding ends) | Bend the stop 1-2 mm down |
| The fuel gauge needle moves irregularly and often falls towards | |
| Weak contact of the sensor resistor with the current collector. Break in the winding of the sensor resistor. | Bend the current collector Replace the sensor |
| The fuel reserve indicator light is constantly on | |
| Short circuit of the sensor wire with ground Short circuit of the flexible sensor bus with the fuel intake tube | Check and eliminate the short circuit Bend the tire |
| The fuel reserve indicator lamp does not light up | |
| Lamp burned out Sensor contacts are oxidized Sensor contacts do not close Break in the sensor wire | Replace the lamp Clean the sensor contacts Bend the moving contact of the sensor Replace the damaged wire |
| The oil pressure indicator lamp does not light up when the ignition is turned on. | |
| Lamp sensor is faulty. Break in wires, oxidation of wire tips. | Replace the sensor Replace damaged wires, clean the tips |
| The oil pressure indicator light is constantly on or goes out at high engine speeds | |
| Sensor faulty Low oil pressure | Replace sensor Check engine |
| Speedometer doesn't work | |
| The nuts securing the ends of the flexible shaft of the speedometer drive are not tightened Breakage of the flexible drive shaft The speedometer mechanism is damaged | Check and tighten the nuts Replace flexible shaft Replace the speedometer |
| Noise from the speedometer drive shaft | |
| The shell of the flexible drive shaft is deformed (dents, kinks, etc.) The flexible shaft is installed with bending radii less than 100 mm | Replace the flexible shaft Correct the installation of the flexible shaft |
- Author: admin
Rate this article: Share with friends!
malfunctions and troubleshooting methods for the instrument panel on a VAZ 2108, VAZ 2109, VAZ 21099
possible malfunctions of the VAZ 2106 windshield wiper, their causes and solutions
Dismantling instructions
Removing the VAZ 2106 instrument scale may be necessary when repairing and replacing its elements, tuning and modification. Dismantling is not difficult and will require a small set of tools: wrenches and screwdrivers.
The removal procedure consists of the following steps:
- First of all, you need to remove the front box from below the tidy.
- Then you need to unscrew all the fasteners and pull out the lower latches.
- Remove the radio plate.
- Next, remove the casing from the steering column.
- The next step is to disconnect the wires. Each one needs to be marked to make assembly easier.
- Now you can dismantle the shield by disconnecting all connectors.
- After removing the sensors, they need to be sorted in order to assemble correctly.
After upgrading the instrument panel, assembly is carried out in the reverse order (the author of the video is Nikolay).
General tuning aspects
The simplest VAZ 2106 is to purchase a ready-made set of accessories and replace standard devices. You can install it yourself using the instructions included with the kit. More labor-intensive is the tuning of individual devices, which involves replacing stickers and arrows.
When changing arrows and stickers, you need to be careful, as these parts are very fragile.
Tuning can be done by replacing the meter dials with white ones and installing overlays on the panel. You can cover the panel with artificial leather or leather if you have sufficient funds. Before stretching the material, the surface of the shield must be cleaned and then adhesive must be applied in an even layer. Next, press the leather or substitute over the entire surface and wait until the glue dries. At the last stage, you need to process the edges, giving it an aesthetic appearance.
LED panel lighting
The most popular is the VAZ 2106 LED. The panel looks especially beautiful at night. LED lamps of various colors are used for illumination. At least 2 bulbs are installed on the speedometer and tachometer dials. For small sensors, one LED is sufficient.
LED lighting around the entire perimeter will look more impressive. LEDs must meet the 12-volt voltage of the on-board network. When installing LEDs, be sure to observe polarity. Thanks to tuning, the VAZ 2106 tidy takes on an individual look and becomes more convenient and functional.
The standard illumination of the VAZ 2106 instruments, according to reviews from car owners, does not satisfy many of our compatriots who personally own this vehicle. There are very serious complaints about this electrical equipment unit - sometimes the light is dim, sometimes other problems arise in this component.
Sometimes there are cases when the instrument lighting on a VAZ 2106 car does not work for reasons related to other defects in the VAZ’s electrical equipment system. But the purpose of the backlight is precisely to make it easier to drive a car in conditions of poor visibility or at night.
It is in such conditions that monitoring instrument readings on the panel of auxiliary indicators located directly in front of the driver of the vehicle seems to be quite problematic, because visibility conditions do not allow this. Therefore, the illumination of the VAZ 2106 instrument scale plays an important role, especially with good brightness and luminous flux strength of electric light sources.
What is included in the electrical circuit?
Domestic yellow “six”
Regardless of whether the ignition circuit in your VAZ 2106 is contact or contactless (BSZ), the electrical circuit of the vehicle includes the following components:
- battery with negative contact on the car body;
- starter device with output “50”;
- generator is one of the main elements of the VAZ 2106 electrical circuit;
- mounting block with fuses protecting power supply circuits;
- ignition switch;
- regulator relay.
It should be noted that the electrical circuit of the VAZ 2106 car with or without BSZ was initially designed taking into account the single-wire type of connection of electrical equipment components. In essence, this means that the negative contacts of electrical equipment are brought to ground, that is, the vehicle body. As for the wired connection, it is provided exclusively by positive wiring.
"Six" instrument lighting control
To initiate and adjust the lighting mode of the instrument scale, a two-position VAZ 2106 instrument illumination controller is integrated into the lighting system, which operates in a low-current network of 12 V with a nominal current of 1.5 A and a weight of 50 g.
This product is an ordinary variable resistance resistor operating on the principle of a potentiometer. Only if in a potentiometer a change in resistance values occurs due to a change in the length of the switched-on section of the circuit, then here the change in this value occurs by changing the length of the coil, as a result of which the value of the rated voltage also changes.
However, in the “six” the instrument backlight most often does not light up due to the failure of this regulator, so the procedure for replacing it is as follows:
- Disconnect the negative contact of the battery;
- We pry off the retaining fasteners of the liner with a screwdriver and dismantle the dashboard;
- In order to replace the instrument backlight regulator, disconnect the wiring and mark (if necessary) the wiring with a marker;
- We dismantle the decorative handle of the device, simply pushing it in our direction, and using a key, first remove the fasteners, then the product;
- Collect everything using the reverse algorithm principle.
VESKO-TRANS.RU
Content
Sometimes there may be cases when the lighting of VAZ 2106 cars does not work for reasons related to other shortcomings of the six electrical equipment systems. But the purpose of the backlight is to make it easier to navigate in poor visibility conditions or in black conditions.
In particular, maintaining such criteria under the control of instrument readings on an auxiliary indicator panel located directly in front of the driver of the vehicle seems to be a rather problematic task, since visibility conditions do not allow this. Therefore, the lighting of the VAZ 2106 instrument scale plays an important role, especially with good brightness and luminous flux of electronic light sources.
Six dimmers
To start and adjust the lighting mode of the instrument scale, a two-position lighting controller for VAZ 2106 instruments is built into the lighting system, which operates in a low voltage network of 12 V with a rated current of 1.5 A and a weight of 50 g.
This product is an ordinary resistor with potentiometer function. Only if the potentiometer changes the resistance values due to the configuration of the length of the switched section of the circuit, then the change in this value occurs through the configuration of the length of the coil, which leads to a change in the value of the rated voltage.
Tuning the illumination of the “six” devices
Typically, tuning the backlight of VAZ 2106 instruments is carried out in order to improve the driver’s perception of the parameters of the instrument panel indicators and to decorate the instrument panel.
Such work should be carried out independently, in order to avoid unnecessary financial costs and to implement your own version of the VAZ 2106 instrument lighting design, which will be a unique and unique project.
As an option for making the illumination of the VAZ instruments of the “sixth” model with your own hands, you can, together with replacing conventional light bulbs for lighting the instruments, retouch their instrument scales to bright colors that are dissonant with the color of the car’s dashboard. This color scheme includes neutral white, bright red and calm blue. The color can be chosen depending on the taste preferences of the vehicle driver.
If the car enthusiast has chosen the option of multi-color LED instrument lighting bulbs for the VAZ 2106, which are offered in seven colors, then an LED strip and a private control unit are installed, which is controlled remotely, and the light range can be changed daily or as needed.
Such an LED “garland” can be found in specialized retail outlets that sell products of this type. The price of such an LED chain of lights is low. All that remains is to select a color palette and start replacing.
Installation of such lighting for VAZ 2106 devices can be viewed in a video on our Internet portal.
The process of replacing instrument lighting itself is a simple operation, because the LED base is absolutely identical in size and mounting to ordinary lamps.
LED illumination of the “six” instruments
As a tuning option, diode lighting of devices is also installed, during the installation of which LED strip and lamps with diodes are also used. Some car enthusiasts are interested in how to make illumination for VAZ 2106 devices of this type and what is required for this.
So, to install LED backlighting for devices, you need 10 -15 cm of tape with diodes of the selected color, several diode lamps of the selected color and a soldering iron.
The order of work is as follows:
- We disconnect the negative contact of the battery and dismantle the instrument panel, disconnect from the connections the board with the instruments where the speed indicators, engine speed indicators, etc. are located.
- We take out the factory backlight bulbs for the instruments of the VAZ 2106 contour arrangement (4 pieces) and for convenience we dismantle the speed and speed indicators;
- We carry out preventive preparation of wiring and diode-type tapes, tested and suitable for use, measure the wires in sections of 3-5 cm, cut and clean the edges for connection, prepare for soldering and solder pieces of wiring with tapes and lamps;
- We prepare places for fastening LED strips and diode lamps, then we stretch the wiring on which the lamps are attached, and glue the tape and prepare the board for soldering;
- After checking the functionality, we assemble the backlight. We recommend the direction of the lamps in the following order: I – vehicle mileage indicator, II – limit (red) line of the power plant speed indicator.
Owners of Soviet cars are familiar with the feeling when they want to improve their car, make it not just unusual, but become the owner of a unique vehicle. After all, most cars pale in comparison to modern foreign cars, but are not inferior to them in terms of technical characteristics. This also applies to the VAZ 2106. Let's figure it out, 2106.
Replacing seats
The first part that is replaced in the cabin is the seats. Even a person with minimal knowledge of structural assembly can handle the installation. It is not difficult to select seats for the VAZ 2106, since Ford Scorpio seats, which have won the love of car enthusiasts with their convenient design for long trips, are suitable for replacement.
To replace it yourself you will need:
- Drill;
- Brackets (the thickness of which is from 5 mm);
- Bolts 8*25 and 10*75 mm.
First we dismantle the old chairs. Using bolts, we attach the brackets to the legs of the new seats, taking into account that each chair requires 2 brackets. We drill holes on the bottom under the chairs, and repeat the same on the brackets themselves. Now we install the seats and secure them with bolts.
Advice. When working, use large washers to securely fasten the chairs. After installation, treat all metal parts.
Troubleshooting
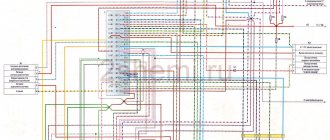
Wiring diagram on the "six"
If you have to look for a wiring fault on a VAZ 2106, during repair work it is necessary to completely de-energize the electrical circuit. To do this, you will need to disconnect the negative wire from the battery terminal, otherwise a short circuit may occur in the VAZ 2106 electrical circuit. Diagnostics of breakdowns is detected using the diagram given above.
If there are interruptions in the wiring, there are several options for how the car will behave:
- The car cannot move and will not start. There can be many reasons for possible malfunctions, but first of all it is necessary to check the starter, distributor, and battery performance. As a rule, a complete battery discharge is one of the most common reasons. It is much less common for a generator to fail, but attention should also be paid to diagnosing this element on a VAZ 21062 with BSZ.
- The car is moving, but one or more elements of the electrical circuit are not working correctly. For example, these could be malfunctions of the interior lights, turn signals, heated rear window or optics. If this is the case, then first of all you need to check the fuse box and identify burnt-out elements. If all the fuses are intact, then in the case of optics, the operability of the lamps is first checked, after which the wiring of the VAZ 21063 with or without BSZ is checked.
Experts recommend starting to diagnose a breakdown by checking the ignition switch, since it performs the following functions:
- controls all capabilities of the ignition system;
- controls the operation of security and anti-theft systems of the VAZ 21063;
- allows you to tow 21063 with a working light alarm (video author - Andrey Aleksandrov).
Replacing the instrument panel
Don't stop at just replacing the chairs. The field for activity is the VAZ 2106. You can make a new panel yourself, adjusting it to the dimensions of the “native” one, then installing and covering the surface with fabric, or you can choose a ready-made box. To make a replacement, it is required for a VAZ 2106. You will need a Phillips and flathead screwdriver, as well as a wrench.
We start with a shelf for things. It is removed by unscrewing the four fastening screws. Having removed it, unscrew the screws on all sides of the radio panel, as well as the upper right screw.
Now let's use a flathead screwdriver. We pry up the panel and remove the mounting strip. Behind it we again see a couple of screws that need to be unscrewed, after which we remove the receiver panel.
We remove the linings using , and also remove the decorative parts. Finally, we dismantle the instrument panel. We unscrew the speedometer fastening nut, unfasten the cable, moving it to the side. When removing VAZ 2106 devices, mark all connectors for connections.
Having removed the instruments, unscrew the screws of the lower fastening connecting the instrument panel and 2106. Carefully inspect it and unscrew the remaining fastenings. Carefully lift the panel and wire away from the lamp, then disconnect it completely. The only thing left to do is install the panel spare parts for the VAZ 2106, securing all the bolts in the reverse order.
Here are some tips that will help you upgrade your VAZ without any problems.
- To adjust the carburetor on a VAZ 2106, pay attention to the options instead of the standard Ozone - Solex and Pekar. But if you don’t want to change the carburetor, then you will need to dig around, remove the spring from the vacuum drive and convert it into a mechanical one.
- Non-contact ignition type is the best for VAZ.
- The heating system in the car leaves much to be desired, so it should be strengthened with the help of deflectors and equipped with ventilation.
- Install a heating system on the engine.
- When performing internal tuning, do not try to replace the standard VAZ steering wheel with a steering wheel from sports models. It is smaller and will not fit our car.
Having finished with the tips, let's look at how to tune the body of a VAZ 2106 and create a stylish car interior.
Disassembling and replacing the instrument panel
This technological operation is carried out in the following sequence:
- Remove the front box from the bottom of the instrument panel.
- Pull back the lower locking latches.
- Disconnect the wires and mark each wire as belonging to it.
- Remove the instrument panel.
- Remove all sensors and carefully sort them. This will make it possible to correctly assemble the products.
- When disassembling speed indicators (speedometer) and speed indicators (tachometer), bent scissors used in medicine are used.
A standard replacement of the VAZ 2106 instrument panel is carried out in the event of a defect in one of the sensors, which may fail. Let's consider the question of how to remove the instrument panel using the fuel sensor as an example; other instruments can be replaced in a similar way using a screwdriver and pliers.
The procedure for replacing panel sensors: 1. We remove the instrument panel. 2. Dismantle the fasteners and the fuel sensor grower. 3. Remove the mounting bracket for the instrument panel sensor and remove the sensor from the workplace. 4. Mark the instrument panel diagram of this sensor with a marker and open the electrical circuit. 5. Remove the instrument panel backlight sockets from the body part. 6. Installation is carried out in reverse order. 7. To replace the speedometer on the instrument panel, it is necessary to remove the product fasteners and the trip meter reset button from the outer plane. 8. Then press the counter and remove it from the shield. 9. Remove the two speed indicator fasteners to the fasteners. 10. Remove the fasteners and speed sensor, and mark the working sockets of the warning lamps with a marker. 11. Remove the lamp sockets from the holders in the speed sensor. 12. If necessary, disconnect the device cable. 13. Installation is carried out in reverse order. 14. The tachometer on the instrument panel is replaced in the same way and then connected.
Modernization ideas: headlights and everything else
Headlights are the eyes of the car. Over time, glass becomes dull, turns yellow, or even becomes unusable. But this is not the reason for their modification or complete replacement, but the desire to turn the VAZ into a beast with bright, powerful headlights.
Oddly enough, a simple way to improve is complete replacement. It is worth noting that the bodywork of the VAZ 2106 is similar to BMW parts, so we will replace the old headlights with new ones from BMW.
The process will not take much time. Open the hood and, having completed the necessary steps, take out the old headlights. We try on the new headlight and drill the holes necessary for installation, after which we install it and tighten the fasteners. All that remains is to properly adjust the light, and the work is completed.
If you have not found spare parts for the VAZ 2106 from foreign brands, but still want to update the headlights, you will need to visit a car store and purchase several diodes that will diversify the appearance of the car.
Working with the dashboard
To shock others and give yourself pleasure, we will tune the instrument panel of the VAZ 2106 using LEDs.
A popular accessory is LED strip. It is not difficult to install it yourself, and the wide range of colors and brightness attracts car owners.
Connects directly to the battery and to the wires leading to the car dashboard. The first method attracts with its reliability, while the second captivates with the ability to turn on the backlight immediately during ignition.
Make sure you have two wires, switches and a fuse. When installing the latter, please note that it should be close to the battery. After soldering the first wire, put a protective tube on it, then connect the second wire to the battery.
But the tuning of the VAZ 2106 is not finished yet.
Installation of double glazing
Most car owners dream of installing double windows on their VAZs. Why dream if it’s easy to realize your idea?
Because, it is. We cut it from the bottom edge so that during installation the corner of the glass remains visible and there is a distance of about 1 mm between the two glasses, otherwise the surfaces will be scratched against each other. Do not forget that when installing the second glass, the weight of the door will increase.
Brave car enthusiasts will not forget about the VAZ 2106; it allows you to realize all your ideas and express the character of the car owner with the help of all kinds of drawings or even entire scenes on the bumper. Painting it yourself is not easy, so it’s better to contact a service station.
WATCH VIDEO INSTRUCTIONS
Don't be afraid to experiment, and then the car will become the most noticeable on the road.
The instrument panel is a non-demountable structure consisting of a steel frame filled with polymer foam and covered with a polymer film. Using removable elements, control devices, controls, a radio receiver and a heater are attached to the instrument panel.
Tuning
High-quality tuning of the instrument panel must be carried out, starting with the removal of the instrument panel, so that during work it is convenient to get all the components and components of the product, right down to the illumination of the VAZ 2106 panel, which can also be made beautiful and modern. The preparatory stage is the dismantling of the front driver's unit, located under the instrument panel, which simply facilitates access and visibility of all elements and electrical wiring of the product, to change the appearance of which you need to make it or buy it yourself in car stores.
First of all, this applies to replacing the sensor dials with white components. The contrast of the dark scales of the VAZ 2106 instrument panel will give the instruments a modern look. They can be done using paints and varnishes. For a beautiful interior, you can cover the instrument panel, the price of which is affordable, with beautiful leatherette, and if funds allow, then with leather.
At the initial stage, the VAZ 2106 instrument panel, a photo of which is posted on our Internet resource, requires cleaning its surface, applying an even layer of special glue, pressing the leatherette to the surface and waiting for the drying process to complete. In the final version, it is necessary to bring the edges of the glued material into an aesthetic appearance.
The LED instrument panel is very popular among car enthusiasts, the light emanating from it simply transforms the interior of the vehicle. The only thing to remember is that large instrument panel indicators require the installation of two LED-type elements, while for small-diameter products the integration of one element is sufficient.
A good addition to instrument panel tuning are LED lighting bulbs. For small sensors you can use one bulb each, but for the speedometer and tachometer you will have to install two pieces each.
Overlays
For installation, it is advisable to remove the dashboard from the car, as this will greatly simplify the process of installing the trim and will allow it to be done much better.
First, you need to degrease the surface of both the dashboard itself and the lining; this is best done by thoroughly rubbing the dashboard with anti-silicone, which is used when painting a car. To improve the adhesion of the glue to the surface, I would recommend rubbing the surface with sandpaper, this will create a groove that the glue will easily grab onto. If you're going to be more specific, use primer on the plastic; I used Mobihel primer.
After a year and a half, I can say that the color of the trim has not changed, the shine has not disappeared either, only the trim above the instrument panel was slightly deformed due to the high temperature...
Scheme
How to remove
The dashboard installed on the VAZ 2106 car is almost completely similar to the dashboard that was equipped with the VAZ 2103 model. Accordingly, the process of removing the panel is valid for both the VAZ 2103 and the VAZ 2106.
1. Disconnect the negative terminal from the car battery.
2. Using a Phillips screwdriver, unscrew the screws securing the storage shelf. After this, unscrew the screws of the lower fastening of the radio panel: one on the right side and one on the left. We also unscrew the screw on the top fastening of the radio panel.
3. Using a flat-head screwdriver, carefully pry the bar with the controls out of the radio panel. Disconnect the wires from the buttons and switches.
4. Unscrew the screws securing the radio console. And we remove it completely.
5. Unscrew the screws securing the decorative trim of the right windshield pillar and remove it. Similarly, we dismantle the left pillar trim.
6. Remove the decorative and protective casing of the steering column shaft. To do this, unscrew the five screws and carefully separate the top and bottom covers.
7. Using two straight screwdrivers, pry off the retaining plates that secure the instrument cluster. Pull out the instrument panel.
8. Unscrew the union nut of the speedometer drive cable. Disconnect the cable and move it to the side.
9. We make marks on the connectors of the wires that go to the instrument cluster so that later, when installing the dashboard in its original place, we do not mix them up. We disconnect the connectors and completely remove the instrument cluster.
10. Use a screwdriver to pry up the electronic clock located in the center of the dashboard, disconnect the wires from it and completely remove the clock. We do the same with the heater operating mode switch.
11. Using a small straight screwdriver, slightly open the latches of the heater control knobs and remove them from the levers.
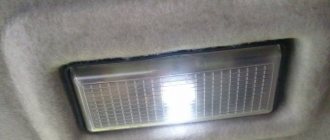
12. Disconnect the conductors from the socket with the glove box illumination lamp.
13. Unscrew the screws that secure the side parts of the storage compartment. We remove the side panel. We unscrew the nuts securing the instrument panel to the body, which are located under the glove compartment lid.
13. Unscrew the screws that secure the instrument panel to the body from the bottom. We also unscrew the two nuts securing the panel at the location of the instrument cluster.
14. Having slightly lifted the dashboard up, remove it. Installation is carried out in reverse order.
The backlight does not light up
I also had a fuse blown, I rewired the backlight wire to the power button on the panel and such problems will no longer exist.
Turn up the brightness control.
The VAZ “six” is considered the standard of reliability and simplicity of the Soviet automobile industry. She has “raised” more than one generation of car enthusiasts. With its simplicity and pliability, it won the hearts of many car owners. Until now, the “sixes” travel along the roads of cities and villages. To stand out from the crowd of cars, owners think about tuning, which transforms the external and internal appearance of the car. You can change the appearance of the VAZ 2106 interior with your own hands.
Tuning the instrument panel lighting on a VAZ 2106
The instrument panel is a non-demountable structure consisting of a steel frame filled with polymer foam and covered with a polymer film. Using removable elements, control devices, controls, a radio receiver and a heater are attached to the instrument panel.
Tuning
High-quality tuning of the instrument panel must be carried out, starting with the removal of the instrument panel, so that during work it is convenient to get all the components and components of the product, right down to the illumination of the VAZ 2106 panel, which can also be made beautiful and modern. The preparatory stage is the dismantling of the front driver's unit, located under the instrument panel, which simply facilitates access and visibility of all elements and electrical wiring of the product, to change the appearance of which you need to make it or buy it yourself in car stores.
First of all, this applies to replacing the sensor dials with white components. The contrast of the dark scales of the VAZ 2106 instrument panel will give the instruments a modern look. They can be done using paints and varnishes. For a beautiful interior, you can cover the instrument panel, the price of which is affordable, with beautiful leatherette, and if funds allow, then with leather.
At the initial stage, the VAZ 2106 instrument panel, a photo of which is posted on our Internet resource, requires cleaning its surface, applying an even layer of special glue, pressing the leatherette to the surface and waiting for the drying process to complete. In the final version, it is necessary to bring the edges of the glued material into an aesthetic appearance.
The LED instrument panel is very popular among car enthusiasts, the light emanating from it simply transforms the interior of the vehicle. The only thing to remember is that large instrument panel indicators require the installation of two LED-type elements, while for small-diameter products the integration of one element is sufficient.
A good addition to instrument panel tuning are LED lighting bulbs. For small sensors you can use one bulb each, but for the speedometer and tachometer you will have to install two pieces each.
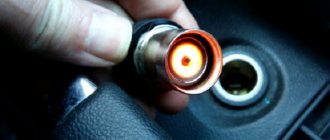
Cigarette lighter connection diagram at the link.
Overlays
For installation, it is advisable to remove the dashboard from the car, as this will greatly simplify the process of installing the trim and will allow it to be done much better.
First, you need to degrease the surface of both the dashboard itself and the lining; this is best done by thoroughly rubbing the dashboard with anti-silicone, which is used when painting a car. To improve the adhesion of the glue to the surface, I would recommend rubbing the surface with sandpaper, this will create a groove that the glue will easily grab onto. If you're going to be more specific, use primer on the plastic; I used Mobihel primer.
I would recommend that you glue with construction adhesives, this could be “Moment”, “Liquid Nails”, also a very good and inexpensive “Dragon” glue made in Poland.
I would recommend fastening it as securely as possible, in inconspicuous places with self-tapping screws, since despite all the advantages, the cover is prone to squeaking, so it must be firmly glued and screwed with self-tapping screws.
After a year and a half, I can say that the color of the trim has not changed, the shine has not disappeared either, only the trim above the instrument panel was slightly deformed due to the high temperature...
Scheme
How to remove
The dashboard installed on the VAZ 2106 car is almost completely similar to the dashboard that was equipped with the VAZ 2103 model. Accordingly, the process of removing the panel is valid for both the VAZ 2103 and the VAZ 2106.
1. Disconnect the negative terminal from the car battery.
2. Using a Phillips screwdriver, unscrew the screws securing the storage shelf. After this, unscrew the screws of the lower fastening of the radio panel: one on the right side and one on the left. We also unscrew the screw on the top fastening of the radio panel.
3. Using a flat-head screwdriver, carefully pry the bar with the controls out of the radio panel. Disconnect the wires from the buttons and switches.
4. Unscrew the screws securing the radio console. And we remove it completely.
5. Unscrew the screws securing the decorative trim of the right windshield pillar and remove it. Similarly, we dismantle the left pillar trim.
6. Remove the decorative and protective casing of the steering column shaft. To do this, unscrew the five screws and carefully separate the top and bottom covers.
7. Using two straight screwdrivers, pry off the retaining plates that secure the instrument cluster. Pull out the instrument panel.
Tuning the interior of the VAZ 2106
All car owners know that a car interior means giving it a new look, improving functionality and safety. With its help you can create an individual and unique style.
Interior tuning consists of several stages:
- torpedo tuning;
- instrument panel tuning;
- beard tuning;
- replacement or reupholstery of seats;
- installation of a radio;
- steering wheel tuning;
- tuning the gear knob.
Let's look at each of these points in more detail.
Torpedo tuning
The top front panel of a car is called a torpedo. It is a solid metal structure covered with polymer foam and film. It contains an instrument panel, glove compartment, interior heater, air duct deflectors, and a clock.
The front panel is an important element of the interior, which can be tuned in different ways: replace the dashboard completely with a new one, paint it with liquid rubber, cover the smooth surface of the dashboard with leather, film or flock. Before starting tuning work, you need to remove the panel.
Torpedo dismantling
Removing the console occurs as follows:
- After unscrewing the four fastening screws, we remove the storage shelf.
- Remove the radio panel.
To do this, unscrew the screws at the very bottom on both sides, then unscrew the top right screw securing the panel. Carefully, prying it with a screwdriver, remove the bar with additional controls from the radio panel. Under this bar there are two more screws, which also need to be unscrewed and, holding the mounting bar, remove the radio panel. We remove the mass from the battery, remove the instrument panel shelf, then dismantle the panel intended for the radio, take out the instrument cluster; There are protective pads on the windshield pillars; they interfere with removing the dashboard, so we remove them - We dismantle the left and right decorative trims of the windshield pillars.
- We disconnect the decorative linings of the steering column, which are secured with five self-tapping screws.
- Next, remove the instrument cluster panel. To do this, use a screwdriver to hook the panel at the fastening points and pull it out a little. Disconnect the cable from the speedometer. We mark the bundles of wires so that they do not get tangled during installation, and disconnect them. Remove the instrument panel.
Steering wheel tuning
A comfortable and beautiful steering wheel contributes to comfortable driving. To achieve this, in the “six” you need to update the steering wheel in the following ways:
- install a steering wheel from another VAZ model;
- retighten the steering wheel.
replace with sports one;
Installing a steering wheel from another VAZ model
The simplicity of the Zhiguli allows you to replace the steering wheel with a steering wheel from other VAZ models.
Many car owners believe that it is not worth the work and effort that needs to be put in.
The steering shaft of the chisel is thinner than the classic one, and not by much, that is, it is not very easy to make an adapter for the hub. Plus the steering wheel is higher, normally it won’t engage the turn signal bump stop. In a word, you need to suffer a lot to install it properly. As for me, it’s not worth it, if you really want a normal steering wheel, then you need to go and buy it, the choice is very rich right now, but you need to look at them carefully, there are so many leftists that it’s just terrible.
https://autolada.ru/viewtopic.php?t=26289
Replacing with a sports steering wheel
A sports steering wheel will give the car a beautiful and aggressive look. You just need to know that the “six” is not intended for sudden maneuvers.
The sports steering wheel has a smaller diameter and is more difficult to make turns with, so you need to get used to it.
Steering wheel reupholstery
In an auto store you can find braiding on the steering wheel for re-upholstering with your own hands. Such kits include the braid itself made of genuine leather, strong threads for sewing and a special needle.