A vehicle's clutch plays an important connecting role between the transmission and the vehicle's powertrain. Sometimes this unit requires preventive measures, so adjustment of the clutch of the VAZ 2109, and other vehicles, is carried out in cases where defects associated with the operation of this mechanism appear. Such malfunctions include:
- clutch pedal adjustment;
- clutch cable adjustment;
- pedal height adjustment;
- clutch adjustment.
How to adjust the clutch on a VAZ 2109
Cars of the 09 VAZ family are equipped with a cable-operated clutch. This technology is 5 times more reliable than classic variations with hydraulic drive. However, during operation, any mechanism requires calibration and this unit is no exception.
A scheduled inspection must be performed every 15,000 km or once a year, whichever comes first. However, unexpected breakdowns occur that require surgical intervention.
The following factors are considered signs of incorrect operation of the unit.
- The car starts moving jerkily - the clutch slips, which causes uneven acceleration.
- Increase in fuel consumption by approximately 10-15%.
- Dissonance between engine speed and actual acceleration of the car.
- When shifting into gear, extraneous sounds and squeaks are heard from the gearbox.
- When inspecting the car, there is an unpleasant smell of burnt pads.
- The pedal falls or sticks.
- The drive does not operate in the middle of the pedal stroke.
Do-it-yourself clutch adjustment on a VAZ 2109
The essence of the work is to set the required pedal pressure and measure the cable tension. Figuratively it looks like this:
- pedal height measurement;
- cable tightening;
- examination.
You can also watch a detailed report on the procedure in the video:
Clutch cable adjustment
Clutch cable calibration is performed as follows.
- The necessary tools are prepared: 2 keys No. 17, a ruler or tape measure, WD-40 or an equivalent.
- The car is driven onto a flat section of the road and the parking brake is put on.
- For safety, you can disconnect the battery terminals.
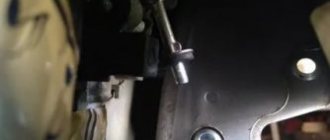
- On the left as the car moves, you need to find the cable itself - the part is attached to the gearbox housing with a special bracket.
- After this, the adjustment unit itself is located (the place of fastening to the gearbox). There is a rubber casing and two nuts that are tightened on the sides of the bar.
- Threads are filled with high-pressure fluid for better unscrewing.
- Next, simultaneously loosen the nuts using two No. 17 wrenches.
- Side No. 1 rotates clockwise to loosen the cable (the pedal falls down), to tighten it, you need to turn it in the opposite direction - the lever rises.
- When the required pretension of the structure is established, all nuts are tightened until they stop.
- Then you need to get into the car, squeeze the clutch all the way 5-6 times and check that the settings are correct, and adjust more if necessary.
Note! According to the factory instructions, the correct position of the cable is when the car begins to move approximately halfway through the free travel of the clutch pedal.
Adjusting the clutch pedal free play
The position and free play of the clutch lever on the VAZ 2109 is set in this way.
- A tool is prepared - a ruler or tape measure, two keys No. 17.
- Inside the car, you need to attach a measuring tape to the side of the pedal.
- When not pressed, the height from the floor is about 180-190 mm - this is normal.
Next, you need to press the lever all the way and remember at which mark the lower part of the pad stops. For example, 50-60 mm.
After manipulating the tensioner, it is necessary to check the correct engagement of gears and the timing of the release bearing. If all standards are met, no additional calibration is required. It happens that the adjustment does not bring the desired effect, in this case it is necessary to contact a qualified technician - perhaps the problem is hidden inside the clutch unit itself.
Clutch operation diagnostics
To understand whether the clutch is working correctly, just follow the procedure.
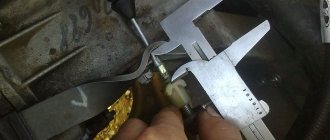
- Take a ruler and place it on the floor. The other end of the meter should be attached to the bottom of the pedal. It should be approximately 18-19 centimeters.
- Press the lever all the way and measure the distance again - normally it will be 7-8 cm.
- It is considered normal when the difference between the readings is 13.5-14.5 cm.
If there is a deviation in the parameters from the norm by more than 20 mm, the drive needs to be adjusted.
Design and adjustment of the VAZ 2109 clutch
VAZ 2109 is the legendary “nine”. The front-wheel drive five-door hatchback was serially produced at the Volzhsky Automobile Plant from 1987 to 2004. From 2004 to the end of 2011, the VAZ 21093 modification was assembled in Zaporozhye.
Many car owners try to maintain their personal car themselves and know how to do it correctly, since they carefully study the operation of the main components and leading modules. The list of routine maintenance includes periodic adjustment of the VAZ 2109 clutch. This task is quite simple if you familiarize yourself with the operation algorithm in advance.
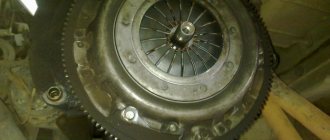
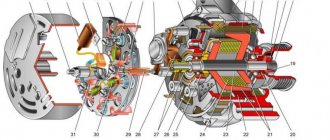
Nine clutch device
The clutch kit is one of the key components of the Nine transmission. This is a single-disc friction-type mechanism located between the engine and the gearbox (gearbox). The algorithm for its operation is as follows:
- Initially, the car is stationary, the engine is started, the pedal is released. The gearshift lever is in the neutral position, that is, the rotation of the input shaft is not transmitted to the secondary shaft.
- The driver is preparing to move forward. With his left foot he presses the pedal, and the mechanism disconnects the gearbox input shaft from the engine. The driver moves the lever to the first gear position, the mechanism ensures the engagement of the primary and secondary shafts of the gearbox. The car is stationary because the engine is disconnected from the transmission input shaft.
- The driver smoothly but decisively releases the pedal. The engine is connected to the input shaft, the task of which is to transmit power to the drive wheels through the secondary shaft, then the car will start moving.
- Switching from first gear to second, from second to third, and so on occurs in the same way.
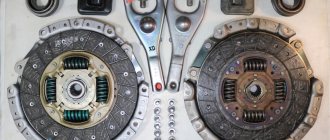
Typical VAZ 2109 clutch malfunctions
The clutch is one of the relatively reliable units of the VAZ 2109. With normal operation and periodic adjustment, it lasts for years. The estimated resource of the unit exceeds 100 thousand km. And if the clutch pedal fails, this is a rare case. The list of typical faults includes:
| Type of problem. | What is expressed? | What is the reason. |
| The clutch drives. | Pressing the pedal all the way does not ensure complete disconnection of the shaft from the gearbox, and the engine is not disconnected from the gearbox. Pressing the pedal when the unit is faulty leads to the fact that the pressure bearing does not act strongly enough on the damper spring, and the engine flywheel continues to partially transmit torque to the gearbox shaft. | The reason for this is often poor adjustment of the VAZ 2109 clutch cable or failure of the drive disk. |
| The clutch is slipping. | When the pedal is fully released, the gearbox input shaft remains loosely pressed against the engine flywheel and slips, that is, slippage occurs. The torque is only partially transmitted to the drive wheels and sliding of the contact surfaces occurs. This effect is clearly manifested when a loaded car is moving uphill: the driver accelerates, the speed increases, but the car almost does not accelerate, the clutch of the VAZ 2109 slips. | In this case, the drive is most often poorly adjusted, the clutch cable gets stuck, the driven disc is worn out or oily, which is why the clutch slips. |
| Noise when switching off transmission. | When you press the pedal, a distinct rustling or rustling sound is heard. | This quiet sound may indicate a possible release bearing failure. Continuing to operate the car in this condition can lead to troubles: if it jams, the VAZ 2109 clutch basket will inevitably quickly fail. Change the bearing at the first sign of a malfunction, otherwise serious repairs to the clutch, including replacement of the basket, are inevitable. |
Clutch adjustment is not only included in the list of routine maintenance of the VAZ 2109, but is often a way to eliminate emerging malfunctions of this mechanism.
Reasons for replacement
Practice shows that there are several main situations that force you to change the clutch cable.
| Situation | Peculiarities |
| The clutch does not work properly | It becomes difficult for the driver to depress the clutch pedal, which causes problems when trying to move away or start the car, the clutch slips |
| Gearbox is acting up | It begins to switch with certain problems, and during operation it also makes strange, incomprehensible sounds |
| The pedal has failed | If, after pressing the clutch pedal, it does not want to return to its original position when you remove your foot, this may indicate a problem with the cable |
We recommend: We replace the heater radiator on a Chevrolet Niva with air conditioning without removing the instrument panel.
Such symptoms can only suggest that the problem lies in the cable. To make sure of this, you should conduct a full check of the node's condition.
All the symptoms mentioned may indicate a broken cable or a broken fork. In the case of a cable, you will have to replace it. If the fork falls off, it will need to be returned to its place and clamped in order to prevent possible repeated falls.
Between a broken cable and a broken fork, it is better to face the first situation. Buying a new cable will cost 200 rubles, and a fork costs about 2000 rubles.
Do-it-yourself clutch adjustment
Experienced car owners know how to adjust the clutch on a VAZ 2109 on their own. Indeed, there is nothing complicated about it. Two 17mm wrenches and a regular drawing ruler 30cm long are all you need for the job. There is no need to open the VAZ 2109 clutch housing; the work is feasible even for an inexperienced vehicle owner.
Motorists usually check the adjustment approximately every 15 thousand kilometers or once a year. If there is a feeling of increased pedal travel, prompt inspection and adjustment are carried out. Work should be carried out in the following order:
- Take a mechanic's ruler or a drawing ruler and measure the distance from the pedal in a free state to the floor of the car. Usually this value is about 20 cm. This will be the first size.
- Press the pedal with your hand and push it all the way down. Measure the distance from the pressed pedal to the floor. This is the second size.
- Calculate the difference between the second and first dimensions and you will get the pedal stroke. If the result is 125-135 mm, clutch pedal adjustment is not required. When the calculated number does not fall within the specified range, adjustment is advisable. But if the pedal travel is 160 millimeters or more, the mechanism must be adjusted immediately.
- To adjust the pedal travel, open the hood, turn off the power to the electrical system, and put the car in the parking brake and in first gear.
- Hold the adjusting nut with one wrench and loosen the locknut with the second. The adjusting nut is located in the engine compartment of the VAZ 2109 on the drive bracket mounted on the gearbox housing. The nut secures the drive shell in this bracket, and the locknut protects it from loosening.
- To decrease the pedal stroke, the cable must be tightened; in this case, rotate the adjusting nut counterclockwise, and to increase the stroke, clockwise.
- Achieve the desired pedal stroke and secure the new position with the lock nut.
This completes the adjustment. Pump the pedal several times and make sure the travel is within the normal range. If it exceeds the acceptable limits, repeat the adjustment process.
Adjustment can be carried out in the warm season and even in the absence of a garage.
We delve into the process of adjusting the clutch using the example of a VAZ 2109 car.
A vehicle's clutch plays an important connecting role between the transmission and the vehicle's powertrain. Sometimes this unit requires preventive measures, so adjustment of the clutch of the VAZ 2109, and other vehicles, is carried out in cases where defects associated with the operation of this mechanism appear. Such malfunctions include:
When is it necessary to adjust the pedal?
VAZ 21093 clutch adjustment
Adjusting the VAZ 2109 clutch is necessary because:
- If this is not done, your car will soon need to be repaired. This is because it will supply too much energy for the pedal to operate properly.
- Due to improper operation, the clutch pedal is partially disengaged. This causes the clutch disc to contact the engine flywheel, causing them both to wear out.
- If the pedal travel is insufficient, the car slips, that is, there is a loss of wheel torque.
Clutch pedal adjustment
Periodic adjustment of the VAZ 2109 clutch pedal is carried out for the following reasons:
- When driving on a non-adjustable clutch pedal, subsequent repairs are possible, because exaggerated energy costs for incorrect operation of the mechanism will cause malfunctions of other components of the car.
- Due to improper functioning, the clutch pedal periodically does not function. This leads to the fact that the pressure plate of the unit is forced into “engagement” with the motor flywheel, as a result of which they are subject to accelerated wear.
- If the pedal stroke is insufficient, the vehicle slips, i.e. the required torque of the wheel pair is lost.
To carry out diagnostic work on adjusting the clutch pedal, you need to use an arithmetic ruler to measure the length of the pedal stroke to the floor. If it does not correspond to 16 cm, then adjustments are necessary.
Signs of incorrect operation of the clutch mechanism: there is no possibility of a smooth start from a standstill, movement from a standstill is accompanied by jerks and jolts, when changing gears the transmission makes increased noise, the pedal of the mechanism falls to the lower position. In practice, it turns out this way: if the vehicle began to move from the moment the pedal began to be lowered, then the free play does not correspond to the required value. When the pedal is completely released, the vehicle does not move, which means there is no free movement in the car.
Clutch pedal adjustment:
- Unscrew the nut located under the clutch pedal.
- Tighten the locknut located below until it stops.
- Next, screw in the fasteners located under the clutch pedal.
- We tighten the rubber washer to the clutch fork as far as possible.
- To increase the pedal stroke, you need to screw the fastener onto the tip. To reduce the pedal stroke, you need to unscrew this fastener. The VAZ 2109 clutch pedal is adjusted until the limit of 12-13 cm is reached.
- After completing the pedal adjustment operations, you need to: depress the pedal three times, measure the length of the pedal stroke, adjust the operation until the required stroke length is achieved.
To adjust the hydraulics you need:
1. Remove the spring from the mountings of the working cylinder and the clutch fork. 2. Adjust the fasteners located on the clutch cylinder rod. 3. The recommended free play value is 0.5 cm.
Often, a large pedal stroke depends on the height of its location from the driver's floor, and this creates certain difficulties. To adjust the height, a series of simple plumbing operations and a wrench set to “12” are required:
- We find two fasteners on the steering column shaft, one is a thrust screw that limits the height adjustment position, the second is a lock nut that changes the movement of the pedal.
- Unscrew the stop screw.
- We give it rotation until the pedal movement normalizes.
- Screw in the locknut.
If slippage is observed after adjusting the clutch, then the following operations must be performed:
- Remove the stem locknut.
- Move it until there is no free movement.
- Return the rod one full turn.
- Determine whether the clutch has free play.
- Test the operation of the transmission gears. If there is an incomprehensible noise, you need to perform the above operations again.
- Screw in the locknut.
Replacement
There are two ways to change the clutch cable:
Each option has the right to exist. We will introduce you to the two operations, after which you can choose which method to prefer.
Taking off the frill
- Raise the car using a jack.
- Unscrew the cable fixing nut. It is located under the clutch pedal.
- On the pedal rod there is a ring and a locking ring.
- To remove the cable, you will need to understand the cotter pin that holds it. To dismantle it, take a size 8 wrench and unscrew the cotter pin.
- It is now partially free as it is still held in place.
- Remove the frill and windshield wiper, then lift the hood.
- In the engine compartment, find the cable fixation point. Dismantling is carried out with a 19 mm wrench, which needs to be used to unscrew the nut.
- An old rubber band is often used if it is not worn out. Yes, and it’s difficult to change it yourself. But if necessary, change it. If you see strange wiring there, feel free to remove them. They do not perform any functions.
- Insert the rubber band into the hole through which the cable went.
- Place all fasteners, bolts, and nuts in a separate box so as not to lose them.
- Install a new cable and tighten the retaining bracket under the hood.
Without removing the frill
Here the operation is somewhat more complicated, since you will have to bypass the frill. But usually the work takes less time, which is why most VAZ 2109 owners choose this option.
- Unscrew the clutch cable fastenings using a 19 mm wrench.
- Remove the cable end from the fork.
- It is not always necessary to remove the tip from the clutch fork. This largely depends on the location of the cable break.
- Go into the interior and find the cable fastener under the clutch pedal. It's small, so a key for 8 will come in handy.
- Unscrew the bracket that holds the tip to the pedal. Try to raise the pedal as high as possible, and then use a flathead screwdriver to hook onto the clip.
- That's it, the cable can be removed. Just don't pull too hard. And what you should be afraid of here is not that it will completely break. You can damage the cable socket with sudden actions.
- It is best to remove the cable through the interior.
- There may be wires in the cable channel that interfere with removal. Pull them out with confidence, as they do not perform any tasks.
- Also, washers located under the hood may interfere with your work. Just carefully unscrew them and you're done.
- Remove the bracket from the pedal lever. This way there will be no problems with removing the cable.
- Carefully insert the new cable into the hole through the interior into the engine compartment.
- Follow the reverse procedure for assembling the assembly.
- The most difficult thing is to put the tip fixation bracket in place. It is because of this that many advise removing the frill. But you can work around this difficulty.
- Make a clip from a regular paper clip. Secure the bracket with it. If necessary, use pliers.
- When assembling, do not forget to lubricate the cable with grease or oil, which does not freeze at sub-zero temperatures. This will make the element more elastic.
Adjusting the VAZ 2109 clutch
This operation is carried out in cases where there are shocks or friction when the clutch is engaged, slight slipping of the clutch when the clutch is pressed for a long time, the clutch “drives.”
To adjust the clutch, do the following:
- Place the gearshift lever in the “neutral” position.
- We dismantle the clutch housing.
- We dismantle the bearing. Repair operations should be carried out smoothly and calmly, because the bearing may be defective.
- Rotate the adjusting fastener until the pedal movement is completely adjusted.
- We test the clutch for oil leaks, otherwise the clutch mechanism may slip. To eliminate this problem, it is necessary to treat the coupling with a degreasing compound.
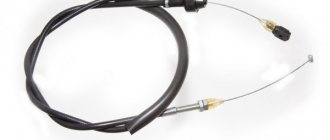
Adjusting the clutch cable VAZ 2109
A technological operation such as adjusting the clutch cable is considered simple and can be done independently. It is recommended to use a clutch cable with the nomenclature code 2109-1602210 for installation on a vehicle. To carry out a repair operation such as adjusting the VAZ 2109 clutch cable, you will need a set of wrenches and a new cable, which may be useful if you replace a used product.
- We check the cable for tension and, if necessary, using 2 “17” wrenches, adjust the cable with the required degree of tension, working with 2 nuts. To completely dismantle the cable, completely remove the nut fastener.
- Remove the cable from the manual transmission.
- Remove the cable from the pedal.
- We remove the cable from the engine compartment.
Important: when adjusting the VAZ 2109 clutch cable, the pedal should be of medium elasticity.
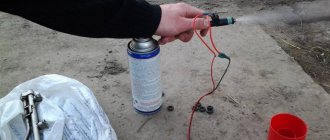
Bleeding the clutch
Bleeding the clutch
Every time the fluid in the system is replaced, it is necessary to bleed the clutch. Otherwise, air may enter here, which will lead to rapid failure of the system. The pumping happens like this:
- A hose is placed on the cylinder fitting.
- Its other end should be lowered into a container with liquid.
- Turn the fitting ¾ turn.
- Press the clutch until no more air bubbles come out of the hose.
Note: if the pedal is completely lowered and the release of air has not stopped, then the fitting should be tightened. It is very important that the liquid level in the tank is normal (at least half of the tank).
Adjusting and repairing the clutch is a completely simple process. Therefore, there is no point in going to a car service center, where the price even for such trivial work will be high. It is much better to diagnose and repair the car yourself and at home. But first you need to review a bunch of photos and videos so as not to damage the car. Any instructions will help you get the job done quickly and efficiently.