The basis of safe driving is the stability of the car on the road. This rule applies to both trucks and passenger cars. And the VAZ 2107 is no exception. The handling of this car has always left much to be desired. To somehow make life easier for drivers, engineers developed a jet thrust system for the “Seven”. But any part, as we know, can fail. And then the driver will be faced with the question: is it possible to change a broken rod with your own hands? Yes, you can. Let's try to figure out how this is done.
- About the choice of jet thrusts Traction
"Track" - Rods "Cedar"
- Belmag rods
- Twin rods
- Test sequence
- Sequence of work
- Sequencing
Purpose of thrust rods on the VAZ 2107
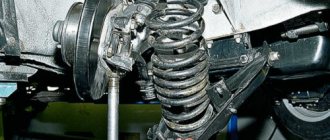
The purpose of the thrust rods on the VAZ 2107 is simple: to prevent the car from “walking” on the road and swaying strongly when entering sharp turns and when hitting various obstacles. This problem has been known since the days of early cars. They didn’t know about any jet thrust at that time, and the cars were equipped with ordinary springs. The result was natural: the car easily overturned, and it was incredibly difficult to drive. Over time, the car suspension was improved: a system of long rods began to be installed in it, which were supposed to take on part of the loads arising from road unevenness or due to an overly aggressive driving style. On the VAZ 2107 and other classic Zhiguli models, there are five jet rods: a pair of long ones, a pair of short ones, plus a large transverse rod, which serves as the basis of the entire traction system. All this is installed near the rear axle of the car.
The reaction rod system is installed near the rear axle of the VAZ 2107
This system can only be seen from the inspection hole, where all work on replacing broken rods is carried out.
Price for jet thrust
Jet thrust for a VAZ 2107 costs from 1,000 to 4,000 rubles, depending on the manufacturer. Manufacturers make rods from elastic types of steel, so the defect can only consist of the initial presence of flaws in the rods.
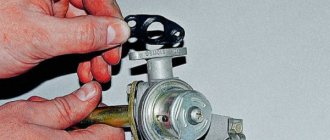
Assembling new rods
- Attach the rod to the front bracket. In this case, lubricate the bolt with nigrol.
- Insert the rod into the rear bracket, also securing it with a bolt.
Often the holes will not line up when attaching the rod. This is natural - after all, the bridge moved with a faulty traction. Then it is necessary to perform the following function: rest the mounting blade against the bracket and turn the bridge until the holes coincide. Then secure the bolt.
About the choice of jet thrusts
Currently, there are not many large manufacturers left that produce jet thrust for the VAZ 2107 and other classics. Their products differ in both price and reliability. Let's look at the most popular products.
Traction "Track"
The product is very popular among owners of the “Seven”. These rods are distinguished by their high reliability and high price, which starts from 2100 rubles per set.
Trek thrusters are distinguished by high reliability and high price
The main difference between Trek is the heads for the bushings. Firstly, they are large, and secondly, they are attached to the rods by welding. The silent blocks on Tracks are also made of especially dense rubber, which significantly extends their service life.
Rods "Cedar"
The overwhelming majority of “Sevens” that had previously rolled off the assembly line had jet thrusters installed specifically from “Kedr”, since this company has always been and remains the official supplier of AvtoVAZ.
Kedr rods have an affordable price and mediocre quality
The quality of Kedr is somewhat inferior to Trek. This is especially true for bushings and silent blocks. All this wears out quite quickly, and therefore they will have to be changed more often. But there is also a good side - a reasonable price. A set of “Cedar” rods can be purchased for 1,700 rubles.
Belmag rods
Despite the simplicity and reliability of Belmag rods, they have one significant drawback: they are not so easy to find on sale. Every year they are found less and less often on the shelves of auto parts stores. But if the car owner still manages to find them, then he can be congratulated, since he got a reliable product at a reasonable price. The cost of Belmag rods starts from 1800 rubles per set.
Today it is not so easy to find Belmag rods on sale
This, in essence, is the entire list of large manufacturers of good rods for the VAZ 2107. Of course, now there are a lot of smaller companies on the market that are quite aggressively promoting their products. But none of these companies gained much popularity among the owners of classics, and therefore it is inappropriate to mention them here.
So what should a driver choose from all of the above?
The answer is simple: the only criterion for choosing jet rods is the thickness of the car owner’s wallet. If a person is not short on funds, the best option would be to purchase Trek rods. Yes, they are expensive, but installing them will allow you to forget about problems with the suspension for a long time. If you don’t have enough money, it makes sense to look for products on the shelves. Well, if this idea is not crowned with success, there remains a third option - “Cedar” rods, which are sold everywhere.
Here we should say a few words about fakes. Knowing that car owners most often choose products from the three above-mentioned companies, unscrupulous manufacturers are now literally flooding the shelves with counterfeits. Moreover, in some cases, the fakes are made so skillfully that only a specialist can identify them. In such a situation, an ordinary driver can only focus on the price and remember: good things are expensive. And if there is a set of Trek rods on the counter for only a thousand rubles, then this is a serious reason to think about it. And don't rush into buying.
About modernization of jet thrusts
Sometimes drivers decide to independently increase the reliability of the VAZ 2107 suspension and extend its service life. To this end, they are modernizing jet thrust. Typically, modernization of rods means two operations. Here they are:
- installation of dual jet rods;
- installation of reinforced jet thrusts.
Now a little more about each of the above operations.
Twin rods
Most often, drivers install dual rods on the VAZ 2107. The reason is obvious: for this procedure you don't have to do anything with the pulls. You simply purchase not one, but two sets of rods that are installed in a regular place near the rear axle of the “seven”. Plus, you purchase not ordinary, but elongated mounting bolts, on which this entire structure rests.
Installing double rods on the VAZ 2107 increases the overall reliability of the suspension
The obvious advantage of such modernization is the increase in the reliability of the suspension: even if one of the tie rods breaks while driving, the car is unlikely to lose control and the driver will always have a chance to notice the problem in time and stop (a break in the tie rod is almost always accompanied by a strong knock on the bottom of the car, which cannot be heard this is simply impossible). This design also has a drawback: the suspension becomes stiffer. If earlier it “eaten up” small unevenness in the road without any problems, now the driver will feel even small pebbles and holes while driving.
Reinforced traction
If the car is used in extreme conditions and drives mainly on dirt roads or on roads with very poor asphalt, the car owner can install enhanced torque rods on it. As a rule, drivers make such rods themselves. But recently, large manufacturers have begun to offer reinforced rods of their own production. For example, you can find Trek-Sport rods on sale, which are distinguished by the large size of silent blocks and an adjustable transverse rod. A pair of nuts on the crossbar allows you to slightly change its length. Which in turn affects the car’s handling and the overall stiffness of its suspension.
The reinforced rods have nuts that allow you to change the length of the rod and adjust the stiffness of the suspension
Of course, the driver will have to pay for increased reliability: the cost of a set of Track-Sport rods starts from 2,600 rubles.
Replacement
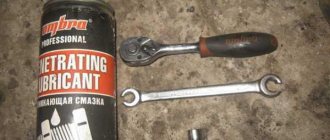
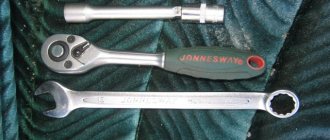
So, you decided to change the jet thrusts without the help of others. To get started, select the right tools. This:
- Metal brush;
- WD-40 lubricant;
- The necessary keys.
Method for removing old rods:
- Carefully clean all connection points of the rod with a brush, then sprinkle with lubricant and let stand for a little while.
- Start unscrewing the nut that holds the rod on the freer side. Most likely, it will be quite difficult to unscrew. Therefore, it is worth spraying more lubricant or taking a wrench with a huge shoulder.
- When the nut is level with the end of the bolt, take a hammer and tap the bolt. This is necessary because The bolt sticks to its place and needs to be removed from there.
- Unscrew the bolt together with the nut and remove them.
- Run to the other side. To remove it, unscrew the bottom of the shock absorber, remove the spacer sleeve, then move the shock absorber to the side. This will give you access to the second bolt on the rod. With all this, all the nuts may not unscrew easily - this is normal.
- Clean the 2nd bolt with a brush and apply lubricant. Then try to unscrew it, if it doesn’t work, cut off the bolt (naturally, you can try to knock it out, but because the 2nd bolt is located on the gearbox side, to gain access to it you will have to disassemble the brake disc and axle shaft, and this is a significant effort, it’s even easier cut off the bolt).
- Remove the rod and the remaining fasteners using, for example, a mounting spatula.
Fundamentally! Under no circumstances should you attempt to repair a broken rod. Don't try to cook it. All this will lead to another very serious breakdown. Use only new parts.
Checking the condition of the jet rods on the VAZ 2107
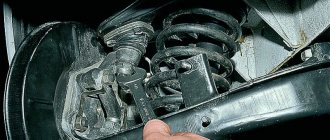
Before we talk about checking jet thrusts, let’s ask ourselves: why is there a need for such a check at all? The fact is that when driving, jet rods are subjected to both lateral and torsional loads. Torsional loads occur when wheels hit large potholes or run over large rocks and other obstacles. This type of load is especially harmful for rods, or more precisely, for silent blocks in rods. It is the silent blocks that are the weak point of the jet thrust (there is simply nothing to break in the thrust itself: it is a metal rod with two eyes at the ends). In addition, the rubber parts of silent blocks are periodically exposed to reagents that are sprinkled on roads during icy conditions. As a result, cracks appear in the rubber and its service life is rapidly reduced.
The rubber part of the silent block on the rod has become completely unusable
If you believe the operating instructions, the new jet thrusts on the VAZ 2107 can travel at least 100 thousand km. But taking into account the conditions listed above, the actual service life of rods rarely exceeds 80 thousand km.
From the same instructions it follows that the state of the jet rods must be checked every 20 thousand km. However, car service technicians strongly recommend checking the rods every 10–15 thousand km in order to avoid extremely unpleasant surprises. To check the condition of the silent blocks in the rods, you will need an inspection hole and a mounting blade.
Test sequence
- The car is placed on an inspection hole (or, alternatively, on an overpass).
- The mounting blade is inserted behind the rod eye.
The mounting blade is installed behind the rod eye - Now you need to rest your spatula against the torque rod bracket and try to move the rod to the side along with the silent block. If this is successful, the silent block in the rod is worn out and needs to be replaced.
- A similar procedure must be done with all other silent blocks on the rods. If they move to the sides by even a few millimeters, they need to be changed urgently.
During the inspection, the silent block shifted to the left by several millimeters. This is a clear sign of wear and tear - In addition, the rods and lugs themselves should be inspected for wear, cracks, and scoring. If any of the above are found on the rods, you will have to replace not only the silent blocks, but also the damaged rods.
Video: checking jet rods on a VAZ 2107
Replacing torque rod bushings — logbook Lada 2107 2006 on DRIVE2
Last weekend I decided to work on the car and bought torque rod bushings, regular rubber ones + pins (1000 tenge + 1000 tenge)
Bushings used BRT
Fingers I don’t know whose company it is
- the replacement process is not too complicated, but without tools it’s a pain in the ass... the car needed to be rolled backwards into a garage with a pit, I cleaned and sprayed all the nuts with WD-40, unscrewed and removed the rods (as well as the lower mount of the rear shock absorber) using: a ratchet with 19mm head and 19mm wrench
- and not without the help of some mother)).
Attaching reaction rods to the body
Because of the shock absorber bolt, it is impossible to get to the rod mounting bolt, there is also a spacer, I don’t have one, apparently so that the shock absorber has more travel
- Only 4 rods were removed (they didn’t reach the panhard, the car was backed up in front) Then, of course, it was possible to buy and install new rods,
- but I wanted to try my hand)) and it’s cheaper to change the bushings yourself!
The process of replacing the bushings began: it took us 2 hours (out of ignorance, and maybe it was our first experience). We knocked out the fingers using a bolt with a nut, a 2.5 kg sledgehammer, and a tree stump)) We knocked out 8 bushings in about 10 minutes. At first they cut the rubber bushings, tried to pull them out, We spent about 40 minutes)) then we got our hands dirty and managed to pull everything out quickly thanks to a large flat screwdriver.
Next, I cleaned the seats on the rods with sandpaper from the remnants of worn-out rubber, it took me half an hour... Well, that’s where the fun began)) The bushings for the small rods, generously lubricated with liquid soap, I was able to “install” with the help of my 95 kg of weight, jumping with my heel on the rubber band )))And I was able to install bushings on large rods only thanks to hammer blows.
Then, with the help of yews and a plumber’s “set,” the two of us somehow pressed the fingers in
(the movement of the yews was barely enough, the yews were not screwed in, everything was done on the floor)))
The photo is not mine, I skimped on Google))
- Pressed...
- We went to install I installed the rods quite quickly, but I had to conjure with the “position” of the body so that the holes on the body and the rods matched... we also used all sorts of iron rods so that the rods would fall into place, after 1 hour all the rods were in their places
- then tightened the bolts.
The next day I bought a device for pressing in jet thrust bushings. It cost me 1200 tenge.
This is it, the photo is not mine, I don’t know why the finger is there)
Panhard bar
with the Panhard bar, now we didn’t have to suffer so much, I drove the car backwards into the garage again: wd-40... unscrew, remove... removed. The bushings were pressed out using the proven technology: “sledgehammers, bolts and screwdrivers”, they were pressed in with a device quite easily and quickly, the bolt tightened the bushing , and there’s also a cone.
- The traction fell into place quite quickly.
- Disclaimer: all the photos were blatantly stolen from Google)) when I took it, I didn’t have time for a camera.
- Results: Some bushings were “average” broken, and after replacing the rear axle became less “chatty”, handling improved quite a lot, and the car began to ask for a skid less))
- But it became a pleasure to pile sideways, because... the car became submissive))
Yesterday (09.12.
2015) it was very snowy (20 cm fell per day), I drove from the secondary street to the main one, the main street has a rather sharp rise (15 percent hill), the secondary one adjoins the main one in the last quarter of the rise (25 meters left uphill) from the right Turning 90 degrees up a steep hill, I accelerated so as not to slide, a skid began, a couple of movements of the steering wheel, and it was successfully extinguished, + I didn’t roll down, only my mother got scared.
So don’t be lazy to watch your iron horses! If they don’t thank you, they will protect you!
Price tag: 700 ₽ Mileage: 15200 km
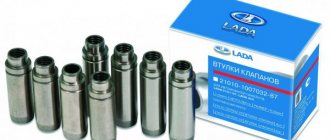
Replacing bushings on VAZ 2107 rods
Bushings for VAZ 2107 torque rods are disposable products that cannot be repaired. It is not possible to restore a worn bushing in a garage. The average car enthusiast has neither the necessary equipment nor the necessary skills to restore the inner surface of the bushing. Thus, the only option for repairing damaged traction bushings is to replace them with new ones. Here's what we need to replace the bushings on the rods:
- a device for pressing bushings (can be purchased at any auto parts store);
- hammer;
- beard with a diameter of 10 mm.