Everyone values the time of day! TROUBLE! The instrument lights do not light up. First things first. Probably half a year ago my speedometer light stopped working. Today I decided to take care of it and changed two light bulbs. I put it in place, turn on the dimensions, and then “Hello.” Only the tachometer light is on and that’s it. The rest of the instruments are not illuminated, and the arrows do not light up either. The BC monitor is on and working, the arrows are also functioning, the indicator lights are all on. Only the devices do not light up. Changed the rest of the light bulbs. the same. Zero result.
Maybe someone had something similar? What could it be? Is it really necessary to change the device?
The relay and fuse box is also called the mounting block or black box. In the event of a car breakdown related to electrical equipment, the fuses and relays are first checked. If a fuse is blown, you must first determine the cause of its blown before replacing it.
How to change instrument lighting on a Priora
Replacing the instrument panel backlight of a Lada Priora
Task: replace the instrument panel backlight in a Lada Priora
We remove the dashboard of the Lada Priora. Let's disassemble it, everything is simple (4 screws and everything else is secured with latches). Another important thing is to carefully remove the hands and not damage them. Peel off the lining (overlay with numbers) and on the back side of this lining we begin to erase the green coating. I washed with ear sticks and rubbing alcohol (solvent is not recommended).
Next, carefully remove the LCD screen. We take out the green filter, erase the green coating of the filter and put everything back
Next, we change 5 light bulbs to white LEDs (you can also install red or blue LEDs, whichever backlight you prefer). I bought white LEDs together with a base at a radio store.
Let's put everything back together in reverse order.
The photo shows that it shines brightly, but in real life it is much worse. After driving around, some diodes began to blink, apparently there was a bad contact, and I decided to change the backlight a little.
I bought 1 meter of LED strip and a soldering iron with a thin tip.
hide
1 Replacing Priora lamps in 5 minutes
2 Illumination of the instrument cluster Lada Priora 2.1 Soundproofing Priora
Replacing backlight
dashboard _
Lada
Priora
VAZ 2170.
Illumination of the instrument cluster Lada Priora
Backlight tuning
instrument clusters
Priora
frets from Pavel Medved.
Let's begin. We take the tape and cut strips, 3 diodes in each, and solder the wiring to them. I took solid copper wire.
Next, glue these strips in the same way as shown in the photo. In some places it is necessary to drill holes for the wires.
Let's check this whole thing. To test the LEDs, I bought a 9 volt Krona battery. All diodes light up
We take the board and connect it to the car, turn on the dimensions and use the control light to find the plus and minus of the backlight. And solder the wiring to them.
Then we assemble everything and twist and insulate all the wires.
I wanted blue arrows. I bought blue fluorescent paint at an art salon. I wiped off the red coating on the hands and painted it.
It shines very brightly. You set the backlight control to minimum and everything is fine, it doesn’t dazzle. But still I decided to tint it with 20Koy.
Here is the final version of the work done. I spent 2 evenings on this matter and was pleased with the result. Now it shines evenly and brightly.
Result: work on replacing the dashboard backlight of the Lada Priora has been completed
Noise insulation priors
To soundproof the Lada Priora with your own hands - for starters, I bought five or two rolls of Splen, STP sheets, corrugations for
Post Views: 102
Lada Priora Hatchback Turbo › Logbook › Installing a daytime running lamp controller
Priora instrument panel: detailed description and disassembly technique
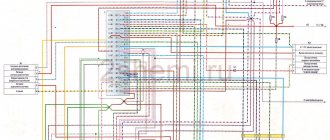
Dashboard pinout Connecting VDO on a Priora car
1 Pink-white To electric power steering 2 Blue-white To hazard warning light 3 Blue-gray To emergency oil pressure sensor 4 Brown-blue To parking brake switch 5 Yellow-blue To immobilizer control unit 6 Black To airbag control unit 7 Yellow To the exterior lighting switch 8 Blue To the right turn signal switch 9 Blue with black To the left turn signal switch 10 White and blue To the computer 11. To the brake pad wear sensor 12. To the seat belt sensor 13 Black To the traction control control unit 14 Red and blue “RESET” key on the steering column switch 15 Pink-blue To the brake fluid level sensor 16 Black To ABS 17 Green To the high beam switch 18 White To the instrument cluster light control 19 Brown Panel ground 20 White-red Terminal “30” 21 Orange Terminal “ 15" 22 Yellow-red To fuel consumption sensor 23 Orange-white MK “forward” key 24 White-black MK “back” key 25 Black-white Outside temperature sensor (-) 26 Yellow-green Outside temperature sensor (+) 27 Pink Fuel level sensor 28 Gray Speed sensor 29 Green-white Coolant temperature sensor 30 Brown-red Tachometer (low voltage) 31. Service. Panel diagnostics. 32 Brown-white Terminal “L” of the generator relay regulator
Here we connect: 1) Speed control, connect the white wire to the gray wire (pin 28 of the dashboard connector) 2) Ignition, connect the yellow wire to the orange (21 pin of the dashboard connector) 3) Dimensions connect the blue wire to the yellow (pin 7 of the dashboard connector)
Next we are interested in the mounting block, on the left under the panel, namely K7 - the relay for the high-beam headlights.
A mass is attached above the mounting block with a bolt.
We unscrew the screw from the bottom and take out the mounting block from the panel; we need the relay on the bottom left.
1) Connect the red constant plus wire to the pink wire going to the high beam relay. 2) The green wire in our case to the white-green wire going directly through the fuses to the lamps
What we end up with: 1) When autostarting, the lamps do not light up. 2) The lamps light up smoothly when you start moving. 3) When parked for a long time, the headlights first dim by 50%, then turn off. 4) When the headlights are turned on, the lighting goes into normal mode and the DRL turns off.
The dashboard contains the following parts, without which the car would not function:
- external lighting controller;
- switch for turning and lighting headlights;
- signal regulator;
- instrument cluster;
- wiper regulator.
Removing and installing the dashboard of a Lada Priora car
Instrument panel Lada Priora: general information on symbols
You will need: 8" and 10" socket wrenches, flat and Phillips blade screwdrivers.
1. Disconnect the wire from the negative terminal of the battery.
2. Remove the steering wheel.
3. Remove the steering column trim.
4. Remove the steering column switches.
5. Remove the floor tunnel linings.
6. Remove the instrument cluster.
Remove the right and left screws securing the center console of the instrument panel.
Use a screwdriver to pry off the heated side window nozzles on the right and left.
Using a 10mm socket wrench, unscrew the two nuts on the upper fastening of the instrument panel on the left and right
Turn the three latches and remove the fuse and relay box cover
Remove the four screws securing the instrument panel amplifier
Turn bottom left...
...and on the bottom right there are two screws securing the instrument panel.
Remove the screw securing the instrument panel to the left of the steering column
Remove the fastening screw located on the right under the instrument panel
Using a size 8 wrench, unscrew the bolt securing the ground wires of the instrument panel to the body bracket
Slide the instrument panel wiring harness clamps to the right
Disconnect the three harness pads from the pads mounted on the bracket
Disconnect the ignition switch (lock) wiring harness connector.
Disconnect the wiring harness connectors from the electric power steering
Using a 10mm wrench, unscrew the nut securing the ground wire of the instrument panel harness from the bracket for the electronic units
Slide the pad lock
Disconnect the instrument panel harness from the ignition system harness.
Disconnect the instrument panel harness connector from the power accessories control unit.
Disconnect the instrument panel harness connector from the airbag control unit
Remove the instrument panel and remove it from the passenger compartment
Install the instrument panel in the reverse order of removal.
Where are the fuses on the Priora?
- The main mounting block of the Priora is closed with a lid and located at the driver’s left foot. To open it, you need to turn three latches 90° and unclip the lid.
- The fuse box is under the hood, which is located near the expansion tank.
- Another mounting block, which is located near the left foot of the front passenger. To gain access to the fuses and relays, unscrew several screws with a Phillips screwdriver.
Below is a description of each fuse and relay block in order.
Possible reasons
Removing the instrument panel ford focus 2. instructions on how to remove the instrument panel ford focus 2
What to do in a situation where the instrument panel backlight on a VAZ-2110 car has disappeared? First of all, you should look for the reason why this malfunction occurred. Sometimes it can be identified immediately, but in some cases this process takes some time. In fact, there may be several reasons, so you will need to check everything methodically.
The most banal and simplest option is that someone turned the rheostat knob, which is responsible for the amount of light flux, all the way to the left.
This, by the way, is often the sin of children who are placed in the front seat. “Young drivers” love to turn all sorts of knobs, press buttons and switch levers. Perhaps the adults overlooked it, and the child “corrected” the dashboard lighting. The problem, as you understand, is solved by simply returning the rheostat knob to its previous position. Therefore, before you start looking for possible reasons for the sudden disappearance of the backlight, check this particular point.
I would like to remind you of one simple rule. In a situation where there may be several possible causes of failure, when searching you need to follow the path of least resistance. In other words, test the simplest assumptions first. You may be lucky and find the problem with minimal time and effort.
If the reason is not in the position of the rheostat handle, you need to proceed to further search for the causes of the breakdown. Possible sources of problems here could be:
- fuse;
- instrument panel circuit board;
- contacts;
- wiring;
- failure of light bulbs due to short circuit.
So, let's look at some of the above reasons in more detail. After the rheostat handle, you should check the integrity of the 5-amp fuse F1. You can also usually turn on the side lights and see if they work on the left side. Everything is explained here simply. The lamps that illuminate the instrument panel, the left side lights, as well as the trunk lighting operate through this fuse. The dimensions located on the right side of the car receive power through F11, that is, they are not of interest to us in this particular case.
You may see the following situation. The left side parking lights, or trunk light, work, but the instrument panel light does not. This means that the problem is not in fuse F1. Therefore, you need to continue searching for the possible cause of the malfunction. In particular, it is necessary to check the contacts of the rheostat that illuminates the dashboard lighting. It is not uncommon for plugs to fall off. Accordingly, the lighting of the shield disappears due to lack of contact.
However, the rheostat itself can also fail. It is quite easy to check this assumption. To do this, you must first remove the rheostat, and then directly connect its contacts. If after this manipulation the instrument panel lights come to life, it means that the problem has been found, and you just need to replace the failed part. If not, then you need to continue searching further.
The most serious problem due to which the instrument panel lighting disappears is damage to the printed circuit board of the dashboard itself. In particular, there are often situations when the track on it that supplies power to the lamps burns out. One point worth noting here. The instrument panel in such a situation cannot be repaired, which means there is only one way out - replacement with a new one.
There are cases when, due to a short circuit, all the lamps illuminating the instrument panel burn out. However, this happens quite rarely. Much more often, one lamp may fail. As you can see, there are several reasons why the instrument panel lighting may disappear. Accordingly, the search will take some time. However, in the vast majority of cases, eliminating the malfunction that has arisen will not be so difficult, and many people can easily do this with their own hands.
Relay in the interior mounting block
K1 – radiator cooling fan relay. See information about F1.
K2 – relay for turning on the heated rear window. See. information about F2.
K3 – starter activation relay. If the starter does not turn when you turn the key, first check the battery voltage and the contacts of its terminals, if necessary, clean them from oxidation and tighten them firmly. Charge the dead battery or replace it with a new one. The common ground contact in the engine compartment or the contact on the solenoid relay may also disappear; check whether the nuts are securely fastened and whether they hold the wire terminals well. You can check the starter by closing its contacts directly with a screwdriver when the gearbox is in neutral gear or by applying a plus from the battery to one of the retractor contacts. If it turns, it means the problem is in the wiring or the ignition switch. If not, most likely the starter itself or the retractor is faulty. Another reason may be the lack of contacts in the ignition switch. Also check the contact group, wires and connectors.
K4 – additional relay (ignition relay).
K7 – headlight high beam relay.See. information about F3, F4.
K8 – horn relay. See information about F5.
K9 – alarm relay. Check together with fuse F8.
K10, K11, K12 – backup relays.
Additional relays are mounted on a bar and located under the dashboard, near the front passenger's feet. To get to them, you need to remove the right tunnel lining. Next to the additional relays is the electronic engine control unit (ECU). If its connector interferes with access to the relay, disconnect it by first removing the negative terminal from the battery.
F1 (15 A) – main relay circuit, starter interlock.
F2 (7.5 A) – power circuit of the electronic control unit (ECU).
F3 (15 A) – electric fuel pump. If the fuel pump has stopped pumping (this can be determined by the absence of the sound of its operation when the ignition is turned on), check together with relay K2. There may also be problems with the immobilizer, it blocks the pump, see information about F20. If the wiring, this fuse and the relay are good, most likely the fuel pump itself has failed. To remove it, you need to disconnect the battery, remove the rear seat cushion, unscrew the cover, ring and fuel hoses, then carefully remove the entire fuel pump.
K2 – electric fuel pump relay. See. above about F3.
The power fuse box is located in the engine compartment under the hood, near the left strut support. To get to it, you need to open the lid by prying the latch.
1 (30 A) - engine control system circuit. If there are problems with the electronic control unit, short circuits or other malfunctions, this fuse may blow.
2 (30 A) - vehicle on-board circuit. 3 (40 A) - vehicle on-board circuit.
4 (60 A) - generator circuit.
5 (50 A) - electric power steering circuit.
6 (60 A) - generator circuit.
In case of any problems, it is important not to panic, to think soberly and logically. The most important thing is to diagnose and establish the cause of the breakdown.
If you don’t have enough experience or nerves, it’s easier to sign up at the nearest car service center. if it has a competent electrician.
I hope this article will help you deal with electrical problems and quickly fix any Priora malfunctions. If you have any experience or information, please leave a comment below, useful information will be added to the article.
Location of Priora fuses under the hood
- F1 (30 A) – power supply fuse for the electronic engine control system (ECM);
- F2 (60 A) – fuse for the power supply circuit of the engine cooling system fan (power circuit), additional relay (ignition relay), rear window heating, electrical package controller;
- F3 (60 A) – fuse for the power supply circuit of the electric fan of the engine cooling system (relay control circuit), sound signal, alarm signal, ignition switch, instrument cluster, interior lighting, brake light, cigarette lighter;
- F4, F6 (60 A) – generator power circuit fuses;
- F5 (50 A) – fuse for the power supply circuit of the electromechanical power steering
Relay and fuse box for Halla air conditioner
- right electric fan power supply fuse (30 A);
- fuse for the power supply circuit of the left electric fan (30 A).
- right electric fan relay;
- additional relay (sequential activation of left and right electric fans);
- left electric fan relay;
- heater fan power supply fuse (40 A);
- compressor power supply fuse (15 A);
- heater fan relay;
- compressor relay.
Panasonic air conditioner relay and fuse box
- Heater fan maximum speed
- Right fan
- Fan sequential relay (low speed)
- Left fan
- Left fan fuse (low speed)
- Right fan
- Heater fan
- Compressor
- Heater fan
- Compressor
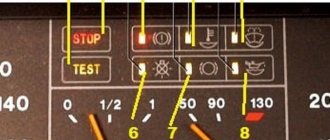
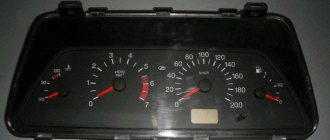
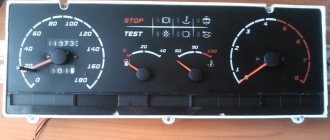
Dashboard indicator symbols
| No. on the diagram | Indicator designations |
| 1 | Tachometer. The device measures the engine crankshaft frequency (revolutions per minute). If the arrow goes beyond the red value, it means that the Lada Priora engine is operating in a dangerous mode; |
| 2 | Brake force distributor indicator. Reports defects in the operation of this node; |
| 3 | Battery charge. If the lamp lights up while the engine is running, the battery is discharged; |
| 4 | Left turn signal. The sign flashes when there is an alarm or the left indicator is on; |
| 5 | Speedometer. The device reports the speed at which your Lada Priora is currently moving; |
| 6 | Emergency lubricant pressure in the engine. If the sign lights up during operation of the power plant, it means the pressure in the system is low; it is highly not recommended to operate the engine in this condition; |
| 7 | Right turn signal (see No. 4); |
| 8 | Handbrake indicator. Lights up yellow if the Lada Priora is in the handbrake; |
| 9 | Antifreeze temperature in the cooling system. The operating temperature of the motor starts from 90° and above to the red mark. If overheating occurs, turn off the engine; |
| 10 | Gasoline level in the tank. If the fuel level approaches the minimum, the fuel pump may break; |
| 11 | Reserve gasoline level. The indicator lights up when there are less than 10 liters left; |
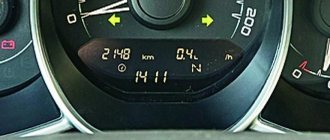
| 12 | Key for resetting the daily mileage and switching between display modes; |
| 13 | Alarm. If you have triggered the emergency lights, the lamp will flash along with the turn signal arrows; |
| 14 | Malfunctions in the electric amplifier. If defects appear in the EUR, the lamp will light up while the engine is running; |
| 15 | High beam designation. An active indicator indicates that you have switched to distant; |
| 16 | Outdoor Lighting. The system notifies the driver about the operation of the headlights or low beams; |
| 17 | Airbag malfunctions. If the lamp lights up after starting, then there is a high probability that the airbags will not deploy in a collision; |
| 18 | Immobilizer. An audible signal and flashing indicate that the immobilizer system is faulty; |
| 19 | Computer screen. Here you can view information from the bookmaker, as well as find out the total and daily mileage; |
| 20 | Indication of unfastened seat belts. The buzzer will signal a violation for 90 seconds; |
| 21 | The brake system is in disrepair. Most often these are worn pads or insufficient fluid in the system; |
| 22 | Disabling a specific airbag; |
| 23 | Indicator of defects in ASB operation, the braking system is operating normally; |
| 24 | Check Engine – there is a breakdown in the engines; diagnostics and subsequent repairs are urgently required. |
The electrical package unit is stuck on Priora's security.
What to do if Priora is not removed from the standard alarm!
The hazard lights are blinking, the car does not respond to the ignition key buttons. As a rule, several blocks are involved here, which are synchronized with each other.
- Ignition
- Radio channel module (Located in the driver's door)
- Electrical package block (Comfort block)
- Engine ECU
New blocks come with non-activated codes inside and can be installed on any car without problems, but once you register (train) the keys, a special code is written into all these blocks, which is synchronized with each other and serves as a standard alarm system. (Immobilizer) As soon as you turn the ignition key, within five seconds there is a poll between the key and the units, if the code matches everywhere, then the engine ECU gives permission to start, if the code of at least one device is not recognized, the engine ECU is blocked and the car does not start.
The working key is trained using a special red training key. I will not describe the procedure for learning keys; there is plenty of information on the Internet. In fact, the main key is the red training key; it stores a code that, after training, is written into the working key and other blocks.
I'll try to explain in more detail how it all works:
- The radio channel code, which we use to open doors using the key's remote control buttons, is written into the driver's door module, where the power window buttons are located. If you replace the comfort unit or engine ECU, the buttons on the key will still work.
- The IMMO (Immobilizer) code communicates only with the ignition key, the electrical package unit and the ECU unit. If you disconnect the driver's door module, the car will still start.
How to determine whether the keys are trained or not:
- The IMMO lamp on the instrument panel goes out after 5 seconds - the keys are trained.
- The IMMO lamp goes out after 30 seconds - the keys are not trained. (The car will start with any blank)
Options for disabling IMMO:
- Write an untrained eeprom dump to the engine ECU. All functions will remain working as normal, key buttons, etc., only the car will start with any blank.
If the vehicle cannot be disarmed using the remote control:
- Here the situation is a little more complicated, which is why this article was written. Suddenly, for some reason, the car remained on guard, the hazard lights blinked, the car beeped, etc. Of course, you open the car mechanically using the keyhole in the door, but the hazard lights constantly blink and the comfort functions do not work, and the car does not start. The cause could be a broken remote control key or driver's door module. Despite all this, the electrical package unit remained armed.
- There are two ways to disarm the electrical package unit. 1) Install the driver's door module from another car and open it remotely using the key of the same car. In this way you can disarm the comfort block. 2) Disassemble the electrical package unit and use the programmer to clean the eeprom M95080 memory chip.
Comfort block, disarming. This instruction applies only to unlocking the electrical accessories unit. If you need to unblock the engine starting, it is enough to write an untrained eeprom dump into the engine ECU.
We disassemble the block and find the memory chip eeprm M95080. It is enough to insert this microcircuit into the programmer and completely clean it, or replace it with a new one if there is no programmer. When retraining the keys, all the necessary data will be written into it again.
After cleaning the microcircuit, the electrical package unit will disarm.
A few more photos on the topic and video.
Pinout of the comfort block for connection on the table.
Electric package controller connection diagram.
When is pinout required (device chips) and how to do it
All car parts fail sooner or later. There are times when they need to not only be repaired, but replaced. The instrument panel may also break, causing it to be removed and a new one installed in its place. This work is easy to do with your own hands if you have at least the slightest knowledge of mechanics. If you are well versed in your Priora (sedan), then you need to perform the pinout in this way:
- First, the dial hands are removed using a regular knife.
- Next, the gasket in the speedometer is scraped out to replace the backlight.
- If there is no need to change the sensors, you can simply remove them and clean them.
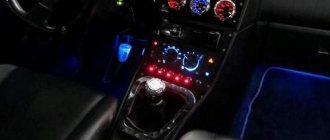
Very often, motorists cover the panel with a special LED strip to achieve even lighting. You can also use CMD diodes, which can be easily fused into glass with a soldering iron. To do this, you need to disassemble the dial and solder diodes directly under the base of the hands. If you understand the purpose of all the contacts, and also know the purpose of a particular connector on the panel, then you can easily do the pinout yourself. The main thing is to carry out everything strictly according to the instructions so that the connection is successful and the panel continues to function efficiently. If you know which is better to install a tidy: with a canbus or a regular one, then it’s better to ask professionals who understand this. If you have no experience in such work, and you do not understand the purpose of certain wires, then the technical service will help you improve the operation of the instrument panel. Of course, you will have to pay for this, but you will not waste your time, and the work will be done efficiently.
Lada Priora Hatchback California Poppy › Logbook › Replacing light bulbs in the Priora dashboard
Experienced and experienced people may not read further, since this entry is for “dummies” like me, who are faced with replacing light bulbs in the dashboard for the first time. My light bulb for illuminating the coolant temperature and the amount of gasoline in the tank went out. The right side of the speedometer periodically went out and then came back to life on its own.
To replace, you will need a Phillips screwdriver, a thin flat-head screwdriver and 5-7 minutes of free time. It is better to take a shortened one (cross), as it is more convenient for it to operate in a limited space. Unscrew the 2 screws on top.
Remove the panel under the steering column (simply snap off the top, turn the 3 plastic fasteners from the bottom). If you had to change fuses, removing the panel is not difficult. We see 2 more bolts (one on the left, the other on the right)
Unscrew them (be careful with the washers - they fly off quickly)
Next, remove the decorative trim that we unscrewed. Lower the steering wheel to its lowest position and pull out the trim. There is no need to remove the steering wheel!
Next we see 2 more fasteners (left and right), which secure the instrument panel itself.
We unscrew them carefully, as washers and screws can fall deep into the torpedo
Afterwards, you can pull the instrument panel towards you a little to gain access to the wiring harness and block. When you are already skilled in this matter, you will be able to change light bulbs without disconnecting the cable.
We see a green block at the back of the panel. It's easy to disconnect, but it's inconvenient the first time. Lightly press the stop tab with a screwdriver and pull the black lever up. The plug will come out of the socket on its own.
Let's take out the panel and see the mounting sockets for the light bulbs. Turning slightly counterclockwise, we pull out the burnt out light bulb. We install a new one. We reassemble in reverse order.
I bought the light bulbs completely assembled (lamp + socket), but some craftsmen replace burnt-out light bulbs, while leaving the old socket. I decided to try a diode light bulb to have an idea of whether all light bulbs should be replaced with LED ones. The diode lamp is slightly longer. Thus, it is closer to the filter and gives a light spot in the illumination area (the center is lighter, the edges are darker). The diode light bulb shines with a cold white light, which is noticeable through the light filter - the green has become brighter, more juicy. For now, I’m happy with the soft green light that came with warm incandescent lamps, so I won’t install diode lamps.
It turned out that the light on the right side of the speedometer was going on and off because it had burned out. But the shaking caused the filament to short circuit and burn again until the next bump “teared” it again. The lamp was replaced. I also bought some spare parts)))
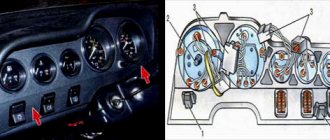
Removing the instrument panel
To remove the shield you will need a flathead and Phillips screwdriver.
Unscrew the two top screws (as shown in the picture), then carefully remove the panel under the steering column. It is held on top by clamps, and on the bottom by 3 fasteners that just need to be turned.
Under the panel we see 2 more self-tapping screws for fastening the shield; we also unscrew them. Now lower the steering wheel to the lowest position and remove the plastic cover of the shield.
Now all that remains is to unscrew the two screws holding the dashboard itself. They should be unscrewed carefully, as the screws may fall under the panel. It is better to unscrew them with a screwdriver with a magnetized tip.
We pull the panel slightly towards ourselves and see the green block and wiring harness. Disconnect it by pressing the “tab” and pulling slightly upward. After which the instrument panel will be removed.
Additional block
Additional relays are mounted on a bar and located under the dashboard, near the front passenger's feet. To get to them, you need to remove the right tunnel lining. Next to the additional relays is the electronic engine control unit (ECU).
If its connector interferes with access to the relay, disconnect it by first removing the negative terminal from the battery.
Circuit breakers
F1 (15 A) – main relay circuit, starter blocking.
F2 (7.5 A) – power circuit of the electronic control unit (ECU).
F3 (15 A) – electric fuel pump. If the fuel pump has stopped pumping (this can be determined by the absence of a sound when the ignition is turned on), check together with relay K2. There may also be problems with the immobilizer, it blocks the pump, see information about F20. If the wiring, this fuse and the relay are good, most likely the fuel pump itself has failed. To remove it, you need to disconnect the battery, remove the rear seat cushion, unscrew the cover, ring and fuel hoses, then carefully remove the entire fuel pump.
K1 – main relay.
K2 – electric fuel pump relay. See above about F3.
What is the fine if the license plate light does not light up?
A common malfunction of vehicle exterior lighting devices is the failure of the rear license plate illumination. There are many reasons for this:
burnout of lamps or damage to their filaments due to vibration and shaking. The simultaneous burnout of all backlight lamps, if there are more than one of them, as on most cars, may be indirect evidence of incorrect operation of the generator - increased voltage in the on-board network. It is recommended to compare it with the normal one for a given car model. But we must take into account that the relatively high voltage in the on-board network (14.6-14.7 V), characteristic of many car brands, is not a malfunction, but significantly reduces the life of low-quality incandescent lamps, and they can often burn out; miscalculations in the aerodynamics of the car, leading to heavy contamination of the installation area of the license plate lights. Liquid will sooner or later begin to leak through the lampshade seals, leading to corrosion of the contacts. Such defects for many car models, for example, the VW Transporter T5, are so frequent that the structures can be transferred from the status of “childhood diseases” to “chronic”; The license plate backlight does not light up due to a break in the wires at the point where they are bent when the body element on which the license plate is attached, the trunk lid, the fifth door, etc., moves. As a rule, this malfunction is typical of fairly old cars with hardened wiring insulation, which is more prone to fractures. Both the power wire and the ground wire (ground) can be damaged; If there is a short circuit in any circuit powered by the license plate illumination through one fuse, the absolutely serviceable lamp will go out. You will have to look for a fault in this direction if all of the above reasons do not appear.
On vehicles equipped with a towbar, you should pay attention to the contact group of the socket and the condition of the wiring of the trailer itself.
Priora instrument panel lights do not light up
Guys, help) the whole tidy is on, only the speedometer is not on, you put the lights from the speedometer in another place, they work, and all the working lights on the speedometer do not light up, what could be the problem?
Where and what to see or change? If you have the skills, then disassemble the device and look for a burnt out track or restore an erased contact pad.
If you have the skills, then disassemble the device and look for a burnt out track or restore an erased contact pad.
Now the whole panel has gone out(((we didn’t even have time to climb in(((
Apparently it was especially bright LED. )))
Not at all. She was dazzling)))
Correct the connector first.
Corrected me, I'm not a fool
How to make the instrument panel turn on the ignition
If you mean the backlight of the tidy when ignition, then you already wrote here)))
If you mean the backlight of the tidy when ignition, then you already wrote here)))
Yes, the topic is about backlighting)), but how can I search from my phone?
Yes, the topic is about backlighting)), but how can I search from my phone?
13 - contact - white - instrument lighting (remove the white wire from the block, instead apply it from the ignition switch or the D+ signal from the generator - the instrument will be illuminated when the ignition is turned on or when the engine is running. The indicator - "gauge" will work normally, as usual when incl. dimensions)
The entire instrument panel periodically began to go out (if you turn on the turn signals, the indicators turn on, but the rest of the panel is still without light), and all other indicators too. The backlight comes from the electrical package controller, contact X2-2 (white wire), then branches somewhere in the harnesses on several wires, diverging to all places, including the dashboard lighting. To begin, pull connector X2 of the electrical package controller several times (it is 20-pin), maybe the contact is bad, or you can turn on the backlight, wait until it stops working and use a needle to measure the voltage on the specified wire.
How to find X2-2: https://xn—-8sbabr6ahc3e.xn--p1ai/images/LADA_Priora/Tuning/Other/podkluchenie-antiradar-priora/mus2.jpg
If the car is new and the Central Body Electronics Unit is installed instead of the electrical package controller, then everything is simpler - the backlight takes its origins in the lighting control module, pin 58b, the wire is also white.
Hello comrades. I have the following problem: the lights on the instrument panel, heater knobs, heated glass, cigarette lighter are not on, but the lights on the power windows and MUS are on. In addition, the left side of the lights does not light up, the low beam lights up normally. What can non-burning elements have in common and where to go?
Added after 7 minutes and I was also mistaken, the MUS is not lit either
Fuse box in the passenger compartment of VAZ-2170, -2171, -2172
The fuse box in Priora is located at the bottom of the dashboard, on the left side of the steering wheel. To get to it, you need to open the cover, which is held on by three latches. Rotate each locking knob 90 degrees and pull the lid down and it will snap open.
Fuses in the interior mounting block
F1 (25 A) - radiator cooling fan. If your fan does not work, check its motor by applying 12 V directly to it from the battery. If the engine is working properly, then most likely the problem is in the wiring or connectors. Check the serviceability of relay K1.
The fan in the Priora usually turns on at a temperature of 105-110 degrees. Do not allow the engine to overheat, watch the arrow of the temperature sensor.
If the fan runs constantly and does not turn off, check the coolant temperature sensor located on the thermostat. If you remove the connector from the working sensor, the fan should turn on. Check the wiring to this temperature sensor, as well as the contacts of relay K1, move this relay, clean the contacts. If this is the case, replace it with a new relay.
F3 (10 A) - high beam, right headlight. F4 (10 A) - high beam, left headlight. If the headlights do not shine on high beam, check the K7 relay and the headlight bulbs. The steering column switch, wiring or connectors may also be faulty.
F5 (10 A) - sound signal.
If the signal does not work when you press the steering wheel button, check relay K8. The signal itself is located under the radiator grille; you can get to it by removing the plastic casing from above. Check it by connecting the voltage to 12 V. If it doesn’t work, try turning the adjusting screw, or replace it with a new one.
F6 (7.5 A) - low beam, left headlight. F7 (7.5 A) - low beam, right headlight. When replacing lamps, be careful; there are separate lamps for the low and high beams, so they can be easily confused. It is better not to install lamps in high-power headlights; the reflectors may melt and the desired effect will not be achieved. Most low beam headlight problems that cannot be corrected by conventional means can be related to the light control module (LCM). The low beam relay is only available in cars equipped with a light sensor, it is located in the place of relay K1; on most cars this relay is not in the mounting block; the low beam circuit goes through the MUS block. It happens that the tracks in the block burn out; if there are problems, it is better to replace it with a new one. If the windshield wipers turn on spontaneously when the low beam is not working correctly, the problem is most likely in the windshield wiper control unit, located in the center of the dashboard, the topmost block, next to the radio, is best reached from the glove compartment, or by hand through the removed console covers at the feet.
Priora fuse box diagram
| Fuse no. | Current strength, A | "Standard" and "Norm" | “Norma” with air conditioning and “luxury” |
| F1 | 25 | Engine cooling radiator fan | Reserve |
| F2 | 25 | Heated rear window | Mounting block, rear window heating relay (contacts). Electrical package controller, contact “10” of XP2 block. Rear window heating element. |
| F3 | 10 | Right headlight, high beam | Right headlight, high beam lamp. Instrument cluster, headlight high beam indicator. |
| F4 | 10 | Left headlight, high beam | |
| F5 | 10 | Sound signal | Mounting block, horn relay. Sound signal. |
| F6 | 7.5 | Left headlight, low beam | |
| F7 | 7.5 | Right headlight, low beam | |
| F8 | 10 | Alarm signal | Mounting block, alarm relay. Alarm sound. |
| F9 | 25 | Priora heater fuse | Reserve |
| F10 | 7.5/10* | Interior lighting, instrument panels, brake light | Instrument cluster, pin “20”. Brake light switch. Brake light bulbs. Interior lighting unit. Interior lighting. The door sill light on the right front door. Additional brake signal. |
| F11 | 10/20* | Wiper | Mounting block, high speed windshield wiper relay. Switch for cleaners and washers, contact “53a”. Wiper and washer switch, contact “53ah”. Heated rear window switch. Mounting block, rear window heating relay (winding). Windshield wiper motor. Rear window wiper motor (2171,2172). Windshield washer motor. Rear window washer motor (2171,2172). Airbag control unit, pin “25”. |
| F12 | 20/10* | Terminal 15 devices | Instrument cluster, pin “21”. Electrical package controller, contact “9” of block X2. Electromechanical power steering control unit, contact “1” of block X2. Reversing light switch. Reversing lamps. Parking system control unit, contacts “11” and “14”. |
| F13 | 15 | Cigarette lighter fuse Priora | |
| F14 | 5 | Left headlight, parking light, license plate light, trunk light | Side light lamps (left side) Instrument cluster, main light indicator License plate lights Trunk light Electrical package controller, pin “12” of block X2 |
| F15 | 5 | Right headlight, parking light | Side light lamps (right side) Glove compartment lamp |
| F16 | 10 | Terminal 15 ABS | Hydraulic unit, contact "18" |
| F17 | 10 | Left fog lamp | |
| F18 | 10 | Right fog lamp | |
| F19 | 15 | Seat heating | Seat heating switch, contact "1" Front seat heaters |
| F20 | 5/10* | Immobilizer control unit | Recirculation switch (switch on) Mounting block, relay for low beam headlights and parking lights (automatic lighting control system) Heater electric fan relay Automatic lighting control switch Windshield wiper and external lighting control unit, contacts “3”, “11” Automatic climate control system controller installation, pin “1” Automatic window cleaning system sensor (rain sensor), pin “1” |
| F21 | 7.5/5* | Rear fog lights | Light switch, contact "30" Diagnostic block, contact "16" Clock Automatic climate control system controller, contact "14" |
| F22 | -/20* | Reserve | Windshield wiper motor (automatic) Mounting block, windshield wiper relay and windshield wiper high speed relay, (contacts) |
| F23 | -/7.5* | Reserve | Windshield wipers and external lighting control unit, pin “20” |
| F24-F30 | Reserve | ||
| F31 | 30 | Electrical package control unit | Electrical package controller, terminal “2” of block X1 Electrical package controller, terminal “3” of block X1 Driver’s door module, pin “6” Threshold light of the left front door |
| F32 | Reserve | ||
Possible reasons
What to do in a situation where the instrument panel backlight on a VAZ-2110 car has disappeared? First of all, you should look for the reason why this malfunction occurred. Sometimes it can be identified immediately, but in some cases this process takes some time. In fact, there may be several reasons, so you will need to check everything methodically.
This, by the way, is often the sin of children who are placed in the front seat. “Young drivers” love to turn all sorts of knobs, press buttons and switch levers. Perhaps the adults overlooked it, and the child “corrected” the dashboard lighting. The problem, as you understand, is solved by simply returning the rheostat knob to its previous position. Therefore, before you start looking for possible reasons for the sudden disappearance of the backlight, check this particular point.
I would like to remind you of one simple rule. In a situation where there may be several possible causes of failure, when searching you need to follow the path of least resistance. In other words, test the simplest assumptions first. You may be lucky and find the problem with minimal time and effort.
If the reason is not in the position of the rheostat handle, you need to proceed to further search for the causes of the breakdown. Possible sources of problems here could be:
- fuse;
- instrument panel circuit board;
- contacts;
- wiring;
- failure of light bulbs due to short circuit.
So, let's look at some of the above reasons in more detail. After the rheostat handle, you should check the integrity of the 5-amp fuse F1. You can also usually turn on the side lights and see if they work on the left side. Everything is explained here simply. The lamps that illuminate the instrument panel, the left side lights, as well as the trunk lighting operate through this fuse. The dimensions located on the right side of the car receive power through F11, that is, they are not of interest to us in this particular case.
You may see the following situation. The left side parking lights, or trunk light, work, but the instrument panel light does not. This means that the problem is not in fuse F1. Therefore, you need to continue searching for the possible cause of the malfunction. In particular, it is necessary to check the contacts of the rheostat that illuminates the dashboard lighting. It is not uncommon for plugs to fall off. Accordingly, the lighting of the shield disappears due to lack of contact.
However, the rheostat itself can also fail. It is quite easy to check this assumption. To do this, you must first remove the rheostat, and then directly connect its contacts. If after this manipulation the instrument panel lights come to life, it means that the problem has been found, and you just need to replace the failed part. If not, then you need to continue searching further.
The most serious problem due to which the instrument panel lighting disappears is damage to the printed circuit board of the dashboard itself. In particular, there are often situations when the track on it that supplies power to the lamps burns out. One point worth noting here. The instrument panel in such a situation cannot be repaired, which means there is only one way out - replacement with a new one.
There are cases when, due to a short circuit, all the lamps illuminating the instrument panel burn out. However, this happens quite rarely. Much more often, one lamp may fail. As you can see, there are several reasons why the instrument panel lighting may disappear. Accordingly, the search will take some time. However, in the vast majority of cases, eliminating the malfunction that has arisen will not be so difficult, and many people can easily do this with their own hands.
Lada Priora Sedan ON THE MASS › Logbook › Changing the color of the tidy
This post is about something I've been wanting to do for a long time, but never got around to! Today my friend and I started changing the color of the instrument panel lighting. We prepared thoroughly, but ended up costing ourselves with little blood. Although in real life there were a lot of e6^u! I won’t say too much, the topic is widespread and Google will confirm this. The first thing was to remove the dashboard itself, I have it VDO. Then the “delamination” process, first the glass was disconnected, then the plastic “arch”, and then the rear protective cover. In order not to lose the position of the arrows, we pasted electrical tape and made marks on it.