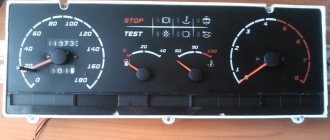
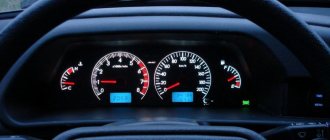
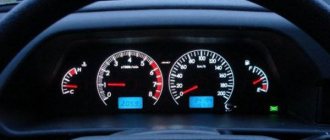
Designation of icons on the VAZ 2109 dashboard
The indicator panel can be divided into 2 parts. The smaller half of the bulbs are mounted centrally at the top of the board. There are indicators on the bottom line of the instrument panel.
- The meaning of the light is simple - the indicator indicates that self-monitoring diagnostics of the alarms are being performed.
- Indicates that there are problems in the power plant. If the lamp is constantly on, you need to diagnose the motor.
- The brake system is in disrepair. Usually the light indicates a drop in fluid in the expansion tank or critical wear of the pads.
- Coolant level sensor lamp. If it lights up constantly, you need to add antifreeze to the system.
- The windshield washer fluid has run out.
- External lighting lamps are damaged. The thread may have burned out or the contact may have broken.
- The front brake pads are worn to the limit.
- The oil level in the engine crankcase has dropped. It may also indirectly indicate a malfunction of the oil pump.
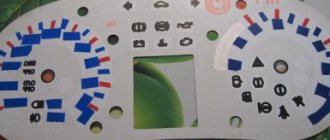
The photo below shows the sequence of light bulbs at the bottom of the dashboard.
| Number | Purpose |
| 2 | High beam indicator. |
| 3 | External lights are turned on and operating normally. |
| 4/6 | Turn signal indicators. On some car trim levels, when the hazard lights are turned on, they light up simultaneously. |
| 5 | The battery is not charging. It is necessary to check the wear of the battery itself and the wiring of the generator. |
| 7 | The engine oil pressure has dropped below normal. It is recommended to perform diagnostics. |
| 8 | The fuel level in the tank has dropped to a critical level. You will need to refuel immediately. |
| 9 | Standard engine fault indicator. |
| 10 | The parking brake is activated. |
What do the buttons on the panel mean?
Depending on the configuration and year of the car, 2 types of devices can be installed here. The keys and controls will vary.
Below is a description of the low tidy indicators.
| Number in photo | Decoding |
| 9 | Rear window defroster switch. |
| 10 | Likewise for the stern fog lights. |
| 11 | Emergency button. |
| 12 | External optics switch. |
| 13 | Interior ventilation control module. |
| 23 | Suction |
| 24 | Sound signal. |
| 25 | Daily mileage reset drive. |
| 26 | Button for turning on the instrument lighting. |
| 27 | Headlights corrector. |
| 29 | Switch for direction indicators and headlights. |
Next there is a decoding of the controls of a more modern - high panel.
| Serial number in the photo | Description |
| 2 | Hazard warning light switch. |
| 12 | Power window switches. |
| 14 | Interior ventilation control module. |
| 18 | Suction |
| 22 | Horn switch. |
| 23 | Instrument backlight key. |
| 24 | Hydrocorrector of headlights. |
| 25 | Optionally, a button to activate the heated front seats. |
| 26/27 | Rear/front fog lights included. |
| 28 | Rear window heating activator. |
| 31 | Head optics operating mode switch. |
Replacing light bulbs in the dashboard of a VAZ 2109
The backlighting of the VAZ 2109 instrument panel is often not satisfactory for drivers. You can change the color and its brightness yourself, without turning to the salon for help.
To improve the lighting, you need to install LEDs instead of conventional incandescent light bulbs. Their glow is much brighter, in addition, you can choose the color of the backlight at your discretion: blue, green, red or white. These are the main colors, but if you look, you can also find purple LEDs.
Replacement of light bulbs or sockets must be carried out carefully and carefully. If the car owner decides to use LEDs to illuminate the buttons, then you need to purchase a light bulb with a regular base. Soldering and a special cartridge are needed if there is a desire to replace the backlight of the instrument cluster. Among the many LEDs, there are also those that have a diffuse or, conversely, point glow.
These effects are achieved using a focusing lens configuration. A more uniform backlight is suitable for illuminating the scale on the instrument panel, and a brighter light is suitable for the button icon. Every driver should take into account the features of design changes when improving his car.
Tidy 21099 injector: icon designations
There are more lights and indicators here than on the carburetor. Additional light bulbs available:
- requirement to check the engine;
- STOP light.
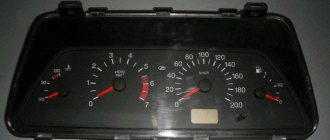
Tidy 21099 carburetor: designations
The decoding described at the beginning of the article can be fully used as an example for this point.
Stop light on the dash 2109
The lamp signals the driver about the presence of unexpected problems in the on-board circuits. When such an inscription is activated on the device, it is recommended to immediately go to a service station and look for the cause.
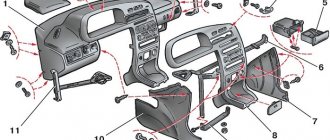
VAZ-2109 panel: do-it-yourself modernization
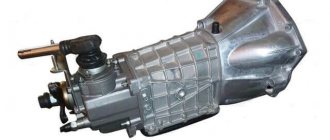
The VAZ 2109 panel is made of a special energy-absorbing material. It consists of an overlay and, in fact, the panel itself. It is made of plastic. Its thickness is 3 mm. The overlay is essentially reinforced with a special metal frame. It has a reliable energy-absorbing layer made of polyurethane foam. On the outside it is lined with a special decorative film. Low and high panels of the VAZ 2109, as well as a “European panel” can be installed on the car. The high panel of the VAZ 2109, like the low one, has certain features that should be taken into account when installing them.
The installation method and the high panel are almost identical, since the mounting points, as well as the connections of the air ducts of the automobile ventilation and heating system, are the same.
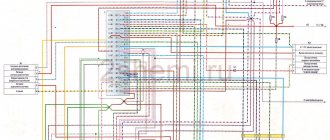
The differences concern only the wiring harness connections. (The diagram of the VAZ 2109 instrument panel is shown in the photo below; follow the link to read even more about it).
How to do easy tuning of the VAZ-2109 dashboard with your own hands
During the modernization of the interior of the domestic “nine”, tuning its “tidy” becomes a truly indispensable element. Beautiful modifications can be done with your own hands. To do this, you will need to make a new dial on a computer using special design programs and printing the picture on a printer. However, first you need to clearly think through the appearance of the dials for the car tachometer and speedometer, as well as for all the sensors that remain. Once the dials are printed, they need to be laminated, and then you can begin to remove the instrument panel. To properly dismantle it, you must first remove the steering wheel pads, and also mark the steering position relative to the shaft. Then carefully unscrew the fastening nut.
Next, you can remove the steering wheel and unscrew the screws that are located in the area of the car lower casing. After this, you will have to disassemble the steering column. When the instrument panel is removed, you should unscrew the arrows from the old speedometer and tachometer. Subsequently, they will be attached to the updated dials.
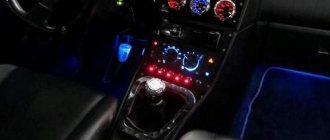
When tuning a VAZ 2109 with your own hands, you can also repaint the dials and hands in bright colors. Regular spray paint cans are suitable for this. At the same time, it is better to make the dial a rich black color. You can make it matte using special means. In this case, the arrows need to be painted in bright pink or original red-burgundy tones. After the painted plates of the machine dial have dried, they are equipped with an old or pre-prepared scale and removed hands. In a situation where the owner wants to modernize the instrument panel in a more modern way, he should also use a special (original, as in the video) backlight. You can add an original touch using a fluorescent marker, but more on that below.
Beautiful modifications to the VAZ 2109 panel
Every driver of a domestic car wants to make the instrument panel of his VAZ-2109 as bright and original as possible. Here is one of the options for how beautifully you can modify this element of the machine. You will need a soldering iron. Next you need to buy numbers and a scale panel. It is important that they are translucent from the inside. You should also purchase an ultraviolet lamp. It is powered by 12 volts. Therefore, nothing needs to be changed.
You will also need a fluorescent marker or paint. It will change color if exposed to ultraviolet light. This technique is often used in modern nightclubs. You will also need ordinary light bulbs with sockets, like those in the “tidy”. There is no need to change the LEDs; they will remain in place. Everything you need is there, you can get started.
First you need to remove the plastic, then the dashboard. Also, don't forget about the black plastic that surrounds the glass. We disassemble the standard insert, as well as the arrows. Most often, there are no holes in the new insert. Therefore, you will have to do them. For the arrows, the holes will be needed wider than in the standard trim. Otherwise, the arrows will start to stick. Next, you need to dismantle the backlight that is installed. The work should be done carefully so that the plastic is not damaged. We take out the board with the light bulbs. We install a neon light bulb instead of the usual ones, and stick a plastic protection on top. It used to have factory bulbs screwed in. Don't forget about the control unit for the new neon light bulb. You should always be careful not to confuse the polarity. If this happens, nothing will shine. Next you need to screw in the instrument lighting bulbs. This should be done in parallel to the neon lamp. We lay the wiring from the inside; first, for this you need to make holes in the partitions.
Let's check if everything is correct. The light bulbs inside should be adjusted. Next we put on the overlay and seal it. After these steps, all we have to do is paint the hands with a purchased fluorescent marker or paint. It is advisable to repeat painting after 10 minutes. After this, the arrows can be installed in their place. This completes the tuning.
Check the work, otherwise you will have to disassemble everything. If there are no problems, you can assemble everything in strictly reverse order. After such tuning, the interior of the VAZ 2109 will be equipped with a colorful panel like good foreign cars. If desired, you can use fluorescent paint to paint the dashboard trim in the place where the needle reaches its limit. It looks very nice.
How to change the backlight of the VAZ 2109 panel
During a trip, an experienced driver carefully looks not only at the road, but also at the dashboard. This is necessary to monitor the corresponding readings of the sensors that are responsible for the operation of the vehicle. It should be noted that its illumination should not tire or strain the eyes. The manufacturer equipped new cars with pale green or yellow illumination. It has a certain effect on the eyes - after a certain period of time they get tired. In this situation, it is better to replace the factory instrument lighting. For such tuning you will need a set of diodes, a soldering iron, screwdrivers with attachments, gloves, and iron pliers. Then we need to choose the color of the backlight. There are many possible options, it all depends on your imagination.
However, as always in any work, this process has its own nuances. It is recommended to install a soft white backlight if you use the car every day or for long trips. It will not tire your eyes. However, if you rarely use the car, then it is better to install light bulbs of a different, most varied color. Now let's start the installation.
First you need to completely remove the dashboard and disassemble the dashboard. To do this, unscrew the screws holding the dashboard to the body. You can find out their number by studying the car's operating instructions. It is possible that it is possible to remove the panel if you disconnect only the trim and release the steering column all the way down. Then we need to unscrew the bolts that are located at the bottom of the trim. Using a screwdriver and a flat socket, pry up the instrument cluster and remove it. You should be especially careful because you can accidentally damage the glass. After that, unscrew the bolts on the back side. We disconnect the glass, and then the plastic gasket. You do not need to touch the arrows, you should work carefully, because you can accidentally touch them or knock them down. If this happens, you will have to set them again and, what is even more difficult, adjust the sensors. When examining the back of the light bulb, you can see the location of all lighting fixtures, including LEDs.
We outline them with a marker and unsolder them from the microcircuit. We check new light elements with an adapter or battery. It is better to use LEDs because they will consume a small amount of energy and also have a long service life.
Then you need to inspect the metal antennae of the diodes so that they are intact. Otherwise the diode will not light up. We insert both antennae of the diode into the hole in the microcircuit that remains after soldering the previous light bulbs. We solder the antennae on the back of the circuit. We mount the remaining diodes in the same way. Reassembly must be done in reverse order. After starting the car, turn on the low beam. Thus, we check how the installed LEDs function.
High and low panel VAZ 2109 - the difference
Depending on the year and modification of the car, two types of devices are applicable. The first is considered a low panel, used mainly on carburetor nines and modifications with an injector.
A more advanced version was brought to market in the last years of production. Here there are all the symbols used initially and several indicators of the engine fuel injection system have been added. The dashboard looks more modern, which makes it attractive to car enthusiasts.
LED instrument panel lighting
In this article, we’ll look at how to improve the appearance of the instrument panel by changing the brightness and color of the backlight of the instrument scales and buttons at your discretion, since in terms of these parameters the standard instrument panel of the VAZ 2109 does not suit all owners of these cars. To do this, we will install instead of conventional light bulbs incandescent LEDs used in instrument panel lighting. They have a brighter glow and come in different colors that you can choose according to your preference. Standard colors are white, red, green, blue, and purple is also found. Please note that to illuminate the buttons, LEDs with a regular base like a light bulb are used, and to illuminate the instrument cluster, you need to install such an LED in a special socket; soldering will be required. But you can also purchase a ready-made LED already mounted in the socket. LED for illuminating the instrument panel (left) and buttons (right) In addition, there are LEDs on sale that have a point glow, when the light of the diode is narrowly directed only in one direction (forward), and LEDs , having a diffused glow, which is achieved by a special shape of the LED lens. Which one you prefer, choose for yourself. So let's get started.
Illumination of the heater (stove) control console
Remove the plastic handles for the heater damper control levers. Remove the glass of the stove control unit by picking it up with a knife. We make a reflector out of foil and fix it under the glass of the VAZ 2109 heater control unit. If it is not made, the console backlight will be concentrated only in the place where the backlight LED is installed next to the heater fan speed control knob, and will decrease towards the opposite area, which does not look very good attractive. Then unscrew the lower part of the center console (the beard), remove the socket with the backlight lamp for the heater control unit and change the lamp to an LED. We put everything back together in reverse order.
It should be noted that simply replacing the backlight lamp with an LED one, despite all the tricks, will not achieve completely uniform illumination of the heater control panel. Although this is still better than the standard backlight.
To finalize the illumination of this unit, it is best to stick a 10 cm long LED strip to the bottom, solder 2 wires (plus and minus) to its contacts, and connect the wires to the backlight lamp socket of this unit. Just act carefully, do not leave uninsulated sections of wires to avoid a short circuit! LED strip for illuminating the heater control panel Now the heater control panel illumination glows brightly and evenly over the entire area. Moreover, this illumination is noticeable both day and night. Illumination using an LED strip This is what the illumination looks like during the day. However, if in the daytime everything is fine with the illumination, then when it got dark I realized that the brightness of such illumination is excessive for me, and it would be nice to have it a little less bright.
You can, of course, adjust the brightness of the entire instrument panel illumination using the corresponding regulator to the left of the steering wheel, but the brightness of the remaining instrument panel illumination lamps suited me, so I did it differently.
We take a black marker and paint over the coating above the LEDs (my LED strip is insulated) to the desired level of light transmission - and the problem of excess brightness is solved. The photo above shows a version of the backlight already modified in this way. You can also cover the LED strip with a piece of tint film, the effect will be the same.
Illuminated buttons on the instrument panel
The procedure is extremely simple: remove the button from the panel by prying it with a screwdriver (carefully), disassemble it, take out the light bulb installed in it, install an LED of the color you like in it, remove the light filter and put everything back together. This is what the result of the modification looks like: the buttons and instrument cluster glow with bright white light. And this is what the white backlight looks like during the day: You don’t have to remove the light filter from the button, but on the contrary, by selecting a light filter, create the appropriate brightness and color of the button glow. On my car, the rear window heating button is illuminated in orange, and the foglight buttons glow turquoise. The turquoise color is the result of a white LED shining through a green filter. The illumination of the hazard warning button is made red in a foreign style. LED illumination of the instrument cluster. We will need 3 LEDs in a socket, double-sided tape and foil. Remove the instrument panel shield (visor). For dismantling instructions, see any VAZ 2109 repair manual. Remove the instrument cluster. Unscrew the speedometer cable and disconnect all the plugs. At the top of the instrument cluster there are 3 backlight bulbs.
They illuminate instrument scales through a green filter. You can remove this filter, or leave it as you like. I would like to note that the light of a white diode through a green filter is quite interesting, try it yourself.
We replace the light bulbs with LEDs (preferably with a diffuser lens); for better light dispersion, we make a reflector from foil, secured with double-sided tape. Reassemble the instrument panel in reverse order. IMPORTANT! LEDs have polarity, so if after installation the diode does not light up, you need to change the polarity of its power supply by simply turning the LED over. Taking advantage of the situation, you can glue all the plastic joints of the panel with double-sided tape, there will be fewer squeaks.
Errors on the panel
VAZ versions of on-board computers have a self-diagnosis option, which allows you to read codes yourself without the use of additional equipment. The following is a list of common problems encountered on cars.
| Number | Decoding |
| 1 | Motor control unit malfunction. |
| 2 | The voltage in the on-board circuit is too high. Usually occurs during short circuit. |
| 3 | Fuel level sensor - open circuit or damaged wiring. |
| 4 | The antifreeze level controller is faulty. |
| 5 | The external temperature controller is faulty. |
| 6 | The engine has overheated, you should stop and let the engine cool. |
| 7 | Engine oil pressure is less than minimum. There may be two reasons for this. Loss of lubricant level or pump failure. |
| 8 | Critical voltage drop in the on-board network. |
| 9 | The battery is low. The serviceability of the generator and its mains should be checked. |
| E | EEPROM data packet error |
| 12 | The diagnostic lamp is faulty. |
| 13 | Lambda probe circuit open. |
| 14 | Increased signal coming from the antirfiz temperature sensor. |
| 15 | The coolant temperature controller is faulty. |
| 16/17 | Incorrect voltage in the on-board network. |
| 19 | DPKV refused. |
| 21 | The throttle position control is faulty. |
| 24 | The speed sensor is faulty. |
| 27/28 | The exhaust gas system sensors are sending incorrect signals. |
| 35 | Idle speed is set incorrectly. |
| 41 | The phase regulator is not working correctly. |
| 44/45 | Excessively lean or rich mixture in the cylinders. |
| 49 | Loss of tightness in engine lines. |
| 61 | Lambda probe is faulty. |
Possible dashboard problems and how to fix them
With prolonged use of vehicles, parts included in various systems gradually wear out, which can lead to serious problems. A car enthusiast can find and eliminate the cause of a malfunction independently if he has certain knowledge and skills. Let's consider the problems associated with the instrument panel of the VAZ 2109.
| Malfunction | Cause | Remedy |
| The coolant temperature and fuel level sensors do not work. | Fuel level and temperature sensors are damaged. Wire tips are oxidized or damaged. | Replace sensors. Check the condition of the wires. |
| When the tank is full, the fuel level sensor needle returns to zero. | The float stop is not installed correctly. | Adjust the limiter. |
| The fuel level sensor needle jumps | Insufficient contact of the sensor resistor with the current collector. Break or damage to the sensor (resistor) winding. | Bend the resistor leads. Replace the sensor. |
| The fuel reserve warning light is constantly on. | The wires are shorted to ground. The flexible sensor bus touches the fuel pipe. | Eliminate the short circuit. Bend the tire. |
| The control lamp does not light up. | The light bulb is out of order. The contacts of the lamp socket are not pressed against the board enough. The contacts have oxidized. The sensor has failed. Wires are oxidized or damaged. | Replace the light bulb. Bend the socket contacts or replace it. Clean contacts. Replace the sensor, ring it and check for functionality. Repair damage or clean wires. |
| The speedometer does not work. | The speedometer drive fastening nuts are not tightened. The drive shaft is broken. The speedometer mechanism is faulty. | Tighten the nuts. Replace the shaft. Replace the speedometer or instrument panel. |
| The flexible speedometer drive shaft is noisy. | The shaft shell is deformed. | Replace shaft. |
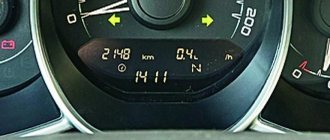
Warning icons on the panel
The steering wheel icon can light up in two colors. If the yellow steering wheel is on, then adaptation is required, and when a red image of the steering wheel with an exclamation mark appears, you should already be concerned about the failure of the power steering or power steering system. When the red steering wheel lights up, your steering wheel will probably become very difficult to turn.
The immobilizer icon usually blinks if the car is locked; in this case, the indicator of a red car with a white key signals the operation of the anti-theft system. But there are 3 main reasons if the immo light is constantly on: the immobilizer is not activated, if the tag on the key is not read or the anti-theft system is faulty.
The handbrake icon lights up not only when the handbrake lever is activated (raised), but also in cases where the brake pads are worn out or the brake fluid needs to be topped up/replaced. On a car with an electronic handbrake, the parking brake light may come on due to a glitch in the limit switch or sensor.
The coolant icon has several options and depending on which one is lit, draw conclusions about the problem accordingly. One red lamp with a thermometer scale indicates an increased temperature in the engine cooling system, but a yellow expansion tank with waves indicates a low coolant level in the system. But it is worth considering that the coolant lamp does not always light up at a low level; perhaps there is simply a glitch in the sensor or float in the expansion tank.
The washer icon indicates a low fluid level in the windshield washer reservoir. Such an indicator lights up not only when the level actually decreases, but also if the level sensor is clogged (the sensor contacts become coated due to poor-quality liquid), giving a false signal. On some vehicles, the level sensor is triggered when the washer fluid does not meet specifications.
The ASR icon is an Anti-Spin Regulation indicator. The electronic unit of this system works in tandem with ABS sensors. When such a light is constantly on, it means the ASR is not working. On different cars, such an icon may look different, but often in the form of an exclamation mark in a triangle with an arrow around it or the inscription itself, or in the form of a car on a slippery road.
Catalyst icon
It often lights up when the catalytic element overheats and is quite often accompanied by a sharp drop in engine power. Such overheating can occur not only due to poor cell throughput, but also if problems arise in the ignition system. When the catalyst fails, high fuel consumption will be added to the burning light.
The exhaust gases icon , according to information from the manual, indicates a malfunction in the exhaust gas purification system, but, as a rule, such a light starts to light after poor refueling or the presence of an error in the lambda probe sensor. The system registers misfires of the mixture, as a result of which the content of harmful substances in the exhaust gases increases and, as a result, the “exhaust gases” light comes on on the dashboard. The problem is not critical, but diagnostics are worth doing to find out the cause.