The Vesta instrument cluster has a built-in trip computer (MK), which has a number of useful functions that are not found in the on-board computers (BC) of many cars (including those of competitors). For example, you can find out the voltage of the on-board network or the speed limiter. Read the instructions for using the bookmaker.
Setting the clock on the Lada Vesta on-board computer
In order to enter the clock setting mode, you need to use the top button of the on-board computer (), by long pressing this key you will get to the mode you need, how can you determine that you are already there? This is very simple, if you are on the right track, then the on-board computer should leave on its display only the numbers responsible for the current time, and one of these numbers (the first from the left) will flicker continuously. Each time digit is adjusted separately and does not depend on each other; in order to adjust the first digit, use the on-board computer buttons (,↓) with short presses. As soon as you set the first digit, move on to the next one; this can be done by long pressing the top button of the on-board computer (). Do these steps with each digit, then leave the time setting mode.
Parameters of the standard Lada Vesta onboarder
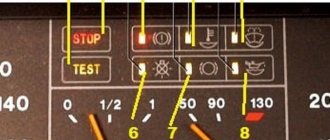
Depending on the model, the Lada Vesta on-board computer can perform a wide variety of functions and display relevant information on the screen display. In the standard version, the monitor displays:
- total vehicle mileage in kilometers;
- distance in kilometers traveled by the car in one trip;
- Digital Watch;
- travel time: hours, minutes;
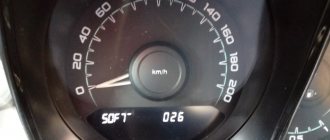
- speed in kilometers per hour;
- recommendations for gear shifting;
- voltage in the on-board network in volts;
- current fuel consumption in liters per 100 kilometers;
- fuel consumption per trip in liters per 100 kilometers;
- fuel costs per trip in liters;
- indicator of how many kilometers of fuel remain;
- number of the included gear;
- speed limit indicator;
- outside air temperature.
The display can also display other useful indicators that make driving much easier. For example, data from the parking sensors of the Lada Vesta, which ensures reliable parking of the car by generating sound and light signals. On-board computers are installed on the entire line of Lada cross, station wagon and on all luxury AvtoVAZ models.
Standard electronic devices also work successfully with additional equipment, which can be installed either with your own hands or at service stations. For example, the standard cruise control on the Lada Vesta “gets along” comfortably with the additional on-board computer.
The most modern BC models have extensive functions: they are integrated with a satellite navigation system, with their help you can watch TV, listen to DVDs, and connect to the Internet.
Direct time setting
The time is set according to this scheme.
You need to enter edit mode . To do this, you need to press and hold the “up” arrow for about three seconds. At this moment, only the numbers “0.0 km” in the second line from the left of the display will start flashing on the screen. While in edit mode, you need to press the same arrow once. The clock indicator on the screen will blink, for example, “08:35”.
You will need to hold down the top key again for a few seconds to start changing the clock.
Only the first digit “0” from “08:35” will begin to pulsate. Now you can use the arrows to change the readings of tens, of which we only have two. To go to the hour units, hold down the “up” button again for a couple of seconds, after which “8” will begin to pulsate. Using the joystick we set the numbers we need from “0” to “9”.
Additional functions
On-board computer The BC has a secret menu with which you can adjust the sound of the turn signal clicks. To do this, you need to hold down both buttons at the same time. We get to the additional menu.
We turn on the hazard warning lights and adjust the click sound using the up and down buttons. By briefly pressing both buttons, you can change the tone of the clicks.
Description of functions
A review of the Lada Vesta on-board computer shows which parameters are displayed on the display or front panel display. This makes the life of a Lada car enthusiast much easier. On Vesta, the standard on-board computer shows the following information, in addition to error codes:
- The magnitude of the vehicle network voltage;
- Cruising range on fuel in the gas tank;
- Current and average fuel consumption;
- Remaining fuel in the tank;
- Travel time along a specific route;
- Average speed;
- Watch;
- Total mileage;
- Controls the outside air temperature;
- Gives gear shift hints (with or without sound);
- On a Lada with cruise control, information about the installed parameters is displayed;
- If there is an AMT, the gear engaged or the auto - manual mode is displayed.
On-board computer Lada Vesta The on-board computer on the Lada Vesta is configured using two keys on the right steering column switch. Using the keys, entering the menu, you can control the readings of Vesta BC, displaying the necessary data on the control panel. Thus, the driver constantly has the opportunity to control the required parameters of Vesta.
Changing the sound of the turn signals
The factory provides settings for the volume and tone of the direction indicators (it does not work on the instrument cluster), however, the car’s operating manual does not say anything about this possibility.
Procedure
:
- We enter the settings menu by pressing and holding both keys of the on-board computer for about 5 seconds.
- The SOUND menu appears.
- Setting “p1” - the volume of the sound of the turn signal turning on
- Setting “p2” is the volume of the switch off.
- Setting “d1” is the key that turns on.
- Setting “d2” is the tone of the switch off.
- Switching between settings is a short press of two keys.
- To exit the menu, press and hold two keys for about 5 seconds.
The easiest way to set up is with the emergency lights on.
Video instructions:
Are you satisfied with the functions of the Lada Vesta on-board computer? Let us remind you that other operating instructions for this vehicle can be found in this section.
Keywords: Lada Vesta on-board computer | dashboard of Lada Vesta
+8
Share on social networks:
Found an error? Select it and press Ctrl+Enter..
Main functions and capabilities of the Lada Vesta head unit
Firstly, the radio tape recorder 100% fulfills its purpose - it plays music files and radio. Music can be listened to via AUX, SD card or via USB devices that can be connected as a file drive. You can also connect the radio via Bluetooth to your phone and play music on your car speakers.
Secondly, the radio displays the time on a monochrome display.
Thirdly, it has a Hands free function.
As you can see, the radio has all the necessary functions for comfortable listening to sound.
Secret settings of LADA VESTA
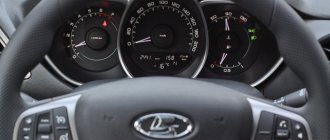
The standard BC and display reflecting the necessary information turn on simultaneously with turning the ignition key. The computer is controlled and configured using two buttons located at the end of the switch to the right of the steering wheel (Fig. 1). By pressing the buttons simultaneously, you can adjust the time, route mileage, reset the readings, and perform other actions.
To set the clock, you need to press the top key and hold it for a while. By briefly pressing, you can scroll through the menu, selecting the desired options, and update the readings. The first section shows the total mileage along the route, the second shows the time (hours and minutes), the third tells you which gear to switch to, and so on, in accordance with the list above. You can exit the menu at any time by pressing the bottom key.
There is also a secret menu in the bookmaker, which is not in the manual. You can get into it by pressing both buttons. In these options, you can change the level and tone of the turn signal or hazard warning signal: to increase the sound, you need to press the upper button, to decrease it, press the lower button. When you hold down both keys on the SET inscription, the settings will return to their normal position.
... not described in the manual, allow you to adjust the tone and volume of the turn signals and hazard warning lights. This menu is a service menu and, according to AvtoVAZ’s plans, should not be available to a wide range of users, since, unknowingly, the sound of the turn signal repeaters may be turned off, which will be mistaken for a malfunction.
Hidden settings, not described in the manual, allow you to adjust the tone and volume of the turn signals and hazard warning lights.
To enter the hidden settings menu, press and hold simultaneously both on-board computer control buttons for about 5 seconds, located on the windshield wiper control lever (to the right of the steering wheel).
| Steering column switch (to the right of the steering column) |
Sound P1 will appear on the display of the bot computer.
P1 – signal tone for turning on the direction indicators.
d1 – volume of the turn signal signal.
P2 – signal tone for turning off the direction indicators.
d2 – volume of the turn signal off signal.
After making the settings, you must press and hold again for about 5 seconds until you go to the standard on-board computer screens. The entered settings will be automatically accepted.
It is recommended to turn on the hazard lights so you can hear the sound when setting up.
Cost of maintenance of Lada Vesta in 2021
The price for LADA Vesta maintenance may vary among dealers in different regions. It is also different for individual trim levels of the base model.
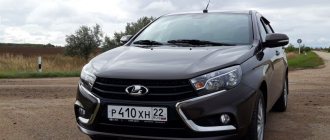
Lada Vesta in the showroom. Photo source: https://zen.yandex.ru/media/ladaonline/chto-luchshe-bazovaia-lada-vesta-ili-lada-granta-liuks-5cb312b568a9c800b4381c37
Average prices for 2021 in Moscow and the Moscow region (work only, without the cost of replacement consumables, in rubles) for Vesta sedan, station wagon, SV Cross models:
- TO-1 – 6600;
- TO-2 – 8800;
- TO-3 – 6600;
- TO-4 – 8800;
- TO-5 – 6600;
- TO-6 – 17700.
The same for the Vesta Sport model:
- TO-1 – 7100;
- TO-2 – 9200;
- TO-3 – 7100;
- TO-4 – 9200;
- TO-5 – 7100;
- TO-6 – 18200.
The cost of maintenance for a Lada Vesta from an official dealer is still less than that of its classmates produced in Russia. You can compare the cost of maintenance of 1 Lada Vesta with its analogues.
Radio Receiver Capabilities
Modes:
- “Radio” mode (manual and automatic search for radio stations)
- “Audio” mode (listening to audio files from an SD card, USB flash drive or phone via bluetooth)
- AUX mode (To play audio from an external source)
- Hands-free Bluetooth mode
Setting up audio parameters (short press on encoder No. 7 in the main menu):
- Switching and changing the radio settings is carried out by rotating the encoder (position 7) in the following order: Equalizer, Bass tone, Treble tone, Balance, Front/rear balance, Loudness, Output.
- There is an equalizer, the settings of which are carried out in the following order: EQ JAZZ, EQ POP, EQ CLASSICAL, EQ VOCAL, EQ USER.
System settings (long press of encoder No. 7 in the main menu) allow you to:
- set the time display format (Clock mode);
- manually set the current time (Setting hours/minutes);
- on off. function of adjusting the current time using RDS signals (RDS CT);
- on off. function of automatic switching to an alternative broadcasting frequency (RDS AF);
- on off. search function for radio stations by a given program type (RDS PTY);
- on off. function for receiving regional radio stations (RDS REG);
- on off. CB band (AM band);
- on off. Bluetooth function (phone connection);
- on off. button press confirmation signal (signal);
- on off. noise reduction function (noise reduction). Affects only operation in “Radio” mode;
- reset the radio settings to factory settings (factory settings). After resetting, the radio settings are set in accordance with Table 2 (clause 1.2 “Description of controls”).
Maintenance regulations for Lada Vesta: features
Each car owner operates his car at his own individual rhythm, so it is impossible to determine a single annual mileage rate for all drivers. AvtoVAZ has set the frequency of maintenance of its cars in such a way as to take into account the interests of both those who spend most of their lives behind the wheel and those who get into the car a couple of times a week.
Maintenance of Lada Vesta. Photo source: https://www.drive2.ru/l/539417107125764692/
Therefore, the moment when it is time to go to the service for the next maintenance of the Lada Vesta was established in two ways:
- every 15 thousand kilometers;
- no later than 12 months after the previous repair.
You need to base it on what happens first.
How to prevent errors on Lada Vesta
How to set up a pioneer radio in a car
There are often cases when, after diagnosing and inspecting the car, technicians do not find significant problems in the equipment that could cause errors. With proper prevention and care of the machine, such situations do not arise.
Experienced professionals recommend performing certain actions while operating the vehicle.
- Avoid deep discharge of the battery. All on-board equipment, including sensitive sensors, react extremely sharply to voltage sags within networks, which can cause their failure or incorrect operation. You should also be careful about the operation of the generator - strong surges also negatively affect the durability of the equipment.
- Once a year, diagnose the condition of all wires and structural elements. When operating a car, all electrical components are exposed to temperature changes, moisture, and dirt. External factors greatly damage the cable braid, which leads to its drying out and cracking. Subsequently, the insulation is broken, leading to short circuits and errors.
- Periodically check the tightness of the connections and the condition of the terminal blocks. During active driving, the plastic clamps are subject to strong vibration - this often causes contact failure and loss of signal from the sensor.
Also, some experts recommend treating all connections with a special oil - this will prevent moisture from entering the terminals and oxidizing them, which also negatively affects the passage of the signal to the on-board computer. At the same time, the cost of such lubricants is relatively low, which allows you to take care of your car quite economically.
Deactivating daytime running lights
Daytime running lights on the Lada Vesta turn on automatically - you just need to turn the ignition switch to two extreme positions. DRLs were invented in order to increase traffic safety on the road, but we must admit that even, for example, at night they shine quite brightly and are sometimes completely inappropriate.
An example of this is an alarm system with auto start. If the owner activates this mode, then at night those around him will already know that the car’s engine is running - this increases the risk of vandalism or even theft. Therefore, some owners of domestic compact cars decided to turn off the DRLs.
This is done very simply. You just need to set the steering column lever to an intermediate position between 0 and the “dimensions” label. That's it, daytime running lights will not work for us when the ignition is activated.
Did you like the article? Subscribe to the channel to stay up to date with the most interesting materials
On-board computer control algorithm
1. Selection of on-board computer functions (carried out using the keys on the right steering column switch).
2. Selecting trip meters and switching between clock and temperature.
3. Enter parameter setting mode, select parameter.
3.1. Setting the time.
When you exit the time setting mode, the seconds counter is reset to zero (reset without rounding). If there are no button presses within 60 seconds, the time setting mode will exit automatically.
4. Display mode of parameters of the “Cruise control” or “Speed limiter” functions.
In the mode of displaying the parameters of the “Cruise control” or “Speed limiter” functions, it is possible to switch the displayed function of the on-board computer (point 1) and the total and daily mileage counters (point 2), the indication of outside air temperature and time is not available, parameter setting modes (point 3 ) are not available.
General Notes:
- “short” – press for less than 1.5 seconds, triggered when released.
- “long” – press for more than 1.5 seconds, triggered by time.
- yellow color – the segment is blinking (square wave, 1 Hz).
- When resetting the route parameters (clause 3(d)), the following parameters are reset to zero: average fuel consumption, fuel consumed, travel time, average speed.
Bookmaker settings are also shown in the video:
How to remove the dashboard of Lada Vesta
A new instrument panel can be purchased for 8,000 rubles and mounted on the dashboard.
Removing the dashboard is not easy, it is quite a responsible task. How does this procedure happen? First you need to remove the negative terminal of the battery. Next, unscrew the 2 bolts on the top of the car console using T20 sockets. After this, the latches will make a clicking sound, and you can pull the instrument panel towards you. All fastening screws will need to be unscrewed, and then the device will need to be disconnected from all wires.
To install the device, you need to do everything in the opposite direction without changing the connection diagram.
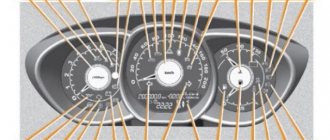
What has changed in the new dashboard of Lada Vesta
The updated dashboard of the Lada Vesta will feature the following improvements: larger fonts, the appearance of daytime lighting for the instruments and a change in the backlight color of the scales to orange.
The first changes will affect cars for export. Updated versions of Vesta will arrive on the Russian market a little later.
Changed instrument lighting helped solve the problem of reading readings. Now it has a more solid and presentable appearance.
The functionality of the new dashboard has also changed and acquired useful properties: sound has been added, the alarm sound has increased, automatic time synchronization with the satellite has been configured, the driver can only adjust the time zone. There are new indicators that warn of seat belts and low tire pressure.
To date, there is no information about the implementation of the device's lighting brightness.
Setting up and operating a car computer
The standard BC and display reflecting the necessary information turn on simultaneously with turning the ignition key. The computer is controlled and configured using two buttons located at the end of the switch to the right of the steering wheel (Fig. 1). By pressing the buttons simultaneously, you can adjust the time, route mileage, reset the readings, and perform other actions.
To set the clock, you need to press the top key and hold it for a while. By briefly pressing, you can scroll through the menu, selecting the desired options, and update the readings. The first section shows the total mileage along the route, the second shows the time (hours and minutes), the third tells you which gear to switch to, and so on, in accordance with the list above. You can exit the menu at any time by pressing the bottom key.
There is also a secret menu in the bookmaker, which is not in the manual. You can get into it by pressing both buttons. In these options, you can change the level and tone of the turn signal or hazard warning signal: to increase the sound, you need to press the upper button, to decrease it, press the lower button. When you hold down both keys on the SET inscription, the settings will return to their normal position.