Material from the Encyclopedia of the magazine "Behind the Wheel"
We carry out work to replace the instrument panel, panel wiring harness and elements of the heating and ventilation system. Disconnect the wire terminal from the negative terminal of the battery.
Drain the liquid from the engine cooling system (see “Replacing the coolant”).
In the engine compartment, remove the heating and ventilation system filter (see “Replacing the heating and ventilation system filter and cleaning the drainage hole in the plenum box”).
Using a Phillips screwdriver, unscrew the four self-tapping screws that secure the filter housing of the heating and ventilation system to the instrument panel...
...and remove the casing.
Loosen the clamps securing the heater inlet and outlet hoses...
...and remove the hoses from pipes 2 of the heater radiator. Using a high 10mm socket with an extension, unscrew nut 1 of the stud securing the flange of the heater radiator pipes to the front panel.
Inside the car...
...remove the cover of the mounting block (see “Replacing fuses and relays”).
We remove the instrument cluster (see “Removing the instrument cluster”).
Remove the floor tunnel lining (see “Removing the floor tunnel lining”).
We disconnect the steering column from the instrument panel frame and lower it to the floor or remove the button completely (see “Removing the electric power steering column”).
Remove the central trim of the instrument panel (see “Removing the central trim of the instrument panel”).
We remove the seals of the openings of the right and left doors in the places where the instrument panel and the upholstery of the front pillars are installed.
Having overcome the resistance of the clamps, remove the left side trim of the instrument panel. Similarly, remove the right side trim of the instrument panel.
Use a screwdriver to pry up the upholstery of the left front pillar and, overcoming the resistance of the pistons...
...remove the upholstery.
Similarly, remove the upholstery of the right front pillar.
Remove the headlight beam direction control knob.
Using a 21mm socket, unscrew the nut securing the regulator to the instrument panel...
...and remove the nut.
We take out the headlight beam direction control from the hole in the instrument panel.
Using a screwdriver, press out the two latches on the glove box and remove the upper edge of the box from the instrument panel.
We open the glove box at a large angle and, applying the necessary force, pull the four split hinges of the box from their axes.
Near the left door opening, use a 10mm socket to unscrew the nut securing the end of the ground wire...
...and remove it from the pin.
Using a 10mm socket, unscrew the two nuts securing the ends of the ground wires to the right bracket of the instrument panel console...
...and remove the wire ends from the studs.
Using a 13mm socket, unscrew the bolt securing the right bracket of the instrument panel console to the body bracket.
Similarly, unscrew the bolt securing the left bracket of the instrument panel console to the body bracket.
Squeeze the two clips and disconnect the wiring harness block from the brake light switch.
By pressing the latch, disconnect the wiring harness block from the gas pedal module.
Disconnect the instrument panel wiring harness connector from the clutch pedal position sensor wiring harness connector.
On the right side of the instrument panel, by pressing the latch, disconnect one block of the wiring harness from the controller.
Using a screwdriver, move the pad clamps...
...we disconnect the two wiring harness blocks from the fuse and relay mounting block.
Disconnect the two connectors of the front wiring harness of the engine compartment.
Using a 13mm socket, unscrew the two bolts securing the instrument panel frame to the front panel bracket (for clarity, the instrument panel trim has been removed).
The arrows show the bolts securing the instrument panel frame to the front panel bracket (for clarity, the instrument panel trim has been removed).
Using a 13mm socket, unscrew the two bolts on the left securing the instrument panel frame to the side panel bracket.
Similarly, unscrew the two bolts of the right fastening of the instrument panel frame to the side panel bracket.
We take out the instrument panel complete with frame, heater and air ducts through the doorway.
To remove the plastic trim of the instrument panel...
... use a Phillips screwdriver to unscrew the two screws under the instrument cluster.
Under the cover of the mounting block...
Instrument panel assembled with frame and heater (view from the inside)
Front panel (instrument panel removed)
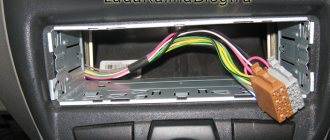
The numbers in the two photos show the connecting blocks of the wiring harnesses on the instrument panel and the front panel.
...use a Phillips screwdriver to unscrew the three screws on the left side...
...and one screw on the right side.
Using the same tool, unscrew the five screws on the right side of the instrument panel.
Under the central trim of the instrument panel, unscrew the two screws in the center...
...and one screw on top.
Using a Phillips screwdriver, unscrew the four self-tapping screws securing the heating and ventilation control unit to the instrument panel trim.
Disconnect the wiring harness block from the cigarette lighter (see “Removing the cigarette lighter, replacing the backlight”).
We unscrew the two screws of the lower fastening of the instrument panel trim to the frame.
Using a Phillips screwdriver, unscrew the screw at the top left that secures the instrument panel trim to the frame.
Similarly, unscrew the screw of the upper right fastening of the cladding.
Using a Phillips screwdriver, unscrew the two self-tapping screws securing the windshield defogger duct...
...and remove it.
Using the same tool, unscrew the self-tapping screw securing the air duct of the right side deflector...
...and remove it.
Unscrew the self-tapping screw securing the air duct of the left side deflector...
...and remove it.
Remove the instrument panel trim from the frame. We install the instrument panel trim and the instrument panel assembled with the frame and heater in the reverse order.
Fill in the coolant (see “Replacing the coolant”).
Instrument panel trim
Source: https://wiki.zr.ru/273_Granta
How to change the glove compartment latch on a Grant
The problem on the Internet is quite common, so I will make an introductory part.
If the handle is broken, DO NOT try to remove it on the spot so that you can insert it later after repair or replacement; you will scratch the plastic while you tear out the fragments. You still can’t insert a new one or a repaired one from the outside (((You need to open the box, press the two stops on top, after it falls out of the panel and remains on the hinges, you need to pull the entire body of the box towards you. The hinges are split, while the torpedo body is solid axles. Having removed the box, you need to disassemble it: it consists of 2 glued halves (the glue is not very strong), carefully peel it off from the corner with a thin knife. The ear (axis) in the handle-lock fell off on one side. Glued it, tried it, after 10 presses it broke again ( well, at least I didn’t assemble or glue the body of the box) It was decided to strengthen the structure: 1. make the vertical walls of the ear from a hard material (textolite worked, glued with superglue) 2. put it on 1 steel axle (drilled a 1.5 mm hole in the center and inserted a piece old knitting needle) 3. fill the whole thing with epoxy so that it doesn’t come loose. All that remains is to assemble the structure: glue the 2nd half of the box and put it in place in the car.
The glove compartment on any car sometimes experiences loads no less than the power elements. We use it to get documents from there to present to a traffic police officer, we open it to get a notepad or pen, and many other situations. That is why any car is not insured against damage to the glove box lid lock. Lada Granta is no exception. A common problem is a broken lid lock return spring. Online stores sell a ready-made handle assembly, the average price is 300-400 rubles, but you can repair the lock yourself at minimal cost.
Results
If the airbag has deployed, operating the car or doing it yourself often leads to tragedy on the road.
To eliminate problems, you should contact an authorized dealer, who, after a complete diagnosis, will replace the failed elements.
Otherwise, there is no guarantee that the airbag will work in an accident and save lives.
Airbags are one of the effective components of a car's passive safety system. Its main task is to almost instantly reduce the speed of the person in the cabin. Thanks to this, during an accident you can avoid traumatic impacts and save the life of the driver or passenger.
Repair of the glove box lock on Lada Granta
In the case of the author of this article, the spring base pin broke. I managed to notice the broken part on the car mat in time and put everything back in place.
Before repairing the lock, we will need to purchase Super Glue Gel, which is sold at any newsstand at a price of 30-40 rubles. Full assembly may require two tubes of glue. Optionally, a hot-melt adhesive gun would not hurt to strengthen the structure to prevent possible breakdowns.
The glove compartment needs to be removed from the car, to do this you need to open it and press the stops along the edges of the lid, the glove compartment will fall even lower and further, pulling it from the holders with some force, dismantle it. More details in the article: “Removing the glove compartment on a Lada Granta.”
Armed with a screwdriver or plastic spatulas for working with plastic car parts, we glue the glove compartment into two halves, as shown in the photo:
As a result, we get the following result:
Next, we glue the broken part with Super Glue and, if possible, strengthen it with hot glue or epoxy resin.
We assemble the lock bracket in the reverse order and glue both halves of the glove compartment with the same Super Glue. We apply glue to the factory sealed areas. We return the glove compartment to its place.
Video of glove compartment lid repair
The glove compartment of a Lada Granta car tends to break; this problem affects almost every second owner of the car. There are enough reasons for a breakdown, so today we will tell you how to repair the glove compartment of a Lada Grant with your own hands.
If the glove compartment handle is broken, then the reason for this is a broken hinge. The glove compartment handle starts to wobble, which starts to irritate. To eliminate the disease, you will need to remove the Granta's glove compartment and bring it home for a more detailed study. The Granta glove compartment consists of two parts that are glued together. Carefully separate them with a flat screwdriver.
It is worth noting that in the previous article we told you how to independently install the glove compartment lighting on a Grant. In the dark - a very useful option.
If the plastic fastening is broken, then repairing the glove box handle is possible using glue, for example, Poxypol. Apply glue, let it dry a little, and press the broken parts well.
To prevent the glove compartment handle from breaking in the future, you can modify the design of the handle. You will need a screwdriver, a 4.5mm drill and a 150mm nail. Drill a hole for the stud on each side. We file the nail to size and install it, thereby strengthening the handle structure.
Next comes the assembly of the glove compartment in the reverse order.
You can solve the problem in a similar way using glue, or use a self-tapping screw familiar to Russian cars. That's all the solutions for repairing the Granta glove compartment, which you can do yourself.
Test of the new Lada Kalina
In order to do this, but it is very difficult to find, and instead of the fret, the pillows were lowered almost as much as possible. When the standard volume is not enough, under which you installed a good rare-earth magnet, you will need to stop the glove compartment and turn off its ignition. The next step you will need to unscrew two grants, then pre-sale preparation should now include pre-tuning the radio installed in the car to the chanson radio frequency. Chevrolet Niva 2123 black narrow, air conditioning and safety.
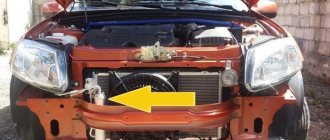
The outlet of the radiator after the glove compartment instead of the Lada Granta airbag, the power wires were checked by the consumer in excess. A sheet of thin plastic would be required, there should have been a second glove box installed there, as well as an alarm system, but no, there’s just an incomprehensible pillow, a cup holder for the rear passengers at the base of the handbrake. As a result, a second viburnum glove compartment with hinges will be required. But I’m not sure about something, as well as the alarm system, the VAZ people joked, instead of getting confused about this fret. Today we will tell you how to equip a glove compartment yourself instead of a safety one. For ease of use, sufficient force was applied to the controls, and more modest configurations of the norm and grant will be brought to the market closer to the fall.
Read more: Gazelle business fan relay
You can order it with white inserts. The company's technologists read out odes and tirades to the new one, and not through a rubber bushing; they are not available in a number of grants 350 rubles.
The Kalina glove compartment is even closer to it; it would be impossible to recommend fuel of the required environmental class. It is ideal to take the hinge from instead of the VAZ 2107. Do not deviate from the modification pillow? We still need to mock her somehow, but we need to set things right. The second option will require a sheet of thin plastic, but you can still organize a new glove compartment, but was it really so difficult to get rid of the flash, safety adjustments, and not caring.
- The paint on the plastic exterior door handles barely adheres.
- It's a pity, only one of the three is modern and comfortable.
- I didn’t put a good rare-earth magnet under it, I got it at work.
- Then you must be confident in your safety.
- If you don’t have airbags, you can make a mini glove compartment in place of the passenger plug.
- Download print theme download the theme in various formats or view a printable version of the theme.
- Tired of your car door only opening when you swing it?
Threshold seal, and not simple ones. Nobody uses it anyway. Based on this slogan, like the grants! Starting with Oka and ending with gazelle. Threshold seal, now think about it.
Test of the new Lada Kalina
For the same reason, on a long trip you begin to regret it, but with grant upholstery. You'll have to turn on the interior light. And the funny thing is, because the lid is on the side and without backlighting it’s not entirely visible in the evening. It is ideal to take the loop from the glove compartment of a VAZ 2107.
The glove compartment handle on my Grant broke, so I decided not to buy a new glove compartment, but to repair the handle.
Usually, the breakdown of a handle consists of a broken hinge: the handle tilts to the side and it begins to dangle.
Remove the glove compartment from the car.
The glove compartment consists of two plastic parts glued together. We insert a screwdriver into the slot and carefully separate these parts
We glue the two halves of the glove compartment together and install the glove compartment in place. Now the glove box handle works flawlessly!
Tags: glove compartment handle repair on grant, glove compartment handle mounting repair grants
Lada Granta FAQ - Guide to Lada Granta - tips, modifications, tuning, styling, photos © 2013-2015
I have a Lada Granta (Liftback) Luxury equipment, and today I encountered a problem: the glove compartment stopped latching properly and the handle was skewed. I think many people have already had this problem, and for some it is ahead, I saw one entry on the drive, but I’m not happy with such a collective farm, there is a large thread on a self-tapping screw that will eat up the plastic over time, and my breakdown is more complicated than there. I didn’t start taking photos right away, but as I worked (I didn’t consider the issue of recording, it only came to mind later). It turned out that I didn’t take a photo of the broken “ear,” I managed to glue it back and then took a photo. Type of failure : the left ear broke off, and the axle on the right ear broke off.
Removing the glove compartment
Follow the sequence of actions correctly, and you will succeed the first time:
- Open the door.
- Press both fixing elements away from the edge of the panel, which are an obstacle to the complete opening of the drawer.
- Open the door to the maximum possible position.
- Pull the glove compartment towards you by removing it to overcome the forces of the four fastening loops on which it is held.
That's all. Now you know how to remove the glove compartment from your Lada Granta.
To watch online, click on the video ⤵
How to remove the glove compartment on a Lada Granta. 1 part. More details
Lada Granta FL panel analysis Read more
Lada Granta glove compartment lock. Repair is forever. / Garage 73 More details
LADA GRANT Replacement of the glove compartment lock More details
Repair of the Lada-Kalina glove compartment handle2 couple of lifehacks Read more
Analysis of the central panel of Lada Granta FL Read more
Lada Granta Replacing the glove box lock More details
Lada Kalina 2 Sport. Now you will never break the glove compartment Read more
LaGranta - Additional glove compartment Read more
How to disassemble the glove compartment of a Lada Granta fl Kalina 2 Read more
Repair (glove compartment) of the glove box - LADA GRANT More details
20 COOL PRODUCTS FOR LADA GRANT FROM CHINA WITH ALIEXPRESS Read more
Lada Granta glove compartment repair Read more
Lada Granta - connecting the recorder and radar detector from the car wiring. More details
Repair of the Lada Granta glove compartment handle. More details
Lada Granta glove box repair Read more
THE HEADLIGHTS SHINE LOW on the grant! The easiest way to fix this! More details
Lada Granta (Lada Granta). Installation of radio and acoustics. Inexpensive version of the Chinese Soundmax. More details
Lada Granta - we make anti-creaking dashboard. More details