Wheel bearing failure is a common problem for car owners. Let's look at how to replace the rear wheel bearing of a VAZ 2114 and what tools are required for this. We will also look at the symptoms of part failure and how to carry out diagnostics to detect the problem.
Video that clearly demonstrates the replacement process:
Useful: How to replace the front wheel bearing on a VAZ 2114?
How to check the rear wheel bearing?
Diagnostics is similar to checking the front wheel bearing. You can do it yourself without going to a car service. There are several points by which failure is determined:
- When driving at a speed of about 50-60 km/h, noise with vibration will be heard, transferring to the car body, while the road surface will be smooth.
- Having raised one side of the car with a jack, we begin to rotate the wheel. If rotation is accompanied by extraneous sounds, this will also indicate a malfunction.
- After driving the car, touch the wheel disk at the hub. If it has a high temperature, then the part is failing.
Of course, it will not be possible to find out the critical wear of a part, but it will be possible to detect a malfunction. When a breakdown is diagnosed, it is strictly not recommended to continue driving the car; this may pose a threat to other road users.
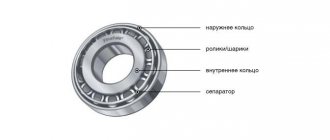
Bearing diagnostics
Let's talk about how to check a wheel bearing.
An indirect sign that you need to pay attention to the bearing on the VAZ 2114 is the appearance of a characteristic hum or hum from one of the wheels while driving. Typically, the noise increases at high speeds, making it easier to hear on the highway.
The driver, being in the cabin, is not always able to correctly determine the source of the noise. For example, a hum from the left wheel may be perceived as coming from the right. Or vice versa. To accurately determine by ear where the damaged bearing is located, you need to watch how the sound changes when turning when the mechanism is subjected to a higher load. If the sound disappears when turning right, but appears when turning left, the right bearing has worn out.
Diagnostics is carried out in the following way.
- We raise the car so that the wheel being diagnosed is hanging out.
- We rock it with our hands, holding the top part.
- We turn the wheel by hand.
- Pay attention to the smooth deceleration of movement and to extraneous sounds.
- An emerging backlash may also indicate a problem.
Necessary tool
Before starting work on replacing the rear wheel bearings on a VAZ 2114, we need to collect the necessary tools according to the list:
- Set of open-end wrenches;
- 30mm head and knob;
- Round nose pliers and pliers;
- Wheelbrace and jack;
- Hammer.
It is better to have a can of WD-40 or liquid wrench, as the parts are susceptible to corrosion and can be difficult to unscrew. If possible, you can purchase or find a special puller for the hub, which will make the work a little easier.
Helpful : How much do wheel bearings cost?
List of new parts and tools for replacing them
Replacing the front wheel bearing on a VAZ 2114 begins with the purchase by the car owner of the following spare parts:
- front wheel bearing (original art. 11180 – 3103020 – 04);
- front hub retaining rings (usually included in the repair kit under art. 11180 – 3101800 – 86);
- a new front hub (art. 11180 - 3103012 - 00), which will be needed if there is excessive wear of the bearing and rotation in the seat.
- tire remover;
- a set of open-end spanners from 12 mm to 24 mm;
- socket heads from 12 to 19 mm and wrenches;
- specialized wheel bearing puller;
- specialized steering wheel end remover;
- duckbills for removing retaining rings;
- carriage;
- Screwdriver Set;
- regular pliers.
The cost of work to eliminate this malfunction from official dealers (at the end of autumn 2021) ranges from 4 to 6 thousand rubles. In small private service workshops they will ask for work from 2500 to 3000 rubles. After reading the instructions below, carrying out repairs yourself will not cause big problems for the owner of a VAZ model 2113, 2114 or 2115.
Symptoms of malfunction
The first symptom of a malfunction will be a noise heard from the rear of the car. This means that the mechanism runs out of lubricant and the metal parts begin to rub against each other. The next thing that will happen is that vibration will be added to the body, which will be caused by slight wear of the element. When a part is on the verge of failure, an unpleasant smell will be felt, as if the brake pads are stuck in the drum. It is better not to let this happen, as the wheel begins to jam and the bearing can fall apart at any moment.
Replacing the rear wheel bearing
When starting to replace the rear wheel bearing of a VAZ 2114, place the car on a level surface and place supports under the wheels for safety. Then you can begin the replacement process:
- Remove the plug from the wheel that covers the hub nut. We unpin it using a core and a hammer.
- We loosen it using a wrench and a 30mm socket. First, you can spray a special agent on the threads that will corrode the rust. Also, the handle of the wrench can be extended using a piece of pipe, which will increase the leverage and provide a smooth load on the nut.
- Raise the car with a jack and remove the wheel.
- Check that the car is not on the handbrake! Unscrew the drum mounts. The adjacent holes have threads. We screw the bolts in there, which will allow the part to be pressed out. You can also tap the drum in a circle using a hammer and a block if it is very difficult to remove.
- Unscrew the bearing nut completely.
- You can remove the hub using the drum and engine head bolts. We screw the drum on with the back side and pull it towards ourselves, so the hub will come out. You can try to knock it out with a hammer or squeeze it out using a pry bar.
- Now we need to pull out the wheel bearing itself. It is best to use a special puller for this. When you don’t have a puller, you can use a grinder to slightly saw down the old element and knock it down.
- Remove the retaining ring in the hub using pliers.
- Next we need to press out the old bearing; if there is no puller, we can try to knock it out. If you can’t remove it, then you can contact a service center that has a hydraulic press, and they will also install a new part for you.
- After installing the new bearing, do not forget to install the retaining ring. Now lubricate the installation site with oil and install the part in place.
Further assembly occurs in reverse order. Be sure to check the tightness of all bolts after installation. Also be sure to tighten the bearing nut.
Rear hub replacement tools
To dismantle the hub you will need the following tools:
- Set of socket heads with extension.
- Pliers (pliers) for removing the locking ring.
- A spanner wrench for unscrewing the brake drum guide pins.
- A block of wood to prevent metal from hitting metal.
- Percussion instrument (hammer, cleaver, half sledgehammer).
- Mount.
- Chisel.
How to replace the hub:
- Loosen the wheel nuts.
- Raise the car with a jack. Place supports for belaying. Place anti-recoil devices (shoes).
- Remove the decorative cap (center of the wheel).
- Unscrew the wheel nuts.
- Remove the brake drum from the hub or remove the disc brake caliper.
- Unscrew the bolts securing the hub to the bracket. The bolt is unscrewed through a special hole in the hub itself. To gain access, you need to rotate the flange until the holes line up with the bolts. These nuts are tightened with a large torque, so unscrewing them is not so easy.
- Unscrew the caliper mounting bolts, steering knuckle mounting bolts and brake pad guides.
- Pull out the hub. The rear hub is removed from the bearing. You need a special puller to press the hub off the bearing.
Price and article number of the rear wheel bearing for VAZ 2114
Many car enthusiasts, when choosing a new part, prefer original spare parts. They have a price above the market average, but differ in the quality of the product. In stores you should look for them exclusively by article numbers 2108-3104020 and 2108-3104020-02 .
It is under them that parts from the AvtoVAZ plant are produced. When the part numbers are not indicated or have a different meaning, it may be a Chinese counterfeit made to match the original packaging, also pay attention to this when purchasing!
The average cost of an original bearing is about 1,500 thousand rubles .
Good analogues
You can also opt for analogues that have excellent reviews from car enthusiasts:
- Part number R172.04. The average price on the market is about 1,500 rubles .
- GKN-Spidan. Catalog number 26727. The cost is also about 1500 rubles .
- Search number H10 1206. The average price on the market is about 1200 rubles .
The quality of these brands is not inferior to the original and in some cases they last even a little longer than the original. Of course, the service life depends on driving style, so there is no exact data on the mileage of the bearings. Replacing a wheel bearing with your own hands is not a labor-intensive process that can be done without going to a car service center. The average price for such a procedure starts from 1000 rubles, which means that by doing car repairs yourself, you can save a third of your budget. You can extend the life of the bearing by not using the car in difficult conditions and on poor roads unnecessarily. This will help reduce the load on the chassis, which in turn will reduce wear.
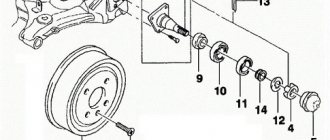
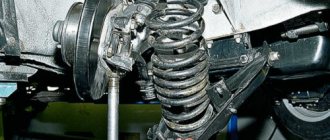
Rear suspension and chassis design
Bearing produced by AvtoVAZ
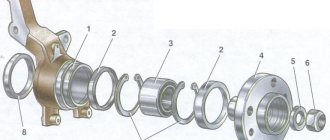
Before proceeding directly to the replacement process, it is worth considering the rear suspension structure in order to understand the location of the part, as well as determine what needs to be removed in order to change the rear wheel bearing.
Sectional view of the rear chassis
1. Rear wheel hub; 2. Rear suspension arm; 3. Suspension arm mounting bracket; 4. Rubber bushing for the lever hinge; 5. Lever joint spacer; 6. Rear suspension arm mounting bolt; 7. Body bracket; 8. Support washer for fastening the shock absorber rod; 9. Upper suspension spring support; 10. Spacer sleeve; 11. Suspension spring insulating gasket; 12. Rear suspension spring; 13. Shock absorber rod mounting pads; 14. Compression stroke buffer; 15. Shock absorber rod; 16. Shock absorber protective cover; 17. Lower support cup of the suspension spring; 18. Shock absorber; 19. Lever connector; 20. Hub axle: 21. Cap; 22. Wheel hub nut; 23. O-ring; 24. Bearing washer; 25. Wheel bearing; 26. Brake shield; 27. Retaining ring; 28. Mud deflector; 29. Suspension arm flange; 30. Shock absorber bushing; 31. Lever bracket with eye for mounting the shock absorber; 32. Rubber-metal hinge of the suspension arm;