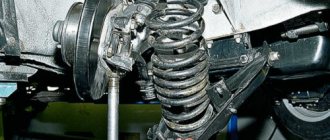
To replace the lower arm, remove the shock absorber, spring, disconnect the lower ball joint from the steering knuckle and the end of the stabilizer bar from the lower arm (see the corresponding sections).
Using a 19mm wrench, unscrew the two nuts securing the lower arm axle to the cross member.
We drive a wedge (chisel) between the axle and the cross member and...
...remove the lower arm.
We note the number and location of the adjusting washers between the axis of the lower lever and the cross member so that when installing the lever, put these washers in their original place.
We clamp the axis of the lower arm in a vice and use the device to press out the rubber-metal hinge. Having removed the part from the vice, remove the axle from the lever through the free hole.
We install new rubber-metal hinges in the following order:
press in one hinge...
...through the free hole in the lever we insert the axle with washers and...
. press in the second hinge. To install the device stop, insert a bolt of suitable diameter into the hole in the lever.
We install the lower arms on the car in the reverse order of removal.
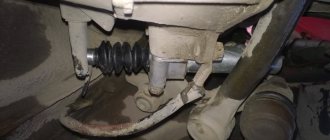
If necessary (cracks, peeling), we replace the compression stroke buffer. To do this, after first moistening its end with a soapy solution and prying it with a screwdriver, remove it from its seat. We also install the new buffer using soap and a screwdriver.
Silent blocks VAZ 2106
Quite high loads are constantly placed on the silent blocks of car suspensions, especially on roads with poor surfaces. Such conditions significantly reduce the life of these parts, as a result of which they fail and need to be replaced. Since the controllability of the car depends on the condition of the silent blocks, you need to know not only how to identify a fault, but also how to replace these suspension components.
What it is
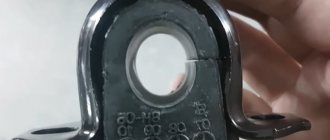
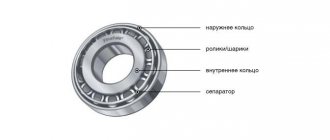
The silent block is a rubber-metal product, structurally made of two iron bushings with a rubber insert between them. Through these parts, the components of the car's suspension are connected, and thanks to the rubber part, vibrations transmitted from one suspension element to another are dampened.
Where installed
On the VAZ 2106, silent blocks are pressed into the arms of the front suspension, as well as into the reaction rods of the rear axle, connecting it to the body. The condition of these elements must be periodically monitored, and if they are damaged, repairs must be made in a timely manner.
What are there
On the VAZ “Six” and other Zhiguli models, silent blocks made of rubber were installed from the factory. However, instead of them, you can use polyurethane products, thereby improving the performance of the suspension and its characteristics. Polyurethane hinges have a longer service life compared to rubber ones. The main disadvantage of polyurethane elements is their high price. If a set of silent blocks made of rubber for a VAZ 2106 costs about 450 rubles, then made of polyurethane it will cost 1,500 rubles. Hinges made of modern material not only improve the behavior of the car, but also better absorb shock and vibration, reducing noise.
What is the resource
The service life of rubber-metal joints directly depends on the quality of the products and the operation of the vehicle. If the car is used mainly on good quality roads, then the silent blocks can last 100 thousand km. If you frequently drive through potholes, of which there are many on our roads, the service life of the part is noticeably reduced and repairs may be required after 40–50 thousand km.
How to check
Problems with the hinges can be judged by the behavior of the car:
- controllability deteriorates;
- Vibrations appear in the steering wheel and knocks in the front when driving over uneven surfaces.
To make sure that the silent blocks have exhausted their service life and require replacement, they should be checked. First, the parts are visually inspected for damage to the rubber. If it cracks and partially comes out, then the part is no longer able to cope with its tasks.
In addition to inspection, you can move the upper and lower arms with a pry bar. If knocking and strong vibrations of the silent blocks are observed, then this behavior indicates a lot of wear on the hinges and the need to replace them.
Video: checking the front suspension silent blocks
How to replace silent blocks on a VAZ-2106
Silent blocks are used in the construction of cars of all models. They are rubber inserts between suspension parts; they are used to absorb vibration and, accordingly, to prolong the uninterrupted operation of the machine’s chassis. The silent blocks themselves are subjected to very high loads, which leads to their frequent failure.
In this article we will talk in detail about how to replace silent blocks on a VAZ-2106 car, we will provide step-by-step instructions and useful recommendations, thanks to which you can perform this rather complex procedure with your own hands, without involving car service specialists.
Replacing silent blocks of the lower arm
By its design, the rubber-metal element is made in the form of a non-separable part, which is non-repairable and only changes if it breaks. To carry out repairs, you need to prepare the following list of tools:
- silent block remover;
- ball joint remover;
- keys at 13, 19, 22, 24;
- hammer;
- chisel;
- mount;
- lubricant (for example, WD-40);
- jack.
Removing the lever consists of the following steps:
- We jack up one of the sides of the car and remove the wheel.
- Unscrew the fastening elements of the shock absorber and remove it.
Dismantling and installation of rubber-metal elements is carried out with one puller, and only the position of the parts changes.
Replacing joints without removing the lower arm
If there is no time or desire to completely disassemble the suspension, then you can replace the silent blocks of the lower arms without dismantling the latter. Having jacked up the front end on the desired side, perform the following steps:
- We place a wooden stop under the lower ball joint. Its height should be such that when the jack is lowered the wheel does not hang out.
Video: replacing lower arm joints on a VAZ 2101–07 without disassembling the suspension
Tools and accessories needed to replace silent blocks
First of all, you will need to prepare all the necessary tools. Without them, it will be quite difficult to get to the silent blocks in a VAZ-2106 car and dismantle failed parts. So, for high-quality and convenient repairs you will need:
- special tools for dismantling ball joints, the upper arm, removing and installing a new hinge made of metal and rubber, as well as for unpressing the far steering tips;
- open-end, ring and miter wrenches for 13, 22 and 24 millimeters;
- jack;
- set of mounts;
- a thin and sharp chisel that will allow you to carefully dismantle the lower silent blocks without removing the lever;
- hammer.
Additionally, you will need to prepare the new suspension components that will be installed on the vehicle. Today it is best to buy polyurethane silent blocks, which differ from ordinary ones in their service life increased several times.
But if your goal is to carry out repairs at minimal cost, then you can get by with traditional rubber parts.
Replacing the silent blocks of the upper arm
To dismantle the upper arm, use the same tools as for the lower one, and carry out similar actions to hang the front of the vehicle and remove the wheel. Then perform the following steps:
- Unscrew the fasteners of the upper support.
After the repair, you should visit the service center and check the wheel alignment.
Once I had the opportunity to change the front end silent blocks on my car, for which I purchased a special puller. However, it was not without troubles, since the device turned out to be quite flimsy and simply bent while tightening the bolt when pressing out the hinges. As a result, I had to use improvised tools and materials in the form of pieces of pipes to complete the repair. After such an unpleasant situation, I made a homemade puller, which turned out to be much more reliable than a purchased one.
Replacing the upper arm
Removing the upper arm
To replace the upper arm of the VAZ 2106 front suspension yourself, you will need keys 13 and 22, a jack, a support, and a wheel wrench for removing the wheel. To dismantle the upper front suspension arm, you must follow the instructions:
- Raise the car on a jack and remove the wheel, then place a support under the lower arm and lower the car. This is necessary to load the suspension to the point that the car is standing under its own weight. The levers will then be aligned.
- Secure the upper arm axle with a wrench and loosen the axle nut by unscrewing it until it aligns with the end of the axle.
- Unscrew the bolts that hold the upper ball joint in place, and then move the lever up a little and completely unscrew the axle nut, pulling the axle out of the lever.
- Remove the lever together with the silent blocks without dismantling them.
Next, carry out all the work that required you to remove the front suspension arm of the VAZ 2106, and install it in place or replace it with a new one. The assembly process is the same as disassembly, but in reverse order.
Replacing torque rod bushings on a VAZ 2106
The rubber joints of the rear axle torque rods are replaced when they are worn out or have visible damage. To do this, the rods themselves are removed from the machine, and the rubber-metal products are replaced by pressing out the old ones and pressing in the new ones.
On the “six”, the rear suspension links are installed in the amount of five pieces - 2 short and 2 long, located longitudinally, as well as one transverse link. Long rods on one end are fixed to special brackets fixed to the floor, on the other side - to the rear axle brackets. Short rods are mounted to the floor member and to the rear axle. The transverse element of the rear suspension is also held in place by special brackets.
To replace the rod joints, you need to prepare the following tools:
- keys to 19;
- new silent blocks;
- penetrating lubricant;
- metal brush;
- mounting blade.
The bushings on all rods are changed according to the same principle. The only difference is the need to unscrew the shock absorber mount from below to remove the long rod. The procedure is performed in the following sequence:
- We drive the car onto an overpass or pit.
- Use a wire brush to remove dirt from the fasteners and apply a penetrating lubricant.
When I had to change the rear axle rod bushings, I didn’t have any special tools at hand, nor did I have a bolt of a suitable size from which I could make a cone for pressing in the inner bushing. I quickly found a way out of the situation: I took a piece of a wooden block, broke off a part from it and cut out a cylinder, the diameter and length of which corresponded to the dimensions of the metal sleeve. The edge of the wooden cylinder was ground into a cone. After that, I lubricated the wooden device with detergent and, without much difficulty, pressed it into the rubber part with a hammer, after which I drove the iron bushing. If it was not possible to press the bushing in the first time, I simply re-lubricated the parts with detergent and repeated the procedure.
Video: replacing rear axle rod bushings on a “classic”
Homemade silent block remover
It is convenient to change the rubber-metal elements of the front suspension using a puller. However, not everyone has it. Therefore, you have to make the device yourself, since it is quite difficult to dismantle the hinges with improvised tools. Let's take a closer look at how and from what materials a puller can be made.
Description
To work you will need the following list of parts and tools:
- a piece of water pipe 3 cm long with an internal diameter of 40 mm and an external diameter of 50 mm;
- washer with an outer diameter of at least 50 mm;
- M12 bolt 7 cm long with washers;
- two pieces of pipe 10 cm long and 40 mm in diameter;
- vice;
- hammer;
- lubricant
We manufacture the puller in the following sequence:
- Using a hammer, we rivet a part of the pipe with a diameter of 40 mm, increasing it to 45 mm.
To avoid troubles when driving a car, it is necessary to periodically inspect the condition of the suspension elements and promptly change not only silent blocks, but also other parts that have failed. By following the step-by-step instructions and using the appropriate set of tools, you can replace the hinges without any special skills.
How to replace lower control arms on a VAZ 2106
Due to numerous requests from VAZ 2106 car owners, we are publishing a guide on how to replace the lower control arms yourself. This operation is quite simple, the main thing is to have the right tool in the garage.
Do-it-yourself replacement of lower arms on a VAZ 2106
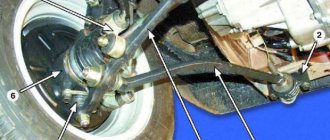
To replace the lower arm, remove the shock absorber, spring, disconnect the lower ball joint from the steering knuckle and the end of the stabilizer bar from the lower arm.
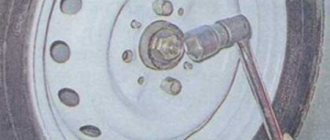
1. Using a 19mm wrench, unscrew the two nuts securing the lower arm axle to the cross member.
2. Drive a wedge (chisel) between the axle and the cross member and...
3. ...remove the lower arm.
4. We note the number and location of the adjusting washers between the axis of the lower lever and the cross member, so that when installing the lever, these washers are put in their original place.
Let us note that if you decide to make a major overhaul of the car’s chassis, I recommend replacing the springs on the VAZ 2106 with your own hands.
5. We clamp the axis of the lower arm in a vice and use the device to press out the rubber-metal hinge. Having removed the part from the vice, remove the axle from the lever through the free hole.
6. Install new rubber-metal hinges in the following order:
– press in one hinge.
– insert the axle with washers through the free hole in the lever.
– press in the second hinge.
7. To install the device stop, insert a bolt of suitable diameter into the hole in the lever.
8. Install the lower arms on the car in the reverse order of removal.
If necessary (cracks, peeling), we replace the compression stroke buffer. To do this, after first moistening its end with a soapy solution and prying it with a screwdriver, remove it from its seat. We also install the new buffer using soap and a screwdriver.
Basic procedures
Before dismantling the front beam of the VAZ 2106, it is necessary to remove the lower suspension arms. After completing the preliminary work, all you need to do is unscrew 2 nuts each, securing the axles of the levers to the beam. When performing this operation, you need to remember how many washers were on the bolts between the cross member and each axle. When reinstalling the levers, you need to put on the washers in the same number and order. The front beam is attached to the side members with 3 bolts on each side.
Silent blocks are replaced if they are worn out or damaged in any way. To carry out repair work, we will need wrenches “13” and “22”, as well as a special device for removing and pressing in the silent blocks of the lower arm of the VAZ 2106.
- Remove the lower arm from the car (see Lower arm of the VAZ 2106 front suspension, removal and installation).
- Clamp the lever in a vice by the axle and remove, if necessary, the lower ball joint by unscrewing the three fastening bolts.
- We unscrew the two nuts of the lever axle and install a device for removing and installing silent blocks and, by tightening the nut, press out the silent block.
- After pressing out the silent block, remove it together with the axle from the lever, remove the silent block along with the washer, while the second washer on the axle should not be removed.
- We install the axle with the washer back into the lever and press out the second silent block in the same way.
Carry out an external inspection of the lower arm; there should be no obvious signs of deformation and various cracks on the arm and in the eyes for the silent blocks, as well as traces of deep corrosion; check the reliability of the welded joint. Install new silent blocks on the lower arm of the front suspension in the reverse order of removal. Perform final tightening of the lever axle nuts after installation on the vehicle.
Lower arm - removal and installation
We remove the lower arm in case of mechanical damage or to replace rubber-metal hinges.
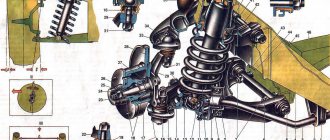
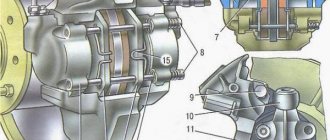
Front suspension lower arm mounting parts:
1 — self-locking nut M14x1.5 (12574811); 2 — thrust washer (2101-2904045); 3 — rubber-metal hinge (2101-2904040); 4 — thrust washer (2101-2904035); 5 — axis of the lower arm (2101-2904032); 6 — spring washer (10517070); 7 — adjusting washer (2101-2904225/28); 8 — nut M12x1.25 (16101511); 9 — lower right lever (2101-2904020-01)
To complete the work, you will need a device for pressing out and pressing in rubber-metal hinges.
Removal
1. We prepare the car for operations (see “Preparing the car for maintenance and repair”).
22 mm socket wrench
Unscrew the two self-locking nuts of the lower arm axle and remove the thrust washers.
19 mm socket wrench
Unscrew the two nuts securing the lever axis to the cross member and remove the thrust washers.
6. Using a mounting spatula, press the lever axis away from the cross member and remove the lever.
Between the axle and the cross member (on the axle mounting bolts) there are washers necessary for adjusting the wheel alignment angles. They should not be removed from the bolts unless necessary. If washers need to be removed, their location should be marked.
7. When replacing the lever, remove the ball joint from it (see “Ball joints - replacement”). When replacing rubber-metal hinges, the support does not need to be removed.
8. Install the lower arm in a vice. To press out the hinge, screw the puller bolt onto the lever axis. The supporting part of the glass should rest against the lever. While holding the bolt from rotating, tighten the puller nut and press the rubber-metal hinge into the glass.
9. Similarly, press out the hinge on the opposite side of the lever and remove the axle.
Replacing silent blocks
The process of replacing silent blocks of the VAZ-2106 suspension can be divided into two stages:
- Replacement of front suspension joints (upper and lower arms).
- Replacing the silent blocks of the rear suspension torque rods.
Replacing the silent blocks of the upper arms
Replacing the silent blocks of one of the upper arms of the VAZ-2106 with your own hands is carried out in the following order (not forgetting about safety precautions):
- Loosen the bolts securing the desired wheel and jack up the car.
- Remove the wheel.
- Using two 13mm wrenches, unscrew the nuts securing the ball joint.
- Using two 22mm wrenches, remove the lever nut, remove the axle and dismantle the upper lever.
- Press out the hinge using a special puller
- The lever is fixed in a vice and, by tightening the puller bolt, the hinge is squeezed out of its seat.
- The second hinge is pressed out in the same way.
- Using the same puller, press in new parts and install the upper arm in place. To do this, repeat the steps in reverse order.
- Worn parts on the second lever are changed in the same way.
Replacing the silent blocks of the lower arms
Replace the rubber-metal joints on the lower arms in a similar way. Only in this case the latter are not removed from the car.
- Remove the desired wheel.
- Using a 22mm wrench, unscrew the axle nuts on both sides of the lever and remove the thrust washers.
- Screw the hollow bolt of the puller onto the axle. Then you need to tighten the nut, holding the bolt from turning. The puller glass will put pressure on the lower arm, gradually moving it away from the hinge.
- Insert the new hinge into place and center it in the hole, pressing the lever with a mounting blade. Then, installing the puller stop on the inside of the last one, press it in.
- Similar operations are carried out with the remaining silent blocks, after which all the removed parts are returned to their places.
Replacement of silent blocks of rear suspension torque rods
In order to replace worn silent blocks on VAZ-2106 thrust rods, you must:
- Place the car on a viewing hole or overpass.
- Remove all jet rods in the following order:
- long transverse rod;
- long pull to the right;
- left long pull;
- short left pull;
- right short pull.
- The rubber-metal joints of the torque rods are changed using procedures that are similar to those given above when describing the replacement of the silent blocks of the VAZ-2106 front suspension.
More information about the technology for replacing silent blocks of VAZ-2106 jet thrusts can be found at:
Installation
1. Having changed the position of the puller parts, we press the rubber-metal hinge into the lever.
2. Through the free hole in the lever, insert the axle with thrust washers.
3. From the side of the pressed rubber-metal hinge, install an outer thrust washer on the axle and screw in a new self-locking nut without tightening it.
4. Having changed the position of the puller parts, we press the second rubber-metal hinge into the lever.
5. Having installed the thrust shaped washer on the axle, tighten the self-locking nut.
6. Install the lower arm and other parts in the reverse order of their removal.
7. Without unloading the suspension, finally tighten the lever axle nuts and install the wheel.
8. After replacing the lever or rubber-metal joints, it is recommended to check and, if necessary, adjust the alignment angles of the front wheels (see “Wheel alignment angles - adjustment”).
Silent blocks VAZ 2106
Quite high loads are constantly placed on the silent blocks of car suspensions, especially on roads with poor surfaces. Such conditions significantly reduce the life of these parts, as a result of which they fail and need to be replaced. Since the controllability of the car depends on the condition of the silent blocks, you need to know not only how to identify a fault, but also how to replace these suspension components.
What it is
The silent block is a rubber-metal product, structurally made of two iron bushings with a rubber insert between them. Through these parts, the components of the car's suspension are connected, and thanks to the rubber part, vibrations transmitted from one suspension element to another are dampened.
Where installed
On the VAZ 2106, silent blocks are pressed into the arms of the front suspension, as well as into the reaction rods of the rear axle, connecting it to the body. The condition of these elements must be periodically monitored, and if they are damaged, repairs must be made in a timely manner.
What are there
On the VAZ “Six” and other Zhiguli models, silent blocks made of rubber were installed from the factory. However, instead of them, you can use polyurethane products, thereby improving the performance of the suspension and its characteristics. Polyurethane hinges have a longer service life compared to rubber ones. The main disadvantage of polyurethane elements is their high price. If a set of silent blocks made of rubber for a VAZ 2106 costs about 450 rubles, then made of polyurethane it will cost 1,500 rubles. Hinges made of modern material not only improve the behavior of the car, but also better absorb shock and vibration, reducing noise.
What is the resource
The service life of rubber-metal joints directly depends on the quality of the products and the operation of the vehicle. If the car is used mainly on good quality roads, then the silent blocks can last 100 thousand km. If you frequently drive through potholes, of which there are many on our roads, the service life of the part is noticeably reduced and repairs may be required after 40–50 thousand km.
How to check
Problems with the hinges can be judged by the behavior of the car:
- controllability deteriorates;
- Vibrations appear in the steering wheel and knocks in the front when driving over uneven surfaces.
To make sure that the silent blocks have exhausted their service life and require replacement, they should be checked. First, the parts are visually inspected for damage to the rubber. If it cracks and partially comes out, then the part is no longer able to cope with its tasks.
In addition to inspection, you can move the upper and lower arms with a pry bar. If knocking and strong vibrations of the silent blocks are observed, then this behavior indicates a lot of wear on the hinges and the need to replace them.
Video: checking the front suspension silent blocks
Replacing springs on a VAZ 2106
Visually check the condition of the springs and, if necessary, replace them when:
- Reduced smoothness;
- Creaking, grinding, the characteristic sound of coils colliding when hitting bumps;
- Misalignment of the front part of the car;
- A noticeable “drawdown” of the front in relation to the rear of the car.
Features of replacing front springs on a VAZ 2106
The VAZ 2106 is a fairly simple car to install, and therefore replacing the front springs is not a difficult task. You can replace this suspension element yourself, which will require:
- Set of open-end wrenches, special and wheel wrenches.
- Jacks (hydraulic and screw).
- Hammer.
- Mounting blade.
- Metal brush.
It is worth noting that springs should only be replaced in pairs - replacing one spring is not allowed.
Instructions
- Loosen the front wheel mounting bolts (the vehicle must be on its wheels when performing this operation).
- Hang the front of the car (you can hang the sides one at a time using a screw jack).
- Remove the front wheel from the side where you are going to change the spring.
- Hold the shock absorber rod from turning and loosen the nut. After this, completely unscrew the nut, remove the spring washer, the cushion washer and the upper shock absorber mounting cushion.
- Unscrew the nuts securing the bracket to the suspension arm (2 pieces), and then remove the spring washers.
- Remove the shock absorber (removed downward, through the mounting hole in the suspension arm).
- Lightly unscrew the two nuts that secure the lower control arm to the axle.
- Place a jack under the lower suspension arm.
- Lightly load the suspension (this will be necessary to make it easier to disconnect the anti-roll bar).
- Unscrew the mounting nuts of the stabilizer bar cushion bracket, remove the washers, and then remove the cushion bracket and the cushion itself from the stabilizer.
- Loosen the lower ball joint pin nut that secures it to the steering knuckle, then back it off until it aligns with the end of the pin.
- Remove the jack.
- Strike the outer surface of the lower ear of the steering knuckle several times sharply (to remove the ball joint pin from it).
- Place a jack under the lower control arm, but do not load the suspension.
- Unscrew the ball joint pin nut.
- Lighten the suspension slightly by lowering the lower control arm (do this very carefully), and then use a paddle to move the anti-roll bar through the bracket mounting studs.
- Completely unload the suspension and remove the jack from under the lever.
- Provide yourself with access to the spring by securing the upper suspension arm with a wire in the highest possible position. The lever should not be disconnected from the steering knuckle.
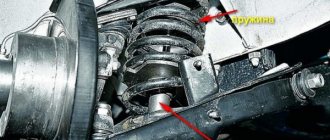
- Pry the spring from below, and then remove its lower end from the support cup. Use a spatula. Perform this operation as carefully as possible to avoid shooting out the spring.
- Remove the spring from your VAZ 2106.
- Remove the spring gasket from the upper support cup.
Replacing silent blocks of the lower arm
By its design, the rubber-metal element is made in the form of a non-separable part, which is non-repairable and only changes if it breaks. To carry out repairs, you need to prepare the following list of tools:
- silent block remover;
- ball joint remover;
- keys at 13, 19, 22, 24;
- hammer;
- chisel;
- mount;
- lubricant (for example, WD-40);
- jack.
Removing the lever consists of the following steps:
- We jack up one of the sides of the car and remove the wheel.
- Unscrew the fastening elements of the shock absorber and remove it.
Dismantling and installation of rubber-metal elements is carried out with one puller, and only the position of the parts changes.
Replacing joints without removing the lower arm
If there is no time or desire to completely disassemble the suspension, then you can replace the silent blocks of the lower arms without dismantling the latter. Having jacked up the front end on the desired side, perform the following steps:
- We place a wooden stop under the lower ball joint. Its height should be such that when the jack is lowered the wheel does not hang out.
Video: replacing lower arm joints on a VAZ 2101–07 without disassembling the suspension
Preliminary work
- wrench 6;
- 2 keys for 13;
- head and key 17;
- head and key 19;
- head and key 22;
- extension;
- hydraulic jack;
- balloon;
- hammer;
- spring ties;
- installation.
- First, we drive the car into the pit, put the handbrake on, and set up the wheel chocks.
- Then we loosen the upper nut securing the right shock absorber (it is located in the engine compartment), while holding the rod from turning with a 6 key.
- We unscrew the top nut and remove it along with two washers and the top rubber band, remembering the order of the parts.
- Then unscrew the 2 nuts securing the shock absorber to the lower arm from below and take it out (pull it down along with the lower rod rubber).
- Repeating steps 2-4, remove the left shock absorber.
- We loosen the bolts securing the front wheels, lift the front of the car with a jack and place supports or bricks under the side members and the bottom in the place where the engine compartment connects to the passenger compartment, unscrew the bolts and remove the front wheels.
- Next, unscrew the 2 nuts securing the lower right arm to the axle by 1.5-2 turns. This is necessary so that it can be lifted with a jack.
- Raise the end of the lever with a jack and unscrew the nuts securing the stabilizer rubber bracket, then remove the bracket and rubber from the stabilizer.
- We unscrew the nut securing the lower ball joint to the ear of the steering cam a few turns (but not completely), loosen it a few millimeters and remove the jack, and then hit the ear with a hammer until the hinge pin comes out of it down a few millimeters ( It’s better, of course, to use a puller).
- We place the jack again at the end of the lever, unscrew and remove the ball nut, and release the lever down a little more.
- Using the installation tool, we move the stabilizer through the upper mounting pin of its bracket, release the lever and remove the jack.
- Raise the upper arm as much as possible and, carefully prying the spring at the lower end with a mounting tool, pull it out of its seat on the lower arm.
- Finally, pull the spring down and remove the left spring in the same way.
Replacing the silent blocks of the upper arm
To dismantle the upper arm, use the same tools as for the lower one, and carry out similar actions to hang the front of the vehicle and remove the wheel. Then perform the following steps:
- Unscrew the fasteners of the upper support.
After the repair, you should visit the service center and check the wheel alignment.
Once I had the opportunity to change the front end silent blocks on my car, for which I purchased a special puller. However, it was not without troubles, since the device turned out to be quite flimsy and simply bent while tightening the bolt when pressing out the hinges. As a result, I had to use improvised tools and materials in the form of pieces of pipes to complete the repair. After such an unpleasant situation, I made a homemade puller, which turned out to be much more reliable than a purchased one.
Replacing torque rod bushings on a VAZ 2106
The rubber joints of the rear axle torque rods are replaced when they are worn out or have visible damage. To do this, the rods themselves are removed from the machine, and the rubber-metal products are replaced by pressing out the old ones and pressing in the new ones.
On the “six”, the rear suspension links are installed in the amount of five pieces - 2 short and 2 long, located longitudinally, as well as one transverse link. Long rods on one end are fixed to special brackets fixed to the floor, on the other side - to the rear axle brackets. Short rods are mounted to the floor member and to the rear axle. The transverse element of the rear suspension is also held in place by special brackets.
To replace the rod joints, you need to prepare the following tools:
- keys to 19;
- new silent blocks;
- penetrating lubricant;
- metal brush;
- mounting blade.
The bushings on all rods are changed according to the same principle. The only difference is the need to unscrew the shock absorber mount from below to remove the long rod. The procedure is performed in the following sequence:
- We drive the car onto an overpass or pit.
- Use a wire brush to remove dirt from the fasteners and apply a penetrating lubricant.
When I had to change the rear axle rod bushings, I didn’t have any special tools at hand, nor did I have a bolt of a suitable size from which I could make a cone for pressing in the inner bushing. I quickly found a way out of the situation: I took a piece of a wooden block, broke off a part from it and cut out a cylinder, the diameter and length of which corresponded to the dimensions of the metal sleeve. The edge of the wooden cylinder was ground into a cone. After that, I lubricated the wooden device with detergent and, without much difficulty, pressed it into the rubber part with a hammer, after which I drove the iron bushing. If it was not possible to press the bushing in the first time, I simply re-lubricated the parts with detergent and repeated the procedure.
Video: replacing rear axle rod bushings on a “classic”
Homemade silent block remover
It is convenient to change the rubber-metal elements of the front suspension using a puller. However, not everyone has it. Therefore, you have to make the device yourself, since it is quite difficult to dismantle the hinges with improvised tools. Let's take a closer look at how and from what materials a puller can be made.
Description
To work you will need the following list of parts and tools:
- a piece of water pipe 3 cm long with an internal diameter of 40 mm and an external diameter of 50 mm;
- washer with an outer diameter of at least 50 mm;
- M12 bolt 7 cm long with washers;
- two pieces of pipe 10 cm long and 40 mm in diameter;
- vice;
- hammer;
- lubricant
We manufacture the puller in the following sequence:
- Using a hammer, we rivet a part of the pipe with a diameter of 40 mm, increasing it to 45 mm.
To avoid troubles when driving a car, it is necessary to periodically inspect the condition of the suspension elements and promptly change not only silent blocks, but also other parts that have failed. By following the step-by-step instructions and using the appropriate set of tools, you can replace the hinges without any special skills.
Diagnostics of silent blocks in the front control arms.
Why do silent blocks need to be changed over time? There are several reasons for this:
- Over time, rubber loses its elastic properties and begins to crack.
- During use of the machine or during its maintenance, oil got onto the silent block.
- Incorrect installation of the part.
- Driving on very bad roads, of which there are a great many in Russia.
Everything is diagnosed quite simply. The first thing that should alert you is the deterioration in the responsiveness of the steering wheel. But this may not be the case only, let’s look further. The second sign of dead silents, the wheels are standing like a house. On the pit or on the lift, check the integrity of the rubber bands (they should not have cracks and they should not be squeezed out). You can take a crowbar or a pry bar and try to move the levers. They should not have free movement (should not dangle).
Replacing silent blocks in the upper control arm of a classic with your own hands.
So, let's begin! In rear-wheel drive VAZs, the silent blocks in the upper arm can be changed without even driving into a hole and without removing the arm from the ball (provided that you have a remover for silent blocks). But first you need to determine whether the bushings of the silent blocks are stuck to the bolt securing the lever to the body. To do this, jack up the car and remove the wheel.
Arrows point to bolt and nut
We loosen the nut securing the upper arm with a 22mm wrench and try to turn the bolt. If it spins and the bushings stay in place, then you're in luck! But if this bolt rotates with great force and the bushings rotate with them, then as they say: “Houston, we have problems!” Next we will consider both cases.
If the silent blocks are not stuck.
Further actions depend on whether you have a puller for silent blocks. If there is one, then you don’t have to remove the lever completely, but just unscrew the nut 22 to the end, take out the bolt and turn the lever towards yourself (for the convenience of further repairs).
We turn the lever for convenience.
Next, take a puller and press out the silent blocks.
Removing the silent block using a puller
And with his help we press in new silent blocks. Before pressing, the mounting hole must be cleaned and preferably lubricated with lithol. In the upper arms, silent blocks are pressed into place up to the ribs, as shown in the photo below.
The new silent should be pressed in exactly like this.
But what to do if you don’t have a silent block remover ? Then you will have to completely remove the lever. We take out not only the bolt securing the upper arm to the body, but also take out the ball from the hub (this is faster than unscrewing 3 bolts securing the ball to the arm). Detailed removal of the ball joint is written here.
We removed the lever, put the lever ear on a pipe or on a yew tree (as in the photo), the main thing is that the silent block does not rest against anything, and knock it out with a hammer.
To press in new ones, we need a mandrel (old bearing, piece of pipe, nut head). The inner diameter of the mandrel must be equal to the diameter of the skirt of the new silent block. And we begin pressing in new parts using this mandrel, having previously lubricated the seat with lithol. Reassemble in reverse order.
Important: we pull the bolt securing the lever to the body only under the load on this wheel! Those. The car should not be on a jack, but on all wheels!
If the silent blocks are stuck to the bolt.
This is a very difficult case, since you will have to spend a long time trying to get the bolt that secures the front upper arm to the body.
For those who want to save themselves a lot of time and are ready to fork out a little, I advise you to buy a new bolt, this lever from disassembly and just cut off the old bolt with a grinder.
Well, if you have time and nerves, then we take a gas burner in our hands and burn out the silent block. Follow fire safety precautions! After all the rubber has burned out, you can begin to knock out the bolt. Get ready to do this for a very long time. After you remove the bolt, knock out the remaining clip of the burnt silent tape from the lever and follow the instructions written above.
Replacing the upper silent blocks
First of all, you should unscrew the vertical bolt securing the bumper, as it will interfere with removing the axle. Next, unscrew the nut securing the ball joint and, using a special puller, press the ball pin out of the bipod.
After that, using two 22mm wrenches, twist the nut and remove the bolt securing the upper arm to the body. Now we will need a puller. Having clamped the removed part in a vice, use a puller to press out the old parts, and press new ones, polyurethane or rubber, in their place.
After the replacement is made, assembly is carried out in the reverse order:
- The lever fastening bolt is inserted and the nut is screwed on. You shouldn’t tighten it completely, we’ll do it at the very end;
- The ball joint is installed in place, the nut is tightened until it stops;
- The wheel is screwed on, the car is lowered and removed from the jack;
- Having turned the steering wheel, tighten the upper arm securing nut until it stops.
Replacing silent blocks in the lower arm of a VAZ 2107, classic.
Here, when replacing, we can no longer do without an inspection hole or a lift.
To begin, use a 24mm wrench to unscrew the nuts securing the lever. Next, if you have a puller, then use it to press out the silent blocks. If there is no special puller, then we simply take a mandrel with a diameter larger than the diameter of the silent block. We set the mandrel as shown in the photo and hit it with a hammer. At the same time, we rest the lever using a mounting tool or a crowbar, as in the photo. Thus, we remove the silent blocks in the lower arms.
Remove silent blocks without a puller
How to remove stuck silent blocks in the lower front control arm.
Stuck silent blocks cause a lot of trouble when removing them. In order to get rid of them you need a gas torch and a hammer with a core. We burn out the rubber and tap the iron bushings on all sides. After that we try to knock them out using a core and a hammer.
If the nuts securing the lever shaft are not stuck, then it is better to completely remove the lever (this will make it easier to knock the bushings out of the shaft). To do this, you will also need to remove the ball from the hub. Above in the article there is a link on how to remove the ball joints.
Pressing silent blocks into the lower arm.
New silent blocks are pressed into the lever until it stops. This can be done using a puller or a mandrel of a suitable diameter; you can use a head as a mandrel.
After installing the new levers, tighten the nuts and release the car onto the wheels. Only after this do we fully tighten the nuts.
Of course, it will be clearer to see how everything is done once than to read it a hundred times. Especially for you, I am attaching a video about replacing silent blocks in the front arms of a rear-wheel drive VAZ.
Sources:
https://bumper.guru/klassicheskie-modeli-vaz/hodovaya-chast/zamena-saylentblokov-na-vaz-2106.html https://vazgarage.ru/vaz2106/hodovaya2106/255-kak-zamenit-nizhnie-rychagi -na-vaz-2106.html https://www.vazbook.ru/06/2106/chassis/fsuspension/nizhniy-rychag-snyatie-i-ustanovka https://bumper.guru/klassicheskie-modeli-vaz/hodovaya -chast/zamena-saylentblokov-na-vaz-2106.html https://www.vaz-zona.ru/zamena-sajlentblokov-perednih-rychagov-vaz-2107-2106-2105/
Replacing the lower arm on a VAZ 2101-VAZ 2107
Welcome! The lower arm - it is located in the front suspension and a ball joint is screwed to it, and the front spring itself is also on it; replacing this arm is not quite easy, it may take you more than one day to replace it (If you are doing the work for the first time) but still, the good news is that this lever is not very expensive and if yours becomes unusable (a crack will appear on it, for example), then it will need to be replaced in the near future with a new one and we do not recommend that you use the car at all (If the lever has a crack appears) until it is replaced.
Note! To change the lower arm, you only need: All the keys that you have in your arsenal, as well as a wheel wrench and a jack, since the wheel will have to be removed on the side on which you will change the arm!
Summary:
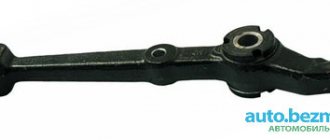
Where is the lower control arm located? In the front suspension of the classic, there are many levers, but some of the largest and most important (Without them the car would not move at all) are the lower and upper lever, the upper lever is at the top and is not subject to special deformation (Only if the car is not lowered and only if You didn’t drive it into a hole at high speed), the lower arms are most often subject to deformation, because they are located at the very bottom, and if you drive the car into a sharp hole (into a hatch, for example), then after the collision the wheel will fall to the bottom and all the weight the front part on the lever will move, in connection with this your lever will bend or even crack, so you need to monitor them periodically and, if possible, after a strong collision with a bump, check the levers for condition, for clarity, the lower lever (namely the one on the left parts placed) is shown in the photo below.
When should the lower control arm be replaced? It is changed only in case of severe deformation, if the lever is slightly bent, then you can still ride on it (Of course it’s better to change it, but in fact you can do the camber and continue driving), but if it is cracked, then this lower lever must be replaced, if the lower arm is severely deformed, the wheels lose camber and because of this the car begins to pull to the side; in addition, the tire tread wears out faster due to the broken camber, so if there is severe deformation (Even if it is not cracked), try to replace the lower arm with a new one.