Recently they brought us a car with a broken cylinder head gasket, and since when replacing the gasket we would have to remove the timing chain, we decided to change it along with the sprockets. We’ll talk about replacing the gasket in another article, but here we’ll look at replacing the timing chain of a VAZ 2107, as well as sprockets and a tensioner with a damper, with your own hands in an ordinary garage. In principle, the procedure is applicable to all cars of this family, because all classics were equipped with one chain motor with a slight difference in volume.
This engine is equipped with a double-row chain, which lasts a very long time; 100 thousand kilometers is not the limit for it, provided that the original Lada parts are in place. It is very simple to diagnose a stretched chain by the characteristic sound from the front of the engine; at the end of the article we will look in detail at how to diagnose and tension the timing chain.
Replacing the timing chain
- We remove the throttle valve pipe, the vacuum brake booster and crankcase exhaust pipe, and the throttle cable. 10mm socket and Phillips screwdriver for clamps.
- We remove the radiator by disconnecting the two pipes from it and unscrewing the two bolts located in the upper right and left corners. The head is 10. The radiator from below is inserted into the grooves in which rubber gaskets are installed, do not lose them.
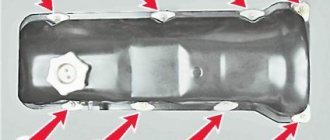
- Remove the valve cover by unscrewing the eight nuts by 10.
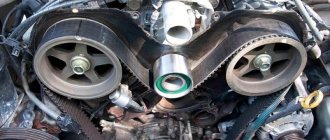
Valve cover fastening. - Loosen the nut of the tension element of the generator and move it towards the cylinder block. Remove the generator V-belt. The key is 17.
Alternator belt tension.
Set top dead center (TDC)
- Turn the crankshaft clockwise until the marks on the pulley and the marker on the front timing chain cover match. Key or socket 38.
Crankshaft pulley mark. - The marks on the sprocket and the marker on the camshaft bearing housing should also match.
Camshaft marks.
Removing the old timing chain
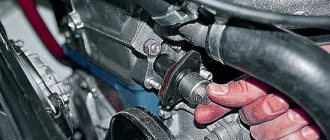
- We lock the crankshaft by tightening the handbrake, placing chocks under the wheels and engaging fifth gear, unscrew the pulley nut. Head 38.
- Unscrew the two nuts by 10 and remove the timing chain tensioner.
Timing chain tensioner. - We bend the stopper petal and unscrew the camshaft sprocket bolt.
Fastening the camshaft sprocket. - Remove the sprocket along with the chain. Please pay attention to the wear of the teeth if you suddenly decide to keep the old ones. If the teeth become sharp, replace the sprocket.
- Remember which hole on the sprocket the key on the camshaft is inserted into. There was once a case when his comrades mixed them up and it’s good that before starting it he manually turned the crankshaft, naturally the valves rested on the cylinders, after which he had to disassemble everything again.
- Having unscrewed three nuts and seven bolts, three of which are on the side of the pan, remove the front timing chain cover, you can immediately change the crankshaft oil seal. Head for 10. We loosen the adjacent bolts on the pallet so that it sinks down a little and when installing the cover back, the gasket does not interfere with us.
Fastening the front timing cover. - The mark on the crankshaft sprocket must match the mark on the block.
Crankshaft sprocket mark. - Unscrew the bolt securing the middle gear and tensioner shoe.
- We unscrew the limiting pin and remove all the sprockets and the old timing chain. The key is 17.
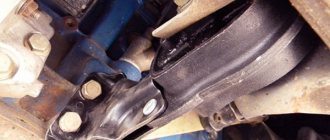
- In the bustle, we forgot to take a photo of the mounting location of the damper, but you can easily find it on the right side of the cylinder head, secured with two 10mm bolts.
Installing a new timing chain
- Be sure to lubricate the new timing chain with engine oil.
- We put it on the crankshaft sprocket and the middle sprocket, install them in place, be sure to tighten and lock them.
- We install the limit pin, tensioner shoe and damper in place. We stretch everything out.
- Check the crankshaft mark.
- We put the chain on the camshaft sprocket, but it is not the camshaft. The descending branch of the chain must be tensioned and the marks must all match. If during installation the mark on the camshaft does not match, simply move the chain the required number of links onto the sprockets, having first removed it.
- Tighten the camshaft bolt, lock it, and bend the tab on the washer.
Timing chain tension
- We install the new tensioner in place; automatic ones are available for sale; I recommend using them. It is better to lubricate the gasket with sealant, tighten the two nuts to 10.
- We remove the pin for automatic or unscrew the cap nut 13 for a regular semi-automatic, you will hear a characteristic click, this means that the tensioner has worked. The chain will be taut. Timing chain tensioner.
- If you are using an old tensioner, it must be cocked before installation. Unscrew the cap nut several turns until the plunger moves freely. Push it all the way into the tensioner body and tighten the nut. You'll have to get the hang of it because the spring is quite powerful.
- In the case of a semi-automatic tensioner, turn the crankshaft slightly clockwise and tighten the nut to 13.
Be sure to turn the crankshaft two turns and check that all marks match.
We install all the parts in the reverse order of removal, fill in antifreeze. We start the engine and enjoy. Everything is quite simple, replacing the timing chain on this car with your own hands is quite possible, the only condition is the presence of an inspection hole.
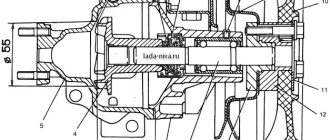
What is timing belt?
The timing belt is the gas distribution mechanism of the engine, which controls the launch of fuel mixed with air into it and the release of burnt gases. It is based on a mechanism for opening and closing the intake and exhaust valves of cylinders driven by a cam mechanism and a camshaft. That is, the fuel-air mixture ends up in the cylinders thanks to the open intake valves, and, having burned, is removed in the form of gases through the exhaust valves. The camshafts are responsible for the actions of these valves.
To enable them to rotate, a special drive was created, operating using a chain or belt.
Timing belt - timing chain;
Valves – intake valves;
Camshafts - camshafts.
Diagnostics of timing chain VAZ 2107i
Over time, the timing chain stretches, resulting in lateral vibrations in the downstream section of the chain. These vibrations can break the damper, and in extremely advanced cases, lead to the chain jumping on the sprocket and, as a result, damage to the engine. When the chain is stretched, a characteristic metallic sound appears in the front part of the engine, increase the speed a little and if the sound becomes weaker or disappears altogether, this is a clear sign of wear on the timing chain. If you have a semi-automatic tensioner installed, try tensioning the chain. The procedure is described above. If this does not help, you will have to change all elements of the gas distribution mechanism.
It is recommended to carry out the tensioning procedure every 10 km.
Why do you need to turn on the ignition?
Incorrect ignition installation is a rather serious problem; ignition of the combustible mixture must occur strictly at a certain moment. If this moment is incorrect, then the engine does not work as it should.
Correct installation of the ignition on a VAZ 2107 can solve several problems that are in one way or another related to engine operation:
- Engine overheating . Often, too early ignition causes detonation. Because of this, the temperature regime of the motor changes. The load on the parts of the crank mechanism increases, and its service life is significantly reduced.
- Reduced vehicle dynamics . It doesn’t matter whether the ignition is earlier or later, in any case this malfunction occurs. When an explosion of the combustible mixture occurs while the piston is at top dead center, all the energy of the explosion is transferred to the crankshaft and converted into torque. Accordingly, the engine response at such a moment is maximum.
- If you set it earlier , then the explosion will occur towards the upward piston, which in addition overcomes the pressure in the cylinder. Naturally, this slows down the rotation of the crankshaft, despite the decent inertia of the flywheel.
- If the moment is later than necessary, then the piston will already go down during the explosion. When the piston reaches bottom dead center, the expansion of gases will continue and some of them will escape into the exhaust manifold. This is where the popping sounds in the exhaust manifold come from.
Replacing the timing chain on a VAZ 2106, as well as a damper, tensioner shoe, and sprockets
Replacing a timing chain on a VAZ 2106, like replacing a timing belt on a VAZ 2110, is a responsible and not easy procedure that requires certain skills and knowledge. Without a basic understanding of what it is, I would not recommend taking on such work.
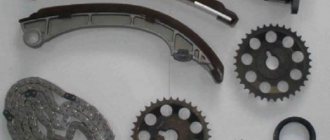
In addition to the timing chain, we will also replace the tensioner shoe, alternator belt, damper and sprockets. Before you start, prepare your tools; you will need a standard set of keys, as well as a universal pulley lock, a special key for “36”, and an empty container for draining antifreeze.
Adjustment or how to set timing marks on a VAZ 2106 yourself
Decoding notes
Without pre-basing the pistons and valves, installing the timing chain on the VAZ 2106 according to the marks is impossible. Therefore, the significance of the marks is not at all conditionally decorative. The signs give an understanding of the position of parts inside the motor:
For your information. The numbering of the “pots” starts from the radiator side.
How to restore tag matches
When the chain is pulled out, the marks will go away. The main difficulty is to return them to a position of mutual coincidence. This work is combined with dismantling the old chain. However, there is no need to rush to remove it - misalignment of all factory markers is fraught with danger.
The base is the position of the crankshaft at which the pulley mark coincides with the long line on the front cover. In this case, the drilling hole for the camshaft star should be closer to the high tide. This must be achieved first. It is worth remembering that the transmission is made with a 2:1 ratio - two revolutions of the crankshaft correspond to one revolution of the camshaft.
Unnecessary fears when dismantling the RV sprocket are not appropriate. The shaft design includes a pin. In addition to transmitting torque, it serves as a fixator of a certain position.
How to put on a chain
Installation of a new chain begins with its attachment to a new crankshaft sprocket. Next, the damper, tensioner shoe, and limiter are mounted. The chain is passed through the drive shaft gear and secured along the way. Afterwards it is mounted on the camshaft sprocket, and its position is adjusted according to the cycle:
The final procedure is to tighten the chain, during which the tensioner is twisted all the way with good force. After rotating the HF key, the final check of the coincidence of the signs is carried out.
Replacement instructions
To install a new chain drive, you need to purchase a set of spare parts and consumables:
If, when diagnosing problems, you find oil leaks under the crankshaft pulley, it is worth purchasing a new oil seal built into the front cover. The part is easy to change during the disassembly of the timing drive.
Why is it recommended to change all drive parts, including gears:
Tools and working conditions
As for the special tools, you will need a 36 mm socket wrench to unscrew the nut (ratchet) holding the crankshaft pulley. Because the ratchet is located in a recess, it is much more difficult to grab it with an open-end wrench.
The rest of the toolset looks like this:
It is most convenient to replace the timing chain in an inspection ditch in a garage. As a last resort, an open area will do, but then to disassemble the unit you will have to lie down on the ground under the car.
Preliminary disassembly
The purpose of the preparatory stage is to provide convenient access to the front cover of the power unit and the timing drive. What to do:
In addition to the listed parts, you can remove other elements, such as the battery and the main radiator. These steps are optional, but will help increase access to the chain mechanism.
At this stage, it is recommended to clean the front part of the engine as much as possible from dirt and oil deposits. When you remove the timing cover, a small opening will open in the oil sump where foreign particles can enter.
Disassembling the injection “six” is done in the same way, only together with the air filter housing it is necessary to dismantle the corrugated pipe leading to the throttle, the crankcase ventilation pipes and the adsorber.
Video: removing the electric fan and radiator of a VAZ 2106
Removing and installing a new chain
If this is your first time disassembling the camshaft chain drive, strictly adhere to the sequence of work:
- Unscrew the ratchet nut with a 36mm wrench. To loosen, fix the pulley in any convenient way - a mounting spatula, a powerful screwdriver or a pipe wrench.
During the disassembly process, you may encounter a situation where a chain stretched beyond normal limits has destroyed or broken the damper, and debris has fallen into the crankcase. Ideally, they should be removed by dismantling the pallet. But since the oil pump is equipped with a mesh, and waste always accumulates in the crankcase, the problem is not critical. The likelihood that part residues will interfere with oil intake is almost zero.
When replacing the chain on my father’s “six,” I managed to drop a piece of plastic stabilizer that had fallen off into the crankcase. Attempts to extract it through the narrow opening were unsuccessful; the fragment remained in the pan. Result: after the repair, my father drove more than 20 thousand km and changed the oil; the plastic is in the crankcase to this day.
Installation of new spare parts and assembly is carried out in the following order:
Further assembly is carried out in reverse order. After attaching the pulley, it is recommended to re-check the correct position of the marks. The mark on the side of the pulley should be opposite the long strip on the front cover.
Video: how to correctly change the chain on a VAZ 2101-07
Timing belt
The timing belt is the timing belt. It is a special part with which it is possible to achieve synchronization of the operation of two shafts:
- geniculate;
- distribution
The average price of timing belts for a VAZ-2105 car is 400-500 rubles. At the same time, you can purchase such a part in almost any store that services cars. The article number for the element is presented in the following variations:
- 122Z;
- 2105-1006040R;
- 2105-1006040.
Among the analogues, we can list pulleys and a belt from the VAZ-2112, however, most car owners advise against this option and suggest finding a belt that matches the markings specifically for the VAZ-2105 model. The table will consider the most popular original belts and analogues, and also indicate the prices for these products.
| Name | Cost in rubles |
| 22GL19.1 Lynx | 210 |
| Mitsubishi 122ZA19 | 221 |
| Gates 5002 | 288 |
| T013 Gates | 350 |
| Ford. Fiat 1.8/2.0 Z=122*19 84> | 450 |
| 1987949019 Bosch | 450 |
| K015521 Gates | 1450 |
| VKMA 01113 SKF | 3320 |
How the timing chain drive of the VAZ 2106 car works: review and replacement
The popular VAZ 2106 car, whose production began during the Soviet era, was equipped with three types of engines - with a displacement of 1300, 1500 and 1600 cm3. The design of the listed motors is the same, the difference is only in the sizes of the cylinder-piston group, crankshaft and connecting rods. On all power units, the timing gears are driven by a double-row chain. The latter gradually stretches out and needs periodic tightening; the minimum service life of the part is 100 thousand kilometers. When tensioning does not produce results, the entire chain drive is changed - along with the gears.
Nuances in installing a timing chain according to factory marks on a VAZ 2106: pitfalls
It is difficult to achieve perfect alignment of two pairs of marks. The main reason is the use of components with dimensions within the maximum limit. By the way, adjusting the VAZ 2106 carburetor with your own hands also never follows the ideal scenario - additional recommendations from experienced craftsmen are almost always used.
Allowable elevation shifts
One of the unwritten norms allows for a discrepancy between the sprocket drilling and the camshaft bearing housing boss within a half-tooth in one direction or another. To be more specific, the installation of the timing chain of the VAZ 2106 engine according to the marks is considered complete when the camshaft sprocket is aligned exactly, and the mark of the crankshaft pulley goes slightly forward. This guarantees stable traction throughout the entire speed range.