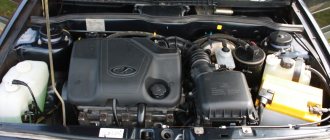
Every driver who independently maintains a car and strives to keep the engine in good condition knows the importance of replacing the oil filter.
Each oil change is accompanied by the process of replacing the oil filter and other consumables. You cannot skimp on oil filters, otherwise metal shavings (formed due to engine wear), dirt and other debris will enter the engine along with the oil, which can lead to failure of expensive parts. The process of replacing the oil filter is quite simple. The driver needs to remove the old filter and install a new one in its place. However, there are situations when the oil filter does not unscrew. What to do in such cases will be discussed in this article.
Why change the oil filter?
The recommended mileage after which an oil change is necessary is on average 15 thousand km. It all depends on operating conditions, the degree of engine wear, and driving style. For example, when constantly moving with a trailer, it is recommended to change the lubricant more often. The same can be said about drivers who prefer an aggressive driving style. Each oil change is accompanied by the installation of a new filter.
Inexperienced drivers sometimes do not understand why this element needs to be changed: they say, it is enough to fill in fresh oil. The fact is that any lubricant that is poured contains foreign particles that negatively affect the operation of the engine. Plus, there are always tiny chips inside the motor, and dirt can get inside it. All this needs to be sifted out, which is what the oil filter does. It has been calculated that if it were not there at all, the engine’s service life would be reduced by five (!) times.
Second method
Unscrew the oil filter using special keys previously purchased at a car store; they come in two main types:
- Chain key.
- Crab Key.
Chain key
crab key
Having decided to purchase a special key, choose the first option; it is more reliable and is more often used by service station workers.
Removal using special pullers
Service technicians and experienced garage repairmen use special pullers to remove the filter element. They are available in 3 types:
- chain;
- crab;
- clamping (tape, screw).
Experts prefer chain pullers, which have greater power and reliability and are suitable for any type of filter elements. Therefore, service station technicians usually remove the oil filter with a chain wrench.
Special pullers can be purchased at auto stores. The key is placed on the body of the part being removed and securely fixed. It remains to remember that the dismantled element must be unscrewed counterclockwise. After removing the filter, make sure that the gasket is not stuck to the motor block. If necessary, remove the gasket or its parts with a scraper.
What to do next?
When the old filter is removed, before installing a new one in its place, be sure to wipe the mounting area with a rag, pour oil into the filter itself, and do not forget to lubricate the rubber gasket with it. Only after this can the new part be considered ready for installation. Screw it into place (you don’t need to put much effort into this), turn on the ignition and let the engine warm up, while you observe the repair site. If everything is done correctly, oil will not ooze out from under the filter.
We recommend: Rules for using external lighting devices and sound signals
Installing a new filter
This is an equally important action. The correct operation of the engine largely depends on the quality of its implementation. Before installation, do not forget to wipe the area where the element is attached with a rag; any dirt that gets in can lead to serious consequences. Oil is poured into the filter housing and the rubber gasket is lubricated. The filter element is installed in place and screwed in; do not apply much force. After this, start the engine and allow it to warm up. Pay attention to the filter; if installed correctly, oil should not escape from under it.
Conclusion
. Changing engine oil is a mandatory and regular procedure. If you do not do it, then problems with the engine cannot be avoided. During the process of changing the lubricant, the question often arises of how to unscrew the oil filter without a key. After all, it doesn’t want to be disconnected by hand, and a specialized tool is usually not at hand at the right time. At the same time, there are plenty of ways to unscrew the filter housing.
Why might this be needed?
Car manufacturers recommend changing the engine oil every 15 thousand kilometers. Under difficult operating conditions, for example, when traveling with a trailer, the lubricant is changed more often. When changing the oil, it is advisable to change the oil filter.
Many car enthusiasts do not understand the reasons for replacing the oil filter when the lubricant is changed. The engine is the heart of the car; it is subject to the greatest wear and tear, since it bears the main load. The engine fluid being poured contains foreign particles that have a bad effect on the operation of the engine. An oil filter is designed to filter out these particles. The more it is worn, the worse the quality of the lubricant becomes, and this, in turn, affects engine wear.
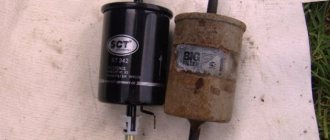
Structure of the filter element
It is impossible to determine the suitability of an oil filter by appearance. It is also difficult to draw conclusions about the need for replacement based on mileage. The filter element works constantly, even when the engine is idling, so its wear depends not on mileage, but on engine hours. Some drivers, when changing the oil, neglect to replace the filter element, considering it unnecessary.
When choosing a replacement product, it is important to focus not on its appearance, but on its content. Drivers with an aggressive driving style are better off installing expensive products. This is due to the fact that when driving fast, hard braking or accelerating, the engine requires a large amount of oil. Expensive filters have synthetic elements that can withstand loads and high temperatures well, allowing the oil to pass through quickly. Analogues have felt-based elements through which the lubricant passes longer than through synthetic material. These products are suitable for lovers of a quiet ride.
When replacement is required
In order to change consumable components on time, it is necessary to take into account the recommendations of the vehicle manufacturer. They always provide for certain regulations for the performance of each maintenance-related work. According to the regulations for the Lada Grant, the filter element and lubricant in the system are replaced every 15 thousand kilometers.
During daily operation, the driver is required to monitor the lubricant level in the engine. The check is carried out before the start of the trip, but it is enough to do it once every few days. If the engine has just been running, it should be allowed to stand for a few minutes so that the lubricant can drain into the crankcase. Now the driver takes out the dipstick and wipes it with an unnecessary rag. The probe is inserted into its hole until it stops, and then removed again. The oil film level should be between the minimum and maximum marks on the dipstick.
The main sign that indicates that the engine lubricant needs to be changed is its color. A very black liquid no longer has the characteristics necessary for optimal operation of the power unit. Lada Granta is not as demanding on the frequency of replacement as foreign-made cars, and allows you to change the lubricant after 15,000 km. Along with it, a new oil filter is installed. However, even if the car has not covered the required mileage, it is better to perform this procedure before the onset of winter.
Oil aging leads to a decrease in its performance. Oxidation processes begin and useful additives are gradually washed out. Over time, dirt begins to accumulate in it. The purpose of motor oil is to lubricate the rubbing parts of the engine. In addition, it cools it and rinses it, removing various impurities.
How to unscrew the oil filter
There are special keys for this that can be purchased at car dealerships. But it happens that it is impossible to get to the filter with such a tool due to limited space. Or another situation: instead of a standard product, you installed a higher quality element with larger dimensions. In such cases, the question arises: how to unscrew the oil filter without a key? But first it’s worth identifying the reasons why the product cannot be turned away by hand. There are two of them:
- during the previous oil change, the filter was tightened too tightly with a wrench (this is typical for car repair shops);
- the product just got stuck because it hasn’t been changed for a long time.
Below are all the popular ways to replace an old filter with a new one. However, this product must be unscrewed by hand. There is also a trivial situation: maybe you just don’t have enough strength. Then invite a stronger assistant.
Using a screwdriver
The tool must be long: longer than the diameter of the filter. You just need to pierce it, and right through it. The screwdriver here plays the role of a lever, which should be sharp and thick. Don't forget to drain the oil first: however, some of it will still spill out, so take care in advance and place a suitable container down. It is worth noting: all filters turn counterclockwise.
Using a leather belt
A regular trouser shirt will do. You need to make a loop out of it and throw it over the body. The free end is a kind of lever.
We recommend: Subaru head units inexpensively on favorable terms
If the belt turns, place a piece of sandpaper under it. If you have an alternator belt from a VAZ or other car at hand, you can use that too. The filter must be unscrewed.
Using a gas key
Removal in this way is only acceptable if there is enough space in your car and the tool can easily fit there. The handle of the tool will be the lever. However, fanaticism is not needed! Be careful not to roll anything else along the way.
Using a chisel and hammer
Everything is clear here: take a tool (it should be sharp), place it on the rim of the filter, closer to the engine (this makes it easier to remove). The blows must be strong and sharp.
Using a homemade tool
It makes sense to make a puller yourself, similar to the factory product. To do this you will need a regular bicycle chain. If it has 30 links, then this is an ideal option for the VAZ classic. The chain must be connected into a ring using a rivet or a regular lock. Next, take your used 19 or 22 socket head: you need to make a cut in it, the width of which corresponds to the width of the chain. This is where you need to insert it. To make it more convenient to unscrew the filter, insert a wrench or ratchet into the square hole of the head. All that remains is to smoothly twist the homemade puller counterclockwise.
When the old filter is unscrewed in one way or another, thoroughly wipe the seat with a rag, removing all particles of dirt. Fill the new filter with oil and screw it in by hand. Try to do this with force, but not excessively! Only after this can the filter replacement procedure be considered complete.
Method No. 2.
Provides for removing the oil filter using a leather belt or rope.
The method itself is quite simple and inherently imitates the action of a special key, which was discussed at the very beginning of this article.
1 Take a wide belt (made of leather or leather substitute) or rope, make a loop out of it and tighten it on the filter counterclockwise.
- Unscrew the part being removed with a sharp, strong jerk.
- If this fails due to the belt slipping, simply place sandpaper inside the loop and repeat the above steps.
How and with what can this be done?
We suggest you familiarize yourself with the main methods that will allow you to dismantle the filter device with your own hands.
User Andrey Florida in his video explained how to replace the oil filter and what options are available for dismantling it.
Can you twist it by hand?
There are special tools for dismantling the filter device. But you can also unscrew it yourself. If the sticking of the device is strong, a tool or improvised devices will be required for dismantling.
Which way should I unscrew?
The filter is dismantled by turning its housing counterclockwise.
Special key
You can use a special key to unscrew it. This is an effective method, but to implement it you will need to purchase a tool. You will find several key options on sale:
- chain;
- clamping tool;
- tape;
- screw puller.
How to use it correctly?
To unscrew it with a chain or other special wrench, hook the filter device with a tool, securely fix it and remove it by turning it counterclockwise.
Chain type removal tool Special wrench with clamp for filter removal
We recommend: Replacing the heater radiator on a Chevrolet Niva with air conditioning without removing the instrument panel
Rope (belt) and screwdriver
To remove the device without a tool, use a belt or rope with a screwdriver:
- A screwdriver is used to pierce the body of the filter device, as a result of which the tool is used as a lever. When using a screwdriver, you need to pierce the element right through, this will make twisting more effective.
- When using a belt or rope, the dismantling method simulates the use of a special key. The strap should be wide and made of leather or leatherette. A loop is made, after which it is tightened on the device itself counterclockwise. For quick dismantling, give a sharp tug on the rope or strap. The removal process may be difficult due to the strap slipping. Then insert a piece of sandpaper into the loop itself and perform the described steps again.
Hammer and long screwdriver
This method of unscrewing a part is similar to the screwdriver method. Its implementation is relevant if you pierced the filter, but could not move it from its place. Then dismantling the device is possible by applying force from blows with a hammer to the screwdriver handle.
Hammer and chisel
If these dismantling methods do not help or the housing of the filter device is damaged, then use a chisel instead of a screwdriver. Make a small notch on the part for the chisel to rest against. We begin to hit the instrument with a hammer. This usually helps to quickly unscrew the filter.
Homemade instrument
You can change the filter and dismantle the device with a homemade puller. The operating principle of such a tool is identical to a special key.
You will learn about making your own dismantling tool from the video. The material was filmed and made public by the kv3st channel.
You need to build such a device yourself:
- You will need a bicycle chain, or rather a section of it. When dismantling the filter in domestically produced VAZ cars, the optimal chain size is 30 links.
- The chain is connected into a ring; a lock or rivet is used for fixation.
- You will need an unnecessary head from a 19 or 22 socket wrench. You need to make a cut in it that matches the size of the bicycle chain.
- Install the extension into the connecting square hole on the head. Use an awl or ratchet. For reliable fixation, the diameter of the extension must be equal to the size of the hole.
- Unscrew the filter device by turning it counterclockwise.
Gas key
The use of this method is relevant if there is free space around the device. Hook the oil filter housing with the tool and use its handles as a lever. Be careful not to damage other powertrain components. Be careful as some oil will come out of the filter when removing it.
Method 3: Using a leather trouser belt
If you don't have an old timing belt at hand, a regular leather belt will do just fine.
- The principle is as follows: the belt is put on in a loop and tightened with force. In this case, the long end of the belt serves as a lever.
Do not forget that the oil filter is unscrewed counterclockwise.
The most important thing is that the filter housing is clean, otherwise the belt will slip. For better contact, the surface of the filter can be slightly sanded.
Method 4: Hammer + chisel.
- Everything is very simple here: a deep notch is made on the filter body on the thread side, then a chisel is inserted into it and the filter is torn off the thread with tangential hammer blows.
- Next, the filter element is unscrewed by hand. This method is rarely used, since the free space around the filter is limited and there is practically no room for such maneuvers.
VIDEO INSTRUCTIONS » alt=»»>