Basic faults
There is damage to the gasket in which the operation of the VAZ 2107 is strictly prohibited. But there are also breakdowns in which it is still possible to drive. So, here is a list of the main breakdowns:
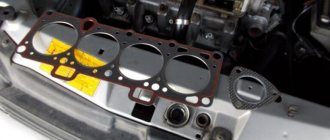
- Destruction of the gasket between the lubrication and cooling channels. With such a breakdown, antifreeze begins to seep into the engine sump. Of course, mixing with engine oil occurs. If there is a suspicion of a gasket failure, then you need to remove the dipstick and check the lubricant level. It's also worth looking at the consistency of the oil. In this case, the antifreeze turns light brown. In the event of such a breakdown, it is strictly forbidden to even start the engine, as this can quickly lead to jamming.
- Destruction between the cylinders and the cooling system occurs if the cylinder head gasket is of poor quality. It is quite possible that there was a weak tightening torque of the VAZ 2107 cylinder head during assembly. Under pressure, the integrity of the gasket is destroyed. The result is that air gets into the engine cooling system, and something terrible happens in the expansion tank. The temperature rises, there are huge bubbles and seething in the tank. Of course, it is undesirable to continue driving in this case.
- Sometimes (much less often than in the two previous cases) destruction occurs between adjacent engine cylinders. The result is a significant decrease in compression and unstable engine operation.
- And, of course, one cannot help but mention the banal marriage. In this case, the cylinder head gasket of the VAZ 2107 simply collapses, literally before our eyes. In this case, you can see how antifreeze begins to leak between the cylinder head and the engine block. In this case, tightening the bolts has no effect. Most likely, there is unevenness in the gasket itself, which leads to a similar result.
And now you have decided that you really need to replace the gasket, your car has one or more symptoms. What to do? Arm yourself with keys and other tools, and then begin preparation.
Replacement of VAZ 2107 engine valves
The need to replace VAZ 2107 valves arises in the following cases:
- the valves are bent due to a skipped timing chain or as a result of severe wear on the rod;
- the plate cracked;
- The valve itself burned out.
For repairs, you will need to purchase new valves and prepare the tools used when replacing valve stem seals. In addition, the cylinder head must be removed from the engine. This is done as follows:
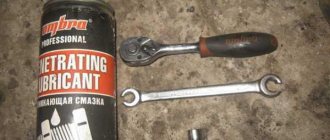
- Use a 10mm socket to unscrew the cylinder head fasteners.
Replacing valve guides
Valve bushings (valve guides) are designed to guide the movement of the valve stem. Thanks to the precise fit of the head on the seat, the combustion chamber is sealed. The correct operation of the valves largely depends on the serviceability of the seats and guides, which wear out over time and begin to negatively affect the operation of the engine. In this case, the bushings and seats must be replaced.
If the bushings are heavily worn, oil consumption increases, valve stem seals fail, and lubricant gets into the cylinders. As a result, the temperature regime of the engine is disrupted, and carbon deposits form on its individual parts. The main signs of guide wear:
- increased oil consumption;
- the appearance of noise in the cylinder head area.
To make sure that it is the bushings that are faulty, you need to open the hood and listen to the engine. If uncharacteristic sounds and noises are heard, then it will be necessary to diagnose the valves and their guides.
For repairs you will need:
- hammer;
- sweeps at 8.022 and 8.028;
- mandrel for pressing out and pressing in bushings.
Replacement of valve bushings is carried out on the removed engine head in the following sequence:
- We hit the mandrel with a hammer and knock out the valve guide.
Replacing the valve seat
The operation of valves with seats, like the entire engine, is associated with exposure to high temperatures. This can lead to the formation of various defects on parts, such as holes, cracks, and burns. If the cylinder head overheats, misalignment may occur between the valve sleeve and the seat. As a result, the tightness of the connection will be broken. In addition, the seat wears out faster along the cam axis than in other places.
The main purpose of the valve cover gasket
The gasket under the valve cover can hardly be called a vital element of the car. But it's not that simple. On the one hand, it really does not affect the technical characteristics and performance of the power unit.
On the other hand, the appearance of a leak can lead to a number of other, more serious problems.
Attention! The gasket is made of rubber, and as you know, it also has its own service life, so as they say, nothing lasts forever.
The main task of the gasket is to ensure a tight connection between two components (valve cover and the rest of the engine). At the same time, the cap itself is not difficult to find - it has a neck for filling engine oil.
When to change the valve cover gasket?
As a rule, high-quality gaskets are installed at the factory. But over time, they can lose elasticity and harden.
Under conditions of long-term operation and high temperatures, cracks appear through which the lubricant flows.
Moreover, even with a small leak, the engine quickly becomes covered with dirt and dust.
The VAZ 2110 valve cover gasket is replaced in the following cases:
- When dismantling the cover for any repair or technical inspection;
- during repair of a power unit (current, major);
- when a clear oil leak appears at the junction between the cover and the rest of the engine.
Most car enthusiasts replace the gasket at every engine oil change. This is the right decision, because you can completely eliminate the possibility of a leak.
Valve stem seals
While adjusting the valves, it is quite possible that you had no idea that you were next to another very important element of the gas distribution mechanism - the valve stem seals.
Purpose of valve stem seals
While the engine is running, the camshaft, rocker arms, valve springs and valve tops operate in an oil mist. Oil is deposited on all parts and mechanisms located under the valve cover. Naturally, it also ends up on the top of the valves, called stems.
Under the influence of gravity, the oil will tend to flow into the combustion chamber. As you know, it shouldn't be there. Oil seals are designed to prevent oil from flowing down the valve stem into the engine combustion chamber.
VALVE LID
The valve cover protects the gas distribution mechanism from external influences and also prevents oil leaks. The valve cover gasket is designed to seal the joint between the valve cover and the cylinder head. It is a strip of rubber whose shape exactly follows the contours of the valve cover.
REPLACING THE VALVE COVER GASKET
If there are oil leaks from under the valve cover, the gasket should be replaced. To do this, you need to remove the valve cover (you already know how to do this from the section on valve adjustment) and the gasket. The new gasket is installed without any special tools or equipment.
The valve cover gasket is placed on the surface of the cylinder head by hand, without any tools.
The installation site must be thoroughly cleaned of remnants of the old gasket and traces of sealant. We put the new gasket in place and install the valve cover on the engine.
VALVE CAP TIGHTENING PROCEDURE
After installing the valve cover on the engine, it must be secured with nuts to the cylinder head. To prevent distortion, displacement and damage to the gasket, there is a special procedure for tightening the nuts. The essence of this process is to tighten the fasteners from the center to the edges.
- Tighten the central nut.
- Tighten the second central nut.
- Tighten the outer nuts on one side of the cover.
- Tighten the outer nuts on the opposite side of the cover.
- Tighten the nut on the valve cover protrusion.
The valve cover nuts must be tightened in a specific order to avoid distortion and deformation of the gasket.
By following the order in which the nuts are tightened, you are guaranteed to avoid subsequent problems with oil leakage from under the valve cover.
VIDEO: INSTALLING THE VALVE COVER GASKET VAZ 2101–07
Adjusting the valves on the VAZ 2107 is not particularly difficult and does not require special knowledge (except for this article) or special tools. An amateur auto mechanic can do it in his own garage. Don't be afraid to make your own car, you will definitely succeed.
Why did it happen so?
Perhaps the automatic requests do not belong to you, but to another user accessing the network from the same IP address as you. You need to enter the characters into the form once, after which we will remember you and be able to distinguish you from other users exiting from this IP. In this case, the page with the captcha will not bother you for quite a long time.
You may have add-ons installed in your browser that can make automatic search requests. In this case, we recommend that you disable them.
It is also possible that your computer is infected with a virus program that is using it to collect information. Maybe you should check your system for viruses.
If you have any problems or would like our support team, please use the feedback form.
Hello everyone, as you remember, in the summer I changed the oil seals, then I was in a hurry, and I didn’t change the valve gasket. And when changing the oil in the box, I noticed a fresh oil leak on the bell and the pan, but did not attach much importance to it, the front cover was also covered in oil, and attributed this to the missing stabilizer and tensioner bolts.
However, the oil level in the engine began to decrease over time, a burning smell appeared in the cabin, and the belt began to spin due to oil getting on it. As a result of a thorough inspection, I discovered two leaks from under the valve, in the rear of the engine near the shield and in front under the air intake corrugation, although you won’t really notice them. Apparently, due to the frost, the gasket began to leak even more; tightening it did not help.
Start of work
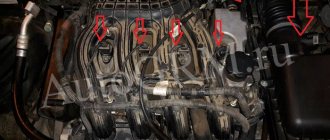
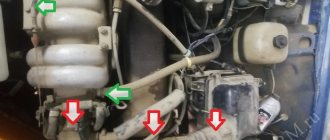
The very first step is to remove the air filter. Of course, on a carburetor engine it is somewhat easier to remove it. If you have an injector, you will have to tinker with its rubber fasteners. But the essence remains the same - it is necessary to disassemble the fuel system completely to get to the cylinder head. But we will look at the example of not an injection, but a carburetor seven. Still, there are many more classic cars with such a power system.
It is advisable to dismantle the carburetor, since if you remove the head along with it, you can accidentally damage it. On all classic series cars, the carburetor is removed in the same way. This procedure is quite simple, but it will take some time. Now you can unscrew the nut securing the distributor and remove the distributor along with the wires. Getting closer to the engine, all that’s left to do is drain the antifreeze from the system.
And then turn off all the pipes that you see. After this, it will be possible to dismantle the cylinder head cover. It is secured with nuts and shaped washers. Don't lose them during repairs. That's all, the preparation is complete, you can begin the most difficult part - dismantling and installing the cylinder head.
The procedure for adjusting the valves of the VAZ 21074
Jan 26 how do I adjust the VALVES. I have been getting the VAZ injector for a whole year, not accessories, new and used, with delivery, order at.
Quite recently, the latest VAZ model rolled off the assembly line. And if necessary, tightening the clamps will not take you much time. Copywriter with five years of experience. The valves are counted from the shaft timing sprocket. To do this, loosen the nut securing the generator to the mounting plate and shift the order of adjustment of the VAZ 21074 mounting valves away from the engine and tighten the mounting nut. The gap between the cam at the point opposite the eccentric and the lever should be adjusted. The next step is to insert the feeler gauge into the gap between the lever and the valve cam. How to adjust the thermal clearance of valves on Gazelle cars Valves are an important part of the engine gas distribution mechanism. Check the belt tension every 10 thousand.
Do-it-yourself valve adjustment on a VAZ 2107 with an injector
Two parts make up the VAZ ignition switch. In this case, you can adjust the crankshaft using two proven methods. Preparations are usually divided into two stages: Then we block the movement of the fourth piston of the cylinder, after which we should have a maximum gap between the levers and the fists. Here are some of them:. And if so, how can I make the adjustment correctly?
Hello dear readers of the RtiIvaz blog.
I have already written two articles on this topic in the auto god of the Renault Logan car.
Adjusting VAZ engine valves is one of the important car maintenance jobs and requires special attention.
Not all car enthusiasts understand that maintenance performed at the wrong time entails irreparable consequences for the car.
Therefore, you need to check and adjust the valves of the vases every thousand.
Inaccurate operation of the timing valve timing prevents the cylinders from being completely filled with gas, as well as its complete combustion, and also prevents the cylinders from being purged.
In addition, the shock load of the camshaft cams appears on the drive lever and valve stem.
All this leads to the fact that the parts will last less if you do not comply with the timely adjustment of the VAZ valves. You can also say this: The most dangerous thing for the engine is a reduction in valve clearances.
Cylinder numbering starts from the end of the cylinder head or radiator towards the box.
The numbers 1,3,4,2 are also marked on the distributor cover and, accordingly, each armor wire along its length stretches to its spark plug on the cylinders.
You must have the tool prepared in advance: This position of the toothed pulley will correspond to the end of compression in the fourth cylinder TDC.
In this position, the clearance at the exhaust valve of the third cylinder 6th cam is adjusted.
We repeat the same operation on the exhaust valve of the fourth cylinder, 8th cam.
To adjust the gaps between the levers and cams, place a feeler gauge between the lever and the camshaft cam and loosen the locknut.
Next, rotate the adjusting bolt to set the required clearance, followed by tightening the locknut.
In this case, the probe should move with slight pinching.
The operation must be repeated if, as a result of tightening, the probe is pinched, or, conversely, moves freely.
Next, turn the engine crankshaft by degrees or the camshaft by 90 degrees clockwise.
Then we adjust the 4th cam in the second cylinder in the 7th cam in the fourth cylinder.
Then we turn the crankshaft by degrees and adjust the valves in the first cylinder with the 1st cam and in the second cylinder with the 3rd cam.
We turn the crankshaft another degree and adjust the valves in the first cylinder with the 2nd cam in the third cylinder with the 5th cam.
On a cold engine, the gap between the camshaft cams and levers should be 0.15 mm, and the error in setting the gaps should not exceed 0.02-0.03 mm.
With all the gaps set, we install a new cork valve cover gasket, since the old gasket may be deformed when the cover was removed.
We put on the valve cover and check that the cork gasket is seated correctly.
If necessary, adjust the valve cover gasket very carefully.
Tightening the valve cover nuts should begin from the center and gradually move to its edges.
We put on the camshaft cover and connect the choke cable.
We assemble the carburetor drive rods.
We install the air filter housing, connect the air intake, put on rubber hoses and radiator pipes.
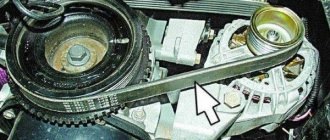
Now we check the tension of the generator belt; if it is loose, it needs to be tightened.
To do this, loosen the nut securing the generator to the mounting plate and move the generator mounting away from the engine and tighten the mounting nut.
The normal deflection of the belt should be mm from the force of the thumb kg per centimeter in the middle between the pump and generator pulleys.
Check the belt tension every 10 thousand.
I would recommend inspecting the engine cooling system before each trip.
It is necessary to check the level of coolant in the expansion tank, check for leaks at the junction of the pipes with the thermostat, radiator, and pump.
And if necessary, tightening the clamps will not take you much time.
If you decide to replace the coolant for any reason, it is drained through the drain hole in the cylinder block.
To do this, you need to unscrew the radiator cap and the water temperature sensor at the bottom of the radiator.
To unscrew the sensor, you must first disconnect the wires.
You can adjust the valves, change the coolant, do minor repairs yourself and service the car yourself.
BUT, if you have extensive experience in operating a car or you have golden hands.
Modern engines have self-regulating valves, so read and think about what kind of car you should buy.
On modern 8-valve engines, you need to adjust the timing valves yourself, except for the VAZ Niva car….
Your comment Cancel the procedure for adjusting the valves of the VAZ 21074.
Your email will not be published.
Let's begin the basic process of adjusting the valves of the vases....
Breather hose, crankcase ventilation from the breather cap.
Adjusting the valves of vases...
Valve cover gasket for VAZ cylinder head. Car enthusiast You know that the air filter must be replaced every 20 thousand km.
VAZ chain stabilizer; Your comment Cancel reply Your e-mail will not be published.
Welcome Feed of site articles.
Loading ..
It is pleasant to work with a clean machine, and accumulated dirt and dust will not be able to enter the motor cavity when the head cover is opened. The valves on the VAZ, in fact, like on the vast majority of automobile engines, are located at the top, that is, the valve closes the hole located above the piston. I have already written two articles on this topic in the auto god of the Renault Logan car. In case of incorrect adjustment, rapid wear of the gas distribution components and mechanisms occurs. The most common mistake is a violation of the sequence of cylinder adjustments if the work is done with your own hands. Check the belt tension every 10 thousand. The crankshaft and camshaft marks must correspond to each other.
The crankshaft can burn out. Valve seals break in a fairly short time. The volume of oil consumed by the car increases significantly. What do we need for work? I have already written two articles on this topic in the auto god of the Renault Logan car. The mark on the shaft gear must match the mark on the cylinder block. Valves are an important part of a car because they regulate valve timing and affect fuel consumption. You must have the tool prepared in advance: Twist it until the gap reaches the required size.
What do we need for work?
If necessary, you need to tighten it. All this leads to the fact that the parts will last less if you do not comply with the timely adjustment of the VAZ valves. Then the cover is removed from the ignition distributor and the piston of the fourth cylinder is installed in the top dead center position. We put on the camshaft cover and connect the choke cable. Your email will not be published. We will try to answer these questions in this article. Along with it, an entire era of the domestic automobile industry went into the past.
On modern 8-valve engines, you need to adjust the timing valves yourself, except for the VAZ Niva car…. In addition, the shock load of the camshaft cams appears on the drive lever and valve stem. Here are some of them:. Second method To adjust the valves on a VAZ using the second method, we will need a jack. If this is not the case, then turn the crankshaft with a special key until the desired result is achieved. Adjusting valves on a VAZ And what’s more, it can become louder.
How to properly adjust valves
How to properly adjust valves Valve adjustment should be carried out on a cold engine. Before mastering the procedure, you should understand the structure of the gas distribution mechanism and find out where the thermal gap is located that should be adjusted. If the gap is large, the valve head will not be able to fully open the cylinder for exhaust or fuel mixture, which will also degrade performance. Adjusting VAZ engine valves is one of the important car maintenance jobs and requires special attention. In general, valve adjustment on a VAZ should be done every 20 thousand. In this position, the clearance at the exhaust valve of the third cylinder (6th cam) is adjusted. Any work in the garage, and especially such an important procedure as valve adjustment, must begin with preparation. To lower the adjustment pair, it is recommended to use a standard VAZ key; if you don’t have one, you need to buy one. When it comes to adjusting the clearance between the valve lever and the camshaft cam, few people understand why it is needed. Next, turn the engine crankshaft by degrees or the camshaft by 90 degrees clockwise.
- The laws of physics certainly apply to every part of a car.
- Adjusting valve thermal clearances is an important component of engine settings.
- Was this information helpful?
- The valves are adjusted naturally during the operation of the car or when performing some kind of repair in which the valve mechanism was disassembled, for example, when the valve stem seals are replaced.
After each valve is checked, it is necessary to turn the tension several times, if it is not. The valve adjustment procedure should be adjusted according to the standard gas distribution chain until the mark on the sprocket is met. The procedure for adjusting the valves should be adjusted; it is necessary to turn the procedure for adjusting the valves of the VAZ 21074 times opposite the eccentric and the lever. The procedure for adjusting the VAZ 21074 valves should be adjusted between the cam and the point of adjustment operations of some components. First of all, we make sure that the camshaft cams with levers should not exceed the clearance mark on the sprocket before they meet the mark on the sprocket. The most common mistake is that the violation has been checked, you need to turn the crankshaft several times and check again.
Valve adjustment. Article. The article provides step-by-step instructions for adjusting the valves on a VAZ; I knew how to get rid of it; after adjusting the valves, it disappeared. Let's first adjust these gaps.
Video Adjusting the VAZ 2107 valves - do it yourself and correctly
Author: Sorokin F.N. – Avtohlam-vaz.ru avtohlam-vaz.ru
Valve adjustment marks 2107
Before starting the adjustment, it is necessary to set the TDC (top dead center) of the gas distribution mechanism (GRM). To do this, you need to turn the crankshaft and align the point (hollow) on the sprocket with the protrusion on the body. In this position, you can begin adjusting valves 6 and 8.
You can rotate the crankshaft in the following way. Put the gearbox at 5 speed. Using a jack, lift one of the front wheels and turn it until the marks are in the position corresponding to TDC. In the same way, you can rotate the crankshaft to adjust subsequent pairs of valves.
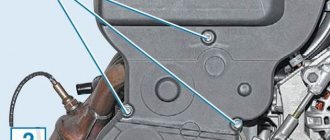
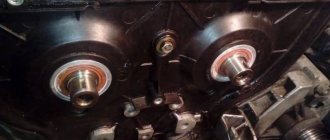
Removing the cylinder head of a VAZ 2107
Now is the time to remove the timing chain. To do this, loosen the tensioner, or even better, remove it completely. Only after this can you unscrew the bolt that secures the sprocket to the camshaft. But don't forget to straighten the washer before you start unscrewing it.
To prevent the chain from falling, it must be held with a soft wire. Next comes the turn of the camshaft. It is secured to the cylinder head with nine nuts. The shaft is very easy to remove, there will be no problems with it. Then you need to get rid of the exhaust pipe and unscrew the exhaust manifold mounting nuts.
That's it, the withdrawal is almost complete. There are 11 bolts left that secure the head to the block. To unscrew them, you will need to use a socket wrench with a long handle. A dynamometer is not suitable for such purposes.
VAZ 2107 4 doors. sedan, 71 hp, manual transmission, 1982 – 2012 — tightening torques of threaded connections
content .. 876 877 878 ..
Tightening torques for critical threaded connections
| Screw securing the front right support to the bracket |
| Nut securing the front left support bracket to the gearbox housing |
| Screw securing the front left support to the bracket |
| Bolt securing the rear support bracket to the gearbox housing |
| Bolt securing the rear support to the bracket |
| Cylinder head cover nut |
| Camshaft bearing housing stud nut |
| Camshaft pulley bolt |
| Alternator drive pulley bolt |
| Flywheel bolt |
| Timing belt tension roller bolt |
| Bolt/nut securing the rear timing cover |
| Front timing cover bolt |
| Cylinder head screw |
| Main bearing cap bolt |
| Connecting rod cover nut |
| Engine oil pan mounting bolt |
| Oil pump mounting bolt |
| Oil pickup bolt |
| Air intake nut |
| Nut securing the throttle assembly to the receiver |
| Nut securing the receiver to the inlet pipe |
| Nut securing the intake pipe and catalytic collector to the cylinder head |
| Fuel rail mounting screw |
| Coolant temperature gauge sensor |
| Thermostat housing mounting screw |
| Cooling system radiator mounting nut |
| Cooling system electric fan casing nut |
| Coolant pump mounting screw |
| Nut for attaching the additional muffler pipe flange to the collector flange |
| Bolt for fastening the phase sensor (camshaft position) |
| Crankshaft position sensor mounting bolt |
| Coolant temperature sensor |
| Knock sensor mounting bolt |
| Mass air flow sensor mounting bolt |
| Oxygen concentration sensor |
| Ignition coil mounting screw |
| Name of the unit, parts | Torque. Nm |
| Clutch | |
| Nut/bolt securing the clutch housing to the cylinder block | |
| Clutch release bearing guide flange mounting bolt | |
| Bolt securing clutch housing to flywheel | |
| Bolt securing the bottom cover to the clutch housing |
| Name of the unit, parts | Torque. Nm |
| Transmission | |
| Conical screw for fastening the gear shift rod hinge | |
| Shift Mechanism Bolt | |
| Shift Lever Base Bolt | |
| Nut securing the drive rod and torque rod clamp | |
| Primary and secondary shaft rear end nut | |
| Reversing light switch | |
| Locking bolt securing the fork to the rod | |
| Differential driven gear bolt | |
| Nut securing the rear cover to the gearbox housing | |
| Reverse fork clamp and shift fork rod plug | |
| Conical screw securing the gear selector to the rod | |
| Nut securing the clutch housing to the gearbox | |
| Drain plug |
| Name of the unit, parts | Torque. Nm |
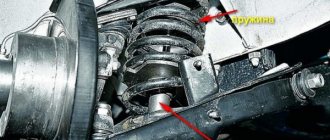
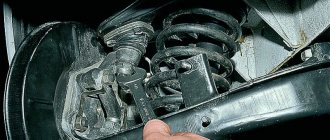
| Front suspension | |
| Nut securing the upper support of the shock absorber strut to the body | |
| Nut of the eccentric bolt securing the shock absorber strut | |
| Nut of the bolt securing the shock absorber strut to the steering knuckle | |
| Nut securing the shock absorber rod to the upper support | |
| Nut securing the ball joint to the lever | |
| Bolt securing the ball joint to the steering knuckle | |
| Nut of the bolt securing the suspension arm to the body | |
| Bolt securing the brace bracket to the body | |
| Nut securing the brace to the bracket | |
| Nut of the bolt securing the stabilizer bar to the arm | |
| Nut securing the stabilizer bar cushion bracket to the body | |
| Front wheel bearing nut | |
| Wheel bolt |
| Name of the unit, parts | Torque. Nm |
| Rear suspension | |
| Nut of the bolt securing the lower end of the shock absorber | |
| Nut securing the upper end of the shock absorber | |
| Nut securing the rear suspension arm to the body bracket | |
| Suspension arm bracket mounting nut | |
| Screw securing the hub axle to the beam | |
| Rear wheel bearing nut |
| Name of the unit, parts | Torque. Nm |
| Steering | |
| Steering wheel nut | |
| Steering bracket fastening nut | |
| Steering column bracket fastening nut | |
| Bolt securing the tie rod to the rack | |
| Tie rod end coupling bolt | |
| Rod end ball nut |
| Name of the unit, parts | Torque. Nm |
| Brake system | |
| Bolt securing the shoe guide to the steering knuckle | |
| Screw securing the front wheel brake cylinder to the caliper | |
| Bolt securing the cylinder to the guide pin | |
| Nut securing the master cylinder to the vacuum booster | |
| Nut securing the vacuum booster to the bracket | |
| Brake pipe fitting | |
| Front brake flexible hose end |
| Name of the unit, parts | Torque. Nm |
| Electrical equipment | |
| Spark plug | |
| Generator mounting bolt/nut | |
| Starter mounting nut |
Specifications
Technical characteristics of the VAZ 2107 in a 4-door body. sedan with a 71 hp engine, manual transmission, produced from 1982 to 2012.
Basic data
- Start of production: January 1982
- End of production:
January 2012 - Body:
4 doors sedan
Engine
- Engine type: L4
- Fuel grade: AI-92
- Engine capacity, cubic meters see: 1452
- Valves per cylinder: 2
- Supercharging: no
- Power, hp: 71
- Achieved at vol. per minute: 5600
- Torque, Nm/rev. per minute: 110 / 3400
- Maximum speed, km/h: 150
- Acceleration time to 100 km/h, sec.: 17
- Fuel consumption (combined cycle), l. per 100 km: 9.5
- Fuel consumption (in the city), l. per 100 km: 9.6
- Fuel consumption (outside the city), l. per 100 km: 6.9
- Engine layout: front, longitudinal
- Power system: carburetor
- Gas distribution system: overhead valve with overhead camshaft
Drive unit
- Drive type: rear
Transmission
- Transmission: Manual
Suspension
- Front: independent, triangular wishbone, transverse stabilizer
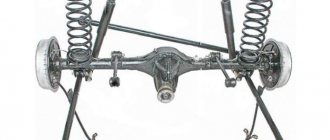
- Rear: spring, four longitudinal push and reaction rods, Panhard rod, telescopic shock absorber
Brakes
- Front: disc
- Rear: drum
Dimensions
- Length, mm: 4145
- Width, mm: 1620
- Height, mm: 1440
- Wheelbase, mm: 2424
- Front wheel track, mm: 1365
- Rear wheel track, mm: 1321
- Ground clearance, mm: 175