No long introductions. Today on the menu: replacing the timing belt for a Ford Focus 3 with a 1.6 engine, and at the same time we’ll replace the pump. The frequency of replacing the timing belt is 120 thousand kilometers or 8 years of operation, whichever comes first. This is what the manufacturer recommends and this applies to “normal” operating conditions, so it is better to replace it a little earlier than the regulations.
Attention! When the timing belt breaks on the third focus, all valves bend.
Do-it-yourself timing belt replacement
The gas distribution mechanism (GRM) synchronizes the operation of the piston group, the fuel injection system and the exhaust of combustion products.
If you are wondering how to change the timing belt, we will provide the necessary minimum information that will help present this procedure as a whole. This will make it easier to decide whether replacing the timing belt is worth your own efforts, or whether it is better to entrust this work to specialists. The timing belt is the most responsible and important belt drive in a car. Its breakage is a big nuisance. You'll be lucky if the problem is limited to bent valves. Therefore, the answer to the question of how to replace the timing belt should be given immediately as soon as you suspect a problem with its operation. In this case, it is better to play it safe than to have serious repairs in the future.
What you need to know when replacing and choosing a new timing belt
An important point for the safe operation of the engine is also the quality of the belt itself (namely, the material from which the belt is made).
Until 1985, neoprene was used throughout the world in the production of drive belts, which was one of the highest quality and high-tech materials. In 1985, Contitech made a major leap forward in technology with the introduction of the first drive belts made from Highly Saturated Nitrile (HSN), a heat-resistant synthetic rubber material. This is a difficult material to process, requiring significant modifications to production lines, which also has a very high cost. However, the extremely high level of performance properties that it realizes allows us to completely solve the problems facing the new generation of drive belts. Externally, a drive belt made of HSN looks the same as the previous generation belt, made of neoprene rubber, but when installed on modern engines with their more intense temperature conditions, its significant superiority becomes obvious. This justifies the relatively high cost of the latest generation of drive belts. If we set out to compare the excess cost of a nitrile belt (HSN) over the cost of a neoprene belt and take into account the number of belt replacements during operation and the costs associated with this, in both cases, it turns out that the consumer who chooses a new belt wins twice :
firstly, by reducing the direct costs of servicing drive belts during the vehicle’s life cycle,
secondly, by dramatically increasing the reliability of this unit, which is important for the safe operation of the engine.
Based on these considerations, manufacturers of almost all modern engines have chosen drive belts made using HSN technology. For example, if VAZ previously recommended changing the timing belt after 50-60 thousand. km., now the Priors state that the replacement frequency is 100 thousand.
Classification of belts by profile (reflected in the belt markings)
Guide to identifying and eliminating common faults:
When operating and replacing the drive belt, remember:
— check the drive belt tension when changing the oil (or when the symptoms described in the “typical malfunctions” section appear);
— outwardly similar belts are not interchangeable;
— installation of drive belts that do not meet the quality requirements established by the equipment manufacturer can lead to serious engine damage and unjustified repair costs, which will be tens of times higher than the cost of the recommended drive belt and its installation.
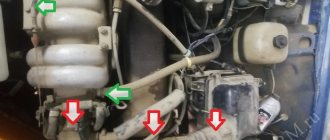
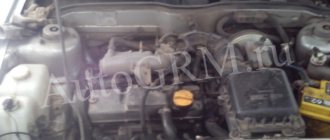
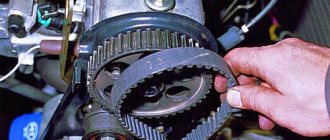
Where is the timing belt located?
First, let's remember where the timing belt is located and what it looks like. Its location is in front of the engine, but do not forget that motors come in longitudinal and transverse locations. In most cases, gas distribution mechanisms use a toothed rubber belt, but in a considerable number of car models from different manufacturers, a steel chain is also used for this.
Engine cylinders can be equipped with two or four valves with one and two camshafts (CV), respectively. The kinematics of the gas distribution mechanisms of such engines differ. We will show them using the example of 8- and 16-valve power units for the VAZ 2110, 2111 and 2112.
The scheme with two shafts is more complicated, and in it, in addition to the pulley of the second RV, a support roller is added. This also complicates the belt replacement procedure. It is most difficult to perform this operation after a break or severe stretching of the belt, when the factory timing settings can be completely lost. Replacing in normal mode is not so difficult that you can’t try to do it yourself.
Signs of a faulty timing belt, causes and remedies
The main task of the timing belt is to connect the crankshaft to the camshaft. The crankshaft controls the engine pistons, and the camshaft opens and closes the valves. The timing belt helps control the timing of these components, ensuring optimal engine performance. A broken timing belt can cause catastrophic engine damage, so it is important to keep the belt in good working order. Inspect the belt during routine maintenance and always ensure it is replaced at intervals recommended by the manufacturer.
Additionally, proper tools must be used to remove and install these pulleys. — See more at: https://staging.gatesi.prd.reference.be/en/problem-diagnosis/accessory-drive-system/oap-function-tests#sthash.bxyPeK6z.dpuf
Additionally, proper tools must be used to remove and install these pulleys. — See more at: https://staging.gatesi.prd.reference.be/en/problem-diagnosis/accessory-drive-system/oap-function-tests#sthash.bxyPeK6z.dpuf
Additionally, proper tools must be used to remove and install the timing belt.
If a belt does fail prematurely, it is important to determine why it failed so that corrective action can be taken. In most cases, the cause of the failure can be found in a problem with one of the drive components.
HOW TO IDENTIFY AND ELIMINATE TIMING PROBLEMS?
When diagnosing serpentine belt problems, use the following troubleshooting methods to resolve the problem: - See more information at: https://staging.gatesi.prd.reference.be/en/problem-diagnosis/accessory-drive-system/micro-symptoms V-belt wear # sthash.WF3iA4GB.dpuf
Source
What is needed to replace the timing belt
The leading link of the gas distribution mechanism is the crankshaft. It sets the pace of operation of the timing belt. Rotation at high speed and friction forces lead to fairly rapid stretching and wear of the belt. However, the decision about what to change when replacing the timing belt is made after a careful inspection of the mechanism.
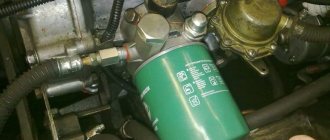
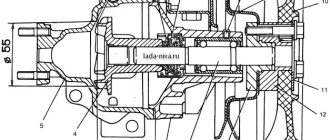
It is checked for the presence of play in the tension and support rollers, the absence of oil leaks, and the serviceability of the water pump, the drive (pulley) of which is part of the timing belt, is determined. Therefore, when repairing the gas distribution mechanism, you may need more than just a belt. To replace it, you will definitely need the following set of tools:
- a set of open-end, socket and ring wrenches Nos. 10, 13, 17, including a special fork wrench for fixing the tension roller;
- a torque wrench for tightening the nuts with the required force;
- a device for checking belt tension;
- screwdrivers;
- jack.
Before you begin replacing the timing belt, you should prepare the vehicle. First of all, the car needs to be fixed so that it does not rock back and forth. Remove the front right wheel and the protection under it, as well as other parts that may cause you inconvenience when working. After removing the protection, return the wheel to its place. It is most convenient to combine marks and marks on timing pulleys and engine body parts.
How to remove and replace a belt drive
The main rule that is important to follow when replacing the belt is not to disturb the valve timing, which is achieved by aligning the marks on the gears, crankshaft flywheel and engine housing. During the work process, you need to check that the marks do not move. The procedure is divided according to the following scheme:
- Disassembling the unit and removing the old belt.
- Visual inspection of the mechanism parts and cleaning the internal cavity from dirt.
- Installing a new belt with a roller, tensioning it.
- Assembly and performance testing.
In most cases, you can install a new drive without any special tools. The exception is 16-valve engines, where it is recommended to use jigs to fix the camshafts, but in extreme cases you can do without them. The standard set of tools is as follows:
- jack and wheel wrench;
- open-end wrenches, spanners, heads with extension;
- screwdriver, pliers with pointed ends;
- flashlight for illumination.
Camshaft Locking Tool
It is easier to work with some car models from the inspection pit, but it is usually not required to replace the timing belt. The work procedure is different for 8 and 16 valve engines, so they should be considered separately. An example is the family of front-wheel drive VAZ cars.
Procedure for working on an engine with 8 valves: step-by-step instructions with photos
First, you need to park the car on a level area or inspection hole and secure it with the hand brake. Then unscrew and remove the front wheel from the timing assembly side by lifting the car on a jack. Perform further actions in this order:
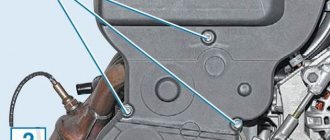
- Remove the plastic cover covering the drive from above.
- Remove the elements that block access to the lower cover of the gas distribution mechanism - mud flaps, anthers, crankcase protection. Loosen and remove the generator drive belt, remove the cover.
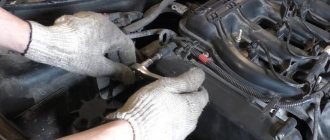
- Use a powerful screwdriver or a mounting spatula to wedge the crankshaft by inserting it between the teeth of the flywheel. Using an open-end wrench, loosen the bolt holding the pulley at the end of the crankshaft. Remove the pulley and screw the bolt back into the hole.
- Release the crankshaft and rotate it with a wrench by the bolt until the marks align. The marks on the housing, gears and flywheel must match. To be sure, jam the crankshaft again.
- Loosen the tension pulley nut and remove the loose old belt. Next, remove the roller.
- Inspect the pump and seals for leaks and thoroughly wipe the mechanism cavity from dirt.
Aligning marks
Advice. As a rule, the pulley bolt is too tight and loosening it is problematic. Have a helper engage first gear and press the brake pedal while you remove the bolt.
The belt is put on the gears in a counterclockwise direction
. Before installing the new belt drive, install the tension roller and tighten the nut without tightening it. Then slide the belt over the gears so that all the slack is on the tension pulley side. Be careful not to disturb the position of the marks.
The tension is checked by turning the strap around its own axis
The next step is to tighten the belt using a roller. You need to insert pliers into its holes and turn it on an eccentric axis, then tighten the nut. The timing belt is considered to be normally tensioned if it cannot be manually rotated around its axis by more than 90°. After tensioning, reassembly and a test run of the motor are performed.
This is interesting: Painting plastic parts in a garage
How to change a belt: video
Replacement on a 16-valve engine
The 16V engine has 2 camshafts that open their pairs of valves with cams. This gives rise to a number of differences in the process of replacing a belt drive:
- after initial disassembly, you need to align the marks on both camshafts;
- the camshafts are fixed with a special device - a jig; in VAZ cars it is a bar with cutouts inserted into the slots at the ends of these shafts;
- in addition to the tension roller, the mechanism has a second roller - a parasitic (support) roller, which also needs to be changed;
- When putting on the belt, you need to monitor the position of the marks and tighten it as much as possible with your hands so that the slack is on the side of the movable roller.
Marks on the 16V motor
Tensioning is also done by turning the eccentric roller and fixing it with a nut. In VAZ cars, a mark is stamped on the roller body, which is aligned with the boss on the body when the belt is tensioned. Having achieved the desired tension, be sure to make 2-3 full revolutions of the crankshaft by hand, and then re-check the position of the marks. In general, the procedure remains the same as when working with an 8V motor.
Video about working with a 16V engine
What else do you need to know about replacing the timing belt?
When changing the timing belt drive, you need to pay attention to the condition of all its parts. If an oil leak is detected from the crankshaft or camshaft oil seal, it is advisable to take the opportunity to change the seal. The problem is that not everyone can do such work on their own, so it is better to detect the leak before disassembling the unit.
The meaning is this: the employees of the car service center where you bring your car to replace the oil seal will still remove the timing belt, otherwise you won’t be able to get to it. And if so, then they will include the operation of removing and tensioning the belt drive in the cost of repairs. There is no point in changing the belt yourself if the service station will do the same and charge you for it.
The block wall is in oil - the oil seal is leaking
The same goes for the water pump, which is clearly leaking antifreeze due to a broken bearing. A sure sign of a malfunction is that the entire space of the timing belt assembly and its parts are covered with moisture thrown by the belt. If you are not able to change the pump yourself, then there is no need to disassemble the car; it is better to immediately go to a car service center.
Advice. A leaking pump must be replaced immediately, regardless of the condition of the belt and other timing elements.
It often happens that a belt breaks while on the road, and the car owner has a spare one in the trunk. Since it will not be possible to move further under our own power, you can install a new spare part in the field under the following conditions:
- the break did not lead to bending of the valves;
- the necessary tools are available;
- There is a way to move your car off the road and park it on level ground.
The replacement process is similar to that described above, only in a 16-valve engine you will have to do without fixing the camshafts. It is important to carefully set the marks and not allow them to move, and after installing and tensioning the belt, double check their position before starting the engine.
Advice. When replacing, you should not treat the new rubber product with any chemicals. It is intended to be installed and operated in its original form, but may begin to slip due to exposure to chemicals.
Do-it-yourself timing belt replacement
Here we suggest looking at a photo report on how to change the timing belt on a VAZ with a 16-valve engine. The procedure is performed in the following sequence of actions:
- Remove the alternator belt from the pulley on the crankshaft.
- Remove the timing belt guard cover.
- Align the marks of the RV pulleys according to the marks on the casing.
- Remove the generator drive pulley, check again and set the marks, adding the crankshaft to this, after which you can remove the tension roller, and after it the belt.
- Check the condition of the belt and rollers.
- Reinstall the belt.
- Install the tension roller.
- Tension the belt.
- Finally check the correspondence of the labels.
- Perform a test run of the engine and complete assembly.
Recommendations for choosing: which company is better?
Modern belts for gas distribution mechanisms of automobile engines are high-tech products, and therefore not cheap. They are made on the basis of artificial rubber (neoprene, polychlorprene) with various additives, reinforced with a cord of durable threads. The latter are made from fiberglass, nylon and cotton.
This is interesting: In January, the St. Petersburg Nissan plant may expand its line
To choose the right new belt, it is suggested to follow these recommendations:
- The best way to avoid making mistakes with the size and shape of the teeth is to take an old belt with you to the store and compare it with the samples offered. Everything must match - length, width, profile of the teeth.
- Don't try to save money by choosing cheaper products. And if your car is used in extreme conditions, then you should choose the best option - the original, in the end it will pay for itself.
- Check the rigidity of the rubber product. The more elastic it is, the longer it will last on the car. Please note: the cheaper the timing belt, the stiffer it is (experts say “oak”).
- Externally, the new product should not have sagging on the teeth (small burrs are allowed), cavities or pores. The surface should be smooth to the touch, not rough.
- If possible, check the catalog number or article number if it is printed on the back of the belt.
It is difficult to follow the listed recommendations when buying a part in an online store. You make such a purchase at your own peril and risk.
Since the auto parts market is saturated with all kinds of counterfeits, there is always a chance of running into a low-quality product. To protect yourself, try to buy a timing belt and pulley at retail outlets from authorized dealers. Original spare parts are sold in sets, sealed in one package.
Set of original parts - belt and two rollers
The most popular manufacturers of belt drives are the Gates and Bosch brands. They are most often counterfeited, so much so that it is quite difficult to distinguish them. The following verification method is practiced: ask to show you several identical products and check the numbers printed on the back. For “correct” belts, combinations of numbers should not be repeated. If the numbers are the same, then you are probably looking at counterfeit products from the Middle Kingdom.
Different numbers are a sign of the authenticity of the product
Timing belt tension: algorithm of actions
The timing belt is an element in the engine design that connects the camshaft and crankshaft, organizing the timely opening and similar closing of the valves. The belt drive must always be well tensioned; as a result, engineers have introduced special tensioners into the design of the gas distribution mechanism. Few people know, but not only the service life of the belt itself, but also the unit as a whole depends on proper tension settings. We will talk in more detail about how to tighten the timing belt, and when such an operation may be required, in the article given today.
Tensioner rotation direction | Gateway to Europe
The reason for the failure of the timing belt drive can very often be found in errors made during the installation process. As with all work on the primary drive system, work should be done with the engine cold and the technician should use the proper tools. Additionally, the timing belt replacement procedure can only be performed correctly and safely if the prescribed installation procedure for the specific application is strictly followed.
ONE INSTALLATION PROCEDURE IS NOT LIKE ANOTHER
It is dangerous to assume that one timing belt installation procedure is the same as another. Although vehicle manufacturers have models with similar engines, different engine codes may require a different procedure. Automobile manufacturers may also use multiple sources (parts suppliers) for a particular engine part (for example, to avoid problems with one supplier causing the automobile manufacturer to stop production). Therefore, neglecting the prescribed installation procedure is especially dangerous.
EXAMPLE ON A POPULAR ENGINE (VAG 1.2 1.6 2.0 DIESEL)
RECOMMENDATIONS FOR ROTATION
A few words about the importance of correct tension
Many motorists know that improper functioning of the timing belt can cause very serious engine damage. This is due to the principles of operation of the mechanism, which boil down to the timely and high-quality opening/closing of the engine valves. This approach not only allows you to adjust the valve timing of the internal combustion engine, but also differentiates between sensitive valves and constantly knocking pistons.
If the timing belt begins to work incorrectly, the gas distribution order is disrupted, as a result of which engine elements begin to wear out at an accelerated rate. Similar disturbances in the functioning of the engine can also occur due to improper belt tension.
Note! A break in the belt drive while driving not only negatively affects the condition of the engine, but can actually severely bend the valves. Repairing a car with such a breakdown often costs motorists five-digit sums of money.
In addition, drive tension that does not meet the standards accelerates wear of the main timing elements, the list of which includes:
- directly the belt drive itself;
- rollers;
- torque clutches;
- guides;
- tensioner
Repair of each of the marked timing parts takes much longer than normal belt tensioning. Well, there is nothing to say about the cost, if you can tighten the drive yourself and completely free of charge, then you will have to pay for replacing the components of the mechanism.
Signs of improper removal and replacement
After installing a new timing belt, car owners often notice the appearance of unpleasant noise and whistling while driving. There may be two reasons for this:
Eliminating whistling and noise after replacing the timing belt is simple - just lubricate it. For this purpose, special aerosols are used, which can be purchased at automobile stores.
The timing belt is lubricated with a special compound
If lubrication does not help and the whistle persists, then you will have to check all components for leaks. If they are found, they are eliminated, parts are replaced if necessary, after which the extraneous noise should disappear.
One of the common causes of leaks is a broken cylinder head gasket.
Often, after replacing the tension rollers and timing belt, an unpleasant engine hum and vibration appears. The main reasons for this are incorrectly set marks or errors when installing the balancer belt, which rotates 180° in the wrong direction. Vibration is eliminated by checking the marks and reinstalling them, as well as adjusting the position of the balancers.
The timing belt is a consumable part that plays a huge role in the operation of a car engine. It may well break and fail, but this problem can be solved. Regular replacement and correct tension ensure the normal functioning of all machine systems and guarantee driving safety.
Source
When does the belt need to be tightened?
Having considered the previous paragraph of the article, it was probably not difficult to understand that monitoring the correct functioning of the timing belt is quite important. In particular, it is worth keeping the belt drive tension at the proper level. By the way, stretching is carried out only in two main cases:
- During a routine check of the gas distribution mechanism and the tension does not comply with the norm. The normal tension of the timing belt is checked in a very simple way, for which you will need ordinary spring scales and a ruler or caliper. To check, the hook of the scale clings to the belt and pulls until the display shows a load of 10 kilograms. Without loosening your grip, all that remains is to measure the deviation of the drive from the normal position. If the belt has been pulled back by more than 5.5 millimeters, but its tension is inevitable. Otherwise, you can leave everything as is until the next timing check, which is recommended every 10-15,000 kilometers;
- When repairing the timing belt, when the belt was removed or its tension was weakened.
In situations that do not correspond to those noted above, it is simply not worth touching the belt drive of the mechanism. Especially if the motor runs stably, without pronounced problems.
Replacing the drive belt: does the direction of rotation matter?
Replacing a timing belt is not an easy task: in most cases, you have to remove the accessory drive belt, as well as some accessories. Once you do, you'll probably have to figure out how to put everything back together. In this case, the question often arises: is it possible to install the timing belt and serpentine belt backwards? In other words, do these belts have a direction of rotation ? Let's try to find the answer to this question for both the timing belt and the auxiliary drive belt. Let's get started!
Timing belt: does it follow the direction of the arrows?
From a purely technical point of view, the new timing belt is absolutely symmetrical, i.e. it has no direction of rotation. “Then what is the use of timing belts with directional arrows?” - you will be surprised. If there are timing marks , then there are also timing marks on the pulleys/engine. The directional arrows only help you set the timing marks correctly and are not necessary at all because, as we said earlier, the new timing belt can run in any direction. Directional arrows help align timing marks.
Do I need to reinstall the timing belt?
If the timing belt is installed properly and the belt tension is correct, then you should not touch it - even if you suddenly notice that the arrows are pointing in the “wrong” direction. Once the car starts running, removing and reusing the timing belt becomes impossible: unfortunately, it only goes to waste, since installing and tensioning the timing belt is only allowed once.
What about the accessory drive belt?
The same applies to new accessory drive belts ). The new poly V-belt is also completely symmetrical and has no direction of rotation.
However, it is essential that the used accessory belt be reinstalled in its original direction. So it is very useful to draw an arrow on the belt before removing it. If you reinstall the belt in the opposite direction , the ribs will end up in different grooves on the pulley than the ones they have worn into over time. This means the belt will have to re-adapt to the new wear pattern, resulting in a dangerous loss of belt tension.
In conclusion, we can safely answer the question in the title: “No, the direction does not matter.” However, automotive technology does not stand still, so it is possible that in the future there will be belts for specific tasks with a specific direction of rotation.
How to replace the timing belt on a VW Polo 6N 1.6
Replacement Interval Guide
NOTE: Volkswagen UK recommends replacing the timing belt every 4 years.
Check the engine for damage
CAUTION: This engine has been identified as an INTERFERENCE engine that is MOST LIKELY to experience valve-piston damage in the event of a timing belt failure. Before removing the cylinder head(s), a compression check of all cylinders must be performed.
Repair time - hours
| Remove and install: | |
| Golf / Bora / Beetle | 2,50 |
| Lupo 1.4 / Polo → 2002 | 1,60 |
| Polo 2002 → | 2,20 |
| Lupo 1.6 | 1,90 |
| Polo classic | 1,30 |
| Caddy → 2004 | 1,60 |
| Caddy 2004 → | 2,20 |
Special tool
Special Precautions
Timing belt
How to replace the timing belt on a VW Polo 6N 1.6
Removal
NOTE: Make sure the locking tool(s) are correctly positioned in the cylinder head.
Installation
Exhaust camshaft drive belt
Removal
NOTE: Mark the direction of rotation on the belt with chalk if the belt is to be reused.
Installation
I hope the information is useful!