Cars admin26.02.2020
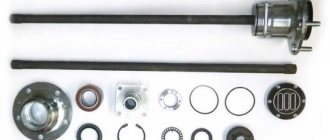
Longitudinal section of the coolant pump: 1 - pulley hub; 2 - roller; 3 - cover; 4 - impeller; 5 - body; 6 - thrust ring; 7 — oil seal; 8 — bearing lock screw; 9 - pulley; 10 - fan; 11 — overlay; 12 — fan hub
Drain the coolant. (see here)
Remove the drive belt (see here)
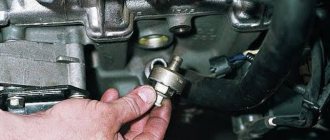
Use a 13mm socket to loosen the three bolts securing the coolant pump pulley. We hold the pulley from turning with a slotted screwdriver, alternately inserting it between the head of each fastening bolt and the shoulder of the pulley hub.
Unscrew the fastening bolts.
. remove the pulley from the pump.
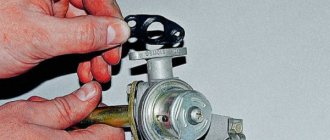
Unscrew the adjusting nut completely and remove the bolt.
Using a 17mm socket, unscrew the nut securing the tension bar.
Remove the tension bar.
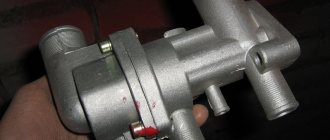
Using a 13mm socket, unscrew the four nuts securing the coolant pump cover.
Remove the pump cover complete with impeller and bearing.
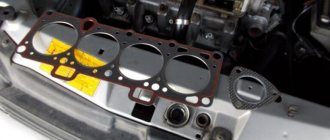
The joint between the cover and the coolant pump housing is sealed with a gasket.
Note
New Nivas are equipped with modern gaskets and seals that eliminate such defects as “water pump leaks.” We install the coolant pump cover in the reverse order.
To remove the coolant pump assembly.
. Use a screwdriver to loosen the clamp securing the supply hose to the pump body.
. and remove the hose from the body pipe.
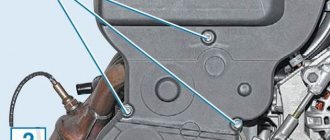
Using a 13mm socket with an extension, unscrew the two bolts of the lower fastening of the pump housing to the cylinder block.
. and one top mounting bolt.
Remove the coolant pump assembly.
The joint between the coolant pump housing and the cylinder block is sealed with a gasket. We install the coolant pump in the reverse order.
Video
A pump is used to circulate fluid in the cooling system. Despite the high reliability of the unit, the part may fail. The water pump cannot be repaired and must be replaced as an assembly. To do this, you don’t have to be a car mechanic or have a large set of tools.
Why do you need a pump in a car?
The cooling system of any car consists of a number of elements and coolant. One of the main parts is the water pump, called a water pump. The element is designed to circulate fluid through the system, resulting in heat being removed from the cylinder head and the cylinder block itself. The pump is not assigned any more functions, but the performance of the motor directly depends on it. If the water pump fails, the power unit will quickly overheat.
The most common pumps are centrifugal type, due to their design features. The part is driven from the engine crankshaft via a belt. The liquid circulates through the cooling system due to the impeller, which is located in the pump cover.
The main part of the pump is located on the outside of the engine, and the impeller is located inside the system. The operation of the pump is quite simple: with the help of a belt, the part from the crankshaft rotates, driving a gear or pulley rigidly fixed to the axis. An impeller is installed on the opposite side of the axis, which also begins to rotate. It is in constant contact with the coolant. When the engine is running, centrifugal force is created, which causes fluid to move through the system.
A pump for a car is necessary to circulate coolant through the engine cooling system and prevent it from quickly overheating
When is a pump replacement necessary?
Despite the simplicity of the design of the water pump and its high reliability, the unit is constantly in operation and malfunctions may occur with it, which are better known in advance. The weak points in the element under consideration are the oil seal and bearing. When the bearing wears out, play and noise appear, which damages the seal.
There are a number of signs that indicate the pump is worn out and needs to be replaced:
- coolant is leaking in the water pump area;
- when the power unit operates, extraneous noise appears;
- When the engine is running, play is visually observed.
The listed signs indicate wear of the bearing and oil seal. There are other less common causes of water pump failure. These include: damage to the impeller, the appearance of cracks on the body of the part, wear of the pulley or gear.
It is worth noting that the pump cannot be repaired, but replaced as an assembly, since the design is non-separable: all its elements are pressed into the body. When replacing a water pump, the gasket must also be changed.
The main reasons for replacing a pump are leakage, bearing noise and play.
Pump repair
Basically, pump failure occurs due to wear of the bearings and seal. These parts are difficult to find in stores, so most often the old pump is simply replaced with a new one. But in some cases repairs are necessary:
- leaking from the pump. A leak occurs either due to strong or, conversely, weak tightening of the mounting bolts, or due to wear of the gasket. In this case, the gasket must be replaced;
- pump play. Occurs due to weakening of the mounting bolts. It can be easily determined by shaking the pump pulley with your hand. If after tightening the bolts the play does not disappear, then the reason is in the bearings on the shaft.
It is important to remember that pump wear is also affected by the tension of the accessory drive belt.
Despite the fact that the process of replacing a pump seems simple, you should exercise extreme care and caution when working. Having completed the repair, you should once again go through the instructions
Make sure fasteners are tight. Before going out on the road in various modes, test the operation of the water pump. Only after making sure that the car is functioning properly should you begin its daily use.
Having completed the repair, you should once again go through the instructions. Make sure fasteners are tight. Before going out on the road in various modes, test the operation of the water pump. Only after making sure that the car is functioning properly should you begin its daily use.
Despite the fact that the process of replacing a pump seems simple, you should exercise extreme care and caution when working. Having completed the repair, you should once again go through the instructions
Make sure fasteners are tight. Before going out on the road in various modes, test the operation of the water pump. Only after making sure that the car is functioning properly should you begin its daily use.
A nice bonus will be a review of pumps from various manufacturers.
To complete the work of replacing the pump we will need:
- antifreeze or antifreeze similar to the one poured in (full capacity is 10 liters, see how much you need)
— sealant (where without it?)
— key for 13 (favorite number on AvtoVAZ?)
— straight hands (we’ll work with them!)
- screwdriver (for removing clamps)
The work can be done anywhere, i.e. no garage or pit required.
As a rule, if the pump malfunctions, the antifreeze runs out, so I don’t describe how to drain it; if it hasn’t drained, drain the remainder (to buy less).
Sequence of actions for replacing a Chevrolet Niva pump:
— Remove the corrugation from the throttle to the mass air flow sensor
— Unscrew all pipes suitable for the thermostat and remove it
— For convenience, unscrew the 3 nuts securing the cooling fan and push it towards the radiator.
— Remove the generator belt — Remove the pump pulley by unscrewing the 3 nuts by 13 (no need to touch the belt tensioners) — Unscrew the 4 nuts securing the pump and one stud (this makes it easier to remove) — Pull the pump out towards the removed stud
— We coat the block with sealant and install the gasket.
- Reassemble in reverse order: Reinstall the pump pulley
- Tension the generator belt
- We install the thermostat, coating the pipes with sealant
- Screw on the electric fan
- Filling with antifreeze
- We install an air corrugation
We are happy with the money we just saved...
Here is a video instruction on how to replace the pump, you don’t need to disassemble anything unnecessary, and everything is very convenient:
Review of pumps from different manufacturers.
It so happened that cars made in Tolyatti became the main cars in the Russian Federation. And because of their popularity, we have the opportunity to choose spare parts from different manufacturers.
Practice has shown that these pumps last the longest (TZA - original VAZ):
Reasonable compromise (SOATE or fenox):
You definitely shouldn’t buy pumps (Pekar), but, unfortunately, these are the ones that are mainly sold in stores, and they look like this:
Pekarovsk pumps have not been running for over a year! Buy them only as a last resort!
Source
Replacing a pump on a Niva
On a VAZ 2121 car, the coolant pump is located in the front of the cylinder block on the right side and its dismantling does not cause any difficulties even for beginners.
The pump on the Niva is located in front of the engine on the right side
Replacement Tools
To replace the pump, you will need the following list of tools:
- head and ratchet wrench or socket wrench 13;
- head at 17;
- liquid drain tube of suitable diameter.
During the dismantling process, another tool may be required, for example, a hammer, a screwdriver, depending on the current situation.
To dismantle the pump, you will need a list of tools, which will depend on whether only the pump or the pump is being removed along with the housing
Draining the coolant and replacing the pump
Before you begin, you will need to drain the liquid (water, antifreeze) from the engine cooling system. To do this, you need to place a suitable container on the left side of the engine and, using a key, unscrew the bolt to 13, attach the tube to the drain hole and remove the plug from the radiator neck. Then you can proceed directly to dismantling the pump.
Chevrolet Niva Niva67 › Logbook › Replacing the Chevrolet Niva pump.
Something started making noise, or rather, it started making noise about a month ago.
But the sound appeared and disappeared, but here there was a constant noise. I was a little upset until the thought “Pump” dawned on me. It’s business))) Removing the belt showed that yes, it’s darling. So for those who have not encountered the replacement, a short report. It's not complicated at all. Unscrew the tensioner and remove the belt from the pump.
We unscrew the protection and boot and climb up to the pump. Unscrew the clamp.
We insert a small screwdriver or nail under the pipe. Carefully pour the liquid into anything you can get your hands on.
Unscrew the 3 bolts securing the pump housing to the engine and remove the pump.
When removed, another 100 grams of liquid may leak out.
Then disassembly, replacement of the worn part and reassembly in reverse order.
I found a cool pump.
The width of the main blades is the same, but the working surface of the new one is different (blue and red arrows) plus additional blades.
What pumps are installed on carburetor and injection Nivas?
Although the good old Nivas are in many ways similar to the new fuel-injected cars, there are differences, including in the water pumps. The part is produced for different modifications of the car in question. For example, pump 21230–1307011–82 can be installed on all Nivas, but in some cases a spare part for 2107, which has a wider impeller, can be used.
When buying a pump, you need to be careful and make sure that the housing fits the impeller. Otherwise, installation difficulties will arise. To avoid mistakes, you can purchase a complete pump, i.e. cover and housing.
Although the classic pump is suitable for the injection Niva, the part may simply not cope with the high temperature and will need to be replaced sooner. The following types of parts exist:
- a standard pump with a plastic impeller, the blades of which are located lower and have an elongated shape;
- a new type pump, also equipped with a plastic impeller with longer blades;
- HEPU water pump, which has a cast iron impeller.
The last option is considered the most reliable, since the impeller, made of plastic, simply melts and deforms at high temperatures, as a result of which the element can break off the axis and the pump jams. The advantage of spare parts with a plastic impeller is their reasonable price and availability.
The HEPU pump is considered the most reliable option for Niva cars, since the impeller is made of cast iron
How to install a fan on a VAZ 21214 pump
Some VAZ 21214 owners are faced with a situation where the standard electric fans of the radiator cooling system do not cope with their task. Usually the problem manifests itself in summer in city traffic jams. In this case, you have to think about installing a fan on the pump, like on the VAZ 2121, but you won’t be able to just pick it up and install it. The fact is that the propeller touches the power steering pulley. The problem is solved by installing a spacer in the form of washers between the fan and the pump pulley.
To prevent the fan blades from clinging to the hydraulic booster, you can grind them down a little or install spacers in the form of washers
Some motorists resort to more drastic measures, grinding down the edge of the propeller blade by 2-3 mm using a file.
To install the fan on the VAZ 21214 pump, you need to sharpen the blades a little so that they do not cling to the hydraulic booster
As a result of the described modifications, the engine warms up in almost the same way as with electric fans, but when the temperature reaches +80˚С, then it rises very slowly.
After some modifications, the radiator forced cooling fan takes its place and its operation is not satisfactory.
Even a novice car enthusiast can replace the water pump. The main thing is to take your time and carry out the process in the described sequence, not forgetting to replace the gasket and fill in coolant to the required level at the end of the work.
Replacement frequency, what antifreeze to fill
In the maintenance information for Niva Chevrolet, it is recommended to change antifreeze every 60,000 kilometers. But many car enthusiasts are not happy with the flooded antifreeze, which becomes unusable by 20 thousand. Dzerzhinsky antifreeze is usually filled from the factory, but there is also information about pouring red antifreeze.
When choosing coolant, it is better to use a concentrate rather than a finished product. Since it can be diluted in the required proportion, because after flushing there is still some distilled water left in the system.
A good choice would be Castrol Radicool SF concentrate; it is what dealers often recommend for use.
If you choose ready-made antifreezes, then you should pay attention to the red AGA Z40. Well-reviewed FELIX Carbox G12+ or Lukoil G12 Red
How much antifreeze is in the cooling system, volume table
| Model | Engine capacity | How many liters of antifreeze are in the system | Original liquid / analogues |
| Chevrolet Niva | gasoline 1.7 | 8.2 | Castrol Radicool SF |
| AGA Z40 | |||
| FELIX Carbox G12+ | |||
| Lukoil G12 Red |
Purpose of the pump
The power unit of any car and its components become very hot during operation. More than others, this concerns the combustion chamber, cylinder head and piston group. To maintain an operating temperature of about 90°C, the engine design provides a cooling system. As part of this system, a pump (water pump) circulates antifreeze through the cooling jacket of the engine, thereby reducing its temperature to operating levels.
The water pump has a simple device
If the water pump fails and forced circulation stops, the engine will overheat. Aluminum pistons will expand inside the steel liners and will initially severely scratch the ground walls. In the worst case scenario, the pistons will jam, causing the connecting rods to bend, and the engine will have to be overhauled.
The VAZ 2121 pump is a separate unit consisting of a housing on a flange with a shaft installed inside. On the shaft there is an impeller for pumping coolant (coolant) and a mounting mount for the pulley. The shaft rotates on two bearings, protected from the inside by a seal that prevents coolant leakage.
In a VAZ 2121 car, the water pump is located on the front of the engine above the crankshaft and generator pulleys. It is not attached to the cylinder block directly, but through an additional housing. Most often, the shaft with the impeller fails and must be replaced, but the housing remains in place.
The water pump shaft is rotated by the alternator belt
Troubleshooting
The main reason for water pump failure is severe wear of the bearings. Oil seal leakage is also a consequence of worn bearings. Cases when the oil seal began to leak coolant on its own are very rare.
The symptoms of these malfunctions are as follows.
- A suspicious noise is heard in the belt drive area, the intensity of which depends on the degree of wear of the bearings. In the early stages it manifests itself in the form of a hum, and then turns into knocking and grinding. The generator shaft can also make similar sounds - therefore, in this case, additional checking is required.
- There is play on the water pump shaft. You can determine it by shaking the shaft with your hand.
The shaft play is felt when the pulley is rocked by hand.
If the bearings are severely worn, the shaft may break into two parts.
If pump problems are not detected in time and the consequences described in paragraph 4 occur, the engine instantly overheats and the coolant quickly leaves the system. In such a case, immediately turn off the engine.
Diagnosing a faulty water pump is quite simple. It is necessary to open the hood and inspect the space around the pulley. If traces of liquid are found, you need to make sure that it is antifreeze and not oil. Then, in order to detect play, you should rock the pump pulley by hand. It should be taken into account that play can occur without coolant leakage through the oil seal. With a small (1–2 mm) play you can drive from 1 to 3 thousand km. After this, repair or replacement of the pump is necessary.
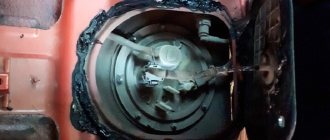
The impeller broke the housing wall and antifreeze leaked out
Video: fault diagnosis and pump repair
Replacing the water pump
The process of replacing the pump on a VAZ 2121 car of various modifications consists of the following steps.
- Purchasing a new pump.
- Preparation of tools and workplace.
- Disassembling the unit and dismantling the old pump.
- Installing a new pump and checking its functionality.
The specified sequence of work may change. If you are not completely sure that the pump will fail (perhaps the antifreeze is leaking due to wear on the gasket), you should buy a new pump only after dismantling and diagnosing the old one.
Pump selection
In addition to the standard product from AvtoVAZ, the following pumps are installed on the VAZ 2121 car:
The listed brands offer pumps with plastic and cast iron impellers. Despite the prejudice of car enthusiasts towards plastic products, it is better to choose plastic - the material is durable, lightweight and does not corrode. You should pay attention to the dimensions of the impeller so as not to buy a fake or an old-style product, the efficiency of which is much lower.
When purchasing, carefully study the packaging and trademarks made on the elements of the unit by casting, embossing or laser engraving. The paper seal sealing the lid of the package must contain a barcode and part number 2123–1307011–75.
The original pump can be identified by the manufacturer's marks on the body
On VAZ 21213-21214 cars you can install a pump with catalog number 2107-1307011-75 from classic VAZ models. However, the standard Niva pump has a reinforced design, so such a pump will last noticeably less, and it can only be installed in extreme cases.
If the impeller breaks or otherwise damages the housing, it will also have to be replaced. Pumps are available for sale as individual pumps or as a set with a housing. The pumps for carburetor and injection engine options are absolutely identical.
Video: choosing a water pump for VAZ 2121
Required Tools
If there is a metal engine protection installed under the bottom of the car that blocks access to the lower bolt of the generator, it will have to be removed. This will require an inspection hole or overpass. Otherwise, you can reach the bolt without a hole - thanks to the high ground clearance of the car.
Chevrolet Niva 2004, engine Gasoline 1.7 liter., 80 hp, AWD drive, Manual - DIY
Comments 16
Good evening! I'm choosing a pump, the question is how long did it take?
3 years. This is about 90 t.km. mileage
I had a hard time with the nut number 3, but nothing from the existing tool fit in there. I could barely unscrew it.
Yes, it's disgusting. I have a 10mm L-shaped wrench just for these nuts.
I also recently changed it, only a little differently)))
Yes, it can be different here)
When I recently changed the belt, it got all dirty with coke, which stained my whole engine. Then I freaked out - the whole engine, where I could get to it, wiped it off with a rag until it was shiny)))) But at first I thought, if you loosen the genych, the belt will come off - oh no, Until I loosened the 3 nuts on the roller, I didn’t think about taking off the belt))) I also looked towards the pump, but I really hope that it will last for a long time - I really don’t want to do the Kama Sutra
I don’t rub it on purpose so that it can be seen if it leaks somewhere. 50 t.km. after the capital, nothing flows anywhere.
Good afternoon, what kind of pump is this (brand)?
Why do you need to remove the pump housing? You can immediately remove the pulley from it, and then the pump itself, by unscrewing the 4 nuts.
I thought that unscrewing 3 bolts and then calmly disassembling it on the table would be easier than unscrewing everything from below. You can get to the same goal in different ways))) I remember. The pulley was screwed on well, it was impossible to unscrew it on the car.
Finally, I changed the pump without a hole, drained the coolant from the thermostat, then removed the thermostat itself and took out the pump through this crotch and installed a new one. The business took about 2 hours with smoke breaks.
It's about an hour here, but that's when there is a pit or a lift.
Well, maybe I could have done it in an hour, but the first time I changed the pump without a murzilka, several times I just tightened the belt to unscrew the wheel on the pump))) then I figured out how to take the whole thing out.
It's about an hour here, but that's when there is a pit or a lift.
remove the cooler diffuser - if it is still there, of course. loosen the 3 bolts on the pulleys, remove the belt. remove the pulley, remove the half-pump, pull it up.
You drain the antifreeze from the block through a hose into a basin under the car. You pour the antifreeze into a canister through a funnel with a primitive filter so that fallen dirt does not get into the middle. An hour of work, but you only need to take off your tie and jacket.
Source