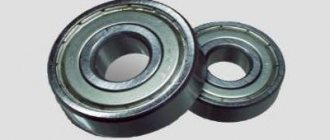
Replacing the timing belt, tension and support roller
The intervals for replacing the timing belt on Lada Priora cars are always changed by the manufacturer from year to year.
Previously, there was evidence that replacement was required at 120 thousand km. Now, even on the new Lada Vesta, the service book indicates an interval of 180,000 km, after which the belt must be replaced. Of course, you need to look not only at the mileage, but also at the actual condition of all timing parts, such as:
If upon inspection it turns out that one of the parts requires replacement, and the rest are in working order, you should not change everything at once. Timing kits for Priora now cost a lot of money, so it is not advisable to replace parts that are known to be good.
Instructions for replacing the timing belt and rollers on a Priora 16-cl.
The first step is to remove the accessory drive belt, which is described in detail in this article. Next, you need to unscrew all the bolts securing the timing belt protective cover, using a special TORX t30 wrench for this.
Then remove the cover, both the upper and lower parts:
Now the entire gas distribution mechanism becomes accessible and further actions can be carried out.
But then it is advisable to find an assistant in order to unscrew the bolt securing the crankshaft damper pulley. This is done as follows. First, jack up the front right side of the car and remove the wheel. The assistant gets behind the wheel, engages fifth gear and simultaneously presses the brake pedal. At this time, it is necessary to unscrew the pulley mounting bolt, since the crankshaft is locked and will not turn.
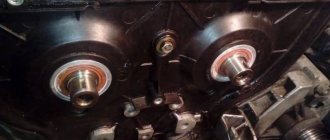
Finally unscrew the bolt and remove the pulley and washer. After which it is necessary to set the Priora timing mechanism according to the marks. To do this, turn the crankshaft clockwise until all marks coincide. You can do this as follows:
The mark on the crankshaft tooth gear should coincide with the cast on the oil pump housing:
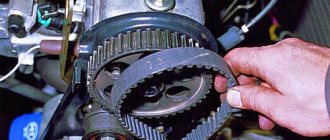
The marks on the camshaft gears must match those on the housing of the inner timing cover. Everything is clearly demonstrated in the photo below:
Now, having locked the gears, unscrew the bolts securing the tension and support rollers and remove them:
After this, you can remove the old Priora timing belt, since nothing else holds it.
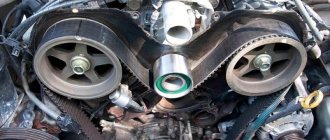
Installing a new timing belt occurs in the reverse order. To do this, first we put it on the crankshaft gear, then strictly counterclockwise through the support roller, onto the right, then the left camshaft gear, onto the pump and install the tension roller. The timing marks on the camshafts may move slightly, so if necessary, correct them using a 17 mm wrench:
The roller has a mechanism that automatically regulates the belt tension in such a way that, in principle, it cannot be overtightened. And the roller itself is tensioned as follows. Using a special key, turn the outer part of the roller until the protrusion coincides with the slot, which is clearly shown in the photo below:
After the marks are aligned, we finally tighten the roller mounting bolt using a torque wrench with a torque of 34 to 41 N*m. After this, we turn the crankshaft two turns to make sure that the timing marks are set correctly. If everything matches, we take further actions. We install the crankshaft pulley in place and tighten the bolt securing it with a torque of 110 N*m.
We start the engine and check that there are no extraneous noises when the timing belt is operating. We put back the casing and all those parts that were removed before starting the repair. For those who want to look at this procedure visually, I recorded a video review of this topic.
Video report on replacing the timing belt and rollers on a Priora 1.6 16-valve
This review is embedded from my YouTube channel.
If you have any questions after reading the material, you can ask them below in the comments.
Leave a reply Cancel reply
You must be logged in to post a comment.
Source
Step-by-step instruction
- hexagon to “5”,
- heads at “17”,
- heads at "15".
- unscrew the 2 screws that secure the cover,
- remove the front lower timing cover,
- remove the Lada Priora generator drive belt.
You can check the position of the crankshaft as follows:
Such work must be carried out carefully so as not to disrupt the valve timing while unscrewing the bolt.
Therefore, replacing the belt on a Lada Priora must be carried out with at least one assistant. Its task is to fix the flywheel. To do this, a large slotted screwdriver is inserted between the teeth of this unit (due to the presence of a hole in the clutch housing).
If the timing belt is changed on a Priora, then new support and tension rollers are installed. To do this, remove the tension roller by unscrewing the fastening bolt. To remove the support roller, unscrew the bolt using a spanner set to “15”. The roller is dismantled along with the bolt and thrust washer. The last part has cores that prevent the washer from being removed from the bolt.
Before installing a new belt, you need to make sure that the marks on the camshaft and crankshaft match. You can control the position of the second element taking into account the alignment of mark No. 1 on the crankshaft toothed pulley with mark No. 2 on the oil pump cover.
If after completing this work you hear noise from the drive belt, then it is possible that the tension roller bearing has failed. To do this, you will need to remove it and check for functionality.
REPLACING THE TIMING BELT ON PRIOR 16 VALVE
Hello, reader of the blog RtiIvaz.ru. Today we will study the topic “Replacing the timing belt on a Priora with a 16-valve engine.” Be careful when replacing the timing belt of a Priora VAZ 2170 with 16 valves!
If the timing belt is installed incorrectly or breaks, a mismatch occurs between the crankshaft and camshafts, resulting in inevitable contact between the pistons and the cylinder head valves. In this case, the valve legs bend and the valve caps no longer adhere to the seats. As a result, compression is lost, and therefore you will have to make expensive replacements of valves and other parts.
The photo below shows the result of an incorrect timing belt replacement:
WE OPEN ACCESS TO THE TIMING BELT
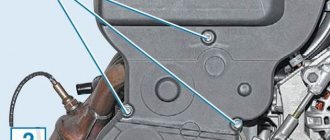
The location of these bolts is shown in the photo below:
FIG 6. Upper timing cover bolts
FIG 7. Bolts of the lower timing cover
And one more important point! It is the crankshaft that needs to rotate the entire timing mechanism. This cannot be done using the camshaft pulleys...
To ensure that the camshaft marks do not get lost during operation, they must be secured to each other. This is done in different ways. I once saw a mechanic insert a socket head between the teeth of a pulley. You can also take a pin and two thick plates with holes. We put plates on the stud, nuts on both sides and insert this structure between the pulleys so that the plates rest against the teeth of the pulleys and tighten the nuts.
It looks something like this! Here, however, is an engine from another car:
FIG 8. Device for fixing camshafts
We have completed the preparatory work and it is time to proceed directly to replacing the Priora timing belt.
Then remove the timing belt and inspect it carefully. First of all, we pay attention to the presence of cracks, fraying of the edges of the belt, and, of course, we look at the condition of the teeth. There should be 137 of them, they should be round in shape. If you find at least one of these defects or the time has come for mileage in kilometers, then the Priora timing belt must be replaced with a new one. Next, you need to pay attention to the condition of the pump. Holding the toothed pulley of the pump, you need to tug it; if there is play in the pulley, then the pump must be replaced.
REPLACING THE PRIORA PUMP
It should be borne in mind that the camshaft pulleys cannot be mixed up; the exhaust and intake pulleys are placed exactly in their places...
To remove the back cover, you need to use a 10mm socket and unscrew the six bolts securing this cover.
The location of these bolts is shown in the following figure:
FIGURE 9. Bolts of the rear timing cover of the Priora
INSTALLING THE PRIORA TIMING BELT
FIG 10. Priora timing belt tensioner roller
After installing the Priora timing belt, you need to check the operation of the entire mechanism. To do this, you need to manually turn the crankshaft, making at least two revolutions. The marks after each revolution must be strictly in their places, according to Figure 4. If the marks do not coincide by at least 1 tooth, then the belt installation procedure must be repeated again. Otherwise, deformation of the valves cannot be avoided, and then you will have to remove the cylinder head and replace the valves.
INSTALLING THE ACCESSORY DRIVE BELT
Holding the belt with your fingers, between the tension roller and the generator pulley, we try to turn it across. A correctly tensioned belt should rotate no more than 90°.
We put the wheel in place, remove the car from the jack and try to start the engine...
If there is no extraneous noise and the generator provides the required level of battery charge, this means that the job was done correctly.
Finally, I want to say that I did the work myself. The other day a friend called me about replacing the timing belt on a Priora. He asked me to help him in this matter. In fact, he himself is ignorant in this matter. I had to dig around on the Internet myself and ask knowledgeable people. Find out what's what. In general, I did the work, and he helped. After this, I share my experience with you by writing the article “Replacing the timing belt on a Priora 16 valves.”
Source
practical guide
Recommendation
If, when the engine is running, a strong noise of a rotating bearing is heard in the area under the front timing belt covers, the condition of the tension and guide rollers should be checked and, if necessary, replaced. This can be done without removing the belt. Also, the rollers should be replaced during routine replacement of the timing belt.
Examination
1. We prepare the car for work.
2. Remove the upper front timing belt cover.
3. Using a 15 mm wrench, unscrewing the tension roller mounting bolt half a turn, loosen the tension on the timing belt.
Comment
To replace the rollers without removing the timing belt, it is enough to loosen the belt tension. In this case, there is a risk of the belt jumping over the pulley teeth, which will lead to a shift in valve timing. Therefore, before releasing the belt tension, align the mark on the camshaft pulleys with the protrusions of the rear belt cover.
After installing the rollers, the marks should not move.
4. Remove the timing belt.
5. By rotating the tension and guide rollers, we check their condition.
Recommendation
Rollers that have play and make a lot of noise when rotating must be replaced.
Removal
1. Using a 15 mm wrench, unscrew the bolt securing the tension roller and remove the roller along with the bolt.
2. Remove the guide roller in the same way.
Installation
1. Install the guide roller and tighten its fastening bolt to a torque of 33.2-41.2 Nm (3.4-4.2 kgcm).
2. Install the tension roller without tightening the fastening bolt.
3. We put the timing belt on the pulleys and adjust its tension.
4. Install the removed parts in reverse order.
How to replace the timing belt on a Lada Priora 16 valves yourself
Russian-made cars of the VAZ-2170 or Lada Priora brand have received recognition from many motorists. This is due not only to the modern design of this car, but also to the fact that the vehicle is equipped with a type 21126 engine. This is a 16-cylinder engine with a volume of 1.6 liters and a power of 106 hp. Along with the advantages, the Priora has a disadvantage, which manifests itself when the timing belt breaks. If the timing belt is not replaced in a timely manner, then when it breaks, the valves will bend. To prevent this from happening, the timing belt on a Priora 16 valve must be replaced in a timely manner, which can be done with your own hands. This procedure is not complicated, and each owner will be able to perform it independently, having understood some of the nuances.
How to replace the timing belt on a Lada Priora on your own?
The process includes not only the rotation of the rubber transmission, but also the rollers - tension and support - change along with it. Repair kits are usually sold at auto dealerships. To work you will need the following tools:
- head at “17”;
- keys to “15”, “13”, “10”, “8”;
- inbus key (hexagon) to “5”;
- a special key for adjusting the roller or pliers for removing the locking ring.
Next, the process of changing the drive occurs in the following order:
- Unscrew 5 bolts with a hexagon on the upper plastic casing of the gas distribution mechanism and 2 on the lower one, remove them.
- Using the socket at “17”, turn the crankshaft clockwise and align both camshafts at TDC on the compression stroke of the first cylinder according to the marks. This moment is determined by aligning marks 1 on the camshaft pulleys with marks 2, which are located on the rear cover.
- Remove the rubber plug in the clutch housing and check the position of the crankshaft: the marks on the flywheel and the slot on the upper housing cover must match.
- Before replacing the timing belt on a Priora car , you need to remove the auxiliary drive pulley. To do this, the assistant must engage 5th gear and press the brake, and the car owner, using the “17” socket with a knob, unscrew the pulley mounting bolt and remove it.
- For the convenience of subsequent assembly, before dismantling the rubber part, experienced car enthusiasts recommend fixing the camshaft pulleys with a simple wooden wedge, which should be driven between them.
- Using a “15” wrench, loosen the tension roller bolt and remove the belt from the shafts. Next, remove the tension and support rollers.
- Apply fixing sealant to the threads of the bolts of the new rollers. Tighten the support roller to a torque of 35-41 Nm , but do not completely tighten the tension roller. Check the position of the crankshaft using the mark on the oil pump cover.
- Place the toothed rubber drive onto the crankshaft pulley. Pull both branches and put the front part on the support roller, and the back part on the pump pulley and place it behind the tension roller. If a wooden wedge was used, it must be removed.
Important! During the repair process, you need to check the condition of the coolant pump. Its shaft should rotate freely, without play or extraneous noise. Traces of coolant leakage are unacceptable. If one of the factors is present, be sure to change the pump.
How to adjust the drive tension on a VAZ 2170?
The final stage of replacing the timing belt on a Lada Priora car is performed according to the following scheme:
- Use a special wrench or pliers to turn the tension roller counterclockwise.
- Align cutout 1 with mark 2 on the inner roller bushing and tighten the fastening bolt to a torque of 20-15 Nm (see photo above).
- Install the auxiliary drive pulley in its original place.
- Turn the crankshaft 2 turns clockwise using the pulley bolt and check the alignment of the camshaft and crankshaft timing marks, as well as the belt tension. If necessary, repeat the operation.
Timing belt and its purpose
The timing belt is a rubber product that has a toothed surface on the inside. Durable types of rubber are used to make this belt. The product is put on the crankshaft and camshaft gears, which allows you to synchronize the operation of these mechanisms. With its help, fuel is supplied to the engine cylinders in a timely manner.
The teeth on the belt are designed to ensure reliable adhesion to the gears and prevent slipping. Priora is equipped with belts that have 137 teeth. If the belt breaks, the car will not be able to continue moving due to incorrect operation of the engine. That is why the regulations state that this element must be replaced every 30-45 thousand kilometers.
This is interesting! If it is noticed that the timing belt shows signs of wear or damage, but the mileage has not yet reached the specified value, then it is definitely necessary to replace it. This is especially important to do on a VAZ-2170 or Priora car, since in the event of a break, the valves fail.
The timing belt not only connects the crankshaft to the camshaft, but also drives the water pump. Despite the fact that the device is a “piece of rubber”, its importance in the design of the engine of any car is priceless.
Repair work
When carrying out such work, it should be remembered that a failed timing belt from a Priora 2172 can lead to costly repairs to the vehicle’s power unit. At the same time, you need to know that the surface of the toothed part of the belt should not have cracks, folds, undercuts of teeth and separation of fabric from rubber. The reverse side of this part should not be worn out or have signs of burning. As for the end surfaces, there should be no delamination or fraying. If there are traces of oil on the timing belt of the Lada Priora, it will need to be replaced urgently. In this case, it is imperative to find out the reason for the appearance of this liquid.
When does a belt need to be replaced on a Priora: possible consequences
It is recommended to replace the timing belt every 30 - 45 thousand kilometers. Of course, the probability of a belt breaking with such a mileage is very low, but the indicated mileage is the resource of the product. There are many cases where motorists clock twice the mileage indicated above on the tachometer, and have never changed the belt. The serviceability of the product in question is measured not only by its integrity. During operation, it stretches, therefore the quality of engagement decreases and the likelihood of slipping increases.
Timing belt with worn teeth: what can happen if the product is not replaced in a timely manner
This is interesting! The service life of the timing belt is influenced by various factors: the nature of the ride, the quality of the product, the ingress of foreign liquids and objects onto the belt drive, etc. It is impossible to indicate the exact mileage that a timing belt will last. To avoid having to go to a service station for major repairs, it is recommended to monitor the operating time of the product on a car such as the Priora.
Signs that the timing belt on a Priora needs to be replaced are the following factors:
Photo of a worn and torn belt on a Priora: what you shouldn’t let your car do
Replacing the timing belt on a Priora 16 valve may be necessary much earlier than at 30-45 thousand km. This is due to oil, dirt and antifreeze getting on the belt drive. Antifreeze or coolant poses a particular danger to the integrity of a rubber product. If a coolant leak occurs, which is caused by a leak in the pump gasket or failure of the pump, then the service life of the rubber product is reduced tenfold. If a coolant leak is detected, the causes should be promptly identified and eliminated. If the cause is a violation of the integrity of the pump or gasket, then the timing belt will need to be replaced at the same time. If there are problems with the strength of the belt at high speeds, irreparable consequences may occur in the form of broken pistons and deformation of connecting rods.
Bending valves on Priora 16 valves
Features of self-checking the serviceability of the timing belt on Priora
If you are thinking about the need to replace a rubber product on a Priora, then it won’t hurt to initially check the belt drive. The inspection will reveal signs of wear and the presence of places where the product is deformed. To carry out the check, you will need to use a hex wrench set to “5” or a T-30 star-shaped bit (depending on the year of manufacture of the Priora).
The procedure for checking the belt drive is as follows:
Removing the timing cover
Marks on the tensioner pulley
This is interesting! The timing belt for the VAZ-2170 on the outer rim has the following information: engine type (21126 or 21127), number of teeth - 137, as well as marking with a product width of 22 mm.
Necessary tools for replacement
Having decided that you need to replace the timing belt on a Priora, you should prepare the necessary material and tools. The materials will require a new timing belt. Moreover, you can buy both the original belt and analogues. The original belt product is also equipped with two rollers: a tensioner and a thrust roller. The cost of such a kit is about 5 thousand rubles.
Original kit for timing system on VAZ-2170
If necessary, you should purchase a new pump if the car’s mileage exceeds more than 100 thousand km and the product has never been changed. If you are replacing the pump, you will also need to replace the coolant.
This is interesting! Antifreeze needs to be replaced every 2 years, and antifreeze every 4-5 years.
Of the tools to replace the timing belt on a Lada Priora, 16 valves will be needed:
It is not necessary to install the Priora in the inspection hole, since most of the actions will be performed in the engine compartment. Once all the tools and materials are ready, you can start working.
Replacing rollers and timing belt: step-by-step steps
Initially, it should be noted that owners of a Lada Priora car with air conditioning will need to perform some steps to get to the timing mechanism. If you have a Priora with air conditioning, then initially you need:
Replacing the timing belt on a Priora 16 valves with your own hands is done by performing the following steps:
Aligning the camshaft marks
Removing the crankshaft pulley
Removing the tensioner and thrust rollers
Location of the inner timing cover bolts
We proceed to the procedure for adjusting the tension of the belt drive.
Which generator roller is better to install on the Priora?
Of the good non-original “prior guides” note:
- Hofer (HF code 608230);
- Gates (T39176);
- Lynx (PB-5039);
- Trialli (CM170);
- Marel (2110).
Alternator belt roller. Photo source: https://www.drive2.ru/l/513749832809054967
Less common are accessories from INA and Andycar. Among the inexpensive and fairly popular options for replacing the tension roller of a Lada Priora generator belt with air conditioning or power steering, we can highlight the products of the Vologda Bearing Plant - the VBF roller (catalog number 830900AKE). But reviews from car owners indicate the “floating” quality of VBF parts, and their purchase should be approached with caution. Many people advise installing Gates spare parts.
There are also drive belt repair kits supplied with this part, for example, Trialli GD613.
How to check tension
At the end of the work, it is necessary to adjust the tension of the timing belt drive on the Priora. The adjustment is made as follows:
Tensioner adjustment key
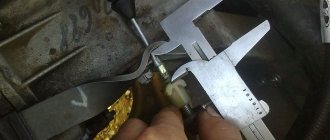
You can check the tension by applying force to a rubber product weighing 10 kg. The deviation value should not exceed 5-7 mm.
When tightening the pulley and roller bolts, it is recommended to use a torque wrench. The tightening torque for each element is equal to the following values:
After adjustment, you can put the protective cover back in place. Finally, the generator belt tensioner roller is installed, as well as the belt itself. It is also recommended to replace these elements with new ones. Finally, do not forget to fill the coolant before starting the engine.
Upon completion of the work done, you can start the engine and check its operation. If the marks are correctly set, the engine will start the first time the key is turned in the ignition switch. In this case, the engine should operate evenly and keep the speed in the region of 800-900 rpm. Listen to the timing belt drive. There should be no extraneous sounds or noises. The presence of a whistle or hum indicates that the tensioner is too tight and needs to be loosened.
Checking and adjusting the tension of the timing belt.
If you want your belt to last long and trouble-free, it is important to maintain its tension in the correct position. To do this, periodically test the tension. Pay special attention to the first tension of the new belt. If the belt is loose, the lateral load on the teeth increases, which greatly accelerates their wear. In some cases, if the belt is very loose, there is a high probability of the belt teeth moving relative to the pulleys. This can lead, at best, to engine instability and loss of power. In the worst case, it will lead to expensive repairs. To check the tension, perform the following steps:
1. Unscrew the 5 bolts securing the protective timing cover and move the cover to the side.
2. Press the timing belt exactly in the center between the camshaft pulleys with a force of 100 Newtons (10 kgf). The belt deflection from the horizontal position should be no more than 7 millimeters. Modern tension rollers are also provided with a tension control mechanism. To check the quality of the tension, make sure that mark A on the outer part of the roller coincides with protrusion B.3. To adjust the tension, slightly unscrew the roller mounting bolt and, by rotating the roller, achieve complete alignment of the marks described above (see figure)
4. Secure the tension by tightening the roller mounting bolt.
5. Reassemble all remaining parts in the opposite order of removal.
How to replace or tighten the alternator belt on a Priora - technology and features of belt replacement
Hello, dear motorists! Well, let's move on to specific cars and their lovers?
“PRIOROVODY” - this is what the owners of cars of one of the latest VAZ series called “Lada” - “Priora” call themselves.
Many people liked the stylish and modern car. The deep-rooted belief that domestic cars are worthless is gradually dispelling. The cars have indeed become more comfortable and attractive, and their technical equipment has improved significantly.
The differences between the Priora and previous modifications are noticeable immediately as soon as the hood is opened. The new owner of a brand new Lada will have to learn a lot all over again. Such a simple, at first glance, manipulation as replacing the alternator belt on a Priora will require considerable effort.
A distinctive feature of new car models is the ability to choose a car with additional equipment already included in the basic configuration. Thus, Priora can be equipped with power steering (power steering) or air conditioning.
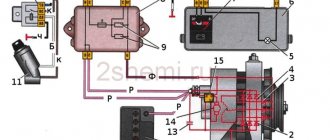
Of course, driving such a machine becomes even more comfortable, but the price for comfort is a more complex design of the generator belt drive. The generator belt of a Priora with air conditioning or power steering is much longer, describes a different trajectory (alternator belt diagram), is serviced and changed according to completely different rules.
Replacing the tensioner pulley VAZ 2110 2170 2172 Priora
Replacing the roller
tensioner VAZ 2110 2170 2172
Priora
visual demonstration of the nuances. savings on service.
Replacing the alternator belt on a Priora with power steering or air conditioning
Video review on belt replacement
drive of auxiliary units on Lada
Priora
with 16-valve...
Tensioning the Priora generator belt - features
Any car owner knows that sooner or later the moment will come when you have to tighten the Priora alternator belt. The belt drive is quite durable, but during operation the belt slightly stretches and the degree of adhesion of its surface to the planes of the pulleys and rollers decreases.
As soon as you hear that the alternator belt on the Priora is whistling, you need to immediately tighten it. This is not difficult to do. In order to tension the alternator belt on the Priora, you need to prepare an open-end or ring wrench 19 mm and a special double-open-end tension wrench for the roller.
It is easy to recognize - it is similar to the key that is used when replacing disks on an angle grinder. The alternator belt adjustment on the Priora is done as follows:
- holding the tension roller cage with a tension wrench, loosen the roller nut;
- by slightly rotating the tension wrench, we turn the eccentric ring of the tension roller of the Priora generator belt, increasing the belt tension;
- tighten the roller nut.
If you press on the belt at the longest gap between the pulleys, it should bend within 8-12 mm, but this rule applies only to the most modest configuration.
If the car is equipped with power steering or air conditioning, the belt describes a different trajectory, which leads to a decrease in the contact area of the belt surface with the pulleys.
To compensate for insufficient contact, you will have to tighten the alternator belt on the Priora a little more. If it is not possible to use the services of qualified specialists, then you can try to adjust the tension of the Priora generator belt, which is called “by ear”. If the tension is insufficient, the belt will slip and “whistle”, and if it is too tensioned, the generator bearings will begin to hum.
Replacing timing belt Priora 16 valves
According to the maintenance regulations on the Lada Priora , replacement of the timing belt is provided for every 200,000 km , and checking the condition of the belt and its tension must be done every 105,000 km . But, according to reviews from car owners, such mileage is only possible with a belt installed from the factory .
After the first replacement of the timing belt and rollers VAZ 217030 (Lada Priora) 1.6 16 valves , it is necessary to reduce this regulation by 3 times . It is recommended to change the timing belt and rollers at a mileage of 50,000 km - 60,000 km , and inspect the belt every 25,000 km - 30,000 km .
If you detect even the slightest cracks on the belt or a hum in the roller bearings, it is necessary to urgently replace the rollers and toothed belt, since if the timing belt breaks, there are 16 valves on the 1.6 , the valves will bend and it will be necessary to repair the engine.
Possible breakdowns and their causes
According to the manufacturers of the Lada Priora, the rollers and belt can withstand up to 200 thousand kilometers. However, in practice, many car owners encounter problems after 40 - 60 thousand kilometers. Failure to correct the malfunction in a timely manner may result in the timing belt breaking. The Internet is full of horror stories about the catastrophic consequences of a break and the subsequent replacement of dead pistons and bent valves. However, few people mention that such breakdowns do not occur suddenly. To avoid serious damage, it is recommended to inspect and diagnose the system once every 50 thousand kilometers. Unfortunately, diagnosing faults in the gas distribution system is a very non-trivial task. The fact is that many signs may simultaneously correspond to several malfunctions, sometimes not related to the timing belt. A malfunction may be indicated by:
- Metallic knocking in the engine;
- “Sag” in power on a cold engine;
- “Shots” into the silencer;
- Blue exhaust fumes;
- Engine overheating.
One way or another, if these signs occur, it is worth conducting a visual diagnosis. Among the main causes of malfunctions with parasitic timing belt rollers are: contamination of the part, inappropriate belt tension or its displacement due to improper assembly. The reason may also lie in mechanical damage that occurs due to incorrect installation or a foreign object getting under the belt.
Don’t tempt fate; keep an eye on the condition of the timing system and the timing of replacement. Buy spare parts for timing belt maintenance in trusted stores.
Which timing belt to choose for Priora 16 valves
Which timing belt is better?
Timing kit (belt + rollers)
| Manufacturer | vendor code | price, rub. |
| CONTITECH | CT1137K1 | 2976 |
| INA | 530053610 | 3044 |
| GATES | K015631XS | 3478 |
| BOSCH | 1987948286 | 3567 |