1128) VAZ 2112: replacing camshaft seals with your own hands
Possible consequences
Leakage of lubricant through the oil seal is not dangerous only for the time being:
- Don’t forget about the dangers to the engine of oil leakage from the lubrication system: firstly, increased wear due to the parts running dry, and secondly, oil consumption for topping up, the price of which is also a pretty penny
- The timing belt can jump over a pulley tooth and even several teeth at once, all due to oil getting on the belt teeth caused by leaking camshaft oil seal, which causes an oil film to form on the timing belt
- If lubricant gets in (lubricant is a chemical), the belt begins to spread and can break under load at full speed of the car, you can imagine the consequences
- Therefore, if even minor oil stains are detected on the timing belt casing, it is necessary to immediately determine the cause of the stain.
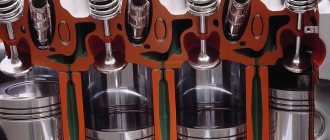
A little about what an oil seal is in general:
- An oil seal is a rubber-metal cuff that serves to seal the rotating parts of units and prevents liquids (lubricants) from leaking out of them
- The name “oil seal” comes from ancient cars, where felt lubricated with lard (fat) was used instead of a cuff.
- The cuff has a special edge, which, when rotated, creates a turbulence that prevents lubricant from leaking out of the unit
- It is important not to confuse the direction of rotation (there are left and right cuffs), otherwise the new perfectly installed cuff will leak
The need to replace oil seals
The camshaft oil seal (cuff) is a sealing ring that prevents oil from leaking out of the camshaft. This gasket is equipped with engines that are equipped with a gas distribution mechanism (timing belt). If it suddenly does not perform its tasks, then the seal needs to be changed.
The main reason for malfunction is normal mechanical wear. All seals are common consumables, and after a certain amount of time they begin to deteriorate because they are made of elastic materials.
Any defect may appear: swelling, change in shape, tears, scarring, etc. Another possible malfunction: the cuff can be squeezed out of its seat.
It happens that the cuff is defective or installed (selected) incorrectly. In such situations, it is also necessary to change the camshaft oil seal, because it does not fulfill its intended purpose.
Oil seal failure is diagnosed visually. If it leaks, you can see traces of oil on the timing belt cover. In order to more accurately determine the extent of the problem, you need to remove the belt cover and conduct an inspection. If there is a malfunction, traces of wear will be visible, or due to increased moisture, the belt has jumped over one or a couple of pulley teeth.
The fact that the oil seal is faulty can be seen when it is time to change the timing belt according to the plan. It is then that oil leaks can be detected on the belt or on the camshaft gear. If the seal is deformed, it should be replaced, despite the fact that oil is not leaking at this moment. However, changing the shape of the oil seal will cause oil traces to appear.
In addition to the above, the element should also be replaced if obvious mechanical damage is detected. This procedure is not urgent, and the car can be operated carefully for a long time. However, you should still know how to change the camshaft seal if it unexpectedly fails.
Moreover, if there are significant oil losses due to a damaged seal or the element is severely damaged, then there is no escape from replacement.
After traveling a certain number of kilometers, the car develops oil traces in the area of the camshaft pulley and oil seal. As the mileage increases, so do the leaks. This situation indicates that it is time to change the camshaft seal.
The problem here is not the loss of oil, but the fact that it is transferred to the timing belt and camshaft drive pulley. This turn of events becomes dangerous because the hot oil causes the rubber of the belt to deform. In this case, the oily liquid makes the belt slippery, and it may begin to slip on the pulley teeth.
As a result, cracks may form on the pistons or bend the valves. Be that as it may, you should change the seal to get rid of oil traces.
How to replace the front crankshaft oil seal on a VAZ 2110-VAZ 2112?
Note! This article describes the process of replacing the oil seal on only 16-valve cars; if you have an 8-valve engine of the tenth family, then in this case, go to the article entitled: “Replacing the crankshaft oil seal on nines,” in which everything is described using the example of an 8-valve engine!
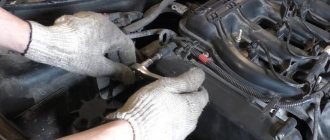
Removal: To remove the oil seal, first remove the timing belt from all upper pulleys and rollers (How to do this is described in the article on replacing the timing belt on a car, we already provided a link to this article at the very beginning of the article, scroll above), then the alternator belt you will need to remove it from the crankshaft pulley (How to remove the belt is described in the article: “Changing the alternator belt on a VAZ”), after these operations, proceed to removing the large and small gears of the crankshaft, both gears are secured by one bolt (It is in the central parts holds) which will need to be unscrewed with a spanner or a socket with an extension (see photo 1), but to get to it, you will have to lift the right side with a jack (look in the direction of the car), remove the wheel (How to remove a wheel, read the article: Correct replacement of wheels on cars) and, if necessary, remove the fender liner, if the fender liner does not interfere, then without removing it, unscrew the bolt securing the pulleys and first of all, remove the large pulley from the crankshaft, there is a washer installed on it, so as not to lose it, remove it from the large crankshaft pulley (see. photo 2), then remove the belt from the small pulley (see photo 3) and finally, remove the small pulley itself from the shaft, that’s all, you can assume that you have reached the oil seal, but there is one nuance, there is a key on the crankshaft pulley, To avoid losing it, use pliers to carefully remove it and put it aside (see
photo 4), when this is done, you can remove the oil seal from the oil pump cover using thin screwdrivers, when you remove it, pay attention to which side it is facing, install the new oil seal in the same way
Installation: The oil seal is installed using a piece of pipe or a head of suitable diameter, that is, it is first leaned against its seat, and then hammered inside (see photo 1), the oil seal should fit clearly, if necessary, fill it in with a screwdriver or a pencil, when everything is finished with installing the oil seal, install both pulleys in their place and note that in order to install the large pulley on the small one, holes B and A will have to coincide with each other, do not forget to install the key on the crankshaft and before installing the large pulley, put the belt on a small one (By the way, install the belt in exactly the same way as it was, usually there is an arrow on them, it should point in the same direction as it looked when removing it, or just change the belt to a new one, you can install it however you want pulleys and rollers), after assembly, start the car and see if oil is thrown out through the oil seal.
Note! Before installation, the oil seal is lubricated with engine oil and exactly the same oil that is poured into the car’s engine, this is done only to make the oil seal easier to install (And the working edge needs to be lubricated, it is indicated by an arrow in the photo below)!
Additional video clip: Watch the video below, it shows the replacement of camshaft oil seals, as well as the replacement of the front crankshaft oil seal. If you do not change the camshaft oil seal, you do not have to remove their pulleys from the car.
Product delivery options
Note! Below are the shipping methods available specifically for this product. Payment options may vary depending on the shipping method. Detailed information can be found on the “Delivery and Payment” page.
Parcel by Russian Post
Available payment methods:
- Cash on delivery (payment upon receipt)
- Using cards Sberbank, VTB, Post Bank, Tinkoff
- Yandex money
- QIWI
- ROBOKASSA
Shipping throughout Russia. Delivery time is from 5 to 12 days.
Parcel by Russian Post 1st class
Available payment methods:
- Cash on delivery (payment upon receipt)
- Using cards Sberbank, VTB, Post Bank, Tinkoff
- Yandex money
- QIWI
- ROBOKASSA
Shipping throughout Russia. Delivery time is from 2 to 5 days. More expensive than regular delivery by Russian Post, approximately 50%. Parcel weight up to 2.5 kg
Express Parcel EMS
Available payment methods:
- Cash on delivery (payment upon receipt)
- Using cards Sberbank, VTB, Post Bank, Tinkoff
- Yandex money
- QIWI
- ROBOKASSA
Shipping throughout Russia. Delivery time is from 3 to 7 days. More expensive than regular delivery by Russian Post, approximately 100%.
Transport companies
Courier delivery in Togliatti
Available payment methods:
- Cash upon receipt
- Using cards Sberbank, VTB, Post Bank, Tinkoff
- Yandex money
- QIWI
- ROBOKASSA
Delivery time from 1 to 12 hours.
Pickup from our warehouse
Available payment methods:
- Cash upon receipt
- Credit, installments
- Using cards Sberbank, VTB, Post Bank, Tinkoff
- Yandex money
- QIWI
- ROBOKASSA
Pickup times must coincide with store opening hours.
List of tools
To replace the camshaft oil seal on VAZ-2110 and 2112 16 valves, a minimum set of tools is required. These include:
- key to “10”;
- key to "17";
- Slotted screwdriver;
- Mandrel for pressing;
- A small amount of motor oil.
A pit or lift is not required for manipulation. The unit is fully accessible from the engine compartment. On VAZ-2110 cars there are 8 valves and on 16 valve units the oil seal is located under the camshaft pulley, on the right side in the direction of movement of the car.
Replacement of camshaft oil seals for Lada Priora
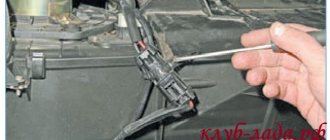
It is convenient to assess the condition of camshaft seals when carrying out routine work to check the condition of the timing belt. We change the oil seal if there are traces of engine oil under the camshaft toothed pulley or on the timing belt. If an oil leak is detected through only one oil seal, we recommend immediately replacing both oil seals. In this case, it is also necessary to replace the timing belt, since oil that gets on the belt will lead to rapid failure of the belt. Remove the upper front timing belt cover (see “Replacing the timing belt”). We show replacing the intake camshaft oil seal. Remove the phase sensor (see “Removing the phase sensor”).
How to tighten main bearings and connecting rod bearings
So, taking into account the above, it becomes clear that the tightening torque of the main and connecting rod bearings is extremely important. Now let's move on to the assembly process itself.
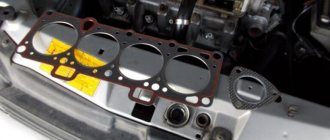
- First of all, molar liners are installed in the bed of the molar necks. Please note that the middle liner is different from the others. Before installing the bearings, the preservative lubricant is removed, after which a little motor oil is applied to the surface. After this, the bed covers are placed, after which the tightening is carried out. The tightening torque should be that recommended for the specific model of the power unit. For example, for engines on the VAZ 2108 model, this figure can be from 68 to 84 Nm.
- Next, the connecting rod bearings are installed. During assembly, it is necessary to accurately install the covers in place. The specified covers are marked, that is, their arbitrary installation is not allowed. The tightening torque of the connecting rod bearings is slightly less compared to the main bearings (the indicator ranges from 43 to 53 Nm). For Lada Priora, the main bearings are tightened with a torque of 68.31-84.38, and the connecting rod bearings have a tightening torque of 43.3-53.5.
Replacing the front crankshaft oil seal on a VAZ 2110
We will need:
- Slotted screwdriver (regular)
- Mandrel with outer diameter 41(±0.5) mm (piece of pipe or head of suitable diameter)
- Some motor oil
1. Removing the crankshaft timing belt. You can use a puller, or you can just pry it off with two screwdrivers.
2. Having removed the pulley, we see the hero of the occasion in all his glory. Outwardly, it may be quite tolerable, but when removed you will see that the edges are already “oaky” and simply do not hold oil. Carefully pry the seal with a screwdriver and pull it out.
3. We take the new oil seal out of the package, admire it and lightly lubricate the outer and inner edges with clean engine oil. Then we install it in place and gently press it into the seat using a suitable mandrel and a hammer.
4. Open the kefir beer and enjoy the result. Now you know how to replace the front crankshaft oil seal on a VAZ 2110.
The most important thing in this work is not to scratch the seat on the inside when removing the old oil seal.
It is also important to fit the new oil seal evenly, without distortions. In general, the work is not difficult
Read about how to replace the rear crankshaft oil seal soon. This work is more serious and complex.
Why is it necessary to replace on time?
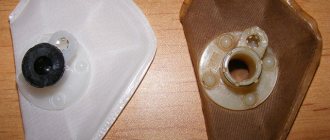
On the left is the new oil seal, and on the right is the old one
. It will be no secret to anyone that timely replacement of the camshaft oil seal will not harm the engine in any way, but will only increase its performance characteristics. The time period for replacing it is not determined in any way and depends only on the mileage and driving style. Since frequent and intensive use of the engine leads to rapid wear of all these parts.
Timely replacement of the oil seal will prevent oil leakage from the engine, which is its main task.
However, if this moment was missed and a leak did occur, this will be accompanied by very unpleasant facts:
- Oil consumption will increase.
- The engine will be constantly dirty , since dust from the road will constantly stick to the oil that spills onto the engine.
- Also, oil that leaks from the engine will negatively affect the general condition of various electrical contacts and elements. First of all, this applies to electrical power supply blocks, where contact may be deteriorated.
Price list
- Special offers
- KAMAZ spare parts
- Spare parts KAMAZ-5490
- Spare parts MAZ, YaMZ
- ZIL spare parts
- Spare parts ZMZ, for GAZ vehicles
- Spare parts for Volzhanki cars
- Spare parts for Gazelists
- Spare parts for trucks Lawns
- Spare parts for GAZ-71 caterpillar
- Spare parts UAZ, UMZ
- Spare parts KrAZ, BelAZ
- Spare parts URAL
- Spare parts BUSES
- AMAZ spare parts
- IKARUS spare parts
- KAVZ spare parts
- LAZ spare parts
- LIAZ spare parts
- NEFAZ spare parts
- PAZ spare parts
- Other buses
- Tractors, computer equipment, attachments
- Tractors and walk-behind tractors
- Municipal vehicles
- Attachments and trailed equipment
- Spare parts for TRACTORS and SPECIAL EQUIPMENT
- JCB – spare parts for special equipment
- Truck crane (KS-3577, KS-4517, etc.)
- AMZ (A-01, A-41, D-440, D-442, D-447, D-461, D-467)
- Amkodor (TO-18, TO-28, TO-30, etc.)
- ATZ (T-4A, TT-4M)
- VgTZ (DT-75)
- VMTZ (D-120, D-144, D-130, D-145T)
- VTZ (T-25, T30A-80, VTZ-2048)
- LTZ (T-40, LTZ-55, LTZ-60)
- MKSM, UNC, DETVAN
- MTZ – spare parts for tractors
- OTZ (TDT-55)
- PTZ (K-700/701/702/703/704)
- KhTZ (T-150, MT-LB)
- ChTZ (T-130, T-170, B-10, B-12, B-170, T-10M, DET-250)
- YuMZ – spare parts for tractors
- Other special equipment and tractors
- RVD – high pressure hoses and hoses
- MMZ spare parts and engines
replacing the camshaft oil seal on a VAZ 2108.
| See all advertisements in the archive |
| Replacing the camshaft oil seal VAZ 21099 |
Click to view | The video shows the process of replacing the camshaft oil seal on a VAZ 21099 car. Replacement with a VAZ... |
| Tags: |
| replacing the camshaft oil seal (VAZ 2108-Kalina) |
Click to view | The Auto_Repair channel will help you troubleshoot your car with your own hands... |
| Tags: |
| Replacing the front crankshaft oil seal VAZ 21099, VAZ 2109, VAZ 2108 |
Click to view | The video shows the process of replacing the front crankshaft oil seal of a VAZ 21099. At the same time, the timing belt was replaced... |
| Tags: |
Click to view | VAZ, 2108, timing belt, timing belt, 2115, 2113, repair, replacement of timing belt, 2109, do it yourself, 2110, VAZ 2108, repair… |
| Tags: |
| Replacing the oil seal in the VAZ 2109 distributor. Eliminating oil leaks. |
Click to view | Replacing the oil seal in the distributor. |
| Tags: |
| replacing crankshaft oil seal VAZ 8kl |
| The Auto_Repair channel will help you troubleshoot your car with your own hands... |
| Tags: |
| replacing the camshaft oil seal VAZ 2115 |
| Replacing the camshaft oil seal on a VAZ 2115 1.6 engine amateur video. |
| Tags: |
| Oil is leaking from under the distributor: how to remove and repair a VAZ 2109 |
Click to view | Oil is leaking from under the distributor, how to remove and fix a VAZ 2109, remove and fix the leak. |
| Tags: |
| Repair of VAZ 2109. Replacement of timing belt, replacement of VAZ pump, replacement of oil seals. |
| Repair of VAZ 2109. Replacing the timing belt, replacing the VAZ pump, replacing oil seals, replacing the belt... |
| Tags: |
| replacing the camshaft oil seal on a VAZ 2108 |
| replacing the timing belt on an 8 cl engine. The belt tension roller was not shown correctly! Everything needs to be reversed... |
| Tags: |
| Replacement of crankshaft and camshaft seals of the front part of VAZ 2108,09,099,14,15. Part 1 |
Click to view | Replacing the timing belt pulley and setting timing marks On the VAZ 2110 8kl video Our group on VK: Instagram… |
| Tags: |
| REPLACING THE TIMING BELT, CAMSHAFT AND CRANKSHAFT SEALS, PUMP VAZ 2111,2110,2112. |
| Repair of cylinder head VAZ 8Klapanov VKontakte group. |
| Tags: |
| Replacing the timing belt on the 8 cl engine VAZ 2108,2109,2110,2111,2113,2114,2115 |
| We change oil seals (valve seals) using the example of a VAZ engine. Archive 2006 Sponsor. |
| Tags: |
| Ignition marks on the injector. Replacing the timing belt on an 8kL engine. Gap between DPKV and ignition pulley. |
Click to view | In this series, we will change the tension rollers on an 8-valve engine (we will not change the belt itself, since it… |
| Tags: |
| The Auto_Repair channel will help you troubleshoot your car with your own hands... |
| Tags: |
| A complete replacement of gearbox seals in a VAZ 21099 is shown. Contacts for communication. Emel... |
| Tags: |
| Replacing valve stem seals on a VAZ-08 |
Click to view | subscribe to my instagram. |
| Tags: |
| Replacement (installation) of a camshaft on an 8 valve VAZ engine. |
| Tags: |
| Replacement of timing belt, pump and installation of split gear VAZ 2108, 09, 99, 13, 14, 15. |
| Hello everyone In this series we will touch on the technical part of the car. We'll change the engine oil, replace the oil seals... |
| Tags: |
| replacing a pump for a VAZ 8 valve internal combustion engine |
| How to quickly replace the camshaft oil seal on a VAZ car with 8-valve engines. The author of the video… |
| Tags: |
| Horror story about valve seals (valve seals) |
| replacing valve stem seals for VAZ 8 valves. |
| Tags: |
| Detailed replacement of oil seals in a VAZ gearbox |
| Thank you so much for watching my videos, tell your friends, leave comments and subscribe... |
| Tags: |
| Replacing the rocker seal and drives of the VAZ 15 is easy and simple!” rel=”spf-prefetch |
| Description missing |
| Tags: |
| REPLACING CAMSHAFT AND CRANKSHAFT SEALS VAZ 2108, 2109, 2199, 2113.,2114,2115″ rel=”spf-prefetch |
| Description missing |
| Tags: |
| Replacing the camshaft on VAZ 2108, 2109, 21099, 2113, 2114, 2115″ rel=”spf-prefetch |
| Description missing |
| Tags: |
| VAZ/VAZ 2109. REPLACING THE CAMSHAFT SEAL. I PUT A SPORTS CAMSHAFT PULLEY.” rel=”spf-prefetch |
| Description missing |
| Tags: |
| Replacement of camshaft oil seal VAZ 8 valves” rel=”spf-prefetch |
| Description missing |
| Tags: |
| Replacing the camshaft oil seal VAZ 2109″ rel=”spf-prefetch |
| Description missing |
| Tags: |
| replacing valve stem seals! simply and easily!" rel=”spf-prefetch |
| Description missing |
| Tags: |
| Quick replacement of the rear crankshaft oil seal on VAZ 2110, 2108, 2114, Kalina, Priora” rel=”spf-prefetch |
Replacing Oil Seals on Priora 16 Valves
How to Replace Valve Stem Seals on a 16-Valve Port
Well, Priora started eating motor oil. The discharge is dark, there are flows from the mass air flow sensor to the throttle. The device itself is also in a sad state of lubrication. But the compression in the cylinders is good. Replacement of front valves with 16 previous valves. The car does not lose power. What is the problem? And what they most likely did was design their seals on the valve stem. How to replace seals without removing the heads to replace 16 valves. How to remove the head on the rear of a 16-valve priors. Replacement of valves, cylinder head inoperative until the 16th. Or, as they are also called, valve seals. But there are 16 of them on Priora, and they need to be replaced.
What is a valve stem seal
The working name used by all repairers is valve seals. These are special rings, rubber and metal belts that wear on the valve body. Their purpose is to prevent the engine oil that lubricates the Priory engine from entering the service cylinders and the air supply system to the receiver. Therefore the oil scraper.
Tools and materials needed to replace valve seals
This work requires a separate set of devices. Naturally, a regular car service has them in its “arsenal” at the very beginning. But a Priora owner who decides to change valve stem seals without outside help will have to pick them up or rent them out:
- Set of wrenches (ring).
- Set of heads with handle.
- Device for compressing valve springs.
- Set of hexagons.
- Screwdriver.
- Mandrel.
- Device for removing and replacing valve stem seals and cotters.
- Magnet.
- Marker.
- Sealant for gaskets when replacing.
- Set of head gaskets to replace old ones.
This is a small kit needed for such an operation.
The process of replacing the oil scraper headgear
The operation of replacing valve seals with “ priority ” It can be divided into several stages:
- Priority training
- Removing the cylinder head.
- Replacing valve seals.
- Engine assembly.
- Test run.
Benefit of the cuff
If the oil seal (cuff) fails or, simply, leaks oil, this significantly affects the operation of the car:
the most minimal harm is that on the VAZ 2110 the engine and the entire engine compartment will be oily; importantly, oil consumption will increase, it will have to be constantly topped up, which the oil level sensor will constantly remind you of; when the oil level drops, valve knocking will be heard, and they are more likely to fail; oily non-metallic parts in a car are quickly destroyed; Oily contacts lead to many problems, starting with poor engine starting; Since problems may arise with the quality of camshaft lubrication, its position (phase) sensor may also malfunction. At the same time, fuel consumption increases, since there will be no adjustment of the fuel supply to each individual cylinder, and the load will be the same for all valves.
Assembly
Reassembly is carried out taking into account the position of each part. Make sure that each plug is in place and that all parts, including the seal, are thoroughly lubricated before installation. The cuff is pressed in carefully using a hammer with a plastic or rubber head, and its edges should be flush with the seat.
- Author: Veniamin
Rate this article:
- 5
- 4
- 3
- 2
- 1
(2 votes, average: 5 out of 5) Share with your friends!
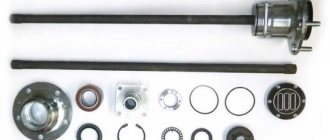
How is the crankshaft oil seal replaced?
To successfully complete the task, you first need to arm yourself with all the necessary tools and prepare an inspection hole in the garage to perform a whole range of work.
Developments from the following manufacturers are recommended for purchase:
| Name | Manufacturer | Price |
| Victor Reinz | Germany | 350 rubles |
| Elring | Germany | 300 rubles |
| Ajusa | Spain | 650 rubles |
| Espra | Spain | 250 rubles |
| Goetze | Germany | 600 rubles |
Screwdrivers, wrenches, sockets, and new seals should be on hand. All work comes down to separate replacement of the front and rear crankshaft oil seals.
Changing the front oil seal
Access to the front crankshaft oil seal largely depends on the specific make of the car, so before carrying out all the work, it is advisable to read the operating instructions with all the necessary information. For owners of domestic cars, in particular the VAZ brand, all work comes down to the following steps:
- At the first stage, the tension of the generator belt is weakened
- The belt is completely removed from the pulley
- The nut that serves to clamp the pulley is unscrewed
- Remove the pulley from the shaft
- In car modifications with a transverse engine, the oil pump housing is removed
- Pry a screwdriver under the oil seal and remove it from its seat
- Installing a new seal
- We assemble the parts in reverse order
It is advisable to treat the junction of the oil seal with the crankshaft with machine oil and apply the substance to the outer surface of the seal and the output end of the shaft.
Changing the rear oil seal
This type of work requires a lot of time and effort from the car owner. To get to the rear oil seal, you need to disassemble the cardan and disconnect the box and clutch housing. The next steps are as follows:
- We dismantle the gearbox along with the clutch basket, do not touch the flywheel
- Loosen the bolts securing the flywheel to the engine
- To set the flywheel to a static position, fasten one gearbox mounting bolt and insert a screwdriver, resting the teeth against the mechanism
- We remove the retaining plastic, and only after that the flywheel itself
- Unscrew the rear clutch shield and release the fasteners connecting the rear engine cover
- Find the rear oil seal and remove it with a screwdriver
- Lubricate the seat
- Press in a new copy with a screwdriver
It would not be superfluous to replace the rear cover gasket; it is also advisable to lubricate all contacting parts with machine oil during work. Then we assemble the entire assembly in reverse order.