How to resolve error P0504?
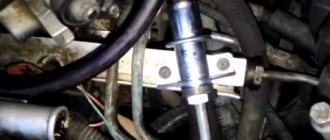
The brake light switch is located under the instrument panel at the top of the brake pedal lever. The brake booster lifts the pedal to the fully extended position. The brake light switch is installed on the crossbar support bracket directly behind the brake pedal mounting bracket. The only way to access the switch is to move the front seat back, lie on your back and look up under the dash. You will see a bracket with a switch on the top of the brake pedal lever. The switch will have four or six wires. The switch lies in the bracket so that its activating rod will be in contact with the brake pedal handle when the pedal is fully extended. At this point, the switch is suppressed by the brake pedal, cutting off the current. When the brake pedal is depressed, the lever continues to engage and activate the brake lights. When the pedal is released, the lever presses the rod again, turning off the brake lights. Diagnostic StepsHave helper checking brake lights. Make sure they work by turning them on and off and that the bulbs are good. If the brake lights come on constantly, the brake light switch is not adjusted correctly or is faulty. The same applies when they don't work. Move the driver's seat back and look under the dashboard. Squeeze the tabs on the electrical connector located on the brake light switch and remove the connector. Using a voltmeter, check the voltage on the red wire in the connector. Place the black wire on any good ground and the red wire on the red wire. You should have 12 volts unless you check the wiring to the fuze block. Plug the connector into the switch and backprobe the white wire with the pedal depressed. You should have 12 volts with the pedal depressed and no voltage with the pedal depressed. If there is no voltage, replace the brake light switch. If there is voltage on the white wire with the extended pedal, replace the switch. If the switch has an adjustable category, check the adjustment. The switch must be in good contact with the pedal handle and fully depressed. If the brake lights are functioning correctly but you still have a code, check the other wires at the brake light switch. Remove the connector and check the remaining wires for power. Make a note of the location of the power cord and replace the connector. The rear mantle is power wire by wire with the pedal depressed. If no force replaces the switch. If the last test had power as the pedal was depressed the switch is good. The problem exists in the wiring to the computer or with the computer itself. Locate the terminal of the computer's STP probe and the rear probe on the computer for grounding. If 12 volts is displayed poorly on the computer voltmeter. If there is virtually no voltage, replace or repair the wiring harness from the computer to the switch. Additional Notes Please be aware that some vehicles are equipped with driver-side knee airbags. Therefore, be careful when working with air pockets. Here is the brake pedal switch shown on a 2011 Ford f-150
Why does the indicator work?
Error codes for Lada Kalina 1.6 8 valves: decoding, self-diagnosis and error 3, 4
If the handbrake lamp does not light up at all when it is activated, the reason is most likely trivial:
- diode burned out;
- wires are broken.
This small problem can be fixed at any car service center for literally pennies. In principle, there is nothing wrong with the diode not lighting up. But its repair cannot be delayed for long. After all, in case of real problems with the brake system, he will not be able to notify you about it in time.
It is much worse if the handbrake indicator is constantly on or lights up while driving. In this situation, it is extremely undesirable to operate the car without understanding the strange behavior of the diode.
The most common situation is when the handbrake light is constantly on. The reasons for this can be very different: from harmless clogging or oxidation of the contact sensor to a stretched cable in the handbrake system.
Reasons for error p0504
P0363 error Lada Granta
The appearance of a malfunction and, as a consequence, error p0504 on the on-board computer has long been identified by specialists working at the Lada manufacturing plant, that is, at AvtoVAZ:
- A short circuit that occurred in the side lights and brake light network. This could have occurred due to improper installation of the lamps.
- Operating lamps that do not meet standards.
The essence of this design is that on the Lada Granta, instead of the usual “Stop” signal, a double one is installed. The first chain of this design is designed to operate at the moment when the brake pedal is depressed, and the second, on the contrary, when the pedal is completely released. When the driver presses the brake pedal, a signal is sent not only to the stop signal, but also to the controller. And when you release the pedal - exclusively to the controller. In this regard, when these factors are combined, the controller, during its operation, begins to “suspect” that not everything is in order with the “Stop” signal, and therefore issues a similar error.
Solving the problem by replacing the brake pedal sensor: How to replace the brake pedal sensor?
To replace the Grant brake pedal sensor, you need to get to the pedal assembly bracket, on which the brake pedal sensor is located, directly above the pedal itself. A high-quality replacement is the key to long-term operation, so it is necessary:
• remove the wire from the negative terminal of the battery;
• press out the plastic fastener (you will need a screwdriver);
• remove the wiring block;
• turn the brake sensor clockwise;
Installing a new sensor is performed in the reverse order, but before doing this, you need to depress the brake pedal and insert the new sensor into the mounting hole, then turn it counterclockwise until it clicks.
What to do if it is not possible to purchase a sensor
Error p0523 Lada Granta and solutions
It also happens that error p0504 appears at the most inopportune moment, for example, when you are in some outback and it is not possible to purchase a new sensor.
In this case, you should remove the same sensor and try to disassemble it. It is quite possible that the contacts in it simply burned out. A breakdown of this type is not uncommon, especially on the Lada Granta.
But there is another, fairly common reason for such a breakdown. This is a spring that has become so stretched over time that it can no longer perform its intended functions. To fix this problem, simply replace the spring.
And in conclusion, I would like to note that if error p0504 appears on the on-board computer of your Lada Granda quite often, then we can say with almost 100% certainty that the brake sensor is to blame.
To eliminate a constantly recurring problem, you should simply purchase a new sensor from a specialized store. It is very noteworthy that if your car is still under warranty, you can contact an authorized dealer to fix the problem, since the problem is covered under warranty.
If you do not have such a desire, simply replace the sensor with a new one. It will cost you about 200 rubles. Agree, quite a small amount of money, for the sake of saving which, it may not be worth contacting the service center with a warranty card.
By the way, you can also replace this element of the car either at a service center or with your own hands. But for the last step you will need the appropriate tool and some skills.
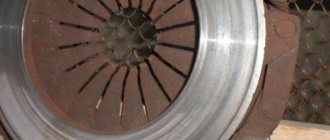
Clutch sensor replacement
Replacing the clutch sensor on robotic gearboxes is a rather labor-intensive process, which often requires subsequent adjustment of the clutch using special equipment. Therefore, the process of troubleshooting is individual for each type of gearbox.
Replacing the clutch sensor on cars with a manual transmission, as a rule, will not take much time and effort. The clutch pedal sensor is usually located directly next to the pedal itself - with a standard set of tools on hand, you can easily replace it.
The clutch pedal sensor itself is not a complex mechanism, so adjustment is not difficult, and the cost of replacing it yourself is not at all high. The average price in auto stores is from 300 to 700 rubles.
What are the reasons that cause sensor failure?
A detailed examination of the essence of the problem that arose, when error code 0504 appeared, will allow us to determine the list of reasons. This refers to the disassembly of the ill-fated sensor in the LADA Granta car. Three clips serve as an obstacle to this noble procedure, preventing the component from being easily disassembled. After overcoming this “barrier”, it becomes possible to observe the real reasons that caused the breakdown:
- deformation of the smaller (of 2) springs located on the rod;
- different heights of the contacts of the designated sensor;
- poor material (steel) used for the manufacture of terminals;
- presence of play on the floating contact element.
“Ringing” can be used as the initial stage of diagnosis. Each of the contacts must be subjected to this action separately, and then in pairs (“2nd” with “3rd”). The experience of LADA Granta owners indicates the presence of a dull tone during ringing, which confirms the malfunction of the contact group. Serviceable contacts are characterized by a distinct ringing “squeak”.
The operation of the brake pedal sensor is based on the following technology:
- the rod is located inside the element and presses the floating contact (when the pedal is released) to the upper group;
- the rod is again inside, but the pressure is applied to the lower group (corresponds to the depressed position of the pedal).
This principle is not complicated, but this does not improve the performance of the sensor. The main problem lies in the bent state of the floating contact. This kind of defect can occur due to this contact getting caught on the spring element, which provokes the sensor to send a signal to the LADA Granta on-board controller about the allegedly activated brake, which is why error code 0504 occurs.
Signs of a faulty brake pedal sensor Lada Kalina
In order to understand that the Kalina brake pedal position sensor is the cause of the vehicle’s incorrect operation, pay attention to the following signs:
- presence of error “P-0504” on the dashboard;
- a significant decrease in power and engine responsiveness when pressing the gas pedal;
- increase in engine speed (short-term) when changing gears.
Main causes of sensor failure
In order to identify the reasons that interfere with the normal operation of the device, it is necessary to disassemble it and carry out a thorough inspection to identify deformations and damage. The most common defects are:
- the internal (small) spring, which is located on the rod, shows signs of deformation or distortion;
- the contact terminals of the product have physical oxidation;
- backlash of the moving contact;
- Quite low quality of factory production (defective, flimsy internal elements of the device).
Pre-installation diagnostics
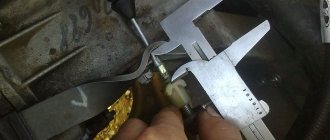
Before buying a new product and installing it to replace a seemingly faulty old sensor, try diagnosing and troubleshooting it yourself. So, on the body of the product there are two special nuts, one on top, the other on the bottom. The top nut adjusts the gap of our sensor. As mentioned earlier, in some cases the gap is set incorrectly, which disrupts the normal movement of the button. Your task is to find and set the optimal gap so that nothing interferes with the operation of the button. After the adjustment work, reset the ECU error, start the car engine and let it run for 15-20 minutes (the error does not register immediately). If the error does not appear, it means that the reason for the incorrect operation of the internal combustion engine is incorrect settings of the Granta brake sensor. Otherwise, you should replace the faulty device with a new, working one.
Performance diagnostics
The functionality test consists of: 1. In testing (checking) the product with a multimeter.2. Disassembly and visual inspection of the internal components of the part.3. The replacement sensor is not known to be good.
The first method involves alternately measuring the contacts of the dismantled sensor. The point is to check each contact individually and in pairs (second and third contact). This is quite convenient to do, since at the place where the contact chip is connected, all connectors are numbered.
The second method is used to identify faulty or deformed internal elements of the product (in most cases, damaged springs). Remove all internal elements and pay attention to their integrity and performance. In addition to the condition of the springs, pay attention to the metal contact plate. There should be no traces of oxidation or contamination. If there are any, clean them out.
The third method is quite simple and trivial. Install a new part to replace the one whose serviceability you doubt. Test the operation of the car by driving in various modes, when switching up and down gears. When the system is restored to normal operation, the malfunction indicator (check engine) should go out (if it does not disappear within 15 minutes, the error should be reset manually).
How to replace the sensor?
If you have received error code 0504, to perform this simple procedure you will need to provide access to the pedal bracket on the Lada Granta, on which our “ill-fated” sensor is actually present, or rather, above the pedal assembly. A well-carried out replacement will guarantee long-term operation.
Let's get started.
- Remove the negative terminal from the battery terminal.
- We press out the plastic retainer (use a screwdriver).
- Next, remove the block with wires.
- Turn the sensor in a clockwise direction.
- We remove the faulty part.
We install the new component on a Lada Granta car in the reverse order. Don’t forget to first release the pedal to be able to insert the new product into its socket. We turn the component against the direction of the arrow until the corresponding click appears.
How to change
The sensor is located slightly above the brake pedal lever. To find it, you need to look under the torpedo. On Lada Priora, Grant and Kalina, a 19 mm open-end wrench will be required for dismantling. The replacement process looks like this:
- Remove the negative terminal from the battery
- Disconnect the 2 plugs from the sensor.
- Loosen the locknut with a 19 mm wrench (remember its approximate location).
- Unscrew the sensor counterclockwise.
- Install a new one and secure it with the adjusting nut.
- Connect the battery.
- Turn on the diagnostic equipment and clear the old error P0504.
The old sensor is quite repairable. In most cases, the cause of the malfunction is a broken spring. If you disassemble the body and install a new spring, the “frog” will work again.
Car owner's comment: On my Lada Grant, a spring broke in the sensor and began to close the contacts of the limit switches. When I left the car overnight, the ignition did not seem to turn off, which is why the battery ran out completely several times. I bought a new battery, but the problem did not go away until I made diagnostics and replaced the sensor. At the same time, the Check Engine did not light up.
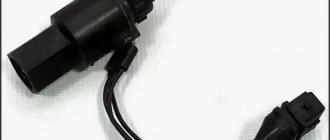
Nissan Primastar Slow Speed › Logbook › Brake light switch
UPD. In the commentary comrade. Shuma34 gave a very good explanation of the “frogs” so as not to be confused. Use it! The music didn't play for long and the pseudo-Nissan had to be repaired again. This time the problem was minor, but it caught me suddenly. I suddenly noticed that all 3 stops were not working for me. And then I learned this expression “Brake light switch.”
So, if both of your feet suddenly don’t work, then don’t rush to change light bulbs like I did. And I climbed only because, in principle, I had not checked for 100 years whether my feet were burning, and the upper one (tritium) thought that, in principle, it had not been working for a long time. Therefore, I decided that I had plugged the flash and both light bulbs into AZIS. It turned out not.
The brake light switch, or “frog” in common parlance, is the same stick that hangs under the brake pedal. It's easy to check it. Remove the chip from the “frog” and close two contacts on it. If everything is in order (except for the frog), then the stoplights will light up.
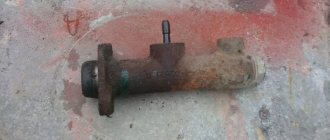
This frog turned out to be faulty and I ordered it. In every sense I ordered it because when it arrived it didn't fit. So, she generally looks like this.
It can be easily removed. Carefully turn it (I don’t remember which direction, but it’s easy) and towards yourself. That's it, it's filmed. And in your hands is what is in the picture. But the connector itself did not fit. In general, this seems to be normal for Renault.
But the most important thing. It didn’t fit and... what should I do? I got a little angry and wanted to go to one of the two places. But it still didn’t work out. The two Renov frogs have fundamentally different designs inside.
Nothing to say. I was even more shocked by the price of the sensor when I personally saw its “most complex” design. After all, for the original sensor they asked for a little more than 1800 rubles. ($30). For a piece of plastic with a metal washer, a spring from a ballpoint pen and two pieces of a plate for connection. What is this?..
I'll tell you further. I bought the original much cheaper. Here - vernet 71223. Came with... something worn out, very visible RENAULT.
Here you go. Now compare the prices of the original and this one will “return.” And the eggs are the same.
And in conclusion. I didn’t start farming anything. I disassembled the original (not a fact) frog, assembled it, installed it, and it worked. It's been more than two weeks now, the flight is normal. So don’t rush to buy a new frog, if necessary. Remove and sort through the old one. It can be removed in a minute, disassembled like an AK-47, and costs as much as a Bentley bolt.
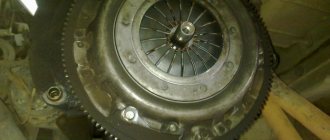
Well, the widespread computerization of cars has reached such a unit as the clutch. No, the electronic unit does not yet control the process itself, but it already controls this process. To do this, a sensor is installed under the clutch pedal to monitor the progress of the clutch.
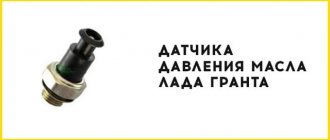
Brake pedal sensor Lada Kalina
Lada Priora Sedan constructor, assemble it yourself Logbook Mileage and clutch replacement
The Kalina brake pedal sensor is a technical device that is used to monitor the degree of impact on the brake pedal. Quite often, car owners of the VAZ line complain about breakdowns or incorrect adjustment settings of the product.
Fortunately, the process of adjusting or replacing a part is not very difficult if certain nuances are observed.
Performance diagnostics
Checking the functionality consists of: 1. Testing the product with a multimeter. 2. Disassembly and visual inspection of the internal components of the part.
3. Replacement sensor is not known to be good.
The first method involves alternately measuring the contacts of the dismantled sensor. The point is to check each contact individually and in pairs (second and third contact). This is quite convenient to do, since at the place where the contact chip is connected, all connectors are numbered.
The second method is used to identify faulty or deformed internal elements of the product (in most cases, damaged springs).
There should be no traces of oxidation or contamination. If there are any, clean them out.
The third method is quite simple and trivial. Install a new part to replace the one whose serviceability you doubt.
When the system is restored to normal operation, the malfunction indicator (check engine) should go out (if it does not disappear within 15 minutes, the error should be reset manually).
Signs of a faulty brake pedal sensor Lada Kalina
In order to understand that the Kalina brake pedal position sensor is the cause of the vehicle’s incorrect operation, pay attention to the following signs:
- presence of error “P-0504” on the dashboard;
- a significant decrease in power and engine responsiveness when pressing the gas pedal;
- increase in engine speed (short-term) when changing gears.
Main causes of sensor failure
In order to identify the reasons that interfere with the normal operation of the device, it is necessary to disassemble it and carry out a thorough inspection to identify deformations and damage. The following defects are most common:
- the internal (small) spring, which is located on the rod, shows signs of deformation or distortion;
- the contact terminals of the product have physical oxidation;
- backlash of the moving contact;
- Quite low quality of factory production (defective, flimsy internal elements of the device).
Adjusting the brake pedal sensor Kalina
If the sensor is in good condition, and incorrect operation of the internal combustion engine continues to bother you, try adjusting the product yourself
Please pay attention to the following features:
- The sensor must be screwed in clockwise until the brake pedal begins to move down. Then you will need to slightly unscrew the product and secure its position using the fastening nut.
- The result should be such that when there is no action on the pedal, the sensor rod is recessed into the housing, and when the pedal is applied, on the contrary, it is completely released from the housing.
- As for the working gap, it is adjusted using two nuts (one at the top, the other at the bottom). The adjustment is carried out using the upper nut, which is tightened, and the lower one, on the contrary, is unscrewed. The entire process is carried out until the button is completely recessed into the body when the brake pedal is applied. However, you should not overdo the adjustment; in other words, you should leave a small gap or travel margin (approximately 2 to 5 millimeters).
Removal and installation
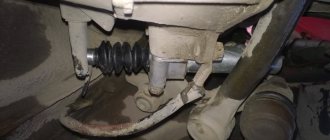
Replacing the brake pedal sensor on Kalina is carried out using an adjustable wrench set to “19”. The sensor itself is located above the brake pedal under the steering column. Conventionally, the removal stages can be divided into 5 steps:
- Before starting electrical work, it is recommended to disconnect the negative wire (terminal) from the battery.
- Then you need to move into the car interior on the driver’s side. For ease of operation, it is advisable to move the driver's seat in the opposite direction from the dashboard.
- Find the location of the sensor. Find a contact chip with wires. Press and hold the 2 plastic fasteners located on both sides of the chip. Pull the connector out of the sensor connector.
- Take the wrench in your hands and loosen the fastening nut. After which the sensor can be unscrewed freely.
- The installation process is similar to the removal procedure, except that you will need to make adjustments (tuning), the process of which is described in detail in the previous section.
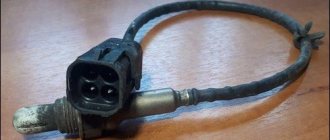
Error P0504 or problem with the brake pedal sensor
The mileage of the car is 2500 km, and the check is already lighting up with alarming frequency. The pre-installed BC multitronic displays a message that error P0504 is a problem with the brake pedal sensor. I erase it so that it doesn’t become an eyesore, but nevertheless, the error pops up. What to do? How can I adjust/change this button? In the photo this bastard is indicated by a red arrow. As people write, you need to play with adjusting it, which is done with two nuts. The most common thing is that people adjust so that the sensor button barely touches the brake pedal pad. In general, let's give it a spin and see. My BC immediately starts yelling as soon as I start the car, saying there is a mistake. I'll go dig around this weekend.
Thank you!
I noticed that the error pops up more often when you stand on the brake with the selector “D” on. I think the problem is deeper than just adjusting the sensor.
Yesterday, April 14, 2014, I was at the dealer for maintenance. In particular, he voiced hemorrhoids with error P0504. The dealer cheerfully undertook to fix everything. But he didn’t fix it, he said that we need to order a brake sensor, they say it’s defective. I drove out of the gate and wasn’t even surprised when the CHECK light came on again. And this morning the car did not start from the remote control, the BRAKES light was displayed on the key fob, which was corrected by pressing the brake a couple of times, then the car simply did not move, became dull, twitched, but after hitting the brake pedal again, everything was corrected, but then again. In general, the morning did not go well. I freaked out, went to the store and bought this damn sensor.
Here he is, the bastard, in the photo. I went to the dealer, where they changed it for me in 25 minutes without charging a penny. On my part, the cost is 170 rubles for a purchase in a store. So far nothing lights up or jerks. I want to disassemble the removed sensor at home and see what in such a cheap and simple part for 170 rubles was ruining the life of a car worth 450,000 rubles! The truth is, I don’t know how to assemble it, the upper part is on three clips, which are very hard, I wouldn’t want to break it.
I will continue the epic with the sensor. Today, 04/24/2014, Jackie Chan’s new dachik lit up again - P0504. Yesterday I disassembled the old sensor.
What is immediately visible is that the small spring sitting on the rod is crooked. Contacts (nickels) of different heights. In pair 3-2, contact 2 rings in a dull tone, rang with a beeper, if on all the others it beeps loudly and loudly, then on the 2nd it is dull and quiet.
The crooked spring was replaced by another, equal in stiffness, as far as I could determine, and equal in length. I understand that when the brake pedal is released, the rod goes inward and presses the floating contact to the upper group; when you press the pedal, then to the lower one. The scheme couldn't be simpler. However, it doesn't work as it should! the spots were all set up, as if a small welding was working, on one spot there was a mark from the very edge, therefore the floating contact was pressed crookedly. As I understand it, it could have been welded, which sent a signal to the brain that the car was on the brakes.
Everything leads me to the fact that the sensor is made of bullshit! The lower spring is crooked, the terminals are made of poor steel, the spots are made of metal coated with something yellow, which can be removed by sanding with sandpaper. Small spring is crooked. The floating contact does not sit exactly on the patch; it has a slight play. All together will result in unstable work. I put everything back in place, didn’t touch anything, just polished the contacts, started ringing - don’t ring contact 3-2, even if it cracks. And so and so, it seemed to ring. Well, how does this happen? Basically crap. I decided to find a replacement for it, and found this:
the price is almost three times more. For Foltz. Also four contacts, a leg with the same 12mm diameter and thread. I will buy it and make a terminal adapter, from round to flat, like ours.
I don't see any other way. Or from Toyota, Mazda, they also have four contacts on threaded legs, only they are shorter in themselves and a little more expensive. These are the thoughts.
As of May 12, 2014, I can’t do anything. I went on a long business trip, to a place where there is not even a highway, and only KAMAZ trucks pass on the winter road. That’s why my wife left the car, and I drive around there. Therefore, I will try to work on the sensor only when I have rare opportunities to see my family. Good luck to everyone!
Error P0504: what is it?
This type of error is associated exclusively with the brake pedal, in particular its sensor. Calling it the latter may not be entirely correct, because it is presented in the form of an end switch with 2 contacts. A simple mechanism with a spring-loaded contact pad sends voltage to the lamps for turning on the brake pedal sensor. At the same time, on the Lada Granta, which has an automatic transmission and an electric gas pedal, the protocols of this switch are taken into account when calculating the transmission performance pattern. That is, when the contacts of the limit switch are closed, a signal from the electrical control unit is sent to the throttle valve. The latter tends to impede engine power. Brake lights, in turn, can light up, but they can also not function even with working bulbs.
Wiring and light bulbs are common factors in code 0504.
Again it is worth paying attention to the components. If Granta owners did not leave reviews, it would be incorrect to blame a functioning stop lamp for a malfunction
However, this point does occur. The active spiral of the 1-pin brake light bulb stretches over time, while the antennae that hold it close with the rest. In this situation, it makes sense to install new brake lamps, which can help correct error P0504.
Possible causes of the Check Engine error and alert may be:
- burnt contacts on the limit switch;
- weak contact of the light bulb base;
- short circuit of the brake light power supply wiring.
These errors are easy to check. There is a voltage at the sensor supply wires of 0.12-0.15 V - which means you need to look for a short circuit or oxidation on the contact blocks/boards. Note that there should be no voltage on the supply wires.
Checking brake pad wear
We check the degree of wear of the brake pads of the front brake mechanisms in the following sequence.
1. Place the car on the inspection ditch.
2. Remove the front wheels.
3. When checking the pads of the left brake mechanism, turn the steering wheel completely to the left, and when checking the pads of the right brake mechanism, turn it to the right.
4. Through the inspection hole in the movable caliper bracket, we visually determine the thickness of the brake pads.
If the thickness of the lining of at least one pad is less than 1.5 mm, we change all the brake pads of the brake mechanisms of the right and left wheels.
Correlation brake switch "A"/"B": error code P0504
The Powertrain Control Module (PCM stores error code P0504) when it detects a malfunction in the Mitsubishi vehicle's brake light switch. A warning light comes on on the dashboard.
When a fault occurs in the brake light circuit, a number of problems can arise. To prevent the vehicle from getting into a dangerous situation, this error will be recorded and the error warning indicator will remain on until the cause is corrected and the code is cleared from the PCM.
Reasons for the error
The causes of the P0504 Mitsubishi code are quite simple and easy to diagnose. These include:
- faulty brake light fuse
- damaged or faulty brake light switch
- brake light lamp
- open or short circuit in the brake light wiring
- problem in the connector or circuitry of the brake switch
Symptoms of error code P0504 Mitsubishi
The first sign of an error will be an illuminated “Check Engine” light. In addition, you may notice other symptoms, including:
- pressing the brake pedal does not disable the cruise control system of a Mitsubishi car;
- one or both brake lights do not turn on when you press the brake pedal;
- one or both brake lights remain on even after you take your foot off the brake pedal;
- pressing the brake pedal at speed causes the engine to stop;
- On an automatic transmission, it is impossible to shift the shift lever.
Diagnosis of error P0504 Mitsubishi
After determining the error code using an OBD-II scanner, it is cleared. All possible causes must be checked. From simple to more complex. You need to start with fuses and light bulbs. If the problem persists, you need to check the brake light switch, wiring, and connectors.
Common diagnostic errors
Often, when the brake light comes on, it is not the driver who assumes that the problem is a burnt out bulb. Replacing the light bulb may not solve the problem, because the source could be the wiring or switch. If the fault is in the switch, then replacing the fuse will do nothing. The new one will also burn out.
How serious is the P0504 code?
It is very dangerous when the brake lights do not work. The car driving behind you cannot correctly assess the situation and your actions, which can lead to an accident. Likewise, if pressing the brake pedal does not disengage the cruise control system, the consequences can be very dire.
What needs to be repaired for error code P0504 Mitsubishi?
In most cases, fixing the cause of the P0504 code is quite simple. Here are some of the most typical situations:
- replacing a burnt out light bulb;
- repair or replacement of wiring or connectors;
- replacing the brake switch;
- replacing a blown brake light fuse;
Adjusting the brake pedal sensor Kalina
If the sensor is in good condition, and incorrect operation of the internal combustion engine continues to bother you, try adjusting the product yourself. Please pay attention to the following features:
- The sensor must be screwed in clockwise until the brake pedal begins to move down. Then you will need to slightly unscrew the product and secure its position using the fastening nut.
- The result should be such that when there is no action on the pedal, the sensor rod is recessed into the housing, and when the pedal is applied, on the contrary, it is completely released from the housing.
- As for the working gap, it is adjusted using two nuts (one at the top, the other at the bottom). The adjustment is carried out using the upper nut, which is tightened, and the lower one, on the contrary, is unscrewed. The entire process is carried out until the button is completely recessed into the body when the brake pedal is applied. However, you should not overdo the adjustment; in other words, you should leave a small gap or travel margin (approximately 2 to 5 millimeters).
Video “Eliminating squeaks”
You can learn how to solve one of the problems associated with the clutch in a car from the video from the author Konstantin Biyanov.
Hello everyone! I would like to tell you a little about the M74 ECU and the common error “P0504 Incorrect signal from the brake pedal switches.” In connection with the transition to new toxicity standards, AVTOVAZ engineers and designers have developed a new line of M74 and M17.9.7 ECUs. The ECUs can be said to be normal, but have not yet been fully tested. After all, cars on these ECUs are very much “strangled” by toxicity standards and therefore, without reprog and installing firmware e2 or lower, you can’t drive the car in any way, but this action is not all available now, since the protocol, pads and the reprog algorithm itself have changed with the ECU, in Therefore, it is necessary to have an additional module for the programmer. Diagnostics of ECU data is already available, since all major companies have taken care of their customers and have released software updates.
HOW TO CHECK
Turn on the ignition and press the brake pedal, the brake lights should light up. After releasing the pedal they should go out. If the lamps do not light up, check the brake pedal sensor and the voltage supply from the battery to the wiring harness block.
(Largus, Vesta, XRAY) Move the rod lock to the right position using a screwdriver. We check the brake pedal sensor using a multimeter in ohmmeter mode. Circuit 3-4 should be closed (resistance value is close to zero), and circuit 1-2 should be open (resistance should tend to infinity). After pressing the rod, circuit 3-4 should open, and circuit 1-2 should close. Before installation, move the rod to the left position.
(Priora, Kalina, Granta, Niva 4x4) Circuit 1-4 should be closed, and circuit 2-3 should be open. After pressing the rod, circuit 2-3 will close, and circuit 1-4 will open.
Thus, the cause of error P0504 may be:
Removal and installation
Replacing the brake pedal sensor on Kalina is carried out using an adjustable wrench set to “19”. The sensor itself is located above the brake pedal under the steering column. Conventionally, the removal stages can be divided into 5 steps:
- Before starting electrical work, it is recommended to disconnect the negative wire (terminal) from the battery.
- Then you need to move into the car interior on the driver’s side. For ease of operation, it is advisable to move the driver's seat in the opposite direction from the dashboard.
- Find the location of the sensor. Find a contact chip with wires. Press and hold the 2 plastic fasteners located on both sides of the chip. Pull the connector out of the sensor connector.
- Take the wrench in your hands and loosen the fastening nut. After which the sensor can be unscrewed freely.
- The installation process is similar to the removal procedure, except that you will need to make adjustments (tuning), the process of which is described in detail in the previous section.
Adjusting the brake pedal sensor in Grant
The sensor is attached to the bracket with 2 nuts screwed onto a plastic housing. Thus, the upper nut fixes the position of the sensor according to the pedal. The nominal space between the pedal and the heel of the sensor is 2-3 mm when the pedal is released.
Meanwhile, if there is no gap, the sensor is able to give a signal at the slightest touch of the pedal, which actually leads to the P0504 code lighting up, as well as the activation of the Check Engine warning light. In turn, after a basic adjustment of the gap using 2 keys, you need to start the car and look for errors. The value of P0504 will not be reset instantly, however, if the problem is still in the adjustment, therefore, the error code will disappear after 10-15 minutes with the engine turned on without load. If such measures do not produce results, it is worth looking for a reason elsewhere.
Broken brake pedal sensor
One of the possible factors for error P0504 to appear in a car is a breakdown or defect of the pedal end switch itself. It is worth noting that the quality of AvtoVAZ consumables has always suffered, and this is the case now. Even Russian sensors are mostly equipped with fairly cheap springs and contacts made in China. The result is that the springs fail and the contacts usually burn out after 5-8 thousand miles.
Due to the spring, the regulator rod does not return to its original position, therefore, the system receives a notification that the brake pedal is pressed. In this situation, the ECU reads that both the brake and gas pedals are pressed together. Therefore, the throttle valve is forced to close.
In many cases, replacing the pedal adjuster on the Grant solves the problem associated with fault 0504. However, it happens that a working sensor refuses to work after installation, and then it is necessary to consider other possible causes.
Causes of sensor malfunction and their symptoms
In most cases, the above error occurs because the sensor (frog) has not been adjusted properly. It is for this reason that the car owner notes the emergence of such problems as:
- instability of the engine: it starts poorly or stalls immediately;
- instability of speed.
The sensor combines two functions: it is both an element of the brake pedal position and a brake light switch. Most often, the malfunction is caused by the sensor misalignment already mentioned above, or by a broken spring. The problem that has arisen manifests itself by the “check” icon lighting up and error P0504 (implying a mismatch in the operation of this part).
So, we found out that error P0504 on Grants is caused by:
- malfunction of the part itself or its wiring;
- the element has not been adjusted properly;
- The ECM may need to be reprogrammed.
New Lada: Will 185/65R14 tires fit the Lada Kalina?
If problems occur, you can repair the sensor yourself by changing the spring, or change the element itself.