Reasons why the Priora 16 valve engine is tripping. Nothing new
- Supply system;
- Ignition;
- Sensors
- The most common cause of 16 valves on a Priora is damage to the injector winding. You can check this by removing the cover and manifold. Then measure the resistance on the injector winding; it should be within 15-15 Ohms. If it is faulty, it should be replaced. Read more about how to do this in the article “How to check an injector nozzle”;
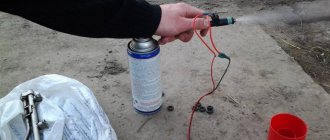
- Another reason is a clogged injector. This usually happens when using low-quality fuel. You can also “clog” these engine elements yourself by pouring various cleaners into the tank. They partially destroy sediments. Which, in the form of a suspension, enter the injector, where they get stuck in the nozzles. To fix the problem, you need to flush the injectors. You can do this yourself without removing them from the engine.
- First, let's visually evaluate the candle. It should be brown-sand color. If it is darker, then it may be faulty. It is advisable to check it on a special stand. The spark should be blue and white. If it is yellow or red, then this is a bad sign. You can, of course, try to clean it with sandpaper, but this may not bring the desired effect;
- Try using another spark plug and check how the engine runs. If everything returns to normal, then the cause has been found. Also check the high voltage wire;
- After this, check the ignition coil. It is the weakest ignition part in the Priora. To check, we reset errors from the ECU. And with the ignition off, they swap the supposedly non-working ignition coil with the obviously working one. The engine starts for a couple of minutes. The diagnosis is repeated. If the flash miss “migrated” along with the coil, the problem is in it. Replace it with a new one.
AutoFlit.ru
Checking Lada Priora injectors
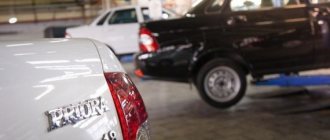
As mentioned above, both the fuel system ECU and the injector itself can fail. To carry out a complete diagnosis of the ECU, special software is required, which the average motorist simply does not have. Therefore, the only option is to diagnose the machine at a service center. The program, connected to special equipment, will quickly detect ECU errors and correct them.
A full check of Priora injectors is possible only on a special stand
And if problems arise in the mechanical part of the injector, then the diagnostic program will be useless. The maximum that it can do is indicate which cylinder is not working correctly. After this, the car owner can only replace the failed injector on the specified cylinder, since these devices cannot be repaired.
In order to clean the injectors in VAZ 2114/2115 cars, it is recommended that you familiarize yourself with this material:
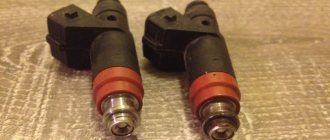
Siemens Deka injectors
Lada Priora Station wagon quartz from Morsha Logbook Replacing the heater fan on a Priora without air conditioning
There is no certainty with Siemens injectors, since the plant can install injectors of different markings on the same engine. However, there is a clear difference between the injectors for eight-valve and 16-valve engines.
In the first case, the nozzle
single-flare, in the second - double-flare, that is, it sprays fuel onto each of the intake valves separately.
They are marked as VAZ20734 (orange markings) and 20735 (blue markings). On eight-valve engines, a Siemens 6393 nozzle with a thick torch can be used. Its productivity is 1.662 mg/sec, and the operating pressure is 3 atm. Each of these injectors can be installed on a VAZ-2114 engine.
This video was processed in YouTube Video Editor ()
Injector works perfectly
Perfect combustion of fuel can only be achieved if the injector is fully operational. Translated from English, it is called a motor pump.
To understand how to properly clean, you need to know the operating principles of the mechanism itself. This part is based on one or two channels. The first will receive the sprayed liquid, the second will receive the same steam or gas, which will spray the first liquid. The torch will burn continuously and evenly if the nozzle is of high quality and clean. In gasoline engines like the Lada Priora, an electromagnetic injector is usually used. It is a simple device that operates using an electronic control unit - at the right time it is required to supply voltage to the valve excitation winding. Thus, an electromagnetic field will be created: it will retract the valve with the needle and release the nozzle. The fuel will inject, the voltage will disappear and the needle will return to the seat.
When to change: self-diagnosis
Lada Priora Sedan 16kl Kvartsukha Logbook REPLACING THE FUEL FILTER
The fuel system of an injection engine has a fairly extensive architecture and faults can only be identified after an accurate diagnosis of each of the system elements. For example, a drop in engine power may be the result of either a malfunction of the injectors, insufficient performance of the fuel pump or a clogged fuel filter.
In addition, jerks and dips, unstable idle and difficult starting, increased consumption, can occur when the injector is simply clogged.
You can check the injectors themselves directly on the engine without removing them. To do this, just start the engine and remove the wires from the connector one by one. If the stability of the engine changes in this case, the engine begins to trip, then the injector
in order. If, when removing the wires from the connector, the stability of the motor does not change, the injector needs to be cleaned or replaced.
How to remove injectors on a Priora with air conditioning
Removing and installing Lada Priora injectors
- Signs of injector failure may include:
- – difficult engine starting;
- – unstable engine operation;
- – the engine stalls at idle;
- – reduced crankshaft speed of the VAZ 2171 at idle;
- – the engine does not develop full power, insufficient engine response;
- – failures in engine operation when driving;
- – increased fuel consumption;
- – increased content of CH in the exhaust gases.
You will need: a 5-point hex key, a flat-blade screwdriver, a 17-point key (two), an autotester.
1. Disconnect the connecting block of the injector wiring harness and the engine harness by pressing the lock.
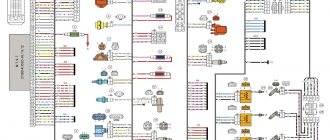
2. Carry out an initial check of the injector windings of the VAZ 2172. To do this, connect an ohmmeter to the contacts of the pads one by one.
The block has five contacts: four for supplying a control signal to the injectors and one common “+12 V” (a crimson wire with a black stripe is connected to it).
3. In turn, connect the four control contacts to the common contact and measure the resistance in each case. It should be 11–15 ohms. If during one or more measurements the resistance value differs from the specified one, the Lada Priora injectors being tested or their wiring harness may be faulty.
4. For a more accurate check and replacement of injectors, remove the fuel rail from the Priora fret (see “Removing and installing the fuel rail”).
5. Use a screwdriver to pry off the spring retainer of the injector...
Removing injectors on Priora (Lada 2170, VAZ 2112)
Thank you so much for watching my videos, tell your friends, leave comments and subscribe...
Replacing injectors (full technology)
Lada Priora Station Wagon Logbook Towbar and roof rack
Before replacing injectors on a VAZ-2114 of any generation, it is necessary to relieve the pressure in the power system.
To do this, remove the rear seat cushion, open the hatch and remove the contact block from the fuel pump. Now it is de-energized and will not build up pressure.
We start the engine and wait a few minutes until all the fuel in the system is used up. As a matter of fact, I’m interested in which spark plugs are best for Lanos 1.5, I take spark plugs seriously. The car drives every day, 5 thousand a month, so I want it to always start with a half turn and. The pressure has been relieved, now you can safely remove the old injectors and replace them with new ones. We proceed according to the following algorithm:
- We de-energize the car by removing the negative terminal from the battery.
Disconnect the negative terminal from the battery
Remove the hose from the pressure regulator
Disconnect the electrical connector of the throttle position sensor
Disconnect the connector from the idle air regulator
Disconnect the connector block from the injector wires
Unscrew the fuel rail mounting bolts
We dismantle the fuel rail with injectors
Squeeze the spring clip and disconnect the electrical connector of the injector.
Rock the injector and remove it from the fuel rail.
Installation of injectors is carried out in the reverse order. Before installation, it is advisable to check the integrity of the O-rings; if they have lost their elasticity, it is better to replace them with new ones. The injectors are installed and ready for further use. Good luck to everyone!
Replacing injectors without removing the receiver - Community "Lada Priora (Lada Priora Club)" on DRIVE2
Hi all! I hope the information will be useful to someone :) There is also an opinion that it is necessary to remove the injectors and wash the receiver, or that it does not take so long to remove it and so as not to suffer, it is better to remove it. This option is for those who do not want to do this for some reason :) — My story: the mileage was approaching 160 thousand, and I washed the injectors for the last time at about 60,000 km, I wondered about the next wash, but I saw information on the Internet that in theory it was advisable to replace the injectors at 100,000 km. And then I remembered that they fitted me with a fuel rail from the same engine, albeit with a mileage of 20 thousand, and it was Siemens, while I had Bosch from the factory. But as far as we know they are interchangeable. So the question immediately disappeared, the injectors were removed and washed, and the question of installation arose. There is a myth circulating at STOs that removing the ramp without removing the receiver is not realistic. But this is just a myth)) and I decided to check it.
It's actually simple:
0. Remove the block from the fuel pump under the rear seat and start the car until it stalls. This will remove pressure from the fuel system.1. Remove the air filter2. Unscrew the vent and bend it to the side3. We unscrew the dipstick (but do not remove it, it will be difficult to insert) 4. Disconnect the injector cable 5. Unscrew the ramp6. We carefully pull it towards ourselves (it came out without any problems) 7. We pull out the first injector from the ramp in place, and turn the rest with their tail to the right.8. Carefully pull out the ramp to the right (I did it in about a minute and a half)9. We install new ones or our own washed ones, making sure to replace the rings with new ones10. ! Inspect the braid for damage to the wire insulation; my wires have become stiff and the insulation has burst. I had to take a new one11. In order not to stain our clean injectors, it is advisable to stop by a car wash before this procedure and ask them to thoroughly rinse that area, or make do with a bottle of carburetor cleaner and then blow everything out of the compressor (as I did)12. We put everything back together in reverse order. With the new scythe it was more difficult, since I had to carefully press down the wires so that everything lay neatly and did not interfere with the ramp getting into place. The process took about 5-10 minutes. We start it up and check for leaks. If it doesn’t run from nowhere, we rejoice at the result