Location, principle of operation and design of the pump
The standard VAZ 2106 oil pump, the price of which is quite reasonable, is a product with a gear pair and a shaft installed in the internal cavity of the crankcase pan. This device is held on the cylinder block by 2 fasteners. The drive type gear is rigidly mounted on the shaft, and the driven element, pressed into the body of the product, rotates on the console in free mode.
An oil receiver pipe with a filter mesh and a pressure-reducing valve built into the part is attached to the pump body. An automobile oil pump operates on the following principle: it sucks in engine lubricant and directs it through an oil line running inside the wall of the cylinder block to the oil purification filter. At the exit from the cleaning filter, the aggregate oil spreads further through the main channels and is supplied to lubricate the main and 2 bearings of the vehicle oil pump drive shaft installed on its axle.
It is necessary to install only parts on the “six” that, according to the nomenclature code, correspond to the catalog numbers of the products installed on the vehicle. Thus, the VAZ 2106 oil pump differs from the same products that are mounted on other versions of Volzhsky Automobile Plant cars. They differ from similar parts, for example, in the geometry of the oil intake device, which is adapted to the configuration of the oil pan.
When comparing the design of the VAZ oil pump of the sixth series with analogues for other versions of the VAZ, you can see differences in the linear dimensions of the shaft with splines and gear. If it is necessary to replace the pump due to the mileage between operations, or due to a sharp drop in engine lubricant pressure, then you need to select parts with the designation 2101.
Principle of operation
The oil pump operates under the influence of the crankshaft. The drive gear transmits rotation to the driven gear, thereby creating different pressures (increased at the output of the device, and decreased at the input). From the crankcase cavity, oil enters the pump through the oil receiver, and then directly into the engine (into its oil line).
Operating principle of the oil pump
If the pressure inside the device reaches the maximum permissible values, then the excess oil is drained back into the oil pan. This is ensured by a pressure reducing valve. If the pump elements malfunction, the rubbing parts of the engine will not receive the required amount of lubricant, which will lead to their premature wear.
Types of Oil Pump Designs
Removing and installing the oil pump
The oil pump is removed for replacement when its supply decreases, causing a constant drop in oil pressure in the engine lubrication system, as well as when oil leaks through the sealing surfaces of the pump housing and cylinder block.
Spare parts only supply the pump assembly, so this section only covers pump removal and installation. The work is shown using the example of the A16 XER engine; on other engines the pump is removed using almost similar techniques.
Repairing an oil pump requires a set of new spare parts, which are not available separately at retail. Therefore, if the pump fails, replace it as an assembly or contact a specialized service for repair.
You will need: all the tools necessary to remove the accessory drive belts and timing gear, the right power unit suspension mount, as well as a TORX T30 wrench and a TORX E12 socket.
1. Disconnect the wire from the negative terminal of the battery.
2. Drain the cooling system (see Replacing the coolant).
3. Remove the accessory drive belt (see Replacing the accessory drive belt).
4. Remove the right power unit suspension mount...
5. ...and the bracket for attaching it to the engine (see Replacing the power unit suspension mounts).
6. Remove the crankshaft pulley...
7. ... auxiliary drive belt tension roller...
8. ...and the lower timing cover (see Replacing the timing belt).
9. Remove the intermediate roller of the timing belt by unscrewing the bolt securing it...
10. ...timing belt...
WARNING
After removing the timing belt, do not rotate the crankshaft and camshafts, as the pistons may damage the valves.
11. ...and the tension roller of the timing belt by unscrewing the bolt securing it (see Replacing the timing belt).
12. Remove the timing pulley from the crankshaft shank.
13. Remove the two bolts securing the water distribution pipe to the water pump.
NOTE
For clarity, the catcollector has been removed.
WARNING
The flange of the water distribution pipe is sealed with a rubber ring. Replace this ring every time the connection is disassembled.
14. Remove the three bolts securing the oil sump to the oil pump...
15. ...nine bolts securing the oil pump to the engine cylinder block...
NOTES
Please note: the oil pump mounting bolts vary in length (bolts A are short, bolts B are long). For clarity, shown with the engine removed
16. ...and remove the oil pump assembly with the water pump.
NOTE
For clarity, shown with the engine removed.
17. Remove the sealing gasket installed under the oil pump housing flange.
NOTE
Replace the oil pump gasket with a new one each time you disassemble the connection, since the old gasket may not ensure a tight connection when reinstalled.
HELPFUL ADVICE
Whenever you remove the pump, replace the crankshaft front oil seal (see Replacing Crankshaft Oil Seals).
18. Install the pump in the reverse order of removal and tighten its mounting bolts evenly crosswise to a torque of 20 N·m (2.0 kgf·m).
19. Install all previously removed parts and fill with coolant (see Replacing the coolant).
HELPFUL ADVICE
When installing a new oil pump, we recommend replacing the oil filter element.
How to adjust the pressure?
In order to regulate the pressure created by the pump in the lines, it is necessary to perform the following manipulations:
- Make sure that the engine oil is of high quality and the level is normal.
- Make sure the drain plug is tight and no oil is leaking through it.
- Check the VAZ-2106 oil pump drive.
- Check the pump operation. Please note that the gasket often fails, but it is easy to replace.
- Check the tightness of all pump bolts.
- It is recommended to install a new filter every time you change the oil. And pay attention to the degree of contamination of the old one.
Now you can configure the pressure relief valve so that it operates at a certain pressure. The hoses through which oil enters the system must be sealed.
Repair
If you have the desire and time, you can repair the unit, because this is not a VAZ pump, which cannot be restored. There is nothing complicated in such work. For repairs you need a small number of tools:
- wrenches 10 (open-end, box, socket);
- ruler;
- set of probes (flat);
- vice.
Replacing the drive gear in this vehicle unit
Replacing the oil pump on a VAZ-2112 16 valves photo, video
If a red indicator lights up on your instrument panel, signaling a lack of oil pressure in the system, then do not rush to run to the store and buy a new oil pump.
The video discusses the most basic reasons why oil pressure may drop in a VAZ engine:
Replacing the oil pump
There is nothing difficult about replacing an oil pump. We drive the car into the pit, prepare the tools and get to work.
- Disconnect the battery.
Removing the battery terminal for repair - Drain the oil into the prepared container (stopper on the tray).
The plug is unscrewed with a key - We jack up the car, place it on a good stand (a stump will do just fine) and remove the right wheel.
- Remove the timing belt.
Timing belt without casing. - Remove the crankshaft pulley and key (you will need an assistant to clamp the flywheel with a screwdriver).
- Remove the crankcase cover.
Removing the pallet - We remove the oil intake itself.
- We clean the oil receiver grid (with solvent or kerosene).
- And directly remove the oil pump itself (6 bolts on the cylinder block).
The location of the 6 bolts that secure the oil pump is marked with arrows
Reassemble the oil pump in reverse order.
The pan and oil pump gaskets must be replaced with new ones. Also, the new oil pump should be washed out of preservative grease and filled with oil (to prevent it from running dry during the first start after repair).
Why is an oil pump needed?
Pump appearance
The oil pump in the engine is designed to build up pressure in the oil system, for the necessary lubricating effect of all rubbing parts of the internal combustion engine. If the pressure in the system is insufficient, the lubrication effect will be ineffective, which in turn will lead to the engine being unsuitable for operation. In this case, the low oil pressure warning light on the instrument panel should light up. Therefore, you should not delay repairing the oil pump.
You are left with two options. Take the car to a service station and lose a lot of time and money, or change the oil pump yourself.
Pump diagnostics
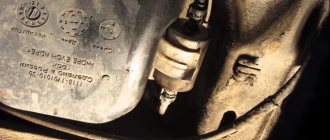
Oil pump removed for diagnostics. Symptoms: oil leak.
First, you need to make sure that the oil pressure sensor itself is working properly - check whether the sensor itself is dry or oily.
Secondly, you need to check whether power is supplied to it correctly or whether a wire is broken somewhere. And only after these procedures, if the light does not go out, will you have to change the oil pump.
Why might it break prematurely?
An oil leak from the oil pump can lead to expensive engine repairs.
Replacement of the oil pump can also be caused by poor quality oil, which will lead to rapid clogging of the oil receiver grid and subsequent lack of oil pressure in the system. It is not uncommon for an oil pump to become wet and oil to leak from underneath it. In these cases, you can get by by replacing the gasket and cleaning the oil receiver mesh.
In general, the oil pump does not bring much trouble to VAZ-2112 owners. It is designed for 120 thousand kilometers. When purchasing a new pump and spare parts for its repair, choose original spare parts. The official manufacturer of oil pumps for the VAZ-2112 is the Tolyatti Plant (TZA).
Fault diagnosis
Checking the oil pump involves a few smart steps:
- connect a pressure gauge to the lubrication system;
- observe the scale while rotating the crankshaft;
- take pressure readings.
If they are normal, and there are no complaints about increased fuel consumption, the pump is in order. On the contrary, if the pressure fluctuates, decreases or increases, the engine oil pump must be repaired or replaced.
Below are details about diagnostics using a pressure gauge:
- Raise the hood of the car.
- Assemble the pressure gauge according to the instructions - connect the scale to the hoses.
- Find the system's emergency oil pressure sensor in the engine compartment and unscrew it.
- Screw the pressure gauge into place of the sensor.
- Start the car engine.
- Watch the pressure gauge scale carefully.
the scale shows a normal value of 2.4 kgf/cm2 - Raise the engine speed by depressing the accelerator pedal. Keep an eye on the scale - the pressure level should jump to 4.5 kgf/cm2. This is the value when the valve is triggered.
- Wait for the engine to warm up thoroughly (up to 90 degrees Celsius). Some modern engines have a higher warm-up threshold - over 100°C.
- Recheck the pressure. If the oil pump malfunctions, it will drop. Emergency pressure is below 0.35-0.45 kgf/cm2. In this case, the corresponding indicator on the device lights up.
Further instructions apply to machines equipped with a distributor. The oil pump drive gear, which is located under the distributor, is checked.
This very gear must be carefully inspected for chips and burrs. If they are present, they may have appeared due to debris that has entered the system. If the splines are damaged, this will indicate regular jamming of the oil pump.
damaged splines on the gear shaft
Next, you need to check the operation of the drive by acting on it from above with a long screwdriver. Move the rod, observing the play. A large gap can be determined by eye; the rod will dangle freely - this will be irrefutable evidence that replacing the oil pump is necessary.
The optimal play is considered to be the one that forms between the rod and the body, no more than 0.1 mm
Replacing the oil pump on a VAZ 2109, 2108
The power plant of a modern car is equipped with several pumps. They can be called “hearts”, each of which pumps a specific liquid - fuel, antifreeze or oil. Today we will talk about one of them – oil. Since it is impossible to diagnose this unit without partially disassembling the motor, the condition of the pump is determined by indirect signs.
If it malfunctions, events most often unfold as follows: the oil pressure warning light lights up on the instrument panel. The car enthusiast checks its level and sees that it is normal (or adds oil if necessary), but the lamp does not even think of going out, which leads to the need to troubleshoot.
There can be many reasons why the light comes on, but most likely the oil pressure sensor is broken or something is wrong with the pump. In this article we will tell you how to correctly replace this unit on a VAZ-2109 and other cars of this family.
Where is the oil pump on the VAZ 2109
Its location is behind the crankshaft pulley. As a result of this circumstance, it will not be possible to get to it without removing some parts, in particular, the pulley itself and the oil pan. Below is a photo showing the oil pump in its seat.
When to change the oil pump
If the pump fails, the following things happen:
- The oil pressure drops, as a result of which the corresponding control light on the dashboard lights up.
- Oil consumption increases, and it constantly has to be topped up (however, this does not always happen).
How to replace the oil pump on a VAZ 2109, 2108, 21099
Tools:
Before you begin the replacement, prepare all the necessary tools. This is a set of wrenches, a set of sockets, a universal joint and an extension. If the pump is replaced with a new one, then buy the necessary spare part (its catalog number is “2108-1011010″). Also, drive the car into a hole or overpass, otherwise it will be very difficult for you to get to the pump.
Removal:
1) Remove the crankshaft position sensor. It should be noted that this is only relevant for an injection engine; if the engine is carburetor, skip this point.
2) Drain the engine oil.
3) Next, remove the timing pulley.
4) Now you can remove the oil pan. Then find the oil receiver and unscrew the bolts that secure it, and then remove it.
5) Take a socket of the required size and an extension, and use them to unscrew the 6 bolts that secure the oil pump to the engine block
Be extremely careful as there are washers under the bolts and it is very important not to lose them
6) Ideally, after step 6, the pump should be removed, but in practice this does not always happen. If this is your case, take a thicker screwdriver, insert it between the pump and the main bearing and gently wiggle it (remember, do not damage the bearing!).
7) Carefully remove the oil pump.
Installation:
1) Before you install a new unit, perform one very important procedure. You need to find the drive gear and turn it like this... (continued below)
2) So that its position coincides with the special flats located on the crankshaft.
3) Now take some engine oil and lubricate the front crankshaft oil seal (more precisely, its working edge).
4) Is the oil seal lip lubricated? Install the pump onto the crankshaft. For this you will need an ordinary pencil. It will be needed to tuck the oil seal into its place (this must be done strictly with the unsharpened end of a pencil!). After this, screw back the 6 bolts securing the oil pump, not forgetting the washers.
5) Now reassemble the remaining parts in the reverse order of removal. Archive important!
Since you will have to remove the timing belt to get to the timing pulley (and at the same time the radiator along with a number of other parts), be extremely careful with the crankshaft when changing the pump.
It must not be allowed to rotate at a significant angle, otherwise the pistons have every chance of meeting the valves, as a result of which they may become deformed, and this will lead to dire consequences.
The oil pump must be removed from the engine in the following order:
- Remove the distributor cover and turn the crankshaft to a position in which ball 2 on the flywheel (mark “MZ”) is installed against the edge of pin 1 fixed in the inspection hatch of the clutch housing, and the distributor rotor plate is directed towards the housing terminal to which the low-voltage wire is connected. voltage from the ignition coil.
- Unscrew the union nut and disconnect the vacuum tube from the fitting of the ignition distributor regulator chamber. Disconnect the low voltage wire from the terminal on the distributor body, loosen the bolt of the clamp securing the distributor in the cylinder head socket, and remove the distributor.
- Remove the oil sump.
- Unscrew the two bolts securing the pump housing flange to the bottom plane of the cylinder block and remove the pump. Installation of the oil pump into the engine is carried out in the reverse order. It must be taken into account that the oil pump drive gear must be engaged with the camshaft helical gear in a strictly defined position.
This is necessary to ensure correct mutual connection of the ignition distributor drive shaft with the pump shaft, since the position of the distributor vacuum regulator housing relative to the cylinder head casing depends on this.At the upper end of the pump drive shaft there is a shank 1, which fits into the slot of the distributor shaft. When installing the pump correctly, shank 1 should be positioned perpendicular to axis 2 of the crankshaft when the piston of the first cylinder is at idle. compression stroke. To install the pump correctly, you need to rotate its drive shaft so that shank 1 is approximately parallel to axis a, connecting the two holes attaching the pump to the cylinder block, as shown by the line.
When installing the pump in place, do not rotate its housing. When the pump drive gear engages with the camshaft gear and rotates through a certain angle, the pump shaft shank will take the correct position. When installing the pump on the engine, it is necessary to install a new paper gasket between the pump housing flange and the bottom plane of the cylinder block. After installing the oil pump and distributor, adjust the initial ignition timing and secure the distributor body in the required position using the clamp bolt. If the oil pump and initial ignition timing have been set correctly, then after fixing the distributor, its vacuum regulator will take the position shown in the figure.
- Reinstall the oil pan.
Pressure reducing valve
The design of the gears is very simple, which is why they rarely break. As a rule, the gap between the teeth simply increases and the oil is pumped worse. But much more often, the bypass valve breaks, which is necessary to control the pressure in the system. If necessary, this element increases or decreases pressure. And this is done very simply - the valve opens at high pressure and closes at low pressure.
Bypass valve design:
- The case is small in size.
- Valve (small ball that closes the oil passage).
- Spring.
- Bolt for stop.
The element is placed inside the housing of the VAZ-2106 oil pump. The price of the valve is no more than 200 rubles. And if the cause of the breakdown lies precisely in it, then it is easier to change only the valve. After all, the cost of the entire pump is about 1,500 rubles.
Eliminating oil leaks
Many models of saws experience oil pump malfunctions during their operation. The nature of these defects may vary, but ultimately this leads to an oil leak. Moreover, such leaks can appear even when the saw is in a lying position. Oil pump pf-43 on a chainsaw and its design. Why doesn't the oil pump work? This is justified by the uneven distribution of water in the storage tank.
Leaks also occur due to the fact that oil pumps for chainsaws have a fitting on their own body for attaching a hose. A loose connection between the water tank and the pump may result in oily droplets.
Such difficulties can be solved by disassembling the saw and repairing the oil pump.
The disassembly process should be approached very carefully so as not to destroy the moving parts of the pump. The following tools will also be useful for this:
In most cases, all chainsaw oil pumps consist of 2 main halves. In one half there is a working mechanism, and in the second there is a storage chamber.
The video discusses repairing a chainsaw
and its sealing in the housing. And this is a similar video.
If the pump leaks, it is necessary to replace the gasket between the two parts of the mechanism.
For repairs, you should disassemble the unit into halves, without touching the working part. There should be a gasket at the junction. Hello everyone, tell me how to remove the oil pump and replace it like in a chainsaw. In this case, if it has huge compressed areas, then the gasket needs to be changed.
If the gasket is not bad, then it should be wiped and replaced. Then the hose is checked. There should be no cracks or diaper rashes on it that will disturb its density. As a rule, when the engine operates normally at low speeds, the oil pump. If similar defects are detected, the hose must be replaced. How to change the oil pump in an alligator chainsaw at home, you will need a few tools and desire, everything is very simple, support our channel in any way you can. If the hose is not bad, then it needs to be washed, degreased and sealed.
Then all output channels are checked, in which there should be no third-party inclusions (garbage, slag, etc.). How to change the oil pump in an alligator chainsaw at home, replacing the oil pump. This debris will lead to congestion, which will create vacuum plugs. If they are detected, the channels should be cleaned. This can be done with compressed air.
Preventive measures
In order to reduce the possibility of various oil leaks while using the saw, it should be periodically serviced. During this process, it is necessary to monitor the tightness of all hoses and gaskets. How does a chainsaw oil pump work | husqvarna. If they are detected, the connecting parts should be pulled.
It is imperative to inspect the quality of the oil being poured. It must be of high quality and used in strict accordance with the features indicated in the product passport. With all this, under no circumstances can you use mining, since it has a heterogeneous structure. Also, it is imperative to do repeated purging of the oil pump. How to remove the oil pump of a Huskvarna chainsaw, kak-snyat-maslyanyiy-nasos-benzopilyi-huskvarna. This will help prevent debris from coking in its working channels.
Low quality lubricating water will worsen the quality of the tool and reduce its service life.
In addition, if the lubrication is poor, the chain may fail, replacing which will be a rather expensive procedure.
After performing sawing work, it is necessary to make sure to clean the saw from any sawdust that has fallen on it. Oil pump; Generally, the oil pump consists of two on the surface should not. During long breaks in work, the chainsaw should be hung in a vertical position. This will allow the oil water to spread moderately throughout all the channels of the instrument. Such uniform distribution will avoid vacuum plugs, which can cause oil pump malfunctions.