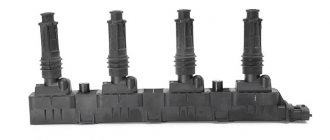
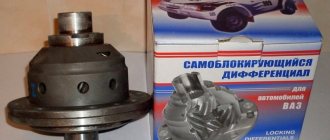
Installation of differential box VAZ-2107
Install the pre-assembled differential case into the crankcase along with the outer bearing races.
Rice. 1. Checking the preload of the differential box bearings using tool A.95688/R
Install two adjusting nuts 4 (Fig. 1) so that they come into contact with the bearing rings. Install the bearing caps and tighten the mounting bolts with a torque wrench.
Preloading the differential box bearings and adjusting the lateral clearance in the meshing of the final drive gears
These operations are performed simultaneously using the device A.95688/R and the key A.55085. Secure the device (Fig. 1) to the gearbox housing with screws 1 and 6, screwing them into the holes for the bolts securing the locking plates of the adjusting nuts.
Rice. 2. Checking the lateral clearance in the meshing of the main gear gears using tool A.95688/R
Move bracket 7 along the guide of the device until lever 5 touches the outer side surface of the cover and tighten screw 8. Loosen screws 1 and 3 (Fig. 2), and install bracket 4 so that indicator leg 2 rests on the side surface of the driven gear tooth at the edge tooth, then tighten screws 1 and 3.
By turning the adjusting nuts, pre-adjust the lateral clearance between the teeth of the drive and driven gears within the range of 0.08–0.13 mm.
The gap is checked using indicator 2 when rocking gear 6. In this case, the bearings should not have preload.
The adjusting nuts must only be in contact with the bearings, otherwise the correct preload measurement will be affected.
Rice. 3. Diagram for checking the preload of the differential box bearings
Tighten the two bearing adjusting nuts sequentially and evenly, causing the differential bearing caps to diverge and, therefore, increasing the distance “D” (Fig. 3).
This discrepancy is noted by indicator 9 (Fig. 1), on the leg of which lever 5 acts. The nuts for adjusting the bearings of the differential box are tightened until the distance “D” (Fig. 3) increases by 0.14–0.18 mm.
Having set the exact preload of the differential box bearings, finally check the lateral clearance in the meshing of the final drive gears, which should not change.
If the gap in the gear mesh is more than 0.08–0.13 mm, then move the driven gear closer to the drive gear or move it away if the gap is smaller.
To maintain the bearing preload set, move the driven gear by tightening one of the bearing adjusting nuts and loosening the other by the same angle.
To accurately perform this operation, monitor indicator 9 (Fig. 1), which shows the value of the previously set bearing preload.
After tightening one of the nuts, the indicator reading will change, as the divergence “D” (Fig. 3) of the covers and the preload of the bearings will increase.
Therefore, loosen the other nut until the indicator arrow returns to its original position. After moving the driven gear, use indicator 2 (Fig. 2) to check the amount of side clearance.
If the gap is not correct, repeat the adjustment.
Remove fixture A.95688/R, install the locking plates of the adjusting nuts and secure them with bolts and spring washers.
Spare parts are supplied with two types of locking plates: with one or two legs; the plates are installed depending on the position of the nut slot.
Adjustment and repair of gearbox components is carried out on a stand, where you can also test the gearbox for noise and check the location and shape of the contact patch on the working surfaces of the teeth, as indicated below.
Checking the contact of the working surface of the final drive gear teeth
For a final check on the stand for the quality of meshing of the main gears:
— install the adjusted gearbox on the stand and lubricate the working surfaces of the driven gear teeth with a thin layer of lead oxide;
— launch the stand; use the levers of the stand to slow down the rotation of the installed axle shafts so that under load, traces of contact with the teeth of the drive gear remain on the surfaces of the teeth of the driven gear;
- change the direction of rotation of the stand and, while braking, get contact marks on the other side of the teeth of the driven gear, which corresponds to the car moving backwards.
Engagement is considered normal if on both sides of the teeth of the driven gear the contact patch is evenly located closer to the narrow end of the tooth, occupying two-thirds of its length and not extending to the top and base of the tooth, as shown in Fig. 4 "e".
Rice. 4. Location of the contact patch in the meshing of the final drive gears
Cases of incorrect divergence of the contact patch on the working surface of the tooth are shown in Fig. 4 (a, b, c, d).
To adjust the correct position of the drive gear and replace the ring, disassembly of the unit is necessary.
When assembling, repeat all the operations for preloading the roller bearings of the drive gear, checking the moment of resistance to rotation, preloading the roller bearings of the differential box and adjusting the lateral clearance of the final drive gears.
Wheel alignment VAZ 2109
The need for wheel alignment can be easily checked.
To do this you need to do a check run. If on a flat section of the road the car constantly pulls to the left or right, then adjustments need to be made. In addition, incorrect wheel installation will lead to rapid tire wear. Before work, it is necessary to check the integrity of the chassis parts: absence of deformation, destruction of silent blocks. There must be the required air pressure in the tires, free play in the steering wheel, and free play in the front wheel hub bearings. In order to check and adjust all this, a VAZ 2109 wheel alignment is performed, for which the car is driven onto a special stand. First, the longitudinal inclination of the axle is checked, then the camber of the wheels, and only lastly is the toe adjusted. The axle tilt is adjusted by changing the number of adjusting washers that are installed at the ends of the suspension braces. To increase the caster angle, you need to reduce the number of adjusting washers in the front or rear, and vice versa, if you need to reduce the angle, you need to increase the number of washers. But they can only be added at the back of the extension; usually the short thread does not allow this to be done at the front. It is worth noting that the number of washers should not be more than 2 in front and 4 in back. The VAZ 2109 camber is adjusted by changing the angle of attachment of the telescopic strut on the steering knuckle. To carry out the work, you need to loosen the fastening nuts and turn the upper adjusting bolt. After installing the required camber, you need to tighten the nuts. If the toe does not correspond to the norm, then adjustment is made. The tie rod tie bolt is unscrewed and the required toe-in is established by rotating the rod. It is necessary to ensure that the planes of the ball joint and the swing arm are parallel. If everything is in order, then you can tighten the coupling bolts. It is recommended that wheel alignment work be carried out in specialized auto repair shops. But if desired, this work can be done in a garage. The main thing is to have a flat surface. Next, all adjustment work is carried out. The correct installation of the wheels can be checked by eye. To do this, tie a weight to a thread and hang it on the wing. If the wheel is parallel to the thread, it means the adjustment was correct. Troubleshooting a vehicle's fuel system || Foreign car gearbox repair
Related posts:
Computer wheel alignment
Purpose and principle of operation of the gearbox
The rear gearbox of the “seven” is a transmission link between the axles of the rear wheels and the engine. Its purpose is to transmit torque from the engine crankshaft to the rear wheels while simultaneously converting the rotation speed of the axle shafts.
In addition, the gearbox must be able to distribute torque depending on the load applied to the left or right wheel.
Principle of operation
Here are the main stages of transmitting torque from the motor to the gearbox:
- the driver starts the engine and the crankshaft begins to rotate;
- from the crankshaft, torque is transmitted to the car’s clutch discs, and then goes to the input shaft of the gearbox;
- when the driver selects the desired gear, the torque in the gearbox is transferred to the secondary shaft of the selected gear, and from there to the driveshaft connected to the gearbox with a special crosspiece;
- the cardan is connected to the rear axle gearbox (since the rear axle is located far from the engine, the “seven” cardan is a long rotating pipe with crosses at the ends). Under the action of the cardan, the main gear shaft begins to rotate;
- rotating, the gearbox distributes torque between the axle shafts of the rear wheels, as a result the rear wheels begin to rotate.
Rear axle device
The design of the rear axle of the VAZ 2101 consists of two main elements: a beam and a gearbox. These two nodes are combined into one mechanism, but they perform different functions.
The bridge consists of two main components: a beam and a gearbox
What is a beam
The beam is a structure of two stockings (casings) rigidly connected by welding. Flanges are welded into the ends of each of them, designed to accommodate semi-axial oil seals and bearings. The ends of the flanges have four holes for installing brake shields, oil deflectors and plates that press the bearings.
The middle part of the rear beam has an extension in which the gearbox is located. In front of this extension there is an opening closed by the crankcase.
The rear beam consists of two interconnected hollow stockings
Half shafts
The machine's axle shafts are installed in stockings. At the inner ends of each of them there are splines with which they are connected to the semi-axial gears of the gearbox. Their uniform rotation is ensured by ball bearings. The outer ends are equipped with flanges for mounting the brake drums and rear wheels.
Axle shafts transmit torque from the gearbox to the wheels
Gearbox
The gearbox design consists of a main gear and a differential. The role of the device is to evenly distribute and redirect the force from the driveshaft to the axle shafts.
The gearbox design includes the main gear and differential
main gear
The main transmission mechanism includes two bevel gears: drive and driven. They are equipped with spiral teeth that ensure they are connected at right angles. Such a connection is called hypoid. This design of the main gear can significantly improve the grinding and running-in process of gears. In addition, maximum noiselessness is achieved during gear operation.
The main transmission gears of the VAZ 2101 have a certain number of teeth. The drive has 10, and the driven has 43. The ratio of the number of their teeth determines the gear ratio (43:10 = 4.3).
The main gear consists of drive and driven gears
The driving and driven gears are selected in pairs on special machines in the factory. For this reason, they are also sold in pairs. In case of gearbox repair, replacement of gears is allowed only as a set.
Differential
The center differential is necessary to ensure that the wheels of the vehicle rotate at different speeds depending on the load on them. The rear wheels of a car do not travel the same distance when turning or overcoming obstacles in the form of holes, potholes, or ledges. And if they were rigidly connected to the gearbox, this would lead to constant slippage, causing rapid tire wear, additional stress on transmission parts, and loss of contact with the road surface. The listed problems are solved using a differential. It makes the wheels independent of each other, thereby allowing the car to freely turn or overcome various obstacles.
The differential allows the rear wheels to rotate at different speeds when the car overcomes obstacles
The differential consists of two side gears, two satellite gears, adjusting washers and a cast iron box that acts as a housing. The axle shafts fit into the axle gears with their splines. The latter rest on the internal surfaces of the box using adjusting washers of a certain thickness. They do not contact each other directly, but through satellites that do not have a rigid fixation inside the box. While the car is moving, they move freely around their axis, but are limited by the surface of the driven gear, which prevents the axis of the satellites from moving from the mounting sockets.
The differential housing with the mechanism is installed inside the gearbox on roller bearings pressed onto the housing support journals.
Design and technical characteristics of the gearbox
The rear gearbox of the VAZ 2107 car consists of a massive steel casing with a shank, a driveshaft flange, two main gears mounted at right angles to each other and a self-locking differential.
Rear gear ratio
The main characteristic of any gear transmission is its gear ratio. It is the ratio of the number of teeth on the driven gear to the number of teeth on the drive gear. The driven gear of the VAZ 2107 rear gearbox has 43 teeth. And the drive gear has 11 teeth. Dividing 43 by 11 we get 3.9. This is the gear ratio on the VAZ 2107 gearbox.
Hypoid transmission and the magic of VAZ gearbox numbers
Technologically, it is easiest to transfer rotation from one bevel gear to another when they are on the same axis. But in the gearboxes of rear-wheel drive cars, a gear with axles shifted by 31.8 mm is used. This complication of the design is caused by the fact that, along with the transverse slipping of the teeth, the hypoid gear causes the teeth to slip longitudinally.
The photo shows the rear axle gearbox of a VAZ 2106, the cost of which is 6-7 thousand rubles
And this, in turn, gave the following advantages:
- long gear life;
- quiet operation;
- quick grinding of teeth;
- increased ground clearance.
If both main gears are severely worn or damaged, replace them only in pairs. The fact is that in preparation for sending ready-made sets of spare parts, pairs are selected using special precision equipment, taking into account the tolerance, the correction of which is applied to the drive gear shaft. On the driven gear you can read all the necessary information about the gearbox model - gear ratio (on the VAZ 2106 it is 11/43), model 2106, serial number and production date.
In principle, one of four sets of final drive gears can be installed in the gearbox of any Zhiguli model. They differ only in the number of teeth, and this dictates the gear ratio. There is no need to say what importance this parameter has when choosing a gearbox. It affects both the maximum speed of the car and the implementation of engine torque. As garage tuners say, “it either pulls better or goes faster.” In some ways they are right.
However, as we have already mentioned, there are only four options for final drive pairs:
- VAZ 2101 - 43/10 with a gear ratio of 4.3;
- VAZ 2102 - 40/9, the most high-torque gearbox with a gear ratio of 4.44;
- VAZ 2103 - 41/10, this is the most popular medium balanced version of the gear ratio - 4.1;
- VAZ 2106 - 43/11, is the fastest gearbox, especially when paired with a five-speed gearbox, and its number is 3.9.
This set gives classic car owners unlimited possibilities to customize the car's dynamic characteristics. No “tuning” can change the dynamics of a classic as much as a rear axle gearbox.
So, for certain purposes you can buy a specific gearbox, which will change the maximum speed of the car, acceleration dynamics, fuel consumption, and traction force. The most “cargo” gearbox from 2102, pennies in a station wagon. Its maximum speed is low, about 145 km/h, but the car confidently drags quite serious loads and trailers without overloading the engine. The limit needs to be known, but the fact remains a fact. If you need a small tractor in the back of a Zhiguli, there is a 2102 gearbox with a gear ratio of 4.44 and a number of teeth of 40/9. This gearbox has become a rarity, but if you wish, you can find the main pair both new and used. The other extreme is the gearbox of the VAZ 2106. It will give the car a high maximum speed, but it will not take off from a standstill, because the traction force as a result is less than that of a two.
Typical gearbox failures and their causes
The rear gearbox of the VAZ 2107 is a reliable device that is very resistant to mechanical wear. However, over time, parts gradually wear out even in the gearbox. And then the driver begins to hear a characteristic crunch or howl heard in the area of the rear axle or in the area of one of the rear wheels. Here's why this happens:
- one of the wheels jammed because one of the rear axle shafts was deformed. This happens extremely rarely, usually after a strong blow to one of the wheels. In this case, the axle shaft is so deformed that the wheel cannot rotate normally. If the deformation is insignificant, the wheel will rotate, but when rotating, a characteristic howl will be heard coming from behind the damaged wheel. It is not possible to fix such a breakdown on your own . To straighten the axle shaft, the driver will have to contact specialists;
- crunching sound in the gearbox when the car is moving. This is a more common problem that every driver of an old “seven” will face sooner or later. The gearbox begins to crunch after several teeth and splines on the axle shafts wear out in the main gear. If the wear is very severe, the teeth may break. This happens both due to metal fatigue and due to poor lubrication of the gearbox (this is the most likely reason, since the lubricant in the “seven” gearbox often escapes through the breather and through the shank flange, which have never been leak-tight). In any case, such a breakdown cannot be repaired, and gears with broken teeth will have to be replaced;
- bearing wear on the axle shaft. This is another reason for the characteristic grinding noise behind the wheel. If the bearing has collapsed, then you cannot drive such a car, since the wheel may simply fall off while driving. The only solution is to call a tow truck and then replace the worn bearing. You can do this either on your own or at a service center.
About gearbox adjustment
If the driver finds out that the main pair of gears in the rear axle is completely worn out, he will have to change this pair. But you won’t be able to simply change the gears, since there are gaps between the gear teeth that will have to be adjusted. Here's how it's done:
- a special adjusting washer is installed under the drive gear (they are sold in sets, and the thickness of such washers varies from 2.5 to 3.7 mm);
- an adjusting sleeve is installed in the gearbox shank (these sleeves are also sold in sets; you can find them in any spare parts store);
- the washer and bushing must be selected so that the shaft on which the drive gear of the gearbox is mounted rotates without play when turned by hand. After the desired bushing has been selected, the nut on the shank is tightened;
Device
In order for the car to move, it is necessary to transfer the rotation of the engine to the wheels. But the engine speed is too high, and in order to correctly distribute the torque, a mechanism is needed that changes the gear ratio. Due to the gearbox and different engine speeds, the speed of movement changes, and the main pair of the rear axle takes over the rotation and transmits it to the wheels through gears.
- flange, it is fixed on the drive gear (shank) of the RZM, and is an intermediate link between the driveshaft and this gear;
- the shank of the main pair, at one end of which there are splines for pressing the flange, at the other end there is a bevel gear with a small number of teeth;
- driven gear (planet gear), it is in mesh with the drive gear, and it is with it that it forms the main gear;
- center differential, allowing the rear wheels to spin at different angular speeds.
The differential design is very simple - the mechanism consists of two axle gears, two satellites and a satellite pin. From the gearbox, the movement is transmitted to the axle shafts, on which the wheels are mounted.
How to remove the rear axle gearbox of a VAZ 2107
The car owner can disassemble the gearbox and replace everything necessary in it (or change the entire gearbox) independently, thus saving about 1,500 rubles (about the cost of this service at a car service center). Here's what you'll need to get started:
- a set of socket heads and a long wrench;
- set of open-end wrenches;
- set of spanners;
- puller for rear axle shafts;
- flat blade screwdriver.
Sequence of work
Before starting work, the oil must be drained from the rear gearbox. To do this, just unscrew the plug on the rear axle housing, after placing some container under it.
- The car is installed on the pit. The rear wheels are lifted using jacks and removed. The front wheels must be securely fixed.
- After removing the wheels, unscrew all the nuts on the brake drums and remove their covers. Access to the brake pads is provided.
Video: disassembling the rear axle on a “classic”
Disassembling the gearbox and replacing satellites
The satellites are additional gears installed in the differential gearbox. Their purpose is to transmit torque to the axle shafts of the rear wheels. Like any other part, pinion gears are subject to wear. After this, they will have to be changed, since this part cannot be repaired. To restore worn teeth, the car owner has neither the necessary skills nor the necessary equipment. In addition, any gear in a car undergoes a special heat treatment - carburization, which is carried out in a nitrogen atmosphere and strengthens the surface of the teeth to a certain depth, saturating this surface with carbon. An ordinary car enthusiast cannot do anything like this in his garage. Therefore, there is only one solution: purchase a repair kit for the rear axle gearbox. It costs about 1500 rubles. Here's what it includes:
- a pair of gears for axle shafts;
- a pair of satellites for the differential;
- satellite axis;
- support washer.
In addition to the repair kit for gearboxes, you will also need a set of regular open-end wrenches, a screwdriver and a hammer.
Sequence of operations
To disassemble the gearbox, it is best to use a regular bench vice. Then the work will go much faster.
- The gearbox removed from the machine is clamped in a vice in a vertical position.
- A pair of adjusting locking bolts are unscrewed from it, under which the locking plates are located.
So, an ordinary car owner is quite capable of removing the gearbox from the rear axle of the “Seven”, disassembling it and replacing its worn parts. There is nothing complicated about this. Certain difficulties may arise only at the stage of adjusting the new gearbox. But you can also deal with them by carefully reading the above recommendations.
Signs of a malfunction of the rear axle gearbox of the VAZ 2107
The gearbox is a fairly expensive part, and its repair is a labor-intensive and complex process. Therefore, you should first make sure that the cause of the noise is a gearbox malfunction. You can do this as follows:
- Choose a flat section of the road and gradually accelerate on it from 20 to 90 km/h. While driving, you should listen carefully and note the appearance and disappearance of extraneous noise from the rear axle gearbox.
- Release the gas and start braking with the engine. While the speed is decreasing, you should also note the moments when noises appear and disappear.
- Accelerate the car to approximately 100 km/h and, switching to neutral, turn off the engine. While the car is coasting, note the presence and disappearance of noise.
To verify the presence or absence of a mono problem like this:
- Park the car, securing it with wheel chocks.
- Raise it with a jack, hanging the rear axle.
- Start the engine, turn on the speed and add gas so that the wheels rotate without load, and the speedometer shows the same speed as during tests on the move.
If the noise remains the same when operating without load as under load, the problem is not in the gearbox. Other rear-wheel drive components should be checked.
If the gearbox does not make noise without load, you will have to start restoring it. Worn gears begin to make noise only under load.
Removing the rear axle gearbox of VAZ 2107
Before removing the gearbox, it is necessary to drain the transmission oil that is poured into the rear axle of the VAZ 2107. To do this, place an oil container under the drain hole of the axle and unscrew the drain plug.
Important: after repair, new transmission oil should be poured into the gearbox.
The next procedure is as follows:
- Unscrew the bolts securing the cardan to the gearbox flange;
- Uncouple the rear part of the cardan and lower it down;
- jack up the car (if it is not on a lift) and remove the rear wheels;
- Unscrew the guide screws of the brake drums;
- remove the brake drums;
- unscrew the 4 bolts securing the axle shafts;
- pull out the axle shafts, freeing the gearbox;
- unscrew the 8 gearbox mounting bolts;
- remove the gearbox.
Checking the serviceability of the shank oil seal
The first sign that it is necessary to replace the shank oil seal on a VAZ 2107 is the presence of traces of lubricant, dust and dirt on the outer part of the rear axle. Determining the presence of leaks on the rear axle is not difficult. To do this, you need to climb under the car and inspect the bridge.
If the oil seal is worn significantly, a puddle of oil may be found under the car. If the problem is not resolved in a timely manner, oil may leak out of the bridge, which will lead to its rapid breakdown. Despite the fact that the cuff is a small part in a car, its serviceability plays a very important role.
Repair and adjustment of the VAZ 2107 gearbox
Adjusting and repairing the gearbox requires some skills and careful adherence to technology. It is also necessary to have pullers, stands and special tools. If the above is not the case, you should entrust the work to professionals.
If your qualifications are insufficient, it is better not to start working with the gearbox. Assembly and adjustment work requires fairly high metalworking skills. It is not difficult to disassemble the VAZ 2107 axle, but this is one of the few components of the “Seven” that requires highly qualified maintenance. It is not worth saving on these works.
Disassembling the gearbox is performed in the following sequence:
- unscrew the shank nut;
- remove the flange and remove the drive gear and adjusting rings;
- remove the oil seal, oil deflector, inner ring of the bearing;
- press out the outer rings of the bearings with a puller;
- disassemble the drive gear with the differential (the spacer sleeve in this case must be replaced).
When disassembling the gearbox, it is necessary to put marks on the bearing caps in order to then install them in their original position. To do this, you can use a core (which is more reliable) or a pencil. Marks must be placed on the covers and on the body, so that later during assembly they can be aligned. You should also mark the left and right covers so as not to confuse them.
This can be done this way: on the covers, in addition to the marks opposite the marks on the body, apply numbers or letters with a pencil. The disadvantage of this method is that the marks will be erased when you clean the lid. Therefore, it is safer to simply make marks with a core. For example, one on the left cover and two on the right.
The inner rings with the separator are removed using a hammer and drift. You need to knock out the rings by lightly tapping them in different places. If you hit only one place, you won’t be able to pull out the ring.
Typically repairs consist of replacing bearings or the main pair. These parts most often fail.
The main pair is available in several variations and determines the gear ratio. The higher the gear ratio, the greater the traction; the lower, the higher the maximum speed of the machine. There are three standard versions of the main pair, used on different VAZ models.
Determination methods
Rear axle VAZ 2107: features of operation and maintenance
There are several ways to determine the gear ratio:
- theoretical;
- practical;
- calculated
The first, simplest, method is theoretical. Usually, in order to find out the necessary information, you just need to look at the car’s instructions, where detailed tables are indicated. Most cars contain such information in the Vin number, where it is encrypted, but it is easy to find out. Russian-made cars usually have a standard set of standard gearbox models. This greatly simplifies the replacement process.
It's a different matter when it is necessary to replace only a separate part of the assembly. Usually, when a car has had several owners, it is not known how many times the gearbox has been replaced and what model is currently installed. This is often quite easy to do, since they try to put the necessary information in places that are most convenient for viewing.
The practical method of determining the gear ratio is more complex and requires direct intervention in the vehicle mechanism. Let's look at the detailed step-by-step instructions:
- The first thing you need to do is find out what model is installed on your car. There are several types that differ depending on the type of gear transmission, there are gear, chain, screw, hypoid, wave and fractional. In any case, the gear ratio is calculated as the ratio of the rotation speed of the driven and drive shafts. If the above data is known, you will have to resort to disassembling the node.
- It is necessary to disconnect the gearbox from the housing and related components and open the cover to have an overview of the structural elements. With the help of such manipulations, you can find out exactly which element of the gearbox you should start from when calculating.
- Then calculate the gear ratio based on the type of unit. If the transmission is geared, then the calculation is quite easy; in this case, the calculated indicator is equal to the ratio of the number of teeth of the driven gear to the teeth of the drive gear. You just need to calculate the specified parameters.
- If the transmission is belt driven, the calculation is made by the ratio of the diameter of the drive pulley to the driven one, or vice versa. The calculation is always carried out from the larger number. With a chain drive, you need to count the number of teeth of the drive and driven sprocket, and calculate the ratio of the larger to the smaller. With a worm gear, the number of runs on the worm and the teeth on the worm wheel are counted, after which the ratio of the second number obtained to the first is calculated.
To do this, you need to use a special measuring device - a tachometer, which measures the rotation speed of the engine drive shaft and the shaft that drives the wheels. The ratio of the first indicator to the second will help to accurately determine the gear ratio.
You can do this easier by calculating the torque of the gearbox by rotating the wheel. The drive axle must be raised on supports. The initial position of the wheel and drive shaft is recorded; this can be done using simple marks. Then you should rotate the wheels until the marks coincide and separately count the number of revolutions of the shaft and wheel. For these purposes, it is rational to use someone else's help.
After collecting all the necessary information, you need to divide the number of revolutions of the drive shaft by the number of rotations of the wheel. To get an accurate result, you need to carefully consider each stage of the procedure, since even the slightest inaccuracy in measurement can critically affect the final result.
Malfunctions of the rear axle of VAZ 2101, 2102, 2103, 2104, 2105, 2106, 2107 cars
Increased noise from the rear wheels
— The wheel mounting bolts are loose
The bolts need to be tightened.
— Wear or destruction of the axle bearing
The axle bearing needs to be replaced.
Constant increased noise from the rear axle
— The rear axle beam is deformed
Replace the rear axle stockings or the entire axle.
We replace bent axle shafts with new ones.
— Wear of splines on axle shafts
— The rear axle gearbox is incorrectly adjusted, its gears or bearings are damaged or worn
The gearbox needs to be repaired or replaced.
— Not enough oil in the rear axle
Bring the level to normal, eliminate leakage.
Noise when accelerating a car
— Shock absorbers are faulty
Check and replace shock absorbers.
— Incorrectly adjusted gearing of the main gears after gearbox repair
Adjust the engagement by selecting the drive gear adjusting ring.
— Damaged axle bearing
— Not enough oil in the rear axle
Bring the level up to normal.
Noise when the car engine brakes
— Incorrect lateral clearance in the mesh between the final drive gears
Disassemble the gearbox and set the gap to 0.08 - 0.13 mm.
— Increased clearance in the drive gear bearings due to loosening of the flange nut or wear of the bearings
It is necessary to check the technical condition and moment of resistance to rotation of the drive gear.
Noise when accelerating and braking the car engine
— Wear or destruction of drive gear bearings
They need to be replaced.
— There is no lateral clearance between the teeth of the main gear gears
Disassemble the gearbox and set the gap between the teeth to 0.08 - 0.13 mm.
Noise when cornering
— Tight rotation of the satellites on the axis
Disassemble the differential, replace damaged and deformed parts.
— Seizures on the working surface of the satellites
Small scuffs can be eliminated by sanding or replacing the satellite axis.
— Jamming of the axle gears in the differential box
It is necessary to check the condition of the gears and mating surfaces in the differential box. In case of minor damage, clean the surfaces with emery cloth or replace the damaged parts with new ones.
— Incorrect adjustment of differential gears
By selecting adjusting washers, set the axial clearance within 0 - 0.10 mm.
Knock when starting to move the car
— Increased clearance in the spline connection of the drive gear shaft with the flange
— Wear of the hole for the pinion axle in the differential box
Replace the differential box.
— The tightening of the rear suspension tie rod bolts is loose
The bolts need to be tightened.
Oil leak from rear axle
— Worn or damaged drive gear oil seal
— Wear of axle shaft seals
It is necessary to check the runout of the axle shafts, the deflection of the beam, and replace the oil seal.
— The gearbox housing bolts are loose, its sealing gaskets are damaged
Tighten the bolts and replace the gaskets.
Notes and additions
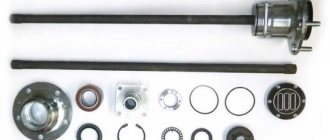
Rear axle gearbox parts for VAZ 2101, 2102, 2103, 2104, 2105, 2106, 2107 cars
1. Drive gear flange. 2. Flat washer. 3. Nut securing the drive gear flange. 4. Oil seal. 5. Oil deflector. 6. Front bearing. 7. Spacer sleeve. 8. Gear housing. 9. Bolt securing the gearbox to the rear axle beam. 10. Gasket. 11. Spring washer. 12. Cover fastening bolt. 13. Rear bearing. 14. Drive gear adjusting ring. 15. Axle gear support washer. 16. Axle gear. 17. Satellite. 18. Satellite axis. 19. Driven gear. 20. Differential box. 21. Drive gear. 22. Differential box bearing. 23. Adjusting nut. 24. Bolt securing the locking plate. 25. Locking plate. 26. Locking plate. 27. Bolt securing the driven gear to the differential box.
More articles on “classic” VAZ cars
About replacing the rear axle gearbox of a VAZ 2107
Extraneous noises that arise under the bottom while driving signal the occurrence of troubles with the gearbox “adjacent” to the rear axle. Even timely replacement of lubricant in the axle does not affect the failure of its parts, so replacing the rear axle gearbox of the VAZ 2107 is inevitable. In order to verify whether the “diagnosis” is correct, it is necessary to dismantle the gearbox, disassemble it, if necessary, carry out repair work, reassemble it, reinstall it and configure it. But here's the question...
Bridge VAZ 2101
The rear axle is one of the main elements of the VAZ 2101 transmission. It is designed to transmit torque from the driveshaft to the axle shafts of the vehicle, as well as to evenly distribute the load on the wheels while driving.
Specifications
The drive axles of VAZ cars of the 2101–2107 series are unified. Their design and characteristics are completely identical, with the exception of the gear ratio. For a “kopeck” it is 4.3. VAZ station wagon models (2102, 2104) were equipped with gearboxes with a gear ratio of 4.44.
The rear axle is used to transmit torque from the driveshaft to the wheels of the car
Table: main characteristics of the rear axle of the VAZ 2101
| Name | Index |
| Factory catalog number | 21010–240101001 |
| Length, mm | 1400 |
| Crankcase diameter, mm | 220 |
| Stocking diameter, mm | 100 |
| Weight without wheels and oil, kg | 52 |
| Type of transmission | Hypoid |
| Gear ratio value | 4,3 |
| Required volume of lubricant in the crankcase, cm3 | 1,3–1,5 |
Where is the gearbox located?
On the "sevens", as on all representatives of the rear-wheel drive family, the gearbox is located at the rear, under the bottom of the car. It connects the cardan to the VAZ 2107 axle and causes the wheels of the car to rotate. Rotation occurs thanks to axle shafts engaged in the gearbox, which, due to the technical features of the rear axle of the VAZ 2107, will have to be removed later. If the car is lifted, or when viewed from a garage pit, the gearbox is simply impossible not to notice.
Signs and malfunctions of the classic rear axle gearbox
Replacing a gearbox with your own hands is a labor-intensive process, which includes not only the purchase of a new unit (quite expensive), but also time costs. Therefore, before you start, you need to make sure that the gearbox is faulty. You can define the signs like this:
- gradually accelerating the car, listen carefully and remember at what moment the noise appears;
- while driving, start engine braking (remove your foot from the gas pedal at speed), at this time listen to the gearbox and note the moment the noise appears;
- accelerate the "seven" to hundreds, switch to neutral and turn off the engine - listen to how the gearbox behaves while coasting.
“If the bridge is noisy both in neutral and at speeds, the gearbox has nothing to do with it. If the hum occurs only at speed (regardless of the number), repairs, or, as a last resort, replacement of the gearbox are inevitable.”
When the signs are identified, it is necessary to carry out another check:
- park the car, secure the front wheels with shoes;
- jack up the rear so that the bridge hangs over (it is necessary that the wheels come off the surface);
- start the engine and accelerate the “seven” to the point at which noise occurs, while the wheels should spin without load.
If the noise has not changed, then the gearbox is clearly in good working order and it is not the cause of the trouble. Here other drive units are checked. Well, if there is no noise when driving without a load, then we are talking about worn gears of the gearbox, which make noise only when driving with a load.
The “seven” gearbox itself is a fairly reliable unit that can withstand a period of 100 to 300 thousand mileage, and there is no need to even look into it. Gears, gear spacer, differential adjustment - all these problems arise during improper operation:
- the use of oil with a low viscosity level, as well as failure to comply with the terms of its replacement;
- operating the “seven” with an amount of oil insufficient for this;
- During movement, the bridge is subject to extreme loads (frequent and unsuccessful slips).
Gearbox removal process
In order to repair or replace the rear axle gearbox of a VAZ 2107, you first need to remove it from the car:
- Drain the oil. This, by the way, may be a reason to replace it.
- Separate the flanges of the cardan and gearbox. To do this, you need to unscrew four bolts and nuts. At this time, it is necessary to fix and immobilize the cardan with a screwdriver or by holding the brake pedal. After unscrewing the nuts, you need to tie the cardan to the muffler. You can simply hang it, but this can also lead to negative consequences for the cardan.
- Remove the axle shafts, because without this the gearbox cannot be removed. At the same time, you can inspect the seals, and if they are worn out, replace them. This will save time and prevent possible malfunctions.
- Separate the beam and gearbox by unscrewing all eight bolts that secure it. When unscrewing the latter, it is necessary to hold the gearbox so that it does not fall. The bolts are unscrewed - carefully remove the gearbox.