1200 rub. for the photo report
We pay for photo reports on car repairs. Earnings from 10,000 rubles/month.
Write:
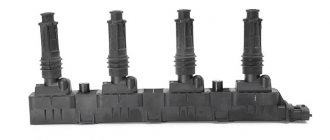
Checking the generator voltage regulator may be necessary when problems with the battery begin to occur. In particular, it began to undercharge or overcharge. When such a malfunction occurs, it’s time to check the generator voltage regulator relay.
The relay should turn off at 14.2-14.5V
The task of this simple device is to regulate the voltage of the electric current that is supplied from the generator to the battery. When it fails, the battery is either not charged enough or, on the contrary, overcharged, which is also dangerous, since this significantly reduces the battery life.
Agree that such a prospect is not very good because of one small detail. This is why it is so important to monitor the operating condition of the voltage regulator (it can also be called a pill or a chocolate bar). But in order to properly check the voltage regulator, you need to know its type and several important features.
Types of Voltage Regulators
Having understood what types of these devices there are, what their features and properties are, a complete understanding of the procedures carried out during testing will come. This will also give the answer to what scheme, in what way and how to check the generator voltage regulator. There are two types of regulators:
In the first case, it is meant that the regulator housing is combined with the brush assembly directly in the generator housing. In the second case, the regulator is a separate unit, which is located on the car body, in the engine compartment, and wires from the generator go to it, and wires from it go to the battery.
A special feature of the regulators is that their housings are non-separable.
They are usually filled with sealant or special resin. And there is no particular point in repairing them, since the device is inexpensive. Therefore, the main problem in this regard is to check the generator voltage regulator relay. Regardless of the type of regulator, the voltage symptoms will be the same.
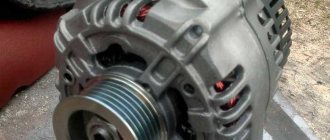
How to test a car alternator with a multimeter
Stable and correct operation of the car’s electronics largely depends on the serviceability of the generator. It provides power to all devices and also helps start the engine. In this regard, it is important to monitor its serviceability, and if necessary, know how to check a car generator with a multimeter.
This element is directly connected to the battery, which also often causes problems. And if it is necessary to connect new devices and various devices to the standard on-board network, you should check the serviceability of the generator, since it is the source of the standard current. In other words, this is one of those parts that needs to be checked regularly.
Symptoms of a problem
So, in case of low voltage, the battery simply will not charge. That is, in the morning you will not be able to start the car, the lights on the dashboard may not even light up, or troubles will arise while driving. For example, dim headlights at night, unstable operation of the electrical system (problems with electrical appliances - wipers, heaters, radio, etc.).
In case of increased voltage, there is a high probability of a decrease in the electrolyte level in the battery banks, or its boiling. A white coating may also appear on the battery case. When overcharging, the battery may behave inappropriately.
Signs, malfunctions and repair of the generator and voltage regulator
In addition, you can also identify the following signs of a faulty voltage regulator (in some cases, some of them may or may not be present, it all depends on the specific situation):
- the control light on the dashboard (although this may be a sign of other malfunctions, for example, that it has burned out, the contact has fallen out, and so on);
- after starting, the battery indicator on the dashboard does not go out, that is, there are obvious malfunctions in charging the battery;
- the brightness of the headlights becomes dependent on the engine speed (you can check this somewhere in a deserted place by placing the car against a wall and accelerating - if the glow changes, then most likely the voltage regulator is faulty);
- the car stopped starting normally the first time;
- The battery is constantly ;
- when the engine speed exceeds 2000 rpm, the indicators on the dashboard turn off ;
- the dynamic characteristics of the car decrease , this is especially noticeable at high engine speeds;
- In some cases, the battery may boil .
Causes and possible consequences of the malfunction
The generator may not work for the following reasons:
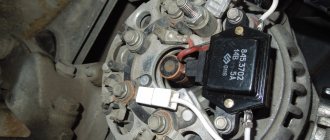
- malfunction of the voltage regulator (“pills”, “chocolates” in the slang of car enthusiasts);
- wear (destruction) of brushes;
- short circuit of the exciting winding (rotor);
- breakdown of diodes (located in the horseshoe);
- wear of bearings and bushings.
A faulty voltage regulator usually results in a lack of battery charge. In this case, the “battery” indicator light appears on the dashboard. The engine continues to run until the battery is discharged to approximately 8 - 9 volts.
During daylight hours, the battery charge may be enough for 30-50 kilometers, provided that the battery was well charged at the time the malfunction occurred.
If the output stages of the voltage regulator breakdown, a malfunction may occur due to an increase in the generator output voltage to 17 - 20 Volts. This recharges the battery. The consequence of overcharging is the process of boiling of the electrolyte. If signs of corrosion appear under the hood in the battery area, it is necessary to check the generator.
A breakdown of the diode bridge can occur when the battery is accidentally reversed (installing the terminals in the wrong polarity). Typically, diodes are punched in pairs in one arm. A faulty diode has a resistance close to zero. In this case, the stator winding of the generator operates in short circuit mode and becomes very hot.
After a few minutes of engine operation, the windings overheat, and a smell of burnt electrical wiring appears under the hood of the car. To avoid fire, the engine must be turned off and the generator checked.
Wear of the brushes leads to gradual failure of the generator. First, while driving, the charge indicator light on the dashboard begins to blink, then it begins to glow constantly. In many generator models, the brushes are changed together with the voltage regulator.
A short circuit in the generator windings can lead to a significant change in output parameters and overheating of the device.
Reasons for failure of the relay regulator
The reasons for the failure of the voltage regulator may be:
- short circuit in the circuit, including interturn short circuit of the excitation winding;
- failure of the rectifier bridge (diode breakdown);
- reverse polarity or incorrect connection to the battery terminals;
- penetration of moisture into the housing of the regulator and/or generator (for example, when washing a car or driving in heavy rain);
- mechanical damage to the unit;
- natural wear and tear of the unit, including brushes;
- poor quality of the device being directly tested.
There are a number of simple methods for checking the regulator, regardless of whether the unit is removable or not.
The simplest way to check the generator voltage regulator
The simplest method of checking the regulator is to measure the voltage at the battery terminals with a multimeter. However, it is worth immediately making a reservation that the algorithm given below does not give a 100% probability of failure of the regulator. Perhaps the generator itself has failed. But the advantage of this method is that it is simple and there is no need to dismantle the device from the car. So, the algorithm for checking the generator voltage regulator with a multimeter is as follows:
- Set the tester to DC voltage measurement mode at a limit of about 20 V (depending on the specific model, the main thing is that it displays values up to 20 V as accurately as possible).
- Start the engine.
- Measure the voltage at the battery terminals in idle mode (1000. 1500 rpm). If the regulator and generator are working properly, the value should be within 13.2. 14 V.
- Increase the speed to 2000. 2500 rpm. In the normal state of the electrical circuit, the corresponding voltage will increase to 13.6. 14.2 V.
- When the speed increases to 3500 rpm and above, the voltage should not exceed 14.5 V.
Read also: How to fix headphones if one comes off
If during the test the voltage values are very different from those given, then most likely the machine’s voltage regulator is faulty. Remember that the voltage should not fall below 12V and should not rise above 14.5V.
As mentioned above, the regulator can be separate or combined with a generator. Currently, almost all foreign cars, and most modern domestic cars, have combined relays installed. This is due to the specifics of their work and space saving.
Checking the generator components on the table with a multimeter
Once a malfunction is suspected, the device is dismantled and diagnosed.
- Place the car on a viewing hole or lift the front part with a jack, and place a safety support.
- Loosen the fastening, disconnect the negative terminal from the battery.
- Disconnect the wires from the generator.
- Unscrew the adjusting and mounting bolts.
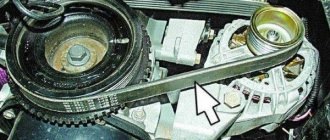
- Remove the belt.
- Remove the device and disassemble.
- Checking the diode bridge of the VAZ 2110 generator with a multimeter is performed in resistance measurement mode, range 0 - 2 MOhm. Silicon diodes used in the rectifier circuit, passing a current of up to 80A during operation, heat up. The cooling radiator is a metal mounting ring. Structurally, two types of rectifiers are produced: with an anode and a cathode on the body. Motorists call parts of the first type positive, the second - negative. A working diode in the forward direction shows a resistance of 0 Ohm, in the reverse direction - about 600 kOhm. A zero value in both directions means a breakdown of the device, a high value means a break. Additional diodes are checked in the same way.
- The rotor field windings are tested with a tester at the switch position of 0 - 5 Ohm. Test leads are connected to slip rings. The resistance value ranges from 1.8 – 5 Ohms. Less is a short circuit, more is a gap.
- The stator windings are tested in the range 0 - 200 Ohm. Alternately touching the terminals of two serviceable windings will show units of Ohms on the instrument indicator; the absence of readings means a malfunction.
- The integrity of the winding insulation is measured by touching one probe to the winding contact, the other to the housing. An infinitely large value indicates normality.
The final confidence in the serviceability of the generator will be given by testing on a bench.
Checking the combined relay-regulator
Checking the VAZ 2110 voltage regulator
To perform the corresponding check, it is necessary to assemble the circuit shown in the figure. To do this, use a charger or power supply with an adjustable load (it is important that it be used to regulate the voltage value in the circuit), a 12 V light bulb (for example, from a turn signal or headlight, with a power of 3.4 W), a multimeter, and the regulator itself voltage (this can be from a Bosch, Valeo or other generator). It is advisable to have the wires used for switching with “crocodiles”.
Checking the voltage regulator of the generator 37.3701: 1 - battery; 2 — ground terminal of the voltage regulator; 3 - voltage regulator; 4 – terminal “Ш” of the regulator; 5 — output “B” of the regulator; 6 — control lamp; 7 — terminal “B” of the voltage regulator.
If you assemble a circuit in which the voltage is at a standard value of 12.7 V, then the light bulb will simply glow. But if you use a voltage regulator to raise its value to 14.14.5 V, then if the relay is working, the light should go out. Otherwise the regulator is faulty. That is, when the voltage reaches 14.14.5 V (depending on the model of the machine and, accordingly, the regulator) and above, the light goes out, and when it drops to the same level, it lights up again.
Checking the VAZ 2107 voltage regulator
Checking the voltage regulator on VAZ 2108/2109 cars
Until 1996, a VAZ 2107 with a 37.3701 generator was equipped with an old-style voltage regulator (17.3702). The verification procedure is given above. After 1996, a more modern generator of the G-222 brand was used (integrated regulator RN Ya112V (V1).
As you can see, the verification algorithm for all regulators is almost the same. The only difference is the cutoff values when the relay is activated.
How to check the VAZ 2110 alternator regulator relay
Generator of English first and last names.
Lada 2112 RIVIERA blue metallic.
c:usersadminpicturesmy scanned images2013-04 (Apr)…
For VAZ-21213, Generator voltage regulator circuit.
PS: Yes, I’m warning you - the regulator input consumes an additional 20-25 milliamps...
Where is the starter relay located on a VAZ 2114.
Checking the charging of the VAZ 2110 generator video!
generator for VAZ 2110 VD-Profi.
circuit for testing the integrated relay of the regulator Ya212A. proverka JA212A.
How to check the relay regulator 2110.
The VAZ 2110 relay-regulator was taken, it seems, and as in the picture they soldered the terminals of the brush...
Re How to break through VIN 1 - 54 kW 73 PS laris IV how to check the charging relay on a car...
how to check the relay regulator of the VAZ 2106 generator.
options for modifying the voltage regulator relay.
Three-level voltage regulator VAZ 2110 instructions.
Generator checks.
Let's add circuits for turn signal relays, wipers, etc. At the same time, they may leave the page...
Three-level voltage regulator VAZ 2109.
Circuit for checking the voltage regulator: 1 - battery; 2 - in...
vaz-2110.net
Checking an Individual Regulator
Checking the voltage regulator of the G-222 generator: 1 - battery; 2 - voltage regulator; 3 - control lamp.
As a rule, separate voltage regulators were installed on old cars, including domestic VAZs. But some manufacturers continue to do this to this day. The verification process is similar. To do this, you need to have a power supply with a voltage regulator, a 12 V light bulb, a multimeter and a directly tested regulator.
To check, you need to assemble the circuit shown in the figure. The process itself is similar to the one above. In normal condition (at a voltage of 12 V), the light bulb lights up. When the voltage value increases to 14.5 V, it goes out, and when it decreases, it lights up again. If during the process the lamp lights up or goes out at other values, it means that the regulator has failed.
Checking relay type 591.3702-01
Relay test diagram type 591.3702-01
You can also still find a voltage regulator of type 591.3702-01, which was installed on rear-wheel drive VAZs (from VAZ 2101 to VAZ 2107), GAZ and Moskvich. The device is mounted separately and installed on the body. In general, the test is similar to that described above, but the differences are in the contacts used.
In particular, it has two main contacts - “67” and “15”. The first of them is a minus, and the second is a plus. Accordingly, to check it is necessary to assemble the circuit shown in the figure. The verification principle remains the same. In normal condition, at a voltage of 12 V, the light bulb lights up, and when the corresponding value increases to 14.5 V, it goes out. When the value returns to its original value, the light comes on again.
A classic regulator of this type is a device of the PP-380 brand, installed on VAZ 2101 and VAZ 2102 cars. We provide reference data regarding this regulator.
| Adjustable voltage at regulator and ambient temperature (50±3)° C, V: | |
| at the first stage | no more than 0.7 |
| on the second stage | 14,2 ± 0,3 |
| Resistance between plug “15” and ground, Ohm | 17,7 ± 2 |
| Resistance between plug “15” and plug “67” with open contacts, Ohm | 5,65 ± 0,3 |
| Air gap between armature and core, mm | 1,4 ± 0,07 |
| Distance between second stage contacts, mm | 0,45 ± 0,1 |
Testing a three-level relay
Regulated power supply
Some car owners install on their cars, instead of standard “chocolate bars,” three-level relays, which are technologically more advanced. Their difference is the presence of three voltage levels at which the battery power is cut off (for example, 13.7 V, 14.2 V and 14.7 V). The appropriate level can be set manually using a special regulator.
Such relays are more reliable and allow flexible adjustment of the cutoff voltage level. As for checking such a regulator, it is completely similar to the procedures described above. Just do not forget about the value that is set on the relay, and accordingly, check it with a multimeter.
Generator check
There is one method by which you can check the performance of a car generator equipped with a regulator relay 591.3702-01 with diagnostic elements. It is as follows:
- disconnect the wires that went to pins 67 and 15 of the voltage regulator;
- connect a light bulb to it (excluding the regulator from the circuit);
- Remove the wire from the positive terminal of the battery.
If, as a result of these actions, the engine does not stall, then we can say that the car’s generator is in order. Otherwise, it is faulty and needs to be checked and replaced.
Read also: Torque wrench with arrow
Generator stator
The stator looks like a small cylinder with a winding inside it. Before checking, the stator itself must be disconnected from the diode bridge. First of all, you should carefully inspect the stator, as well as its individual elements, for any damage. Particular attention should be paid to signs of possible burning.
Next, you can check with a multimeter by setting the “Resistance measurement” mode. With its help, winding breakdowns are detected. To do this, one contact should be connected to the body, and the other to the winding terminal.
Note! In this case, the resistance must be very high; in fact, it tends to infinite values. If the readings are less than 50 kOhm, then this most likely indicates a malfunction of the stator and the entire generator.
Stator check
General Tips
Before starting the test, you should always find out in advance which generator set is on the car. For example, depending on the model of the machine, the relay regulator can support different values in the range from 13.6–14.2 V. You need to know this in advance, since in the end all this affects the final result of the test.
Otherwise, there are no particular difficulties, so it is quite possible to identify malfunctions or other problems that happen from time to time with the generator and other elements of the on-board electrical circuit on your own.
Didn't find the information you are looking for? on our forum.
If you find an error, please select a piece of text and press Ctrl+Enter.
We recommend reading:
VAZ 2115 does not open the rear door from the outside and insideTorque of the VAZ 2110 starterVAZ 2114 lock from the viburnum on the VAZ 2109 slowly gains speedHow to tighten the alternator belt on a VAZ 2110, 8 valvesWhat kind of gasoline to pour in the Lada Granta, manufacturer's recommendationsVAZ 2110 how to change the frog on a car, diagnostics and replacementOil pressure in the VAZ 2106 engine, possible malfunctions, how to diagnose a breakdown
Similar articles
What kind of oil to pour into the VAZ 2115 engine? Choosing oil for the VAZ 2110 VAZ color chart, codes, names, descriptions VAZ error codes - table with a list of all errors
One of the most basic spare parts of any car is, of course, an electric generator. As soon as this device fails to function properly, the car lasts no more than 2 hours. That is why it is important not only to repair the generator correctly, but also to diagnose it in time. This article will tell you how to properly check the VAZ-2110 generator.
The following characteristics of the vehicle state indicate that the generator has failed:
- when the engine is running, the battery lamp shows a complete lack of charge;
- during operation, the part constantly overheats;
- the electrolyte inside the battery constantly boils away;
- the headlights begin to dim, the horn makes a quiet (muffled) sound;
- when idling, pressing the gas pedal, the brightness of the headlights increases, and the generator begins to make super-strong revolutions;
- the presence of extraneous sounds (howling, humming, creaking, crackling, and so on);
- the same voltage readings when the car engine is running and when it is turned off.
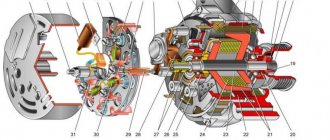
The VAZ-2110 generator consists of:
- rotor;
- front roof;
- bearing;
- stator;
- slip rings;
- regulator;
- diode bridge;
- back cover.
Recommendations for increasing the service life of the regulator
In order to increase the service life of the voltage regulator, it is necessary to adhere to several simple rules aimed at implementing preventive measures. Among them:
- do not allow excessive contamination of the generator, periodically inspect its condition, and, if necessary, dismantle and clean the unit;
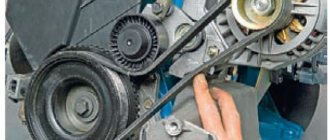
- check the tension of the alternator belt, tighten it if necessary (either yourself or in a car service);
- monitor the condition of the generator windings, in particular, do not allow them to darken;
- check the contact on the control wire of the relay-regulator, both its quality and the presence of oxidation on it;
- Perform periodic voltage checks on the vehicle battery with the engine running.
Following these simple rules will allow you to increase the resource and service life of both the generator and the vehicle voltage regulator.
Results
Checking the voltage regulator relay is not a difficult task, and almost any car enthusiast with basic repair skills can handle it. The main thing is to have the appropriate tools for this - a multimeter, a power supply with a voltage regulator (although you can connect it to a battery with a charger), a 12 V lamp and pieces of wires for mounting the appropriate circuit.
If during the inspection you find out that the regulator is out of order, then it must be replaced (repair work is usually not carried out). The main thing is not to make a mistake when choosing it and purchase the part that is suitable specifically for your car.
Checking the voltage regulator on a car
To check the pH you will need a DC voltmeter with a scale of up to 15.30 volts. We check this way: with the engine running at medium speed and the headlights on, we measure the voltage at the battery terminals. It should be within 13.5. 14.2 V.
If the regulated voltage does not fall within the specified limits, and there is a systematic undercharging or overcharging of the battery, then it is possible that the voltage regulator is faulty and needs to be replaced.
How to test a car alternator with a multimeter
Stable and correct operation of the car’s electronics largely depends on the serviceability of the generator. It provides power to all devices and also helps start the engine. In this regard, it is important to monitor its serviceability, and if necessary, know how to check a car generator with a multimeter.
This element is directly connected to the battery, which also often causes problems. And if it is necessary to connect new devices and various devices to the standard on-board network, you should check the serviceability of the generator, since it is the source of the standard current. In other words, this is one of those parts that needs to be checked regularly.
Stories from our readers
“Fucking basin. "
Hi all! My name is Mikhail, now I’ll tell you a story about how I managed to exchange my two-wheeler for a 2010 Camry. It all started with the fact that I began to be wildly irritated by the breakdowns of the two-wheeler, it seemed like nothing serious was broken, but damn it, there were so many little things that really started to irritate me. This is where the idea arose that it was time to change the car to a foreign car. The choice fell on the melting Camry of the tenth years.
Yes, I had matured morally, but financially I just couldn’t handle it. I’ll say right away that I am against loans and taking a car, especially not a new one, on credit is unreasonable. My salary is 24k a month, so collecting 600-700 thousand is almost impossible for me. I started looking for different ways to make money on the Internet. You can’t imagine how many scams there are, what I haven’t tried: sports betting, network marketing, and even the volcano casino, where I successfully lost about 10 thousand ((The only direction in which it seemed to me that I could make money was currency trading on the stock exchange, they call it Forex. But when I started delving into it, I realized that it was very difficult for me. I continued to dig further and came across binary options. The essence is the same as in Forex, but it’s much easier to understand. I started reading forums, studying trading strategies. I tried it on a demo account, then opened a real account. To be honest, I didn’t manage to start earning money right away, until I understood all the mechanics of options, I lost about 3,000 rubles, but as it turned out, it was a precious experience. Now I earn 5-7 thousand rubles a day. I managed to get the car buy after half a year, but in my opinion this is a good result, and it’s not about the car, my life has changed, I naturally quit my job, I have more free time for myself and my family. You’ll laugh, but I work directly on the phone)) If If you want to change your life like me, then here’s what I advise you to do right now: 1. Register on the site 2. Practice on a Demo account (it’s free). 3. As soon as you get something on the Demo account, top up your REAL ACCOUNT and go to REAL MONEY! I also advise you to download the application to your phone, it’s much more convenient to work from your phone. Download here.
Checking the voltage regulator after dismantling it
The removed generator voltage regulator is checked according to the following diagrams: (the first diagram for the old-style LV): It is better to check the relay-regulator assembled with the brush holder, since in this case you can immediately detect breaks in the brush leads and poor contact between the terminals of the voltage regulator and the brush holder. You need to turn on the lamp 1. 3 W, 12V between the brushes. To terminals “B”, “C” and to the regulator ground, connect a power source first with a voltage of 12.14V, and then with a voltage of 16.22V. (a 12V power source can be a battery, and a 16. 18V power source can be the same battery, but with 2..4 of the cheapest AA batteries connected to it in series.)
If the voltage regulator is working properly, then
- in the first case, the lamp should be on,
- in the second - go out.
If the lamp lights up in both cases, then there is a breakdown in the regulator, and if it doesn’t light up in both cases, then there is a break in the regulator or there is no contact between the brushes and the terminals of the voltage regulator.
An example of a practical test of a 54.3702 voltage regulator using a 21W lamp: By the way, a three-level voltage regulator can also be installed on the “ten”.
The amount of electrical voltage generated by a car generator is not constant and depends on the number of revolutions of the crankshaft. In order to stabilize it, a special regulator is designed. We will talk about it in this article using the example of a VAZ-2110 car.
Read also: How to cut correctly with a circular saw
Connection diagram and operating principle
The voltage regulator on most cars is connected to the on-board network according to the diagram below.
The operating principle of a voltage regulator (VR) is the same as that of a relay. In other words, it opens and closes an electrical circuit. That is why the device is also called a relay regulator. It is triggered when a predetermined voltage value coming from the generator changes.
The first regulators had an electromagnetic design. These were real relays. Modern devices are made on the basis of semiconductors. They are small in size, and in addition, they work much more accurately and efficiently. Some of them are even equipped with special alarms that allow the driver to monitor their performance.
Beginning of work
Multimeter device
To start checking, no special preparations are required. You just need to prepare the multimeter itself. It is also advisable to check the generator - inspect the generator stator, diode bridge, voltage regulator, etc. This makes it possible to identify faults at an early stage. In addition, an external inspection of other elements of the vehicle's electrical circuit should be carried out. No further work may be required.
- Generator VAZ-2110. Design Features
Generator circuit
So, the verification includes several stages:
- Inspection of the relay regulator.
- Checking the diode bridge.
- Checking the stator.
- Checking the rotor.
Voltage regulator VAZ-2110
The "tens" launch vehicle also has a semiconductor design. It is integrated into the generator, which allows you to maintain the required voltage directly at the output of the device.
The stock “tens” regulator is available under catalog number 1702.3702. It can also be used in generators of all Samar models.
On new modifications of the VAZ-2110, the voltage regulator may be marked 1702.3702-01. This is a new generation of relays that are manufactured using MOSFET technology, which can significantly reduce output power losses. In addition, these devices are characterized by increased reliability and resistance to overheating.
Types and location of voltage regulators
As you know, the VAZ 2107 car began to be produced a very long time ago. And over the years, not only different motors were installed on it, but also different voltage regulators. On the earliest models, the relay regulators were external. On later “sevens” the regulators were internal three-level. Let's take a closer look at these devices.
External voltage regulator VAZ 2107
It is the external voltage regulator that many motorists in the old fashioned way call a “relay-regulator”. Today, external voltage regulators can only be seen on very old “Sevens” produced before 1995. These cars were equipped with an old generator model 37.3701, which was equipped with external relays.
External relay regulators were installed on the very first VAZ 2107 models
The external regulator was located under the hood of the car; it was mounted on the left front wheel arch of the car. As a rule, external relays were made on the basis of a single semiconductor, although after 1998 on some VAZ 2107 there were external regulators made on a common printed circuit board.
The external regulator was not built into the generator, but was located under the hood of the car
External relays had certain advantages:
- Replacing the external regulator was fairly easy. It was held on by only two bolts, which were not difficult to reach. The only mistake that a beginner could make when replacing this device is to mix up terminals 15 and 67 (they are located next to each other on the regulator);
- the cost of the external regulator was quite affordable, and they were sold in almost all car stores.
Of course, the device also had disadvantages:
- bulky design. Compared to later electronic regulators, the external relay seems very large and takes up too much engine compartment space;
- low reliability. External VAZ regulators have never been of high quality. It is difficult to say what is causing this: the low quality of individual components or the poor build quality of the device itself. But the fact remains a fact.
Internal three-level voltage regulator
Internal three-level voltage regulators began to be installed on the VAZ 2107 starting in 1999.
The internal regulator began to be installed on the VAZ 2107 after 1999
These compact electronic devices were built directly into car generators.
The internal regulator is mounted directly into the VAZ 2107 generator
This technical solution had its advantages:
- compact sizes. Semiconductors were replaced by electronics, so now the voltage regulator fits in the palm of your hand;
- reliability. It’s simple: there’s nothing special about electronic devices that breaks. The only reason why a three-level regulator could burn out is a short circuit in the on-board network.
There are also disadvantages:
- difficulty of replacement. If there were no particular problems with external regulators, then to replace the internal relay the car owner first needs to get to the generator. To do this, he will have to remove the air filter and a couple of air ducts, which requires patience and time;
- difficulty of acquisition. As you know, the VAZ 2107 has long been out of production. So getting new components for the “seven” is becoming more and more difficult every year. Of course, this rule does not apply to all details. But internal three-level voltage regulators for the VAZ 2107 are among the parts that are not so easy to find today.
Read about malfunctions of the VAZ 2107 generator: https://bumper.guru/klassicheskie-modeli-vaz/generator/proverka-generatora-vaz-2107.html
Technical characteristics of the VAZ-2110 launch vehicle
The voltage regulator relay for the VAZ-2110 generator has the following characteristics.
Regulation voltage with battery at a temperature of 25 o C and a load of up to 3A, V
Regulation voltage with battery at a temperature of 25 o C and a load of more than 3 A, V
Operating temperature range, o C
Maximum output circuit current: standard/agreed with the manufacturer, A
Permissible long-term exposure to high voltage, V
Permissible exposure to high voltage for up to 5 minutes, V
Signs of LV malfunction
In VAZ-2110 cars, the voltage regulator breaks quite rarely, but if this happens, signs of its malfunction may be:
- Failure of the control panel backlight.
- Exceeding the battery charging voltage.
- Insufficient battery charge voltage.
If the voltage regulator relay of the VAZ-2110 breaks down, the fuses responsible for the safety of the power supply circuit of the instrument panel may blow out. If the backlight lamps do not light up when the ignition is turned on, there is a possibility that the LV is to blame.
The same can be assumed when the voltmeter needle, indicating the battery charge level, deviates from its usual position, i.e., shows higher or lower voltage.
How to check the pH on a VAZ-2110 without removing it
If you find at least one of the listed signs, do not be lazy to check the voltage regulator on your VAZ-2110. This procedure will not take more than 10 minutes. To do this, you will need a voltmeter or multimeter turned on in its mode, as well as an assistant. The verification procedure is as follows:
- We start the car engine and warm it up to operating temperature.
- Without turning off the engine, we connect one voltage probe of the generator, and the second to the “ground” of the device.
- We ask the assistant to turn on the low beam headlights and press the accelerator pedal, keeping the speed at 2000-2500 thousand rpm.
- We measure the voltage with the device.
For the VAZ-2110, the voltage regulator should produce 13.2-14.7 V. This is the norm. If the voltmeter readings differ from those shown, diagnostic measures should be continued.
Checking the removed voltage regulator
To make sure that it is the LV that has failed, and not the generator itself, it should be checked separately. To do this, you will need to disconnect it from the main device. The procedure is as follows:
- Remove the negative terminal from the battery.
- We find the place where the launch vehicle is attached to the generator. Unscrew the 2 screws that secure it.
- Disconnect the yellow wire going from the regulator to the generator.
- We dismantle the launch vehicle.
To diagnose the device, you will need a power supply with the ability to adjust the output voltage, a light bulb (12 V) with a socket and a pair of wires. The verification algorithm is as follows:
- We assemble a “control” from a lamp and wires and connect it to the regulator brushes.
- Set the voltage on the power supply to 12 V.
- We connect the “plus” from the power supply to the “D+” terminal of the regulator, and the “minus” to its “ground”.
- We look at the lamp: it should be lit.
- We increase the voltage on the power supply to 15-16 V. If the regulator is working properly, the lamp should go out. If this does not happen, the LV must be replaced.
Generator rotor
The rotor is a rod made of metal with an excitation winding. If you look at one of its ends, you can see special contact rings with sliding brushes.
Rotor check
First of all, it is necessary to remove the rod and conduct an external inspection of the winding, as well as the bearings. In some cases, the problem is damage. If everything is in order, then you should proceed to checking with a multimeter.
The device should be set to “Resistance measurement” mode. It should be checked between the slip rings. This value should not be too large - this indicates the serviceability and integrity of the winding.
Note! It is quite difficult to carry out detailed diagnostics of the rotor on your own, so if you suspect any problems, you should contact a car repair shop.