Bleeding the brakes of a Lada Kalina car
We bleed the hydraulic drive of the brake system after its repair, which resulted in a violation of the tightness of the system and if air is suspected of getting into the system.
In the latter case, you must first determine and eliminate the cause of air getting into the hydraulic drive and only then begin pumping it.
The presence of air in the hydraulic drive of the brake system is determined by the behavior of the brake pedal: it becomes soft (you can’t feel the stop at the end of the pedal stroke) and drops below its normal position.
To complete the work you will need an assistant, as well as:
— a special wrench for the bleeder fitting or an 8 mm socket wrench;
- a transparent vinyl tube of suitable diameter;
— container for draining brake fluid;
— new brake fluid recommended by the manufacturer.
— inspection ditch or overpass (preferably).
1. We prepare the car for work.
2. Disconnect the wiring harness connector from the brake fluid level sensor connector and remove the reservoir cap
To prevent air from entering the hydraulic drive of the brake system, when bleeding the drive, make sure that the brake fluid level in the reservoir does not fall below the MIN mark.
If the rear axle of the car is suspended (the car is on a lift or mounted on stands), the pressure regulator will block the path of brake fluid to the rear wheel cylinders. Therefore, to bleed the rear wheel cylinders, it is necessary to open the regulator valve.
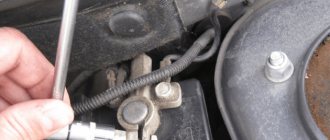
3. To open the pressure regulator valve, insert the blade of a slotted screwdriver between the lever and the plate, recessing the regulator rod.
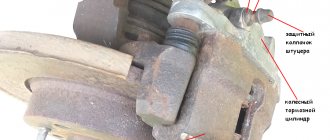
4. Clean the brake cylinder fitting of the rear right wheel and the surface around it from dirt.
5. Remove the protective rubber cap from the bleeder fitting.
6. We put a special or 8 mm socket wrench on the bleeder fitting, and then a transparent vinyl tube (the diameter of the tube should be such that it fits tightly on the fitting), lower the other end of the tube into a transparent container partially filled with brake fluid.
7. An assistant presses the brake pedal several times and, after the last press, holds the pedal in the lower position.
8. Loosen the fitting, unscrew it approximately half a turn until liquid begins to flow out of the fitting.
9. After the brake fluid stops coming out of the tube, tighten the fitting.
10. The assistant again presses the pedal several times and holds it pressed.
11. We repeat the steps described in paragraphs 7 and 8 (see above).
12. We carry out bleeding until the release of brake fluid with air bubbles from the cylinder fitting stops, after which we finally tighten the fitting.
13: Remove the vinyl tube and spanner from the fitting, and put a protective rubber cap on the fitting.
14. Next, pump the brake cylinder of the front left wheel.
15. Similarly, we pump the cylinders of the secondary circuit:
rear left and front right wheels in the specified order, monitoring the fluid level in the master cylinder reservoir.
16. By pressing the brake pedal, we check the operation of the hydraulic drive and the absence of fluid leakage from the bleeding fittings.
If the pedal is soft or it drops below its normal operating position, we re-confirm that the system is tight and repeat pumping the hydraulic drive.
How to properly bleed the brakes on a Lada Kalina
Good day everyone. It's time to change the brake fluid. How it all began. I came to the service station to perform a wheel alignment after independently replacing the front struts with SS-20 and SEVI strut supports. The collapse was done. There's something new at the service station. Check the condition of the coolant, brake fluid and engine oil level. I was next to the guy who performed this procedure. After taking a sample of the brake fluid, it was clear that there was moisture above normal. This year I just wanted to change it myself. But here, after the “tests”, it definitely needs to be changed. I immediately bought 1L DOT-4 ENI brake fluid in the store. — 400 rub.
I made the replacement the other day. Sequence of work: 1). I pumped out the brake fluid from the reservoir with a large syringe;
2). I drained the remaining brake fluid into a bottle from each wheel;
3). When unscrewing one of the fittings on the rear drum, the edges licked a little. I had to buy a fitting for 20 rubles.
We bleed the hydraulic drive of the brake system after its repair, which resulted in a violation of the tightness of the system and if air is suspected of getting into the system.
In the latter case, you must first determine and eliminate the cause of air getting into the hydraulic drive and only then begin pumping it.
The presence of air in the hydraulic drive of the brake system is determined by the behavior of the brake pedal: it becomes soft (you can’t feel the stop at the end of the pedal stroke) and drops below its normal position.
To complete the work you will need an assistant, as well as:
— a special wrench for the bleeder fitting or an 8 mm socket wrench;
- a transparent vinyl tube of suitable diameter;
— container for draining brake fluid;
— new brake fluid recommended by the manufacturer.
— inspection ditch or overpass (preferably).
1. We prepare the car for work.
2. Disconnect the wiring harness connector from the brake fluid level sensor connector and remove the reservoir cap
To prevent air from entering the hydraulic drive of the brake system, when bleeding the drive, make sure that the brake fluid level in the reservoir does not fall below the MIN mark.
If the rear axle of the car is suspended (the car is on a lift or mounted on stands), the pressure regulator will block the path of brake fluid to the rear wheel cylinders. Therefore, to bleed the rear wheel cylinders, it is necessary to open the regulator valve.
3. To open the pressure regulator valve, insert the blade of a slotted screwdriver between the lever and the plate, recessing the regulator rod.
Replacing brake fluid
To complete the work, you will need an assistant, as well as a rubber bulb.
1. We prepare the car and the necessary equipment to perform the work.
2. Remove the tank cover
To prevent air from entering the hydraulic drive of the brake system, when replacing the brake fluid, make sure that its level in the reservoir does not fall below the MIN mark.
3. Use a blower to remove the working fluid from the master brake cylinder reservoir.
4. Fill the tank with new fluid up to the top edge of the tank.
5. We pump the circuits of the hydraulic drive system, starting with the rear wheels of the car.
6. We pump each wheel cylinder until new (lighter) brake fluid begins to emerge from the fitting.
7. After replacing the fluid in both circuits, we check the operation of the hydraulic drive and bring the fluid level in the master brake cylinder reservoir to normal.
How to bleed brakes in the field
What if you don’t have the necessary material on hand to modify the brake fluid reservoir cap? We return to the standard method of bleeding the brakes:
- Press the brake pedal several times until it becomes firm;
- We place a pry bar or any other tool of suitable length (for example, a stick) between the seat and the brake pedal;
- We unscrew the brake fitting and watch how the brake fluid comes out along with air bubbles;
- We repeat the process for each wheel starting from point No. 1.
In all cases of bleeding the brakes, monitor the fluid level in the reservoir. If you can’t unscrew the fitting, spray WD-40 on it and wait a couple of minutes for it to dry out.
If the brakes do not bleed, the system is not sealed or one or more components, such as the master cylinder or pipe, are faulty. Also, do not forget to flush your car's brake system on time.
How do you bleed the brakes on your car? Let us remind you that it is convenient to search for other operating and repair instructions by content for each Lada model: Granta, Kalina, Priora, Vesta, Niva, Largus or XRAY.
Bleeding hydraulic brakes Kalina 1117
Tool:
- Medium flat screwdriver
- Split spanner 8 mm
Parts and consumables:
- Brake fluid
- Rags
- Bottle
- Hose
- Master brake cylinder
- Brake slave cylinder
Note:
To complete the work, you will need an extra pair of hands, so it is advisable to find an assistant. In addition, it is most convenient to work with many components through an inspection ditch or overpass.
1. Bleeding the brakes is necessary to remove air from the hydraulic drive after it is depressurized, when replacing the master cylinder, brake cylinders, hoses, tubes, as well as when replacing the working fluid or when the brake pedal becomes “soft”.
2. When the engine is not running, we remove air from the system, first from one circuit and then from the other in the following sequence:
- right rear wheel brake;
- left front wheel brake mechanism;
- left rear wheel brake;
- brake mechanism of the right front wheel.
3. If air gets into one of the circuits, it is enough to bleed only this circuit, and not the entire hydraulic drive. If the rear wheels are hanging out, insert a screwdriver between the lever and the plate spring of the pressure regulator in the hydraulic drive of the rear wheel brake mechanisms, fixing the regulator piston in the recessed position. We check the level of working fluid in the hydraulic brake reservoir and, if necessary, add fluid.
4. We clean the brake bleeder fitting of the right rear wheel from dirt and remove the protective cap from it.
5. Using an 8-mm spanner, loosen the tightening of the bleeder fitting. We put a hose on the fitting, and immerse its free end in a container partially filled with working fluid.
6. An assistant must vigorously press the brake pedal all the way 4-5 times and keep it pressed.
7. Using the “8” wrench, unscrew the bleeder fitting 1/2-3/4 turn. In this case, liquid with air bubbles will flow out of the hose, and the brake pedal will move forward. As soon as the liquid stops flowing out of the hose (the pedal should be pressed all the way), tighten the fitting, and only after that can the assistant release the pedal.
8. We repeat pumping until air bubbles no longer appear in the liquid coming out of the hose. We remove the hose, wipe the bleeder fitting dry and put a protective cap on it. We pump, as described above, the brake mechanism of the left front wheel.
9. Similarly, we bleed the brake mechanisms of the other circuit. When pumping, you need to monitor the fluid level in the tank and add fluid if necessary.
10. If, when you press the brake pedal, you feel its “softness” and increased travel, it means there is air left in the system. In this case, we repeat pumping until the pedal becomes “hard”, i.e., when pressed, go no more than half the distance to the floor. If air cannot be removed, check the tightness of connections, pipelines, hoses, master and working cylinders. We tighten leaking connections, replace faulty master and working cylinders.
The article is missing:
- Photo of the instrument
- Photos of parts and consumables
- High-quality photos of repairs
Bleeding Kalina brakes
I will tell you how to bleed the brakes on a Lada Kalina car. The pumping sequence is as follows:
- rear right
- front left
- rear left
- front right
We start with the first wheel in order to bleed (rear right). What will you need for this? Brake fluid (the same as what was poured into the system), a small hose (in my case with a diameter of 5-6mm, about 30 cm long), an empty container for collecting brake fluid, a partner and a set of keys. There should be a special fitting on the back of the wheel for bleeding the brakes. We remove the protective cap from it, put on the hose, and lower the other end into an empty container (a bottle, for example).
Please note here that the brake drum must be on. Otherwise, the resulting pressure when you press the pedal will simply push the pistons out of the brake cylinder and you will have to remove it and reassemble it. IMPORTANT! Bleed the brakes WITHOUT jacking up the wheels, use a pit or overpass. Otherwise, the adjustment of the “sorcerer” (the brake force distributor between the front and rear wheels) will go wrong.
It is better to use a transparent hose. This way you will see the presence of air in the escaping liquid.
Now we put our assistant behind the wheel and ask him to press the brake pedal several times and keep it pressed. You slowly unscrew the bleeder fitting (it is enough to unscrew it half a turn). Brake fluid should leak and the brake pedal should drop to the floor. As soon as the main flow of liquid with air comes out, tighten the fitting. Only after this can the pedal be released. We perform this simple operation until air stops escaping (the liquid will be free of bubbles). Then we move to the second wheel (front left) and do the same. And so with all the other wheels.
Bleeding the brakes on Kalina
Welcome! Bleeding the brakes - this procedure is carried out after removing (Disconnecting) things that relate to the brake mechanism, in other words, let’s say you wanted to disconnect the brake hose from the caliper in order, for example, to replace the caliper separately, in general, when disconnecting the hose, it is recommended to completely drain the brake fluid, but you can essentially don’t do this, you’ll just have to plug it with a plug when it’s disconnected and thus fluid won’t flow out of it, but after this disconnection the brake system becomes airy, that is, air gets into it, and air with brake fluid is a very bad sign , by the way, if the brake hose suddenly breaks a little somewhere, then the system will become airy in the same way, and therefore (depending on how airy it is) the brakes will very noticeably disappear, but if a lot of air gets into the brake system, then in this case the brakes will literally it won't happen at all.
Bleeding the brakes Kalina order
Good day everyone. It's time to change the brake fluid. How it all began. I came to the service station to perform a wheel alignment after independently replacing the front struts with SS-20 and SEVI strut supports. The collapse was done. There's something new at the service station. Check the condition of the coolant, brake fluid and engine oil level. I was next to the guy who performed this procedure. After taking a sample of the brake fluid, it was clear that there was moisture above normal. This year I just wanted to change it myself. But here, after the “tests”, it definitely needs to be changed. I immediately bought 1L DOT-4 ENI brake fluid in the store. — 400 rub.
I made the replacement the other day. Sequence of work: 1). I pumped out the brake fluid from the reservoir with a large syringe;
2). I drained the remaining brake fluid into a bottle from each wheel;
3). When unscrewing one of the fittings on the rear drum, the edges licked a little. I had to buy a fitting for 20 rubles.
How to bleed the brakes on a VAZ 1117-VAZ 1119?
Note! Bleeding the brakes is carried out, as we have already noted in another article, in the same way as replacing the brake fluid, and therefore, since our website already has an article dedicated to replacing the brake fluid, we will not describe in detail the article on bleeding the brakes, but still some nuances which you need to know, we will indicate in this article, but first read from beginning to end another article on replacing brake fluid, a link to it is given in the text just above!
1) In general, you read another article and already know about the brake circuits and the pumping procedure, that is, the assistant gets into the car and presses the brake pedal 5 times, he does all this sharply but with an interval of 1-2 seconds, At this time, you loosen the fitting and the brake fluid begins to flow into the bottle; when replacing the fluid, it needs to be drained until new water flows out (Clean), but you are pumping the brakes, so you will have to wait until all the air bubbles are gone (They can be visible through a transparent hose or you can see them directly in the container into which you will drain the brake fluid), as soon as the air bubbles disappear, finish bleeding and move to the other wheel and bleed it, and so on until everything you won’t be able to bleed four wheels, although if you are confident in one of the circuits, then you can leave it alone, for example, you can bleed the left rear wheel and the right front (This is one brake circuit), and not touch the right rear and front left at all (This is second circuit).
2) After bleeding, wipe off particles of brake fluid from all fittings with a rag and close them with protective caps, if you suddenly lost one of the caps, then go to a car store and buy it, we don’t recommend driving without it at all, otherwise dirt can get into the brake fluid if the fitting is bad will be twisted, and also during the procedure, be sure to monitor the level of brake fluid in the system and try not to let it drop to zero (About 5-10 centimeters should always remain), but if it happens that all the fluid runs out in the system, then you can start pumping the brakes again, because at this time air will get into the system and all the wheels that you previously passed will have to be passed through again.
Additional video clip: The brakes are bled on all front-wheel drive cars that are produced identically at VAZ, so we have placed a video clip just below, which does not show clearly, but tells in detail how to properly bleed the brakes on a car and how to replace them brake pads for new ones, the video shows the VAZ 2108 car from beginning to end.
How to bleed brakes in the field
What if you don’t have the necessary material on hand to modify the brake fluid reservoir cap? We return to the standard method of bleeding the brakes:
- Press the brake pedal several times until it becomes firm;
- We place a pry bar or any other tool of suitable length (for example, a stick) between the seat and the brake pedal;
- We unscrew the brake fitting and watch how the brake fluid comes out along with air bubbles;
- We repeat the process for each wheel starting from point No. 1.
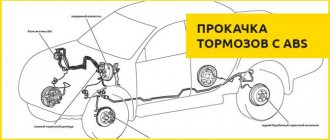
How to bleed brakes with abs (ABS): step-by-step instructions
Removing air from pipelines and cylinders is a mandatory operation, which is accompanied by changing brake fluid, replacing hoses or working cylinders. Bleeding brakes with ABS differs from a similar procedure on cars without ABS. This is due to the presence of valves and a hydraulic accumulator, from which air cannot be removed in the standard way.
Anti-lock brake system (ABS) device
When braking, ABS regulates fluid pressure in the working cylinders, preventing the wheels from completely locking. Thanks to this, the braking distance is reduced and the driver continues to control the vehicle’s trajectory even during intense braking on snow, sand or wet asphalt.
The principle of operation of the abs system. Video:
The anti-lock braking system includes the following parts:
- Control block. Electronics that change pressure by opening and closing bypass valves. It analyzes information about wheel rotation. When the wheel stops, the valve partially relieves pressure and the pad presses less.
- Sensors that control rotation speed. The devices are mounted on wheel hubs and operate due to the Hall effect. They transmit information to the ECU.
- Hydraulic block. It consists of hydraulic accumulators, solenoid valves for inlet and outlet, an electrically driven pump and damping chambers.
In their normal position, the exhaust valves are closed and prevent fluid from leaving the cylinder. Accordingly, the intakes are open and do not prevent pressure from increasing when the pedal is pressed. When the car brakes, fluid enters the cylinder, increasing the pressure in it. If the wheel starts to slow down too sharply, the ECU closes the intake valve, preventing blocking. If necessary, a signal is sent to open the release valve, which reduces the pressure to a value at which the wheel is unlocked.
Types and types of ABS anti-lock systems
Based on the number of control circuits, there are three types of anti-lock braking systems:
- single-channel - when one wheel is blocked, all four are released;
- two-channel - triggering occurs based on data from the best (high-threshold) or worst (low-threshold) wheel;
- four-channel - each wheel is adjusted separately, which ensures maximum braking efficiency.
Important! Modern cars are equipped with four-channel systems.
Depending on the location of components and maintenance features, there are three types of ABS:
- with components (hydraulic module, valves, accumulator and pump) located in a single unit;
- with components spaced in the form of different units;
- with optional SBC and ESP systems.
Despite the complicated design, it is quite possible to replace ABS brake fluid yourself.
How does the Kalina brake system work?
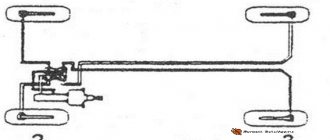
Braking is carried out by transferring force from the vacuum brake booster through two circuits to the brake cylinders with simultaneous automatic adjustment depending on the load on the rear wheels. The front-wheel drive is equipped with disc brakes, and the rear-wheel drive is equipped with drum brakes.
Brake system "Kalina" - diagram
The braking system of this machine is formed by the following components:
How to properly and quickly bleed ABS brakes with your own hands
The procedure for bleeding the brakes is influenced by the design of the system, the location of components and the presence of additional electronic modules. The correct sequence is important. You need to start by relieving the pressure in the hydraulic accumulator. To do this, you need to turn off the ignition (it is not necessary to start the engine) and pump the pedal.
A simple secret to quickly pumping brakes. Video:
Read how to bleed ABS brakes and stock up on the following materials, parts, accessories and tools:
- spanner;
- a rubber (possibly plastic) hose with a diameter corresponding to the thickness of the fitting tip;
- brake fluid;
- container (necessarily transparent). This is where you will drain the old brake fluid.
You cannot do without an assistant who must press the pedal on command. You will perform manipulations with the fittings that ensure the removal of liquid.
Bleeding ABS brakes, where the components are located in one unit, differs little from the standard procedure. The only thing you need to do is turn off the system by pulling the fuse. This method works on domestic Ladas.
You can take advantage of the built-in pump. Then you will have to pump with the ignition on or even with the engine running. The sequence and order of bleeding the brakes starts with the right front cylinder and looks like this:
- disconnect the terminal of the level control sensor fixed on the expansion tank cover;
- remove the cover;
- open the brake reservoir;
- fill the reservoir to the brim with brake fluid;
- put the hose on the tip of the fitting;
- lower the end of the hose into a container to collect liquid;
- open the fitting by turning it a quarter or half a turn;
- to activate electronic systems, turn on the ignition;
- release the brake;
- wait until the pump expels the airy mixture;
- release the brake pedal;
- Tighten the fitting with a wrench.
The brake bleeding scheme is no different on any car, be it Patriot, Lacetti, Ford, Passat, Gazelle. First, air is removed from the “far” circuit (for “left-hand drive” cars it is on the right), then from the “near” circuit.
Important: When bleeding, keep an eye on the brake fluid level. If it falls below the minimum, the system will fill with air. Then the work has to be done again.
To bleed a system with components located in different places, a diagnostic tester is needed. It connects to the car and allows you to control electronic components using a smartphone or computer. In this case, you will also have to unscrew the fittings and drain the airy liquid. However, no manipulation of the pedal is required. Instead, the valves and electric pump must be activated using the appropriate menu items. This way you can bleed the systems on the VW Passat B6 and other modern cars.
Bleeding the brakes using the Priora as an example
Before you bleed the ABS brakes, you will have to drive the car into a pit. This will help you gain convenient access to the fittings on the rear cylinders and will allow you to avoid removing the discs during operation. On the Priora, the procedure for pumping brakes with ABS does not differ from that adopted on simpler models. The only difference is that the work must be performed by first turning on the ignition. In this case, the solenoid valves will be in the open position.
How to properly bleed the brakes on a Priora with abs with your own hands, video:
Technology for pumping the brake system with ABS for Lada Kalina
Technology for pumping the brake system with ABS for Lada Kalina
Bleeding brakes with ABS, taking into account the characteristics of the system ↑ Bleeding the brake system with ABS will require you to have certain technical skills. In addition, it will not be superfluous to first study the manual on the design and maintenance of the brake system of your car.
Features of bleeding brakes with ABS:
in cars that have a hydraulic valve block, a hydraulic accumulator and a pump in one unit, replacing the brake fluid and bleeding the brake system with ABS is carried out in the same way as bleeding the brakes on a car without ABS (you need to turn off the system by removing (disabling) the fuse). Bleeding of the circuits is carried out with the brake pedal pressed, the RTC bleeder fitting must be unscrewed. The ignition is turned on and the pump expels air from the circuit. The bleeder screw is tightened and the brake pedal is released. An extinguished ABS fault light is evidence that your actions were correct. Bleeding the brake system with ABS, in which the hydraulic module with valves and the hydraulic accumulator are separated into separate units, is carried out using a diagnostic scanner to retrieve information from the ABS ECU. It's unlikely you have one. Therefore, bleeding of brakes with ABS of this type should most likely be done by you at a service station. Bleeding the brake system with ABS and electronic activation systems (ESP or SBC) is carried out only under service conditions. How to bleed ABS brakes? ↑
It is important! It should be remembered that the pressure in the brake system reaches 180 atm. Therefore, in order to prevent the release of brake fluid, before disconnecting the brake lines on any system with ABS, it is necessary to discharge the pressure accumulator. To do this, with the ignition off, press the brake pedal 20 times.
Technology for bleeding the brake system with ABS
Bleeding brakes with ABS, like bleeding a conventional brake system, is done with an assistant. Turn off the ignition (position “0”). Disconnect the connectors on the brake fluid reservoir.
Front wheel brakes:
put the hose on the bleeder fitting; open the fitting back; the brake pedal is pressed all the way and held in the depressed position; we observe the release of an “aired” mixture; tighten the fitting and release the pedal. Rear right wheel brake:
put the hose on the bleeder fitting, unscrew it one turn; press the brake pedal all the way, turn the ignition key to position “2”. In this case, the brake pedal is held in the pressed position; a running pump will expel air from the system. That is, as soon as the brake fluid begins to come out without air bubbles, close the fitting and release the brake. Rear left wheel brake
The hose is put on the fitting and unscrewed 1 turn; DO NOT press the brake pedal; a working pump pushes out the “aired” mixture; press the brake pedal halfway and tighten the fitting; release the pedal and wait until the pump stops completely. In reverse order: ignition key to “0”, connect the connectors to the brake fluid reservoir, check the brake system for leaks
–>Auto parts and service stations –>
The brake system is one of the key components of the correct and safe operation of a car. Any malfunction in the brakes can result in a problem or tragedy for all road users. To avoid problems while driving, it is necessary to constantly monitor the condition of all parts of the system: discs and pads, and especially the brake fluid.
Brake bleeding is required in the following cases:
You noticed that the brake pedal has become “softer” and its travel has increased. You have repaired or serviced the brake discs, replaced the brake pads, or completely tuned the brake system.
In these cases, it is definitely necessary to bleed the brake system to remove air. Procedure for bleeding the brakes
As always, you have a choice of how to level up. You can contact a car service. There you will be bled using a brake bleeder. A modern and efficient unit designed to remove air from the brake system. The professional brake bleeding device is equipped with adapters that allow it to work with many existing models of cars and trucks.
The second option is to bleed the brakes yourself. In principle, the procedure for bleeding the brakes is the same for any system. You will need a simple homemade device for bleeding the brakes from a syringe, tubes (hoses) and a plastic container. Options for pumping yourself: two people or one person, i.e. you yourself.
Scheme for bleeding the brakes: you should start from the wheel that is located at a far distance from the GTZ.
- rear right wheel mechanism;
- front left wheel mechanism;
- rear left wheel mechanism;
- front right wheel mechanism.
Bleeding the brakes with a partner
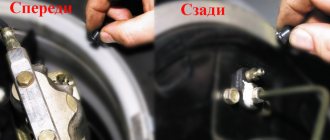
Remove the plug that covers the brake bleeder fitting and put a transparent hose on it. We lower the free end of the hose into a container partially filled with brake fluid.
The partner presses the brake pedal with intensity 3-4 times and leaves it pressed. You slightly unscrew the bleeder nipple until the brake fluid begins to be forced into the container. You can determine the presence of escaping air by the bubbles in the liquid in the container.
After this, tighten the bleeder fitting and repeat this procedure in the same order on the other wheels. Replace or add brake fluid of the type recommended by the car manufacturer. If after bleeding the brake pedal is still “soft”, check the wear of the brake pads, or repeat the bleeding procedure again.
Bleeding brakes without a partner
This task is quite labor-intensive, but sometimes this happens. As a device for bleeding the brakes, you will need: a brake fluid reservoir cap identical to yours, a syringe and a container. Here's the design:
We seal the syringe into the reservoir cap using a “sealant”, then screw this device onto the brake reservoir, having first filled the syringe with brake fluid. We unscrew the fitting at the outlet of the circuit that is to be pumped. We install a container to collect the leaking brake fluid. Then use a syringe to inject brake fluid.
Another way to bleed the brakes without an assistant will require you to have a block or other support. After filling the brake reservoir, you pump the brake pedal several times and hold it depressed. Then perform the standard procedure: unscrew the fitting and wait until the flow of brake fluid becomes slightly uniform. Close the brake bleeder screw.
Bleeding the brake system
In order to bleed the brake system of the Lada Kalina , we drive the car into a pit or lift it on a lift. Before bleeding, make sure there is sufficient brake fluid level in the reservoir.
Remove the connector from the low brake fluid level sensor.
Unscrew the tank cap. To bleed the brakes, you will need someone to sit in the driver's seat to pump the brake pedal. We start pumping from the rear right wheel. Remove the cap from the bleeder fitting and place a transparent tube of suitable diameter onto the fitting.
The IV tube will be just right. Let's prepare a container into which the brake fluid will be drained. We lower the other end of the tube into this container.
When everything is ready, the person in the car presses the brake pedal several times. And after the last press, it holds it pressed.
Immediately after this, use a No. 8 wrench to turn the fitting approximately half a turn. Along with the brake fluid, air comes out of the system, which got into it while we were driving with a brake fluid leak. As soon as the liquid stops flowing, clamp the fitting. The pedal is still pressed!
Then the assistant behind the wheel pumps the brake pedal again. This is done until there is a continuous flow of brake fluid, without air bubbles, from the fitting. Typically it takes five to ten times, depending on the degree of air in the system. We finally tighten the fitting. We put on the cap. The brake system is pumped crosswise. Therefore, now it is the front left wheel. The actions are similar.
An assistant pumps up the brake pedal. Release the bleeder fitting.
Thanks for subscribing!
We clamp it. Pump up the pedal again. Let go of the fitting. We clamp it. We make sure that there is enough brake fluid in the reservoir, not below the minimum level. Top up if necessary. Then the rear left wheel. The actions are similar.
Pump up the brake. Let go of the fitting. We repeat the steps until there is a continuous flow of brake fluid. Front right wheel.
Let's pump it up. Let go of the fitting. We clamp it. We repeat the steps as necessary. The brake pedal should have a travel of approximately two centimeters and rest, but not sink. We also make sure that the fittings do not leak liquid.
After bleeding the brake system, it is recommended to go to a brake test bench to check the braking force reading.
Differences and specifics of bleeding brakes with ABS
The anti-lock braking system allows you to control the vehicle's handling when braking. After pressing the pedal, the central control panel receives a response signal from sensors installed on the front and rear wheels. Thanks to the control system, the wheels slow down at the same speed as the car itself. In other words, thanks to ABS, the car cannot skid.
Regardless of the manufacturer, most devices have common characteristics:
- Electronic speed sensors on the hubs;
- Pressure controllers for main brake fluid lines;
- Electronic unit for signal processing.
Unlike most cars with simple braking systems, bleeding anti-lock brakes is difficult. For the procedure to be successful, it is necessary to familiarize yourself in detail with the theory of ABS operation. However, if the hydraulic accumulator, valves and pump are located nearby due to the design solution, the pumping technology will be very similar to the standard one.
Before starting work, in addition to standard tools, you must acquire a scanner to read information from the electronic unit. However, if the car has additional sensors, it is better to take the vehicle to a specialized salon. Any improper intervention calls into question the safety of road users.
Usually, for successful bleeding with the ABS system, it is enough to monitor the pressure in the hydraulic system. The standard value is 180 atm, but to work with the brakes it must be reduced - turn off the ignition and apply the brake 20 times. Only after this, some of the liquid will splash out and the pressure will drop significantly. After reducing the pressure, you can begin to turn off the ignition and disconnect the connectors and controllers on the GTZ tank for further manipulations.
The brake bleeding diagram, or, in other words, the brake bleeding sequence, should look like this:
- front left wheel mechanism;
- front right wheel mechanism;
- rear right wheel mechanism;
- rear left wheel mechanism.
- front right wheel mechanism;
- front left wheel mechanism;
- rear left wheel mechanism;
- rear right wheel mechanism.
Starting the pumping procedure itself, provide comfortable access to the relevant mechanisms with which you will work - remove the desired wheel, or drive the car into the inspection hole. Procedure for bleeding the brakes.
- Remove the cap from the expansion tank.
- Unscrew the brake bleeder fitting and clean it of any buildup.
- Place a clean hose onto the fitting of the corresponding brake mechanism, lowering the free end into a reservoir filled with brake fluid. Due to the fullness of the container, air does not enter the cylinder through the fitting.
- Start the engine and leave it running.
- Press the brake pedal several times (your assistant can do this) until the brake fluid flows through the hose into the reservoir. Perform these actions as long as the brake pedal allows, until it hits the floor.
- Bleed the brakes until all the air is out of the mechanism, while constantly refilling the reservoir with new brake fluid. The tank should not be completely empty, otherwise it will fill with air again. This system is used for cars with a manual transmission.
- Tighten the abs bleeder fitting. Tighten it while the pedal is reversed to prevent air from entering.
- Remove air and fluid from the clutch hydraulic drive as well.
- Add fluid to the expansion tank to the maximum mark.
- Check the action of the brake pedal; it should be depressed 1/3 of the entire pedal stroke.
In any case, before starting pumping, read all the nuances in the technical documentation for the car.