Let’s be clear right away: valve adjustment is only possible on an 8-valve car. For a 16 valve machine, only replacement of hydraulic compensators is provided. This more modern system is now installed on many modern domestic and foreign cars.
Car enthusiasts often ask questions: how exactly does valve adjustment occur on a VAZ 2110, why is this procedure needed, and how to do it yourself? And also, when should this procedure be performed?
Herzog valve kit for 16 cl. engine
Symptoms
To understand that the valves on the VAZ 2110 engine need adjustment, it is enough to know the behavior of the engine.
After prolonged use, the car owner may notice that the engine has begun to work somehow differently. This fact should alert you, because the consequences can be serious. The main symptoms of a faulty valve mechanism adjustment on a VAZ 2110 look like this:
- the engine is noisy when starting up after a long period of parking (clacks);
- compression in the cylinders disappears (the engine loses its former power);
- Valve cover gasket leaks oil;
- “shots” appeared in the carburetor or muffler;
- fuel consumption has increased.
The listed signs can be diagnosed independently, without resorting to the services of a car service. Before you put the VAZ 2110 in for repairs and begin adjusting the valves, you should prepare a mechanic’s tool: a micrometer, a rack for pressing the pushers and a multi-part feeler gauge. The last thing to measure is the thermal gap between the camshaft cam and the adjusting washer. Instead of a rack, it is possible to use two powerful slotted screwdrivers. An installation kit (clamp and probe) is sold in most Auto Parts stores. Its cost varies from 200 to 500 rubles. Correct installation of valves on a VAZ 2110 8 valve injector or carburetor is the key to success.
Setting procedure
The first step is to put the adjusting device in place, then by turning the crankshaft, align the mark on its pulley with the protrusion on the cylinder block. In this case, the mark on the camshaft gear should also align with its protrusion. In this position, the piston of the first cylinder is at the very top (TDC), which can be easily checked with a screwdriver through the spark plug hole.
Then proceed in the following sequence:
- Check the tension of the timing belt by turning it around its axis as far as possible. A well-tensioned belt will not turn more than 90°. If you find any slack, tighten the belt using a pulley, otherwise further adjustment will be difficult.
- Using a wrench, turn the camshaft slightly clockwise so that the gear moves 2.5 teeth relative to the protrusion. Scratch your own mark on the gear with a sharp metal object - it will be useful to you in the future.
- Use feeler gauges to check the clearances in valves No. 1 and 3; they should be 0.35 and 0.2 mm, respectively. When the gap is set correctly, the feeler gauge moves in it with some effort.
- The size of the gap is adjusted with washers. If it is too small or large, remove the installed washer with tweezers and look at the markings where the thickness is electrographically applied. To be sure, it can be measured with a micrometer.
- Select the total thickness of the washers to maintain the specified gaps, check them with feeler gauges.
- Counting 11 teeth from the first mark, place the second, after 10.5 teeth - the third, and after another 11 - the fourth.
- Turning the camshaft clockwise and aligning your marks with the protrusion, repeat the valve adjustment in accordance with the table:
Reasons for replacement
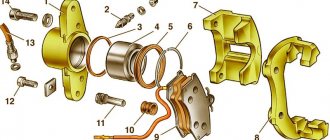
As mentioned above, the reason for replacing the valves may be a broken timing belt, but this is not always the only reason. Often the valves need to be replaced due to the motor chain jumping. When this happens, the valves simply turn out and it is clear that their further operation becomes impossible. After this, the valves look like this:
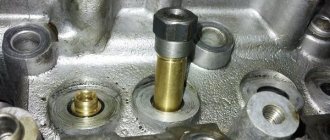
Replacing valve guides for VAZ 2110
In addition, the valves themselves may wear out. More precisely, it is the valve stem, which has a certain size, that is subject to wear. The leg is specially measured with a micrometer to check compliance with the standards. So, if the valve stem has a size that is less than 7.97 mm, then this is wear and tear and such a valve should be sent to the trash bin. Finally, a burnout or crack in the plate itself may cause the valves to be replaced.
Replacing valve guides on a VAZ 2110
How to calculate the thickness of a new shim?
Everything is very simple - the thickness of the new washer H is calculated by the formula: H = B + (A - C)
. Where A is the measured gap, B is the thickness of the removed washer, C is the nominal gap.
The thickness of the washer is marked on top of its surface using an electrograph. To preserve it, always install them with the label facing down.
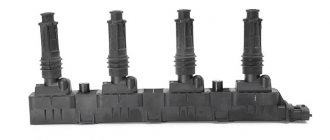
Replacing the ECM ignition module on a VAZ 2110 and Bogdan
Changing the oil in engine 2110. Replacing the oil filter
Valve adjustment frequency
After using the car for a long time, its owner may notice that the engine is no longer performing as well as it was before. In principle, all changes in engine operation should always alert the driver, since this is often fraught with quite serious consequences. In most cases, adjustment of the VAZ-2110 valves (8 valves) is required if the following symptoms are present:
- excessive noise when starting the engine after the car has been idle for a long time;
- lack of compression in the cylinders (a noticeable decrease in engine power);
- oil leaks through the cover gasket;
- regular “shots” in the muffler or carburetor;
- increased fuel consumption.
It is not necessary to go to a specialized car service in order to diagnose the above problems.
Main signs and causes of faulty valves
Adjusting MTZ valves: work procedure, adjusting the gas distribution mechanism
Replacing all valves on a Priora with 16 valves can occur either when they are bent or when they burn out. They can burn out due to poor quality parts or poor quality of the mixture used.
If the vehicle engine overheats too quickly, then sooner or later the working surface of all valves begins to burn out (wear out). Another point is that the valves and their mechanisms have a return spring. If the return spring begins to wear out, the valve will begin to hit the piston during operation. In this case, the result will be the same as a damaged timing belt.
It is important for the vehicle owner to correctly diagnose problems with valves. The very first sign of an emerging problem is a decrease in the level of engine response, which manifests itself in a noticeable decrease in vehicle power.
In some cases, tapping sounds are heard.
A common symptom of valve problems is black smoke coming out of the exhaust pipe. This problem is combined with increased engine oil consumption. The machine may also operate unstably when idling. It is difficult to diagnose this problem, since it is difficult to accurately determine the cause of the breakdown without disassembling the engine.
Preparatory stage
It starts with turning off the on-board power supply to the car, for which the terminals are removed from the battery and it is necessary to drain the old engine oil into a prepared container through a service plug and coolant from the engine crankcase, this is done by disconnecting the lowest radiator pipe from the cylinder block, the only precaution is Carrying out the procedure on a cooled engine, otherwise you can get your hands burned!
Spare parts and tools for work
Before starting work on replacing valves on a VAZ 2110, high-quality new parts are purchased, the names and original articles of which are as follows:
- Set of gaskets: valve cover (art. 2108-1003270/77) and cylinder head (art. 21083-1003020), intake and exhaust manifolds (set art. 21083-1008081), exhaust gas intake pipe (art. 2103-1203020-04) , as well as an oil seal (art. 2108-1005034) and oil flinger rings (art. 2108-1007026-86) (the so-called cylinder head repair kit)
- New valves for the fuel mixture intake system 4 pcs. (art. 21083-1007010)
- New exhaust system valves 4 pcs. (art. 2108-1007012)
- Valve guides 8 pcs. (art. 2108-1007032-87)
- Engine coolant
- New bolts securing the cylinder head to the cylinder block (art. 2108-1003271Н/О)
- Timing belt (art. 2108-1006040-86) and generator drive belt (art. 1000012562)
- Engine oil and oil filter
Repairs to replace worn-out parts are carried out using a standard set of tools, which are usually sold as a set, namely:
- a set of open-end wrenches marked from 8 to 21 mm;
- set of internal hex keys;
- a set of sockets with a diameter from 8 to 24 mm;
- valve desiccant;
- screw valve guide puller;
- torque wrench (needed for proper tightening of the camshaft, cylinder head and camshaft gear bolts);
- Screwdriver Set;
- electric drill;
- specialized lapping paste of two types (for rough lapping of valves to their working surface of the combustion chamber and for finishing grinding);
- gloves to protect hands from possible damage.
This is interesting: The design of the master brake cylinder of a passenger car and replacement of the repair kit
The presence of tools, parts and a covered room will allow you to carry out troubleshooting work yourself, since the price of replacing 8 valves on a VAZ 2110 in non-certified services in the fall of 2021 varies from 30 to 45 thousand rubles At a certified service station of official dealers, such work will cost more than 50 thousand, which will greatly affect the financial situation of the car owner.
How to adjust valves on VAZ 2110-VAZ 2112?
Note! Let’s immediately say about all the engines that were installed on cars of the tenth family, firstly, on all of them (it doesn’t matter whether it’s a carburetor or an injector) the valves are adjusted identically, only the only difference will be in removing the cylinder head cover, as they said earlier, the thermal clearance of the valves is adjustable only by 8 valve cars, so if you have a 16 valve, then you can completely forget about it and never think about it, and what’s more, don’t forget to buy the cylinder head cover gasket at the auto store; you will remove the cover, and when removing this gasket, be sure to replace it with a new one, if there is one It’s also possible to stock up on a good sealant, it will come in very handy!
One more thing, the valve clearance is checked only at positive temperatures, namely at “+20 ° C”, so if you carry out work in winter, then either do everything in a heated garage, or warm up the car thoroughly and quickly remove the cylinder head cover with gloves and check (the engine will have cooled down a little at that point) on a warm engine the gap at the valves and, if necessary, make calculations and change the adjusting washers (this can be done without rushing, the main thing is to measure the gap while it’s warm outside or while the engine is warm)!
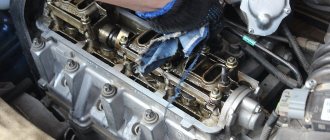
1) Let's start adjusting, first, use a cloth or something else to clean the Cylinder Head cover from dirt, make sure that after removing it, no dirt or other unnecessary objects (Pebbles, for example) get into the valve mechanism, then disconnect it from the cylinder head cover all the hoses (Don’t be afraid to disconnect them, these are crankcase ventilation hoses and after they are disconnected, no liquid will flow out of them) that are connected to it, and in total there are two hoses connected to it on carburetor cars (Pipes would be more correct to call them), one of the pipes comes from the air filter housing, and the other is connected on the opposite side of the cover, you will immediately find them if the engine is in front of your eyes, and they are attached by clamps, these clamps will need to be slightly loosened with a screwdriver and then disconnected hoses, as for injection cars, there is practically nothing different on them, the same two pipes are located in exactly the same places as the pipes of a carburetor car, for clarity, we indicated both of these pipes with arrows in the photo below.
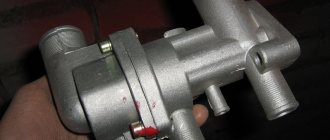
2) As soon as the hoses are disconnected, we go further and move on to other things that may interfere with the removal of the cylinder head cover, on carburetor cars this is the air filter housing, for example, and it must be removed (How to remove the housing, read the article: “Replacing the air filter housing with VAZ"), on injectors this is a bracket that holds the throttle cable (This bracket is shown in the photo with a red arrow, and it is attached to either three or two nuts, everything depends on the engine, for clarity, both nuts securing the bracket in the photo are indicated by blue arrows, You unscrew these nuts and put the bracket and the cable aside and, if necessary, remove the throttle cable; how to do this, read the article: “Replacing the throttle cable on a fuel-injected car”).
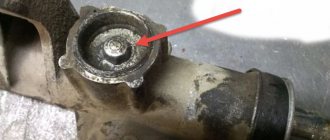
3) And to finish removing the cover, unscrew the two outermost lateral cap nuts with a socket wrench or something like it and you can remove the cover from the car engine, but if you have a carburetor car, then also unscrew the central nut as shown in the photo below nut and remove the throttle cable bracket and let it hang on the cable (If the cable does not allow you to remove the cylinder head, then you disconnect it from the carburetor; how to do this, read the article: “Adjusting the cable on carburetor cars”), as soon as the operation is completed done, unscrew the same two side cap nuts and remove the cover from the carburetor car.
4) Now that the cover is removed, remove the oil near the pushers (Indicated by arrows in the small photo) to make it more pleasant to work and so that the dipsticks do not become dirty; once the oil around them is removed, remove the side cover that covers the timing belt (It is indicated by an arrow in the main photo ), it is attached to two bolts in the side and one in the center secures it, you unscrew all these bolts and then remove it from the car.
5) Then you will need to turn the crankshaft until the mark on the camshaft pulley (Indicated by a red arrow) coincides with the mark (Whisker) which is located on the rear timing belt cover, and to make the marks match, you will most likely have to turn the crankshaft , this is done in several ways, but we will only talk about the easiest of them; at the beginning, do not forget to turn out the spark plugs (it will be easier this way; read about how to turn out the spark plugs in the article: “Replacing spark plugs on a car”), after which engage the fourth (Direct) gear and roll the car until the marks coincide, but if the work is carried out in a garage and it is not possible to roll the car (By the way, you can roll it in jerks, that is, turn on the fourth, roll about two meters, engage neutral gear, roll the car back and again the fourth and so on until the marks coincide), then hang out any of the front wheels and turn it by hand, again until the marks coincide, there is another way but we won’t tell you about it, but then you will also tear off the crankshaft pulley mounting bolt, but in principle we can give a hint, in general, you will need to set the neutral gear and the crankshaft pulley mounting bolt (the pulley itself is indicated as number 3, and the bolt can be seen in the center in the photo) will need to be turned clockwise, until the marks coincide, but in no case do not turn the bolt securing the camshaft pulley (This pulley is indicated by number 1 in the small photo), otherwise some people do this.
6) Once everything is done, turn the crankshaft pulley a little more (Turn clockwise about 40-50°), in this position the camshaft cams will turn from the pushers and you can start checking the gaps, to do this, insert the feeler gauge between the pusher and the camshaft cam first, second, third and fifth valves and check the gaps, which should be “0.2+0.05 mm” for the intake valves and “0.35+0.05 mm” for the exhaust valves, if the gap does not match on any of the valves, then remove adjusting washer and replace it with a new one, it is removed as follows, first the pusher itself is pushed down (inside, by the way, it is indicated by a blue arrow), the easiest way to push the pusher in is with a screwdriver or a special device that you most likely don’t have, we’ll stick with a screwdriver , by the way, before recessing it, turn it with your hand so that it faces you with the groove facing you (It has two grooves through which it is very convenient to get the adjusting washer by picking it up with tweezers or something similar, the groove is indicated by a yellow arrow for clarity), after then use a screwdriver to push the pusher inwards and use tweezers to pick up the adjusting washer through this groove (indicated by the red arrow) as shown in the small photo and you can select a new one.
Note! The counting of valves must begin from the camshaft pulley, that is, the first valve comes from it at the beginning, then the second, etc., so that you do not get confused, we have posted a photo below in which we clearly indicated the number of the valves, we will immediately note which of these valves are the intake ones are valves numbered “2, 3, 6 and 7”, respectively, valves numbered “1, 4, 5 and 8” are exhaust valves, make sure you don’t make a mistake when you make the adjustment!
7) Regarding the selection of the thickness of the adjusting washer, which regulates this very thermal gap, first, on the washer that you took out, write down or remember the numbers that are printed on it (This is its thickness, but if the washer was not installed correctly or if the valves have not been adjusted for a long time , then this inscription has been erased and in this case either you will need to resort to using a caliper, or using a micrometer, we recommend using a micrometer since it will more accurately determine the thickness of this washer, so measure it and write it down in the same way or remember it, the record should look like these are the numbers “3.75 mm”), now, based on these numbers, determine the thickness of the new washer, and it is calculated according to a certain formula: “H = B + A – C”, in which the letter H stands for the thickness of the new adjusting washer, the letter B is the thickness old washer taken out, the letter A is the measuring gap that you got when you checked the gap with a feeler gauge between the pusher and the camshaft cam, by the way it is calculated in millimeters, and the letter C is the nominal gap, as we have already indicated, the nominal gap should be “0.2” for intake valves +0.05 mm”, for exhaust “0.35+0.05 mm”, well, just achieve a nominal gap right around “0.35 mm” for exhaust, for example, we do not recommend you, always take the average value, for example “0.40 mm”, that is, you will create a gap so that you have it a little, and not tightly everything stands, for example, purely under “0.35 mm” and by the way, when you get a number, round it up, for example, it turns out that the new washer should be “3.81 mm”, round it up up to “3.80 mm”, if “3.84 mm”, then round it up to “3.85 mm”, there are simply no new adjusting washers with a thickness of “3.81 mm”, “3.84 mm”. Well, that's all, all the washers are installed in their places in the reverse order of removal, after installing the new washers, check the valve clearance, if it is incorrect, it means either the washer was of the wrong thickness, or you messed something up, then one turn ( 360°) rotate the crankshaft and adjust the clearances of the fourth, sixth, seventh and eighth valves in the same order and finally pour the engine oil that is used in your car into the upper part of the cylinder head (This is where you wiped it with a rag in the beginning for convenient operation was) and install everything in its place, at the same time change the gasket at the cylinder head cover and if you have sealant, then apply it to this gasket and by the way, when installing new shims, install them with the inscription facing down so that the camshaft cams do not erase it behind very short time.
Additional video: You can clearly see the process of adjusting the thermal clearances of the valves in the video below:
Note! Watch another instructive video below, it will also give you additional information and if you plan to adjust the valves in the near future, we hope you won’t have any problems!