Acoustic shelf VAZ 2110 and its manufacture
Acoustic shelf VAZ 2110
The acoustic shelf of the VAZ 2110 is made with your own hands if the standard one is not satisfactory for various reasons. Firstly, the factory shelf cannot in any way improve the quality of car audio that the owner so desires. Secondly, the factory shelf does not make it possible to install speakers with a wider diameter. On the VAZ 2110, the acoustic shelf can be made independently without any problems, although it can also be purchased at some store.
Acoustic rear shelf VAZ 2110
Acoustic shelf VAZ 2110
The acoustic shelf of the VAZ 2110 is made with your own hands if the standard one is not satisfactory for various reasons. Firstly, the factory shelf cannot in any way improve the quality of car audio that the owner so desires.
Secondly, the factory shelf does not make it possible to install speakers with a wider diameter. On the VAZ 2110, the acoustic shelf can be made independently without any problems, although it can also be purchased at some store.
Acoustic shelf VAZ 2110
Before moving on to the immediate algorithm of actions, let's dwell on the benefits of an acoustic shelf. Let's find out what its advantages and advantages are.
So, below are the known advantages of such a shelf:
- The standard places on the factory shelf are designed for speakers 13-16.5 cm. As a rule, this size of dynamic heads cannot provide the powerful and high-quality sound that all music lovers are looking for. In this case, a special shelf will help make your dream come true;
- The acoustic shelf significantly improves the sound of any speakers;
- Thanks to a good acoustic shelf, it will be possible to build a sound stage, making the sound direction more directional;
- An acoustic shelf, properly and firmly fixed, will prevent squeaks and rattles of plastic;
- The shelf will help hide expensive speakers, thereby protecting the owner from car vandalism;
2110 acoustic shelf with hidden speakers
- An acoustic shelf greatly improves the appearance of the car interior.
It would be advisable that the owner of a VAZ 2110 car, before making the shelf himself, familiarize himself with the following information:
- Shelves are usually made from MDF or natural wood. Generally, wood is the better option as it is durable, but in terms of appearance and the benefits that an audiophile is looking for, the two materials are essentially the same;
DIY acoustic shelf 2110
- All acoustic shelves, no matter what their properties, type or purpose, must be covered with some kind of material.
Note. Basically, it's carpet. But it also happens that the owner has to cover the shelf with another material, in order to match the interior trim, which can be made of Alcantara or leatherette.
- The acoustic shelf must be firmly fixed in place. It should not creak or wobble;
- The acoustic shelf does not have to be installed at the back. Today, side acoustic door shelves are known, the installation of which does not require replacing manually operated windows or boxes placed under the seats.
Note. All this taken together is called an acoustic system and is aimed at producing a cleaner, more powerful sound.
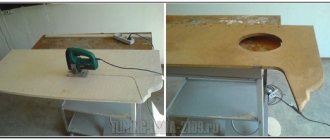
Making the rear shelf
So, first, let's look at how you can make a rear acoustic shelf with your own hands, spending a minimum of time and effort on it.
- We find a piece of plywood, the thickness of which would not be less than 10 mm and more than 20 mm. The shelf can be made either single-layer or multi-layer;
- We take the dimensions of the workpiece using a factory shelf as a template, which will need to be carefully dismantled, or a ready-made version downloaded from the Internet.
Note. Creative people draw their own template based on the appropriate dimensions. Thus, they add individual touches and original solutions to the product.
- The finished template now needs to be attached to a sheet of plywood, take a pencil and trace the workpiece;
The process of working on an acoustic shelf
- Now we arm ourselves with a jigsaw and cut everything along the lines.
Note. In this case, it is important to act slowly, remembering the rule: measure seven times - cut once. In the process, you need to adjust the shelf in place, check everything, cut off the excess. Careful attention should be paid to the cracks between the shelf and the rear window, trunk hinges that could become an obstacle, etc.
- We determine in advance what kind of shelf we will make: multi-layer or single-layer. In the first case, we get a shelf with better rigidity and a more beautiful design.
But to make it you will have to spend more time and effort. In particular, the sheets will need to be firmly secured to each other using PVA glue and self-tapping screws;
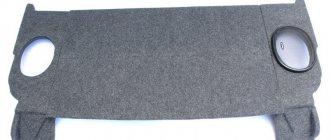
- It's time to cut holes for the speakers (see How to choose speakers for a car radio on your own). Here we will need to build on the size of the speakers that we will install.
- After all this, all that remains is to reupholster our shelf with the appropriate material (carpet, alcantara, substitute). The material must be covered with the correct glue.
Note. Let us immediately note that it is recommended to protect plywood from moisture. To do this, it will be useful to treat it with drying oil or paint (you can do both). It is advisable to paint the material in a ventilated area and leave it to dry for at least a day.
Note. For carpet, Yerevan glue Nairit or some kind of aerosol glue is ideal.
- As a result, the rear shelf is ready and all that remains is to install it.
Advice. If we are working with carpet, then it can be made into a perfectly “obedient” material in your hands using ordinary water and a hairdryer. By sprinkling a few drops of water on the carpet, you can achieve its “obedience” if you tighten it properly and dry it with a hairdryer. The material will take absolutely any shape.
As a rule, the rear acoustic shelf is not left like this.
It is modified in the following ways:
- They make a recess in the shelf itself for storing various things. This is easy to do if you use two sheets of plywood: one at the bottom, the second with holes for the speakers at the top;
- On the rear shelf you can make podiums for acoustics, thereby giving direction to the sound. For this purpose, inserts from the same plywood are used, installed at the appropriate angle in the form of a ring. Just don’t forget about giving strength to such podiums (they need to be lubricated with epoxy glue and then treated with polyurethane foam);
How to make an acoustic shelf 2110 with podiums
- The rear shelf can be made soft if foam rubber is placed at the manufacturing stage (upholstery).
Production of an acoustic system in the door of a VAZ 2110
Acoustic system in VAZ 2110
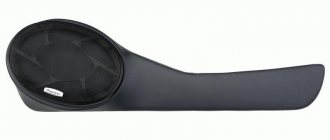
If the windows in the doors of the VAZ 2110 are mechanical, then you will have to replace them with electric ones. This will make it possible to free up additional space by allowing you to install a shelf with podiums here (acoustic podium).
Note. Typically, the layout of such a podium in the door should have a hole cut out to fit the diameter of the acoustics. The layout must have the required depth, and the speaker must be installed there so as not to touch the metal part of the door.
Again, to make such a podium, plywood is used, pre-treated with moisture-resistant substances (paint, drying oil). As for the thickness of plywood, it is advisable to select it within the range of 12-15 mm.
Advice. In order for the doors of the VAZ 2110 to close without interference, the podium with the shelf must follow the curves and shape of their front part.
Such a shelf with a podium or several podiums must be well fixed so that it does not wobble or creak.
Sound system VAZ 2110 in the door
Production of an acoustic system for the seats of a VAZ 2110
Sound systems VAZ 2110 under the front seat
Many experts call the reproduction of the low-frequency sound range the main problem of car audio. If the speakers can be placed under the front seats using inexpensive but high-quality materials, the problem can be largely solved.
The acoustic box or shelf under the seat, as this device is called, was invented for the “classics”.
Below is an algorithm for performing such a process:
- Under the front seat of the VAZ 2110 we will find an opening formed by the arc of the front support and the frame. It’s not that big in size, but it’s perfect for our idea;
- We make the front support collapsible by removing the seats and rivets;
- We make a box in which we make small partitions. Don’t forget to reinforce the box with a frame made of bars;
- We make a front panel on which the head will be held (from 2 sheets of plywood);
- We attach the panel to the box. We fill the resulting cavity with small sawdust and PVA;
- Install the box and enjoy a completely different sound.
This process involves doing the operation yourself, strictly according to the instructions. It is recommended to use video reviews with step-by-step explanations, photos - materials, diagrams and much more that can be useful.
The price of making a custom shelf is very high, so the art of making shelves yourself is considered a great advantage.
- Author: Grigory Romanchuk
Grigory adored cars since childhood, and in his teens, when he independently connected the car radio in his father’s nine, he realized that cars would be his job, hobby, calling.
Materials: https://avtozvuk-info.ru/polki-podiumi/akusticheskaya-polka-vaz-2110-279
The benefits of an acoustic shelf
Acoustic shelf VAZ 2110
Before moving on to the immediate algorithm of actions, let's dwell on the benefits of an acoustic shelf. Let's find out what its advantages and advantages are. So, below are the known advantages of such a shelf:
- The standard places on the factory shelf are designed for speakers 13-16.5 cm. As a rule, this size of dynamic heads cannot provide the powerful and high-quality sound that all music lovers are looking for. In this case, a special shelf will help make your dream come true;
- The acoustic shelf significantly improves the sound of any speakers;
- Thanks to a good acoustic shelf, it will be possible to build a sound stage, making the sound direction more directional;
- An acoustic shelf, properly and firmly fixed, will prevent squeaks and rattles of plastic;
- The shelf will help hide expensive speakers, thereby protecting the owner from car vandalism;
2110 acoustic shelf with hidden speakers
- An acoustic shelf greatly improves the appearance of the car interior.
Advantages of an acoustic shelf
Acoustic accent shelf
A shelf that can be purchased in a store perfectly solves acoustic problems. It provides rigidity, makes it possible to install larger speakers and, in general, is designed for heavy speakers.
However, from an aesthetic point of view, this option is considered not very successful. Not everyone can beautifully integrate a purchased acoustic shelf and plywood. In addition, if the owner of a Hyundai Accent fully uses the trunk, he will have to remove the reinforcement every time to put any cargo inside.
Acoustic accent shelf
On the other hand, manufacturers of acoustic shelves have provided this option. They released special shelves with sides. Now the owner does not have to remove the shelf to put large cargo in the trunk. The acoustic shelf with a folding part, which is also designed for comfortable operation with the trunk, has the same convenient parameters. In addition, modern acoustic shelves are made in such a way that they imply hidden installation of speakers (see How to choose speakers for a car radio on your own). This is a very good solution in view of the fact that speakers have been theft very often lately. A burglar only needs to break the glass from behind to get them out. And so they are not visible. In addition, another advantage of a wooden shelf is that it is tightly screwed to the car body. If the speakers stand openly on a weak, unattached factory-made plastic shelf, then the burglar will get not only the speakers, but also the shelf itself.
Important information about acoustic shelves
It would be advisable that the owner of a VAZ 2110 car, before making the shelf himself, familiarize himself with the following information:
- Shelves are usually made from MDF or natural wood. Generally, wood is the better option as it is durable, but in terms of appearance and the benefits that an audiophile is looking for, the two materials are essentially the same;
DIY acoustic shelf 2110
- All acoustic shelves, no matter what their properties, type or purpose, must be covered with some kind of material.
Note. Basically, it's carpet. But it also happens that the owner has to cover the shelf with another material, in order to match the interior trim, which can be made of Alcantara or leatherette.
- The acoustic shelf must be firmly fixed in place. It should not creak or wobble;
- The acoustic shelf does not have to be installed at the back. Today, side acoustic door shelves are known, the installation of which does not require replacing manually operated windows or boxes placed under the seats.
Note. All this taken together is called an acoustic system and is aimed at producing a cleaner, more powerful sound.
Making the rear shelf
So, first, let's look at how you can make a rear acoustic shelf with your own hands, spending a minimum of time and effort on it. Begin:
- We find a piece of plywood, the thickness of which would not be less than 10 mm and more than 20 mm. The shelf can be made either single-layer or multi-layer;
- We take the dimensions of the workpiece using a factory shelf as a template, which will need to be carefully dismantled, or a ready-made version downloaded from the Internet.
Note. Creative people draw their own template based on the appropriate dimensions. Thus, they add individual touches and original solutions to the product.
- The finished template now needs to be attached to a sheet of plywood, take a pencil and trace the workpiece;
The process of working on an acoustic shelf
- Now we arm ourselves with a jigsaw and cut everything along the lines.
Note. In this case, it is important to act slowly, remembering the rule: measure seven times - cut once. In the process, you need to adjust the shelf in place, check everything, cut off the excess. Careful attention should be paid to the cracks between the shelf and the rear window, trunk hinges that could become an obstacle, etc.
- We determine in advance what kind of shelf we will make: multi-layer or single-layer. In the first case, we get a shelf with better rigidity and a more beautiful design. But to make it you will have to spend more time and effort. In particular, the sheets will need to be firmly secured to each other using PVA glue and self-tapping screws;
- It's time to cut holes for the speakers (see How to choose speakers for a car radio on your own). Here we will need to build on the size of the speakers that we will install.
Note. Let us immediately note that it is recommended to protect plywood from moisture. To do this, it will be useful to treat it with drying oil or paint (you can do both). It is advisable to paint the material in a ventilated area and leave it to dry for at least a day.
- After all this, all that remains is to reupholster our shelf with the appropriate material (carpet, alcantara, substitute). The material must be covered with the correct glue.
Note. For carpet, Yerevan glue Nairit or some kind of aerosol glue is ideal.
- As a result, the rear shelf is ready and all that remains is to install it.
Advice. If we are working with carpet, then it can be made into a perfectly “obedient” material in your hands using ordinary water and a hairdryer. By sprinkling a few drops of water on the carpet, you can achieve its “obedience” if you tighten it properly and dry it with a hairdryer. The material will take absolutely any shape.
As a rule, the rear acoustic shelf is not left like this. It is modified in the following ways:
- They make a recess in the shelf itself for storing various things. This is easy to do if you use two sheets of plywood: one at the bottom, the second with holes for the speakers at the top;
- On the rear shelf you can make podiums for acoustics, thereby giving direction to the sound. For this purpose, inserts from the same plywood are used, installed at the appropriate angle in the form of a ring. Just don’t forget about giving strength to such podiums (they need to be lubricated with epoxy glue and then treated with polyurethane foam);
Acoustics for a VAZ 2112 car
Acoustics for a VAZ 2112 car
already exists, but it is weak and needs to be replaced. In order to remove holes from the door, it is recommended to take a sheet of aluminum about one and a half millimeters in size. This thickness makes it easy to adjust the sheet to the shape of the door, and if you also make noise insulation from vibroplast underneath it, then when knocking it will resemble wood.
In order not to make a mistake in the sizes, you need to make templates from paper, then take rubber scissors, attach the template and carefully cut out. All this needs to be secured with self-tapping screws. But the vibroplast prevents complete sealing, remove the foil from the material and the problem is solved! Under the foil near the vibroplast
there is a sticky layer, so it turns out that the plug is held not only by the screws, but also by the adhesive base of the vibroplast. The next point is the wires; previously they passed through exactly the hole that we plugged. And then we find a way out, run the wires into the hole for the window regulator, it turns out there is enough space there. The pull of the lock has weakened, we prepare a piece of corrugation, which is made of plastic, maintaining a diameter of 7 mm, do not forget to treat it with vibroplast glue, while simultaneously tearing off the foil from the scraps. The hole that remains from the lock rod is completely sealed with vibroplast, a rubber tube of the lock rod is attached there, we notice that the door has begun to open poorly, the handle is stuck. You need to fix the problem, carefully peel the tube from the vibroplast, and if you can’t do it with your hands, then pick up a knife. Now the door is completely ready for podiums with 16 cm speakers to be attached to it.
This is already a separate case. All this work was done to ensure that the doors did not rattle or make noise. It all depends on the acoustics you install. Not everyone likes powerful music, but our tuning is designed just for hammering. As a rule, we place a subwoofer in the trunk of a car, because it takes up a lot of space in the cabin, and there is a feeling of surround sound if it comes from the rear. It is advisable to make complete sound insulation of the VAZ 2112 car
, Shumka, doors alone are not enough. The work does not take much time, it is quite possible to do it alone. If a professional does it, and more than one, then the work will be done in a very short time; it is recommended to prepare in advance all the tools and materials that will be useful in the process of completing the work. You also need to work in a warm room, the glue should grab everything, but in a cold place it will simply harden. We select the size of the holes according to the diameter of the speakers installed on the car. All contacts must be well insulated in order to prevent fire.
Acoustic modification (soundproofing) of the front doors of VAZ 2110, VAZ 2111, VAZ 2112
engine assembly for a VAZ 2110 car | 2111 | 2112
Acoustics for VAZ 2111
Acoustic rear shelf for VAZ 2112, VAZ 2111, VAZ 2110
First of all, pay attention to the fact that the rear acoustic shelves are fundamentally different from each other. In addition, a shelf for a sedan simply cannot fit a hatchback car. That is why the procedure for designing an acoustic shelf should be approached extremely carefully.
But according to those who like to do everything with their own hands, you can make a shelf yourself, and this is where you can find similar production elements. In addition, it is also worth noting that not only the appearance of the inside of your car interior, but also the sound quality of the music will depend on the quality of its manufacturing.
Rear shelf Hyundai Accent
After I put on the music, the rear shelf was left unfinished. It itself was already quite faded, the speaker grilles were scratched, and in some places stained with some kind of ink, probably because the previous owner was carrying a small child in the back.
I thought about it and decided not only to make it noisier, but also to refresh it a little, namely to change the speaker grilles and reupholster it with a dark gray carpet.
I removed the shelf while I was playing music, the manual from the club forum helped. By the way, it was holding on for me with just one and even a broken piston. It seems that it was already dismantled and put back together before.
First of all, I glued the metal with the remnants of STP SIlver and STP Gold, and drove like that for a week until the next weekend))
I really wanted to change the grids to those that were included with the speakers, but without surgical manipulation it seemed to me that this would not be possible to do as I would like. Standard plastic ones stick out quite a lot, and if you put a carpet over them, and then attach a new mesh, you would end up with something mountainous and wavy, which is not at all what you wanted.
It was decided to farm a little)
I bought a couple of sheets of 2mm plexiglass (320 rubles per sheet) to cut out something similar to a spacer that would be inserted into the recess of standard meshes. A screwdriver and an emery machine will help. In short we have the following:
Now the problem arose of how to remake the wells into which the sound comes from the old meshes to the new design)) First, they had to be cut off with a knife or cutter:
To somehow glue these two things together, I first tried epoxy glue, but it didn’t work ((After drying, I pressed a little and everything fell apart.
The collective farmer in me woke up more and more and came out with the following: I pasted over the earlier cut part with an accent, and screwed it together on plastic corners, after which I placed the entire structure with glue from a can to the shelf itself.
Having made sure that everything was holding up pretty well, the process of removing the shelf from the inside began:
Now it's a matter of small things. We cover it with carpet, placing it on spray glue. We fasten the landing sides from the new nets, put on 4 new clips, cut off the excess carpet, cut holes for the speakers and the lampshade, screw the lampshade and go to install it on the car.
It fits back quite tightly, all the clips snap into place normally, nothing interferes with the speakers))
By money:
Glue - 480 RUR. Carpet musical dark gray ACV 1.5m x 1.0m - 290 RUR. Clips - even 150 rubles for 10 pcs.
It seems like it turned out cool, plus there are advantages in sound and appearance)
I was going to do it!
Everything is not as complicated as it seems.
The operations are all painfully simple: remove the shelf, remove the rear speakers, get rid of dirt and dust, degrease, glue vibroplast;
We take the shelf: we get rid of it, glue the vibroplast, then the accent, put it in place and rejoice at the result! Thanks to everyone who suggested and helped with advice
(“How to remove a shelf?”, “Should I leave the rear?”, etc. There were a lot of questions due to ignorance, but that’s in the past!).
PS I decided to remove the rear speakers for good a long time ago. Loud front + sub decides, the rear is of no use and never was!
By the way: I sealed all the technical holes so that the bass came out into the cabin only through the holes in which the speakers were placed. The glued shelf no longer jumps with a roar from the bass, and the bass itself has become longer and lower! I did it, sat down, turned on the mayfun and BAAAAAA! The sound is excellent! (one thing that upsets me is that the front door trims are jumping
But that's next!) At the end - photos of a clean car!=THANK YOU FOR YOUR ATTENTION!=
Acoustic shelf Hyundai Accent
The Hyundai Accent acoustic shelf is designed for the correct installation of speakers. This shelf no longer vibrates during operation. An Accent acoustic shelf is especially recommended if the speakers are large. The frail factory shelf in a Korean car is in no way capable of supporting powerful speakers, and they won’t fit there, since the standard seats provide for smaller speakers.
Making an acoustic shelf for a VAZ 2114 with your own hands
Having a hatchback body, the VAZ 2114 is distinguished by an impressive trunk, which covers the entire rear part of the car. It is separated from the interior by a seat and a removable shelf.
The shelf has bending points provided by the design, along which it folds, increasing the volume of the luggage compartment. This design does not cause any complaints, especially if the presence of music is not important, but if music means a lot to the owner, a “surprise” awaits him - there are no places for mounting an audio system in the design of the VAZ 2114.
The standard shelf is thin and light, any speaker will make it heavier, which will lead to its incorrect fixation, the shelf will rattle a lot, the audio system will resonate with the pits and the rumble from behind will be simply unbearable, the presence of such “music” is very doubtful pleasure. Later, the sides will also become loose, and then it will become completely unbearable.
The problem is solved in three ways:
- The shelf is removed, there are no rear speakers, there is nothing to rattle, but there is no music either.
- Acoustic shelf VAZ 2114 is inexpensive to buy, but it will improve the situation significantly.
- Make an acoustic shelf yourself.
In addition to eliminating third-party noise, the acoustic shelf will solve the problem of trunk structural rigidity, provide the acoustic system with a reliable frame, and eliminate the negative impact of acoustic vibrations on the mechanical joints of the rear door and trunk as a whole.
Selection of speaker systems
For high-quality sound of the played soundtracks, it is recommended to purchase a 2-component system, which contains separate tweeters and mid-bass midrange/bass speakers. In this way, a high-quality sound stage can be formed.
That is why it is recommended to place them in front. The role of the subwoofer is played by cheaper coaxial speakers, which are installed in the rear of the car. To install tweeters and connect them to the radio, you need to install additional wires.
HF speakers are installed in the triangles of the Lada Vesta mirrors. If you need a budget option, then you should buy coaxial system speakers. You will not get the effect of frequency diversity to obtain a sound stage, but the musical sound of the broadcast programs will be good. No additional system configuration is required.
We are finalizing the factory version
If the VAZ 2114 acoustic shelf is expensive for you, but you don’t want to make it yourself from scratch, then you can modify the factory shelf.
To do this you need the following tools and materials:
- Plywood.
- Putty.
- Upholstery.
- Self-tapping screws.
- Epoxy adhesive.
- Jigsaw.
- Knife.
- Emery (sandpaper).
- Stapler.
The shelf is easy to modify; for a good result, the steps are performed in the following order:
- We draw a template on cardboard, use it to draw places for the speakers on the shelf, and cut them out with a jigsaw.
- We use the shelf as a template, draw what we need on the plywood, and cut out what we need on the plywood.
- Using epoxy glue, we glue the shelf to a piece of plywood cut out for it.
- We cover (glue) the finished result with carpet (another fabric), not forgetting about the plywood ends.
We make it from scratch
The acoustic shelf of the VAZ 2114 is easy to make with your own hands, you will have to spend a little on materials, and do not regret a little of your time.
The following “ingredients” will be useful:
- Centimeter chipboard or MDF.
- Carpet (other fabric).
- Glue.
- Self-tapping screws.
- Jigsaw.
- Drill.
- Grinding machine (emery, sandpaper).
- Stapler.
- Materials for the layout: cardboard, pencils, drawing supplies.
We will do it like this:
- We are preparing a template, then we will try it on the car, it should be a little larger.
- We cut out the shelf according to the template, remove the irregularities by grinding down the gap included in the template.
- We double-check its dimensions on the car, if everything matches the car and the size of the intended speakers, then the shelf is ready.
- We are preparing materials for covering (pasting), everything should be at hand.
- Apply glue to the plywood, apply fabric, and roll everything out to avoid bubbles.
- We fix the edges with a stapler.
- Let it dry for a day.
In order for the shelf to be foldable, you need to take care of the moving elements in advance and try on the hinges. It is better to do this before pasting with carpet, so the design will look much more aesthetically pleasing; the moving technical gap can be closed with a strip of “elastic” (elastic fabric), but not with carpet or other non-stretchy fabric.
Very often, people don’t want to fool themselves with jigsaws and glue, so they immediately buy ready-made ones. This solution has a significant advantage, because there are a great many modifications of shelves, both a regular “plastic shelf” and a solid “VAS 2114 acoustic shelf with sidewalls” are sold, all intermediate options are also present in the online assortment. Although the purchased version will be many times more expensive than the homemade one, laziness and the “pursuit of beauty” sometimes overpower common sense and the desire to save.
We create acoustic podiums
It doesn’t seem logical to change the shelf, investing effort, time and money into good sounding music, leaving the standard VAZ 2114 podiums, which are made of plastic and eliminates more than half of your work. Plastic does not dampen the vibration of the speakers at all; on the contrary, it enhances it, creating rattling and extraneous noise. Therefore, we will make new podiums, tougher, and making all the previous torment justified.
For the new holder you will need:
- Columns.
- Installation rings (included in the kit).
- Gloves and brush.
- Epoxy glue and hardener.
- Fiberglass and lycra.
If you start creating a podium from scratch, some skills in woodworking and other work with materials will come in handy, firstly, for an untrained person this is unrealistic, and secondly, people with such skills can imagine what exactly needs to be done without this article. Therefore, relying on the option that there are no such skills, as well as special equipment, on the basis of a standard podium we will carry out the procedure for strengthening it using the materials described above.
This procedure is done as follows:
- We cut off the mesh (part of it) from the podium and fix the installation ring; the structure should come out monolithic and rigid.
- We put lycra on the structure.
- Mix glue and hardener.
- We spread the resulting solution onto the lycra and, as in papier-mâché, glue the fiberglass (you need to stick 3-4 layers).
- Let the structure dry.
- We install.
The option of polyurethane foam is “not an option”: firstly, it causes corrosion of the body, and secondly, in addition to vibrations, foam also dampens sound.