Why VS auto?
Advantages of our store:
- large selection of car accessories;
- low prices;
- products are accompanied by certificates, which confirms high quality;
- prompt delivery to any region of Russia;
- free consultation with a manager;
- discounts are provided;
- promotions are valid.
If you need a VAZ 2114 acoustic shelf with sidewalls, select a model in the catalog, leave a request on the website, or contact the manager by phone.
We guarantee high quality of goods and speed of delivery.
Delivery and payment for acoustic shelf
Delivery: Orders are sent to the regions by transport companies and Russian Post.
Payment: Payment in cash - made upon receipt of the goods in the office or upon meeting with the courier in Tolyatti, as well as by bank receipt (Form PD-4), VISA, MasterCard, Maestro card, through SberBank to a card account.
| Hole for SAB | 10, 12 |
| Carpet color | Graphite Black Gray Blue Red |
| Material | Plywood, Carpet |
| Holes for speakers | 16 cm, 13 cm, 20 cm, 6*9 inch |
| Comments | Folds 50x50 |
| Equipment | shelf, sides (2 pcs.), fasteners |
| Shelf thickness | Sides 25mm, middle 10mm. |
| Cars | VAZ||Samara||2003-2013 2114 Hatchback 5d, VAZ||Samara||2005-2013 2113 Hatchback 3d, VAZ||2109||1988-2006 Hatchback 5d, VAZ||2108||1984-2003 Hatchback 3d |
Tuning VAZ 2109
As mentioned earlier, the optimal price-quality option for a sound system on a VAZ 2109 would be to install 4 speakers, two in front and two in back. There are no problems with the front seats, since there are standard places for 13-inch speakers in the front panel. For those who don't have 13 inches, they can make podiums for the front doors and install speakers with a diameter of 16. The rear standard places for speakers in the plastic inserts on the sides of the rear shelf are no good - they are too small to reproduce more or less noticeable bass, and the standard shelf is too flimsy to support the 6x9-inch oval speakers that are most suitable for placement in it.
Making an acoustic shelf for a VAZ 2109 with your own hands
As mentioned earlier, the optimal price-quality option for a sound system on a VAZ 2109 would be to install 4 speakers, two in front and two in back. There are no problems with the front seats, since there are standard places for 13-inch speakers in the front panel. For those who don't have 13 inches, they can make podiums for the front doors and install speakers with a diameter of 16. The rear standard places for speakers in the plastic inserts on the sides of the rear shelf are no good - they are too small to reproduce more or less noticeable bass, and the standard shelf is too flimsy to support the 6x9-inch oval speakers that are most suitable for placement in it.
Therefore, in this article we will look at how you can make a good rear acoustic shelf to accommodate two 6x9 speakers. The material will be useful to owners of VAZ 2109, 2108, 2114, 2113.
From the materials we will need:
- Plywood sheet 18 mm thick
- A piece of carpet measuring approximately 1 m x 1.5 m
- Aerosol adhesive for carpet
- Wood stain
- Staples for furniture stapler, size 8 mm
- Two hinges for the folding part of the shelf
- Masking tape
- Self-tapping screws
Required tool:
- Jigsaw
- Plane
- Screwdriver (or drill)
- Furniture stapler
- Stationery knife
- Scissors
- Ruler
- Pencil
However, this list can be shortened, but you will spend more time performing certain operations manually, without the help of a tool.
You can cut out the shelf template yourself, taking into account your preferences. To do this, you need to take a piece of thick cardboard and, by measuring and adjusting, make a model of the future acoustic shelf. For example, the contours of a future shelf can be outlined by removing a standard shelf with plastic sides (it is highly recommended to make a full-size shelf, from glass to glass) and laying this out on a sheet of cardboard.
For the lazy, I can offer this ready-made template for the rear acoustic shelf for a VAZ 2109 (download), many thanks to its creator. You just need to print it on A4 sheets on a regular printer and lay it out in a certain order, you’ll figure it out.
It is also worth considering the fact that our cars may have some variation in dimensions when assembling cars. Therefore, if you use a ready-made template, you will still have to adjust the shelf to its location.
Next is the manufacturing process itself.
We place a plywood sheet on the workbench and draw on it the contours of the future shelf according to the template. Don't forget about the holes for the speakers, as well as the processing of the edges for the contours of the rear pillars and the rear window rubber. Then we cut out the folding part of the shelf, attach the stiffener and cover all the parts with stain. After the stain has dried, you can screw on the hinges.
Now we spread the carpet on the future shelf and measure, leaving an allowance of 4 centimeters at the edges. We cut it out, apply glue and evenly and carefully glue the carpet to the wood of the shelf. Some places require careful gluing.
The ends of the shelf also need to be glued with carpet, the remainder is wrapped on the bottom edge. In order not to smear everything with glue, we use masking tape.
Next, we pierce the edge of the carpet along the perimeter of the shelf with construction staples using a stapler. You can leave a carpet allowance above the hinges for the lid, and they will not be visible from the outside. Now we cut off the excess carpet that is not glued with a stationery knife.
Next, we tighten the folding part of the shelf into the carpet, according to the same principle as the shelf itself. We mark the places where the canopies will be attached to the folding part.
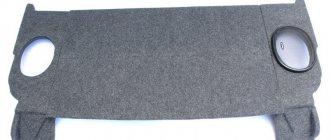
All that remains is to screw the folding part, and that’s it, our shelf is ready, you can install it on the car. This is what it looks like externally:
There is no need to remove the plastic sidewalls where the holes for the standard speakers are located; our shelf is placed on top of them and screwed from below using self-tapping screws.
You can enhance the bass and sound quality of the rear speakers by installing a power amplifier, which can be placed on the same shelf between the speakers, it will stand.
- Author: Roman
Rate this article:
- 5
- 4
- 3
- 2
- 1
(3 votes, average: 5 out of 5)
Share with your friends!
Making sports door handles with your own hands on a VAZ 2109
DIY oil catcher
What can a shelf be made from?
MDF shelf drawing
A common material for an acoustic shelf is MDF or multi-layer plywood. Be sure to cover the surface of these materials with carpet or other acoustic material to ensure compliance with the overall design of the interior. As for the area for installing speakers, they must be made so firmly that they completely eliminate rattling and vibration.
Making a shelf with your own hands
Acoustic shelf for VAZ 2109
So, if we decide to make a shelf with our own hands, then go ahead. A ready-made acoustic shelf costs about 1,000 rubles in a store. Why waste extra money if you can make everything yourself, spending some of your time and receiving inexpressible pleasure from the process. A homemade shelf has advantages over a purchased one, and it’s simply impossible not to notice.
Start
To make a shelf for a VAZ 2109, you will need to prepare.
Materials
- Plywood or MDF.
- Macroflex.
- Glue (one can is enough).
- Several meters of carpet.
- Self-tapping screws.
- Polyurethane foam.
- Sanding paper.
- Standard rear shelf made of plastic.
- Small nails (furniture).
- A simple pencil.
- Tape measure or simple ruler.
- Screwdriver.
- Drill with drills.
- Brush.
- Construction stapler.
Tools
Note. As mentioned above, the ready-made standard shelf of the VAZ 2109 is used as a model. Therefore, it will need to be removed. A simple screwdriver, a little patience and time - the shelf is dismantled.
- We place this very shelf, cleaned of dirt and dust, on a flat table.
- We lay a sheet of chipboard on top.
- Take a pencil and carefully trace the edges intended for the seat belts.
- Draw ovals for the speakers with a pencil.
How to mark an acoustic shelf
Main stage of work
Acoustic shelf for VAZ 2109
This includes the manufacture of acoustic podiums, the construction of a box for seat belts, pasting and much more.
Podiums
- We also make the base of the podiums from chipboard.
- We work with a jigsaw.
- To give the structure additional rigidity, you need supports made of bars measuring 20x40 mm. There should be several pieces of bars and they are inserted between the ovals using screws.
Note. The podiums, as mentioned above, are made on a separate piece of chipboard.
- We place the podiums on a standard shelf and trace them with a pencil.
- We also mark with a pencil the places of the round holes intended for air intake from the trunk.
- Between the bars of the podium, voids appear that need to be filled with sealant. As for the holes inside the product itself, they are covered with cardboard. This will prevent the foam from falling out during the drying process.
- Fill with polyurethane foam.
DIY shelf
- We wait until the foam dries completely.
- Take a sharp knife and carefully cut off the excess.
- We process the surfaces with sandpaper.
- Now we impregnate a piece of nylon with epoxy glue and wrap it around the entire structure. This is done for strengthening and strength.
How to make an acoustic shelf for a VAZ 2109
Making a box for belts
Note. When making a box, the following point must be taken into account: the belts must enter the box from the side.
- We outline the places with a pencil.
- Cut with a jigsaw.
Covering with carpet
- Pasting can be done using clothespins.
Note. After these operations, the boxes are assembled and screwed in place.
The final stage of work
- The final stage involves installing the manufactured shelf in place. Bolts attached to the metal part of our “nine” can be used as clamps. The nuts must be attached to the trunk side.
Advantages of an acoustic shelf
VAZ 2109 acoustic shelf
Today you can purchase an acoustic shelf in specialized stores. Its cost is not that high, although it is still recommended to do it yourself. In any case, whether the shelf is purchased or made with your own hands, it will provide advantages:
- The acoustic shelf creates improved sound from the speakers.
- Thanks to the shelf, rattling is significantly reduced and other unnecessary sounds are eliminated.
- This shelf harmonizes perfectly with the interior of a car such as a VAZ 2109.
- After installing the shelf in place of the standard rear panel, there is a unique opportunity to use the entire useful volume of the trunk to play music. In other words, in this case the luggage compartment plays the role of a kind of acoustic box.
- The acoustic shelf protects from external attacks. Therefore, such an installation is called hidden. If everyone saw that you have expensive speakers in your car, the likelihood of theft would increase several times.
- The shelf allows you to install speakers of any size. If you make a shelf yourself, this will give you even more possibilities.
Features of fastening and removal
Despite the apparent simplicity of this operation, the process of removal and reinstallation should not lead to subsequent rattling or distortion. The fact is that the material from which the rear shelf is made is quite fragile and cannot withstand even a small load. Therefore, the need for careful removal and installation is directly related to the longevity of its use. In some cases, you even make a VAZ 21099 shelf with your own hands.
The fastening of the shelf, taking into account the fragile plastic used on the VAZ 21099, is carried out using special plastic pistons. To release them, you need to remove the central part of the piston, after which it can be easily removed by hand. Having released the pistons, remove the central shelf.
Typically, removing the center shelf alone is not sufficient to gain access to the top of the shock absorber. At the edges, the rear shelf is attached to the side ones, which are where the speakers of the acoustic system are installed.
The speaker shelves are attached to the internal panels using a self-tapping screw and a piston similar to the one discussed above. Therefore, by carefully unscrewing 2 screws and releasing the piston, you can gain access to the shock absorber strut and standard acoustics. To raise the shelf you need to remove the wires from the speaker tips.
After removing the central part and the side elements that make up the rear parcel shelf, you can replace the struts and gain access to the torsion bars of the trunk lid hinges.
Tools and materials
First of all, you will need to stock up on materials and tools with which you can make a shelf. This list includes:
- Sheet of plywood - 2 pieces with a thickness of at least 5 millimeters;
- Cardboard sheet;
- Set of self-tapping screws;
- 2-3 furniture curtains;
- Electric jigsaw;
- Sandpaper;
- Marker;
- Shelf covering material;
- Roulette, ruler, etc.;
- Glue.
The design involves the creation of two main elements. They are combined into a single system - a podium for the speakers and a folding part with which you get access to the luggage compartment.
How to make a trunk shelf on a VAZ 2109
Today it is rare to meet a car enthusiast who is content with the standard equipment of his car. Modern drivers are increasingly engaged in styling (from the English word “styling” - style), i.e. change the interior of the car and its appearance in order to stand out from the general flow of vehicles. At the same time, owners of domestic cars do not lag behind the owners of foreign cars, and sometimes even surpass them in design ideas translated into reality. In this article we will give an example of how to make a trunk shelf on a VAZ 2109 with your own hands at the lowest cost from simple and affordable materials.
We cut according to the template.
Tools that will be needed for work:
- decorative handles for furniture;
- plywood;
- cardboard;
- upholstery material;
- adhesive mixture (universal glue);
- two hinges for furniture.
How to make an acoustic shelf yourself on a VAZ 2109.
First of all, we will ruin the planes.
Today I’ll tell you how to make an acoustic shelf with your own hands for a VAZ Nine. When you want bass, but you don’t want to spend the family budget on an amplifier and subwoofer, especially if you already have 6x9-inch speakers, popularly called “ovals”.
We have already discussed questions about the feasibility of making a shelf in the article about a virtual subwoofer, and in the same article about ways to subsequently improve the sound by building up the system step by step, so let’s move on to the topic.
Let's start with the necessary tools and materials.
- Birch plywood, 18mm thick, preferably of the highest quality, without knots. A sheet of 152x152 cm costs around a thousand. With excellent quality - one and a half.
- Carpet. Width - 1.37 m. Length - 80 cm. Price - from 150 to 300 rubles per linear meter.
- Glue for carpet - aerosol "Star Dreams 185 Professional".
- Self-tapping screws 41 mm for the stiffener - 10 pcs.
- Wood stain.
- Staples for staplers 8 mm, hardened “Stayer” type or other high quality ones.
- Two canopies for the opening part (photo below).
- Self-tapping screws 32 mm for awnings - 8 pcs.
- Wood saw with a “clean cut” - better than “Bosch”
- Grinding wheel with sandpaper for fortune
- Masking tape
- Jigsaw
- Planer, electric too
- Screwdriver or drill as a last resort
- Fortune
- Stapler
- Scissors
- Stationery knife
- Metal ruler
- Pencil
Tools:
I’ll tell you right away about the templates for the shelf. If you like to craft, then making such a template will not be difficult. You just need to take regular cardboard and cut out a template according to your car. I agree that it may take some time to get the perfect shape.
Therefore, for those who don’t like to waste their time making adjustments to the car, I posted my shelf template for 2109. I can’t promise anything about the 2112, since it almost always fits the car—the tailgate trim dances a lot. But if there is demand, I will post it too.
We will assume that you received the template (no matter how). Let's continue.
Place a sheet of plywood on the cutting table. oh, yes, if you don’t have one, then the sawhorses left over during construction, an ordinary workbench, stools, and finally, can work. Trace the template. Cut out the future shelf, holes for the speakers and process the edges for the bends of the rear pillars and the rubber of the rear window.
After this, cut off the opening part from the shelf, screw the stiffening rib at the back with self-tapping screws through the shelf and then apply stain on both sides. Once the stain dries, install the awnings:
Take the carpet, place it on the shelf, cut it with a margin of 4 centimeters. The rest will go to the opening part. Remove the carpet, spray glue over the surface. Some places need to be well glued.
For better quality, the carpet is also glued at the ends of the shelf. To avoid splashing the bottom more than necessary. use masking tape.
After the carpet has been stapled around the perimeter, you can carefully cut it out in the area of the canopies so that it appears from above that there is no canopy as such, because it is hidden from prying eyes. Also, use a stationery knife to remove excess pieces around the perimeter.
Now tighten the opening part. Also treat with glue and punch with staples using a stapler. Trim off the excess. Attach it to the shelf and mark below where the canopies are located.
After all this, all that remains is to screw the “opener” correctly and your shelf is ready! Without the car it looks like this:
Judging by their content, the following articles are relevant to this text:
How to make soundproofing doors yourself, without extra costs. Everything is ready to transform the Nissan Wingroad into a new pleasure center. Some of the materials used were available, so there is no need to be intimidated by the variety. Next, step-by-step actions are highlighted in bold, following which any schoolchild will cope with the task set for Defender’s Day, and a schoolgirl by the Eighth of March and even more so. Today we will talk not about the golden key that everyone is looking for in their life, but about hands that, under certain circumstances can become gold, bringing their owner not only material wealth, but also the respect of friends and acquaintances. And about what can be done with these hands. We will talk about where to start in order to calculate and manufacture the subwoofer housing yourself. This began in 1996. Only after returning from the army, where he served for a year and a half, did the future Master decide what to do next - how to make a living. Friends invited me to work as an apprentice installer of security systems and car audio. Back then, knowing practically nothing about installing music and alarms, I went, but this was not a hindrance, since I have been inquisitive since birth.
Trunk upholstery VAZ 2109
Replacing trunk upholstery for VAZ cars
Upholstery (lining) of the trunk of any car is a necessary thing in many respects. Moreover, as practice shows, it often performs not only utilitarian functions, but also purely aesthetic ones. A classic example is the lack of upholstery on the top trunk lid of Grant model cars. Many drivers do not like it when metal and not very beautiful three recesses are visible when the cover is open. This fact was used by a number of manufacturers who began to produce and sell upholstery options for the top cover to owners of cars of this brand. And quite expensive.
Trunk upholstery, even made from high-quality materials, will wear out or become damaged over time. The operating time largely depends on what and under what conditions the driver transports in the trunk of his car. If you are faced with just such a situation when it is necessary to replace the car trunk trim, then refer to the catalog of our store, and we will not only promptly deliver the ordered goods, but we will also briefly tell you how to replace the upholstery yourself.
This procedure is quite simple on many VAZ family cars. To do this, you only need a Phillips and slotted screwdriver. This operation is performed in several stages (for VAZ 2106, 2105, 2107):
- Using a slotted screwdriver, you need to disconnect the plastic buttons for the rear mounting of the trunk mat.
- In the same way, you can disconnect the three rubber buttons on the front fastening of the trunk mat and remove it from the car.
- Using a Phillips screwdriver, you need to unscrew six (or more, depending on the modification) screws securing the rear trunk trim.
- Now you can remove the rear trunk trim.
- Using a Phillips screwdriver, you now need to unscrew the five screws and remove the right trunk trim.
- Then, using a Phillips screwdriver, unscrew the six screws and remove the left trunk trim along with the spare wheel cover.
- Using the same screwdriver, remove the self-tapping screw and the trim of the rear left arch.
Now you can install the new trunk trim. The procedure is performed in reverse order.
How to buy?
The order can be placed directly on the website, by filling out an application form, or by phone or in person, directly in the store at the Fortuna-Don car market.
Purchasing goods on the site occurs as follows. By clicking the “quick order” button, you are taken to the page for filling out the form. After filling out all the fields and checking the information, you click the “Place” button, confirming the order. After that, you can choose a payment and delivery method convenient for you.
How to pay?
Payment for goods is possible in any way: by cash or bank transfer, or using a plastic card. If you use the purchase form through the website, the order is transferred to work after assigning it the status “paid”.
How to receive the goods?
When placing an order in any form (via the website, by phone or directly in the store), you can choose a delivery method that is convenient for you. The goods can also be picked up in person by visiting our store at the Fortuna-Don car market, or you can choose the desired delivery method, including courier delivery.
| Manufacturer: | Plastic JSC Syzran |
| Vendor code: | 2108-5402270/71 |
| Name: | Piston for trunk upholstery VAZ 2108-2109 (set of 16 pcs) 2108-5402270/71 |
| Department: | VAZ |
An example of a theme. VAZ 2109: creating an acoustic shelf with your own hands
2109 creating an acoustic shelf and installing an amplifier and 6x9 pancakes on it
Amplifier MAC Audio Fearless 4000D (nominal 4x150) Kit for connecting a four-channel amplifier Speakers 6x9 Kenwood KFC-E6935 (nominal 60)
Sheet of plywood 1.5 x 1.5, thickness 12 mm (340 RUR) Fabric 1.5 x 1.5 (340 RUR, almost 225 RUR per linear meter cost) Liquid nails 2 cans for a gun, 400 ml each (140 RUR each, the MOMENT of installation was called) Fasteners (corners, screws, screws, nails, hinges) approximately 350 RUR
The tools I needed were: a pencil, a jigsaw, a drill, a grinder, a hammer, screwdrivers, keys, a glue gun, scissors, a stationery knife, a piece of aluminum angle 0.3-0.4 thick (for smoothing the glue), a soldering iron and all the junk for it .
Before starting work, I read everything there was on the Internet about creating shelves, found a couple of templates and sizes, and did not buy a paid one via SMS. I wanted to make a shelf from glass to glass with my own mount instead of the standard plastic ones.
At first I thought of making a template out of paper, trying it on, adjusting it, and then cutting a sheet of plywood from the norm. Having looked at the approximate dimensions of the shelf from glass to glass, I realized that this template would not fit on A1, and A0 in the city I don’t know where to print and I didn’t want to spend money on it. Therefore, I took one of the drawings with dimensions from the Internet and drew it on a sheet of fiberboard, it was approximately similar, but as it turned out after trying it on, somewhere it was small, somewhere it was large.
I spat on all these drawings, took my two standard plastic ones, and a standard shelf, attached it, circled it, and got a template. Because The fiberboard ran out, I took some very thin sheet of plywood from the garage. When trying it on, it fit better than the previous template, but there was still some reserve in some places, because... I cut it with a jigsaw with a reserve.
In a few approaches we adjust it to be ideal.
With the back seat it looks like this:
Now we put it on a sheet of new plywood (I took 12 mm, you could take 15), trace it and cut it out.
HERE, when trying it on, I ran into a problem. Because the plywood of the template was thin, it fit where the interior trim was bent, but the thick sheet would no longer fit there = . Therefore, we file the edges that do not fit or file them with a jigsaw.
Now the shelf fits perfectly. Then I decided to give her a test. I inserted the shelf onto the standard plastic ones and placed a 14 kg freon cylinder on it. Then I also added the spare wheel. Holds what you need.
Also at this point I abandoned the idea of making my own mounts instead of the original plastic ones, because... Without the original plastics, there was a lot of open space up to the body, which I really didn’t like, and I didn’t want to rack my brains about where and how to cover it up and hide it, so I left this shelf on the original plastics.
Before finishing the shelf, you need to mark where the speakers will be (relative to the amplifier, I expected it to hang from the bottom of the shelf between the speakers) and which part will open. With the speakers, I simply made a template along the line, took a longer ruler and a tape measure, and marked it out. And with the lid, after some thought, I decided to make the opening part like a curtain door (only in the horizontal plane). This is due to the fact that if you make the opening part very narrow, then it will not fit on the standard plastic ones and you will have to screw some kind of threshold on the bottom of the shelf on which the opening part of the shelf will rest; if it is made too deep, then it will rest against the trunk lid seal will not fall inside.
Additional Information
The lid rises with the trunk.
If desired, the shelf lid can be connected to the trunk door using a spring or rubber band. In this case, the lifting part of the shelf will rise along with the trunk door.
In conclusion, it is necessary to pay attention to the financial component of the issue. Self-manufacturing of a trunk shelf for a VAZ 2109 will cost the vehicle owner much less than the cost of services from service station specialists.
What is the volume of the body of a VAZ-2109 car?
Inside, the trunk suits car owners and does not cause any complaints, although its dimensions are somewhat smaller than those of the Priora and Kalina. The latest models are quite large, for which car enthusiasts appreciate them. But the VAZ-2109 also has its advantages and features. The car can comfortably fit 5 people of average weight. The low-mounted dashboard is very convenient; modern electronic components can be built in there, but this requires a lot of money. A small drawback of the body is that it is made of plastic and noise is occasionally heard. Subsequently, the trunk requires technical modernization. This is not difficult to do, and the financial costs for this work are insignificant.
Product delivery options
Note! Below are the shipping methods available specifically for this product. Payment options may vary depending on the shipping method. Detailed information can be found on the “Delivery and Payment” page.
Parcel by Russian Post
Available payment methods:
- Cash on delivery (payment upon receipt)
- Using cards Sberbank, VTB, Post Bank, Tinkoff
- Yandex money
- QIWI
- ROBOKASSA
Shipping throughout Russia. Delivery time is from 5 to 12 days.
Parcel by Russian Post 1st class
Available payment methods:
- Cash on delivery (payment upon receipt)
- Using cards Sberbank, VTB, Post Bank, Tinkoff
- Yandex money
- QIWI
- ROBOKASSA
Shipping throughout Russia. Delivery time is from 2 to 5 days. More expensive than regular delivery by Russian Post, approximately 50%. Parcel weight up to 2.5 kg
Express Parcel EMS
Available payment methods:
- Cash on delivery (payment upon receipt)
- Using cards Sberbank, VTB, Post Bank, Tinkoff
- Yandex money
- QIWI
- ROBOKASSA
Shipping throughout Russia. Delivery time is from 3 to 7 days. More expensive than regular delivery by Russian Post, approximately 100%.
Transport companies
Available payment methods:
- Using cards Sberbank, VTB, Post Bank, Tinkoff
- Yandex money
- QIWI
- ROBOKASSA
Delivery is possible to any locality where there is a representative office of the transport company. Delivery time is from 2 to 10 days. Sending large parcels is approximately 50% more profitable than by Russian Post.
Courier delivery in Togliatti
Available payment methods:
- Cash upon receipt
- Using cards Sberbank, VTB, Post Bank, Tinkoff
- Yandex money
- QIWI
- ROBOKASSA
Delivery time from 1 to 12 hours.
Pickup from our warehouse
Available payment methods:
- Cash upon receipt
- Credit, installments
- Using cards Sberbank, VTB, Post Bank, Tinkoff
- Yandex money
- QIWI
- ROBOKASSA
Pickup times must coincide with store opening hours.
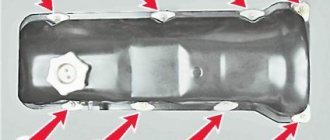
Improvement of the standard rear shelf of the "nine"
The main drawback of the standard design: the shelf on the VAZ 2109 rattles while driving. This disadvantage is quite easy to eliminate with your own hands. There are three popular options for making a shelf silent.
- Attach with Velcro.
- Press with an elastic element.
- Screw it on.
Velcro (Velcro tape) is a combination of two textile tapes, one of which is covered with micro-loops, and the second with micro-hooks. When connecting these surfaces, the hooks engage with the loops and securely fix the attached elements. Velcro comes in a variety of colors, starting with white. It is recommended to use a non-marking gray or black version in the car. The tape with loops is glued to the base, and the tape with hooks is glued to the underside of the shelf in contact with the base. By lightly pressing, the hooks engage with the loops, the VAZ 2109 shelf is fixed on the base and does not rattle when moving.
Some craftsmen use various elastic elements that press the rear shelf to the base and ensure silence when moving.
| How to press | What can be used |
| Creating a pressing force acting on this part. | To do this, it is convenient to use a rubber car harness used to secure luggage in the trunk. A pair of loops from such a bundle is attached to the underside of the shelf: one near the left support, the second near the right. |
| To secure the shelf, the loops are placed on hooks reinforced on the underside of the base. | Elements of furniture fittings can be used as such hooks. Fixing the part from the bottom side is quite aesthetic: only four heads of mounting screws are visible from the interior. |
| How the shelf is cleared. | Simply remove the elastic loop from the hook. |
The option of screwing the rear shelf to the base with the sides ensures that this element is tightly pressed. But this is the most difficult option, requiring time and effort to use. It’s one thing if you need to press Velcro or put on an elastic loop. It’s another matter if, when fixing a part with screws, you must do the following simple operations:
- unscrew the wing of the left and then the right screw;
- align the holes in the shelf with the mounting screws;
- install the removable shelf with screws;
- twist the lambs, also one by one.
Fixing this element does not imply a force load on the connection - there is no point in securing it with screws.
Manufacturing
Making a shelf, no matter how difficult it may seem at first glance, is a quick task. First you need to prepare the following materials and tools:
- A sheet of plywood with a thickness of at least 10-12 mm. As for the dimensions in length and width, it is better to take 1.5x1.5 m at once. In total you will have to pay about 500 rubles;
- Then you will definitely need to buy material for reupholstering the homemade shelf. Carpet is considered the best and not very expensive. We immediately take 100x150 cm;
Acoustic shelf for VAZ 2108
- Glue for the material. As a rule, either aerosol or Nairit is the best. Both are freely available in stores;
- You need a good stapler with the appropriate staples. This tool will make it possible to fix the fabric along the edges of the shelf;
- Canopies for fixing the opening part of the shelf;
Note. An acoustic shelf can be made in different ways. The best type in the VAZ 2108 will be a shelf with an opening part.
- You also need 10 self-tapping screws to create stiffeners. It is better to select 41 mm screws;
- You should also select 8 screws to secure the opening part of the shelf. Their size is 32 mm;
- Stain, which we will use to process plywood to give it a stylish appearance;
- Masking tape is also needed. We use it to cover those parts of the shelf that the glue should not get on;
- A set of tools including screwdrivers, scissors, a stationery knife, a jigsaw, etc.;
- Marking tool. A regular pencil or pen will do. You can add another ruler or corner to them;
- First of all, we find a template for the future shelf. You can either download it from the Internet or draw it yourself;
Purchasing a finished part
Many owners of "nines" use the surface of the rear shelf to install additional media player speakers. In this case, you get a VAZ 2109 acoustic shelf. The easiest way is to purchase a ready-made acoustic shelf at a car store. There is a wide variety of options on sale to suit every taste and budget.
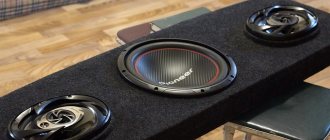
The rear shelf on the VAZ 2109 has an elongated shape along the rear seat with a folding part approximately 250 millimeters deep. This makes it very popular to use 6x9 inch (16x21 cm) coaxial speakers as rear-mount speakers. The mid- and high-frequency speakers of such systems are located on the same axis, one behind the other.
They provide a good filling of deep and rich sound throughout the car interior. But such an arrangement of audio systems, unfortunately, does not ensure that sound arrives from the front, in the listener’s face, as prescribed by feng shui requirements, or simply common sense. Rear row passengers listen to music in the very back of their heads, but it is loud.
Installing a purchased audio shelf can be done by yourself. This element is placed on the standard mounting points. To prevent rattling, Velcro is quite suitable.
It is better to connect the wires to the audio system through a standard connector block to facilitate the removal of the shelf when transporting oversized cargo.
Making your own acoustic shelf
Car enthusiasts who want to assemble and install an exclusive audio system on their car often go to the trouble of making an acoustic shelf with their own hands. The question of the advisability of installing a non-standard individual system on a twenty-year-old domestic small-class hatchback does not have a clear answer. But if the decision on this has already been made, then a homemade acoustic shelf will undoubtedly come in handy.
The question of rattling of such an element of the trunk of the “nine” does not arise at all while driving. Made from 12mm or even thicker plywood, loaded with two speakers with powerful magnets, and sometimes also a subwoofer, this part is securely fixed in place under its own weight. Making an audio shelf and podiums for a VAZ 2109 with your own hands is the most expensive and time-consuming option. But it gives a truly visible (and audible) result.
The shelf is usually cut out of thick plywood or chipboard with an electric jigsaw. You can download the drawing from the Internet or draw it yourself based on the dimensions of the standard part, taking into account the speakers and subwoofer planned for installation. Acoustic system podiums are often made using the technology of filling the structure frame with hardening foam filler.
The technology involves sequential implementation of the following steps.
- A hole is cut out in the center of the planned location of the podium to place the speaker magnet in it.
- A ring element is cut out of thick plywood, which will serve as the end of the podium - a seat for the speaker.
- For each podium, a spacer element is sawn off from a 25x25 mm block, the length of which corresponds to the maximum elevation of the speaker seating element above the surface of the shelf.
- Cut off one spacer element for the minimum elevation.
- Prepare two spacers for the middle elevation points.
- Self-tapping screws secure the landing circle with the desired inclination to the plane.
- The inner cylindrical surface of the podium is formed from kraft cardboard and the podium cylinder is foamed in the spaces between the spacers.
- The open outer surface of the podium is shaped by trimming off the excess filler with a knife, after which the surface is sanded, puttied and primed.
- As a final processing operation, painting or covering with carpet is used.
They install a homemade acoustic shelf on the VAZ in the place where the standard shelf is installed, connect it to the media center and enjoy the music in their “chisel”.
Essentially 2 shelves were prepared at once, so it took 3 days to make. To make 2 shelves you needed: 1 sheet of plywood 2 el. jigsaw 3 emery 4 file 5 brackets 2+2 6 a bunch of screws 7 mesh from the Freightliner air filter 8 the smallest putty 9 sandpaper 10 stapler 11 titan glue 12 solvent 646 13 patience 14 beer and a warm garage if possible)