A faulty starter relay is often the reason why the car refuses to start when the key is turned in the ignition. Perhaps these are not the most pleasant moments in the life of any driver. Therefore, in such cases, it is important to know how to check the starter solenoid relay, and how to start the car if it does not work.
We will tell you about the purpose of the starter solenoid relay and its structure, how you can check it and perform simple repairs yourself.
At the end of this article, watch the video that shows how to start your car if the starter solenoid relay is not working.
Also on our website you can find information about other common causes of starter malfunction with step-by-step instructions on what to do if the starter does not work.
When, when you turn the key in the ignition switch, you can clearly hear that the starter is idling, then the cause of this malfunction may be the solenoid relay. But before you start diagnosing it, you should know the purpose of this electrical unit.
Purpose of the starter retractor relay
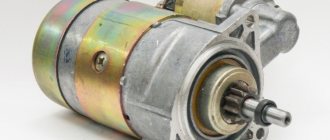
As you know, a starter is an electric motor that is powered by a battery. When starting the engine, the starter gear must quickly engage with the flywheel ring of the engine crankshaft. At the same time, the starter electric motor is turned on, which rotates the crankshaft - this process in action is clearly visible in the animation below.
The starter solenoid relay is responsible for quickly connecting two toothed parts: the flywheel and the overrunning clutch gear (Bendix). The retractor relay is installed on the starter housing, connecting to the clutch in the front using a lever. If the relay does not push the gear forward, then the starter rotates on its own.
However, the culprit of such a malfunction may be not only the retractor relay, but also the overrunning clutch (read more about Bendix repair). If the clutch is jammed, then the force of the retractor relay is not enough to extend it.
Principle of operation
It all works like this: when the engine is not running, the armature of the retractor relay is pulled out of the housing due to the action of the spring on it. The same spring holds the Bendix and gear through the fork in a position where there is no engagement.
When the ignition key is turned to the start position, the solenoid relay is first activated.
The electrical energy supplied to the coils of the solenoid relay ensures the appearance of a magnetic field inside the housing.
This field acts on the armature, and it, overcoming the force of the spring, enters the body, after which the retracting coil is turned off and ceases to create a magnetic field, but in the retracted position the armature is held by the holding coil with its magnetic field.
In this case, the armature pulls the fork, which in turn moves the bendix forward along the rotor shaft, and its gear engages with the flywheel ring.
The armature, entering the housing, pushes the starter relay rod, and, moving, closes the contact plates of the positive terminals with each other.
Electricity from the battery is supplied to the brushes of the starter motor, and its rotor begins to rotate. And since the gear has already engaged, the rotor begins to rotate the flywheel.
After starting the power plant and turning the ignition key back, the power to the holding coil stops, its magnetic field disappears and the armature comes out of the housing under the influence of a spring.
At the same time, it disengages the bendix through the fork and stops acting on the relay rod. He, in turn, moving away, opens the contact plates, and the starter is completely turned off.
Checking the starter retractor relay
To determine the reason for the lack of connection between the gear elements of the starter and the engine, you should check the functionality of the solenoid relay. For ease of diagnosis, most often it is necessary to dismantle the entire starter.
However, before you begin dismantling the starter, it is advisable to carry out several simple operations that will help identify the problem:
- Check the condition of the battery, the reliability of the terminals, remove oxides from the battery terminals;
- Make sure that the electrical wiring is securely attached to the starter with nuts. If there is corrosion, clean the contacts with fine-grained sandpaper;
- Find the starter switch relay in the car and check its condition.
Starter removal procedure
To remove the starter, you need to disconnect the wires that go to it, and then unscrew the mounting bolts (usually two or three).
Often, to perform these seemingly simple operations, the motorist has to spend a lot of time and effort.
This is explained by the fact that the starter in many car models is well hidden in the engine compartment, and in order to get to it, it is necessary to remove many interfering components and mechanisms from under the hood. And in some cars, such as the Volkswagen Golf or Passat, engine support will be required to remove it.
It is best to carry out this work in a viewing hole or on an overpass.
How to check the starter solenoid relay
When the starter has been successfully removed from the engine compartment, it should be cleaned of dirt, and the oxidized contacts should be treated with sandpaper.
- Now the starter needs to be placed next to the battery and two electrical wires of sufficient length must be prepared. It is best to use wires for “lighting” that are equipped with “crocodiles”.
- The first step is to connect the positive terminal of the battery with one electrical wire to the corresponding terminal of the solenoid relay.
- After this, the other wire is connected to the negative terminal of the battery.
- All that remains is to touch the free end of the negative electrical wire to the starter housing and find out the result:
- if upon connection there is a quick and distinct click in the area of the solenoid relay, then it is working;
- if there are no signs of “life”, then the solenoid relay needs to be repaired or replaced.
How to charge the battery in a VAZ-2109
If the starter malfunction is due to lack of battery charge, start charging the device. To properly charge the battery, carry out the procedure in a ventilated room. It is not necessary to remove the unit from the car; the process can take place directly in the VAZ-2109. When charging the battery, follow these requirements:
- Disconnect all electrical cables.
- Immediately before charging, carefully clean the terminals from adhering dirt and dust, paying special attention to oxidized areas.
- It is advisable to completely discharge the battery before charging - to do this, turn on all electrically powered devices.
- Observe the movements of the ammeter needle; it should approach the zero mark.
- Monitor the temperature of the electrolyte - it will increase during charging. For example, the temperature of the electrolyte has increased to 40 degrees, then the current should be halved. If within 2 hours the density of the electrolyte and the battery voltage in the VAZ-2109 remain unchanged, it means that the battery is fully charged.
Typically, 10-12 hours are enough to charge the battery. Please note that in the summer the electrolyte in the VAZ-2109 heats up at an accelerated pace, so the car owner’s task is to regularly check the density and level of the material.
Repair of starter retractor relay
First, we suggest watching a video instruction on how to replace the solenoid relay yourself, and then we will tell you how to repair it.
Depending on the manufacturer, starters are equipped with a collapsible or non-demountable solenoid relay. To fix a problem with a non-separable element, you just need to buy a new part. All that remains is to unscrew the two mounting bolts, remove the faulty relay and install a new one in its place (see the video above).
In the case of a detachable solenoid relay, you can try to repair it. The repair is as follows:
- Unscrew the screws securing the housing cover.
- Sometimes it is necessary to additionally solder the ends of the winding.
- Removing the cover opens up access to find a possible problem - these are power contacts that may be worn out or burnt:
- in the first case, replacing contacts will help,
- in the second case, the problem can be solved with the help of sanding paper.
- Now all that remains is to assemble the solenoid relay and check its functionality.
- The repaired starter is installed in place, after which its operation can be tested.
And lastly, we recommend watching a video that shows how you can start a motor with a non-working starter solenoid relay.
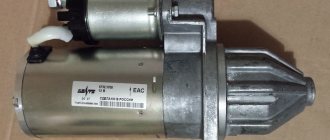
Types and manufacturers of VAZ retractor relays
Today, there are several types of VAZ solenoid relays with different designs and applicability:
In addition, retractor relays for VAZ Classic cars (2101 - 2107) are divided into two categories - old and new. Old-style relays have a collapsible design, so they can be repaired if desired. The new relays are non-separable, so if they break they can only be replaced. Collapsible and non-dismountable modifications also have retractor relays of other, more modern VAZ models. But in any case, both types of relays are interchangeable, so there are no problems with their installation.
Solenoid relays for VAZ cars are produced by several domestic and foreign enterprises:
Particular attention should be paid to starters and solenoid relays ZiT - the products of this enterprise were initially installed on VAZ cars, therefore starters and solenoid relays KATEK and KZATE were long considered the “reference” for Zhiguli and later models of the Volzhsky Automobile Plant. And today, most third-party manufacturers, to prove the high quality of their products, indicate that these relays are interchangeable with KATEK and KZATE relays.
The situation is similar with the products of the Iskra company. Today, a number of modifications of some VAZ models are equipped with AZD starters, to which only “original” solenoid relays produced at the same enterprise are suitable. This must be taken into account, since these solenoid relays are not interchangeable with products from other factories.
Element Role
All VAZ cars, including model 2109, have a standard engine starting system, which is based on an electric starter. Here's what you need to know about him.
- A starter is a small electric motor that is connected to the flywheel of the motor via a coupling (Bendix) for a short period of time to start the rotation of the flywheel.
- Despite its small dimensions, the starter passes through itself enormous currents.
- If the starter circuit were closed directly in the ignition switch, then not a single component of the system would be able to withstand such current loads. As a result, they would burn out.
- Therefore, for these purposes, the starter is connected remotely to the battery via a relay. Its contacts are designed for high currents.
- The starter operates briefly and must be turned off after the engine starts. Otherwise, its active destruction will begin due to the influence of motor power.
- Relyushka performs these tasks perfectly. Actually, it is precisely to ensure the functioning of the system and protection against current, timely shutdown of the starter, a retractor relay is included in the design.
Element diagram
Lada 2110 PhiX Logbook Additional, starter unloading relay VAZ 2110
Hi all! I’ll tell you about a very useful modification that will be useful for owners of elderly VAZ 2110. Many decades have encountered a problem when, in hot weather, a hot engine does not respond to the movement of the key. The starter does not turn and you have to go under the hood with a screwdriver and connect the contacts directly. In the case when the starter is working (in my case it is completely new), the culprit for this trouble may be the contact group of the ignition switch. Over time, the contact group in the ignition switch wears out or the current collector contacts burn out. This problem is successfully solved by installing an additional unloading relay. By the way, such a relay is installed on many cars from the factory.
To install this relay we need: 4-pin relay with a metal ear (30-40A); 80r Wires 1.5 sq. mm; about three meters -80 block for relay - 1 piece; 20p Flat male connector - 1 pc; Flat female connector - 1 pc; Ring lugs - 2 pcs. Insulating tape, heat shrink, corrugation.
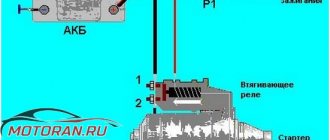
Let's put this whole thing together according to the following scheme.
The relay needs to be protected from moisture, for this I used thick heat shrink, in which I completely covered the relay block.
After assembly, I check the relay by connecting it to the LBP.
Pay attention to the laboratory power supply, the ammeter shows the current that the relay consumes. The current is only 0.12A and it is this current that will flow through the contact group of the ignition switch
For comparison, the pull-in current according to different sources is from 10 to 30A! Most often we are talking about 20-25A, where 20A is the current of the pull-in winding and 5 amperes of the holding winding.
Obviously, such currents will not be to the liking of the ignition switch contact group. The relay solves this problem perfectly.
Checking status
Before changing the relay, make sure that the problem with starting the engine is related to this component.
To do this, consider two situations that indicate its malfunction.
Situation
Your actions
The relay makes clicks, but the armature does not spin
If there are clicks from the relay, check the condition of the armature. To do this, the terminals of the retractor relay are bridged with a large screwdriver or a piece of welding cable to the terminals at the ends. Taking a thin wire or a screwdriver can easily burn the terminals. When the armature is working, after closing the terminals, the armature will spin, which can be determined by the sound. Consequently, the solenoid relay itself has failed and requires repair.
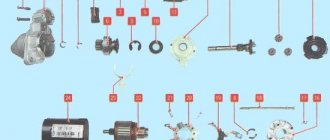
Troubleshooting and repair of starter 29.3708 of a VAZ-2109 car
In previous articles we looked at how to remove and disassemble the starter 29.3708. In this article we will briefly look at how to repair and troubleshoot starter parts.
1. Clean all starter parts.
Check the condition of the stator winding.
To do this, turn on the test lamp in the 220 V AC circuit and connect the wire to one of the terminals of the stator winding, and connect the other end of the circuit to the housing.
If the lamp is on, it means the winding insulation is damaged. Replace winding or stator. Check the second winding in the same way.
The stator windings can be checked with a tester.
Connect one contact to the terminal and the other to the stator housing.
The winding resistance must be at least 10 kOhm. If it is less, replace the stator.
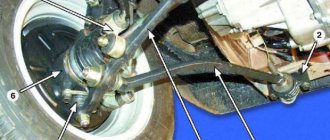
Dismantling
There should be no problems with the dismantling process. The main thing here is to remove the starter, since the required relay is held on it. Therefore, dismantling is carried out as an assembly.
- Turn on the handbrake, disconnect the battery by removing the negative terminal from it.
- A wire with a large cross-section goes from the battery to the contact of the relay. It can be turned off by unscrewing it using a 13 key.
- Remove the thin winding power wire from the solenoid relay.
- Using the same 13mm wrench, unscrew the three mounting nuts holding the starter to the clutch block.
- You can remove the device through the bottom or top. If you chose the top, then you need to slightly rotate the starter around its axis and remove it.
- The lower output is more difficult, since here you need to remove the crankcase protection. But if parallel work is carried out that requires similar manipulations, problems will not arise.
Repair
Next, you have a choice to make: replace the entire relay or try to repair it.
Only a relay that has a collapsible design can be fully repaired. It is not uncommon for cars to have a relay with a non-separable body. Repairs there are also possible, but only partial.
But if you want to save money or just like to tinker with your car, you can try to bring a damaged relay back to life. To do this, we offer you detailed instructions.
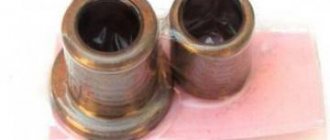
Disassembled element
If this measure does not help, we will disassemble the case and repair it.
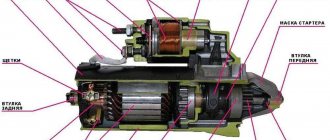
- The relay consists of a housing with a winding inside, a core with a return spring and contacts.
- The spring disconnects the starter rotor gears from the Bendix ring when the power to the relay winding is turned off.
- The back cover of the relay is fixed with screws to the body. Therefore, the first thing we do is remove this cover by unscrewing the corresponding fasteners.
- Both contact bolts have a nut, which you also unscrew.
- You will see washers under the nuts. Do not lose them so that you can return them to their place during reassembly.
- Unsolder both terminals of the winding using a soldering iron. Then remove the cover.
- If you find traces of carbon on the contacts, they can be removed with a small file.
- There is a rubber O-ring under the cover. Check it for elasticity and integrity. If the ring is damaged or worn, replace it with a new one.
- Remove the contact plate along with the rod.
- Use a flathead screwdriver to remove the return spring.
- If the spring is deformed or stretched too much, it will need to be replaced. Otherwise, a worn spring will not be able to guarantee the desired contact. As a result, the relay does not work properly.
- Disassemble the contact plate. To do this, you need to remove the retaining ring that insulates the washer. After this, the plate will fall out on its own due to the pressure created by the spring.
- Remove the contact bolts from the cover. Clean the surfaces of their contacts. Often, due to burning of the contact surfaces, the solenoid relay stops working normally.
Contact bolts
- If the carbon deposits are too strong and cannot be removed with simple sandpaper, do not rush to buy new bolts. Just rotate them 180 degrees. So they will touch on the other side, where there is no carbon deposits.
- The relay windings are located in a non-separable housing. If they are damaged, you will have no choice but to completely change the relay.
- Replace all damaged and worn elements of the switching relay, and then put everything back into the housing. Reinstall the solenoid relay and check if the ignition returns to normal.
If the relay has a non-separable housing, many recommend replacing it. But if you wish, you can even repair such a unit. To do this, you need to flare the housing with pliers, then unsolder the contacts and remove the cover. Next, follow the instructions given above.
VAZ 21099 carburetor does not start List of popular reasons and repair methods
Where is the Charging Relay on the UAZ Bukhanka. UAZ charging relay
- There is no voltage from the battery to the starter;
- Check the indicator on the battery; it should light green.
- If it is black or red, it means the charge is very low and you need to recharge the battery. 20-25 minutes are enough to start the engine;
- The degree of wear of the graphite rod on the distributor of the trampler has exceeded the permissible standards, as a result of which current does not flow to the first cylinder and the mixture cannot ignite;
- We unscrew the cover of the distributor and look at the rod, it is centered inside. The minimum length should be 1.0 cm or more, if less, replace the tamper cover. Due to the fact that the graphite rod does not reach the distributor, the current is not transmitted to the spark plugs and, accordingly, there is no ignition.
- The throttle valve is closed and air does not enter the working chambers of the carburetor;
- Check the tension of the choke cable. The air damper rod must be strictly vertical; all other positions may overlap it and become a barrier to air. Press out the bolt and straighten the rod.
- The fine filter of the fuel system is very dirty and does not allow gasoline to pass into the combustion chamber in the required quantity;
- Look at the filter color. If it is a rough orange color, it needs to be changed because it is clogged. The optimal color is light yellow.
- The coil on the ignition coil is damaged, causing the spark plugs to not receive the spark that is the source of ignition. See the article “How to test the ignition coil with a multimeter”;
- Proceed as follows: disconnect the positive cable on the battery, unscrew the top part of the ceramic block on the coil and you will see a metal spiral. If there is damage, the entire ceramic module must be replaced. There are no other options. It is strictly forbidden to use soldering, it will not help.
- The fuel and/or air jets are clogged and cannot transfer the mixture to the combustion chamber;
- You can only check by unscrewing the air filter cover and removing it along with the top carburetor cover. After unscrewing both types of jets, blow them with a stream of compressed air and screw them back in. There is no need to change.
- The line of the electrical cable that transmits current through the circuit is damaged;
- If you are not an electrician, then it will be difficult for you to determine which wire is damaged. Try only with the tester, starting from the ignition switch;
- There is no gasoline in the gas tank (for example, it was drained);
- The diaphragm in the fuel pump does not work or is damaged (see signs of a faulty fuel pump);
- Only by removing the top cover of the fuel pump can you understand the degree of integrity of the diaphragm. Replace if damaged.
- The cam on the fuel pump rod is damaged or severely worn, as a result of which the rocker rod does not touch it and fuel is not pumped into the system;
- In this case, it is necessary to change only the entire fuel pump as a whole. Once a cam wears out, it cannot be repaired.
- The air filter is clogged;
- The cylinder head is broken, and as a result, the compression level has dropped sharply and is not enough to ignite the mixture.
AutoFlit.ru
Self check
To independently check the functionality of the solenoid relay, you first need to check the starter itself. The scheme is quite simple. First of all, turn the key in the ignition and try to start the car. If the starter does not work, you will hear a specific clicking sound. This means that the fault lies in the relay.
Without disassembling or dismantling the starter, you can check the mechanism of the device yourself. To do this, bridge two contacts on the rear panel of the traction relay (they look like copper bolts). If the device starts to move (spins), then the problem is in the retractor.
Remember that when disassembling and repairing a car yourself, you should be careful and careful. Follow the instructions to avoid aggravating the damage or getting injured.
Where is the fuel pump located on the VAZ-21099 injector
Removing and installing a gasoline pump (PG) is not a difficult job and does not require extensive plumbing experience or high qualifications. But if you don’t have to look for a fuel pump on carburetor cars for a long time (it is located on the engine, under the hood), then a beginner may not find it on the injector on the first try. Where is the fuel pump located on the VAZ-21099 sedan injector? Let's figure it out step by step:
- we move the front seats in the car forward as much as possible to free up space in the rear;
- open the rear left door of the car, find a small hinge on the rear sofa, which is located at the junction of the “seats” approximately in the middle of the cabin;
- pull the loop up, thereby raising the back of the lower seat;
- under the carpet we see the gas tank flap;
- unscrew the two fastening screws, remove the hatch and find the fuel pump underneath.
Causes and solutions to the problem
All faults can be divided into two categories:
- the breakdown lies in the starter and retractor relay;
- the starter armature rotates and the relay clicks;
The most common reason for a relay to not work is that the soldering point of the wire to the terminal has lost contact. Before disassembling the device, just try soldering these places with a soldering iron - the problem is solved. Well, if the starter still does not work, then the relay will have to be disassembled. Sometimes the coil that creates the electromagnetic field burns out. Simply replacing the old wire with a new one eliminates the problem; to do this, you just need to rewind the coil with your own hands.
In the second case, when you hear clicks, but the starter does not rotate, try bridging the terminals on the solenoid relay with a screwdriver with a rubberized handle. Having done this, the starter armature will start and begin to spin, you can easily understand this by the characteristic sound. In this case, the breakdown lies in the inability of the relay to pass electric current through itself. Be careful when working, because you are in an area of electromagnetic activity and you may get an electric shock.
For what reasons can the starter relay fail?
Most often, failure of this device is caused by burning of its contacts. The phenomenon is very common, due to the fact that a high current flows through the relay (from 80 to 300 A). Because of this, a spark gap may form, which causes the contacts to burn. This in turn leads to low conductivity of electrical energy.
Also, a break in the winding is often noted on the solenoid relay. In cases where such a disaster occurs in the middle of the winding, the driver has no choice but to buy and install a new device. But when a break occurs in the soldering area of the winding and contact, the situation can be corrected by replacing the damaged area.
When it's the starter
If after these steps the starter continues to be silent, it means it is broken. To repair it, you need to disassemble the solenoid relay. But how to do this if the mechanism itself is not intended for disassembly? In an old-style relay, you need to unscrew one or two screws and unsolder the wiring that goes inside the device.
Modern devices are non-separable, and in order to open the back panel, you will have to flare the metal body of the mechanism. Flaring can be done with a large screwdriver or pliers. After this you need to remove the cover. To repair, clean the burnt contact plate and the surfaces of the bolts from soot to a shine. The better you clean it, the longer the relay will last you.
Of course, it would be wiser and safer to go to the nearest service station, but for a number of reasons, drivers sometimes repair the car themselves. Saving money and time requires preliminary preparation and certain knowledge in machine repair.
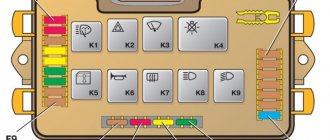
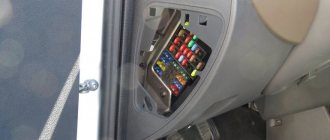
Mounting fuse block in VAZ 21099
Being the main unit that connects and protects various electrical circuits of a car, the mounting block can also become the focus of numerous problems associated with wiring.
The poor location of the fuse box on the VAZ 21099 makes it vulnerable to the negative effects of moisture. Therefore, for those owners of these cars who do not want to contact a car service center for every trifle, it is important to know not only what and where exactly the fuse is located, but also the interchangeability of blocks of various modifications - in case of replacement.
Starter connection diagram for 2105
- generator;
- accumulator battery;
- stator winding shunt coil;
- starter VAZ 2105;
- serial stator winding coil;
- holding winding of traction relay;
- pull-in winding of the traction relay;
- starter relay;
- mounting block;
- ignition switch.