- Work resource
- Engine operating temperature
- Are the valves bent?
- How much does engine No. 126 cost?
- Engine disassembly and repair
- Instructions
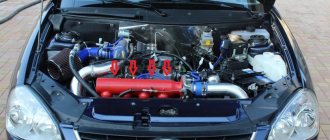
The VAZ 2170 model received several power plants, but the most popular engine in the Priora is a gasoline unit with 16 valves and a volume of 1.6 liters. On various automotive forums it is called briefly - 126 (number). Responsible drivers spend a long time thinking about which car to buy, and the engine plays an important role in this matter. Service life, operating temperature, price of a new motor, analysis - our review will answer all these questions.
Engine operating temperature 16 degrees. Priora ⋆ I Love My Lada
Not only the engine life, but also a number of other performance indicators depend on the operating temperature of the VAZ 21126 gasoline injection 16-valve engine. When the operating temperature is lower or higher than the nominal one, power and dynamics are lost; the temperature affects the operation of the heater and the quality of mixture formation. And this entails indicators on fuel consumption and engine life as a whole. Today we will figure out how to change the operating temperature of the Priora, Tens and Kalina 16 valve engine, what temperature is normal and how the cooling system fan affects engine operation.
Rated operating temperature of the VAZ 21126 Priora engine
To find out what the normal operating temperature is in the Priora 16 class injection engine, just study the factory technical documentation. It says that according to the International Motor Vehicle Manufacturers Convention, the operating temperature in gasoline engines with an injection power system should be within 90 degrees. Specifically, the Priora VAZ 21126 engine must operate in the temperature range from 87 to 103 degrees.
This contributes to the normal correct operation of the power system, maximum engine performance, and in addition, the content of harmful substances in the exhaust gases complies with Euro3 standards that were current at that time. And the engine power, as practice shows, remains within the nameplate limits - about 98 forces at 5.5-5.6 thousand rpm. Again, judging by the reviews, and based on practice, fuel consumption during overheating can increase by 15-25%, and when operating the engine at coolant temperatures below 85 degrees, consumption increases by 10-18%.
When does the fan turn on on a VAZ 21126 and how does it affect engine performance?
Since the VAZ 21126 engine differs only slightly from the main VAZ 2110 (21124) engine, their operating temperature conditions are the same, this applies to all 16-valve VAZ engines. Another thing is that the driver in real time can assess the operating temperature conditions only by two indicators, and even then they are not very objective - this is the arrow of the liquid temperature indicator on the instrument panel and the moment the cooling system fan turns on.
Obviously, you can’t tell much by looking at the arrow; its readings are more of a symbolic nature. But the fan on Priora and VAZ 2110 operates at a clearly set coolant temperature. The fact is that the engine control system (ECM) has more accurate temperature data than the driver. These are sensors located in the cylinder block, there are two of them.
At the same time, the engine temperature drops by an average of 5-7 degrees if the Carlson is turned on at half power, and if with full load, the temperature levels out from 105-107 ˚C to a nominal 96-98 degrees, depending on the speed and temperature outside.
Priora temperature sensor. How to check
Consequently, all responsibility for turning on the fan, and, consequently, adjusting the operating temperature, lies with the sensor. Its design is simple. This is an ordinary temperature sensor, which, when the temperature changes, changes the strength of the supplied response pulse. This is what the characteristics of the engine temperature sensor for VAZ 21126 Priora and Kalina look like:
| Liquid temperature, °C | Resistance, Ohm |
| 100 | 123 |
| 80 | 215 |
| 60 | 667 |
| 40 | 1459 |
| 20 | 3520 |
| 9420 | |
| -20 | 28680 |
| -40 | 100700 |
Naturally, as the temperature changes, the sensor voltage will also change.
| Liquid temperature, °C | Voltage, V |
| 110 | 0,5 |
| 80 | 0,8-1 |
| 60 | 2-2,5 |
| 40 | 2,7-3 |
| 20 | 3-3,2 |
| 4-4,5 | |
| -20 | 6 |
| -40 | 10 |
Therefore, if you have a multimeter in your hands and some skills in working with it, you can easily check the temperature sensor. To do this, you need to know to what temperature it is heated (which is easy to find out with a simple thermometer), and take the readings of a multimeter. Now the question of how to find out the temperature at which the fan turns on on Priora, Kalina and VAZ 2110 with a 16-valve VAZ 21126 engine disappears, and you can also draw a simple conclusion.
Thus, we found out the principle of operation of the cooling system fan of Priora and Kalina cars with a 16-valve VAZ 21126 engine, as well as indications of the normal temperature in the cooling system.
Post Views: 18,151
Refinement of the cooling system
Domestic cars are far from perfect, that's a fact. Lada Priora was no exception in this regard, having inherited many shortcomings from the legendary “ten”. One of them is an unfinished cooling system.
There are several ways to quickly and without financial costs modify the SOD on Priora.
- Installing a 6-hole thermostat (stable maintenance of coolant temperature).
- The use of Kalina SOD on Priora will reduce the pressure in the system and provide quick warm-up at subzero temperatures.
- Installing a larger or additional water pump to improve coolant circulation efficiency.
- Use of multi-speed and silent forced cooling fan.
- Changing the firmware of the control unit so that the fan operates at a lower temperature.
Refining the cooling system of the Lada Priora is a feasible task even for novice car enthusiasts. The SOD has a simple design with a minimal set of components. Thanks to this, the system is relatively reliable.
If the operating rules are followed, the ODS does not cause problems for the car owner, but natural wear of parts is possible. Therefore, it is necessary to regularly monitor the operation of the system and, if even minor problems are identified, correct them as soon as possible.
The VAZ 2170 model received several power plants, but the most popular engine in the Priora is a gasoline unit with 16 valves and a volume of 1.6 liters. On various automotive forums it is called briefly - 126 (number). Responsible drivers spend a long time thinking about which car to buy, and the engine plays an important role in this matter. Service life, operating temperature, price of a new motor, analysis - our review will answer all these questions.
Engine disassembly and repair
What is the operating temperature of the 8 valve Lada Granta engine?
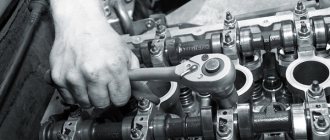
Repairs are carried out according to the standard scheme - we find faulty parts and replace them with working ones. The instructions below describe the process of disassembling the unit itself; before that, you need to dismantle it from the Lada Priora and thoroughly clean it of grease and dirt.
Instructions
- Using the 13th key, remove the bracket fastenings. 4 nuts hold the front cylinder block support;
- We remove the bracket and move on to the left support - it is removed in exactly the same way;
- Next, unit number 126 must be installed on the stand;
- After fixing, you can dismantle the pump cover, generator, oil pump and other external components;
- Depending on the breakdown, at this stage it is possible to replace certain components;
- Using the “tenth” key, we unscrew the fastenings of the heater tubes that go to the pump body. After this, the tube can be removed;
- Now we have access to the antifreeze pump - unscrew it from the cylinder block;
- After dismantling the pump along with the gasket, we move on to the crankshaft rear oil seal cover;
- Next, remove the bracket. Before unscrewing the connecting rod cap, you must make sure that the first piston is at bottom dead center;
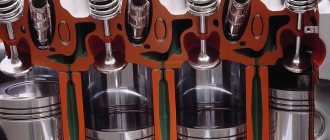
- By pushing the piston into the cylinder, you can remove the piston along with the connecting rod. The pistons are removed from other cylinders in the same way;
- If necessary, you can repair the piston, namely, replace the compression and oil scraper rings along with the expander;
- The piston pin can be knocked out only after the piston is securely fixed. Place it in a vice and give it a few blows with a hammer. We recommend marking the working parts of the unit so as not to get confused while repairs are being carried out;
- To remove the crankshaft, you will need to remove its bearings and then remove the beds. Repair and assembly are carried out in the reverse order.
Thus, you can completely disassemble the 16-valve engine and repair and replace faulty parts. But if the unit bends the valve, then only an experienced mechanic can handle the malfunction with his own hands. In any case, you will find out whether the motor bends the valves or not after removing the head cover.
Select VAZ engine model
Motor 126 and 127: working life, differences
Engine temperature rises at idle
These engines on Priora had a displacement of 1.6 liters (or 1596 cm3). Optimal for city sedans, the engine size of the Lada Priora gave a good combination of dynamics and consumption: along with very decent acceleration, fuel consumption does not exceed sky-high numbers. Both engines received good marks, because the car behaved perfectly in the city and on the highway.
127 motor - looks like this
In fact, the 126 Priora engine became the first sixteen-valve engine for this model, and the 127 is a modified version, “overclocked” by AvtoVAZ designers. In addition to the same engine displacement, they have other identical characteristics. The in-line type of arrangement of four cylinders provides a simplified design that can be repaired on your own.
The distributed multipoint injection system is involved in creating a good, rich fuel-air mixture (a lean mixture can lead to breakdowns). The cylinder diameter is 82 mm, the piston stroke is 75.6 mm, the compression ratio is 11. The “engines” fall under the Euro 4 standard, they are powered by gasoline with an octane rating of 95.
The 126 engine for the Priora received the following characteristics: 98 hp. (72 kW at 5600 rpm), acceleration to 100 km/h in 11.5 seconds (with manual transmission), city consumption 9.1 l - 100 km (manual transmission), maximum torque - 145 Nm.
The 127 engine for the Priora was upgraded to the following figures: 106 hp. (78 kW at 5800 rpm), acceleration to 100 km/h in 11.5 seconds (with manual transmission), city consumption 8.9 liters per 100 km (with manual transmission), maximum torque – 148 Nm.
The difference may not seem so noticeable, but this is a very small but strong step in design on the part of AvtoVAZ (this is where the change to sixteen-valve “engines” with a volume of 1.6 liters ended). For a car of the Lada Priora class, the engine power was sufficient.
In the same block it is necessary to say about the operating temperature. An absolutely normal operating temperature is considered to be between 90 and 95 degrees Celsius. Further, when the car is being pushed in a traffic jam, is basking in the sun, or for some other reason, but can still work - from 97 to 110 degrees. The engine is slow in places and wears out a lot, but you can still get to your destination. A temperature below 90 degrees is a direct sign indicating that the car has not yet warmed up, and it is better to wait in place until the arrow points to the coveted 80-90 mark.
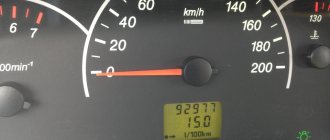
In general, the service life of the Lada Priora engine with a normal driving style and careful treatment is 200,000 km - after this mark the time comes when the “engine” requires major repairs. AvtoVAZ mentioned the timing belt separately as a recommendation, saying that it needs to be checked every 100,000 km (many car enthusiasts talk about the figure of 50,000 km).
All Lada engines have a problem, and it is related to the valves, which will be discussed further.
Choosing new thermostats for cars
Operating temperature of the VAZ-2114 engine 8 valves: facts
Since the cost of a thermostat is usually not very high, and it is responsible for the performance of an expensive engine, it is better to change it every two years. Today you can find several types of such devices on the specialized market. The most primitive are mechanical devices. But an electronic thermostat for a car controls the temperature using a special sensor. There are also electromechanical units that operate using contact pairs.
When choosing a thermostat, it is very important to know its temperature regime, since it differs for different brands of cars. And, of course, it is necessary to select the device strictly according to this parameter
Thus, thermostats for cars can be high-temperature, operating in the range of 300–1200 °C. The valve opening for medium-temperature devices occurs in the range of 60–500 °C. There are also low-temperature devices with an operating temperature of less than 60 °C.
Engine disassembly and repair
Repairs are carried out according to the standard procedure - we find faulty parts and replace them with working ones. The instructions below describe the process of disassembling the unit itself; before that, you need to dismantle it from the Lada Priora and thoroughly clean it of grease and dirt.
Instructions
- Using the 13th key, remove the bracket fastenings. 4 nuts hold the front cylinder block support;
- We remove the bracket and move on to the left support - it is removed in exactly the same way;
- Next, unit number 126 must be installed on the stand;
- After fixing, you can dismantle the pump cover, generator, oil pump and other external components;
- Depending on the breakdown, at this stage it is possible to replace certain components;
- Using the “tenth” key, we unscrew the fastenings of the heater tubes that go to the pump body. After this, the tube can be removed;
- Now we have access to the antifreeze pump - unscrew it from the cylinder block;
- After dismantling the pump along with the gasket, we move on to the crankshaft rear oil seal cover;
- Next, remove the bracket. Before unscrewing the connecting rod cap, you must make sure that the first piston is at bottom dead center;
- By pushing the piston into the cylinder, you can remove the piston along with the connecting rod. The pistons are removed from other cylinders in the same way;
- If necessary, you can repair the piston, namely, replace the compression and oil scraper rings along with the expander;
- The piston pin can be knocked out only after the piston is securely fixed. Place it in a vice and give it a few blows with a hammer. We recommend marking the working parts of the unit so as not to get confused while repairs are being carried out;
- To remove the crankshaft, you will need to remove its bearings and then remove the beds. Repair and assembly are carried out in the reverse order.
Thus, you can completely disassemble the 16-valve engine and repair and replace faulty parts. But if the unit bends the valve, then only an experienced mechanic can handle the malfunction with his own hands. In any case, you will find out whether the motor bends the valves or not after removing the head cover.
Are the valves bent?
Each engine in a Lada Priora car bends a valve, this also applies to the most powerful unit number 126 by 16. They will tell you this in any service center that services domestic cars. But novice drivers should know that the engine bends components for a reason, and if you follow the operating rules, you will not encounter this problem.
The Lada power plant bends parts only if the routine work to replace the belt and other components of the gas distribution mechanism (GRM) is violated. The motor bends the valve if the rollers, belt or water pump were not replaced in time. When one of these elements breaks, the number 126 pistons meet the valves. Due to this design feature, the motor bends the parts. The solution to the problem is a major overhaul of the Lada.
So, the task of the owner of a Lada Priora with engine number 126 for 16 cl is to check the timing belt in a timely manner.
The condition of the belt should be checked every 50 thousand kilometers (according to the factory recommendations - 100 thousand) - there should be no cracks, delaminations, or breaks on it. If they are present, the belt must be changed urgently. Mandatory repairs take place after 200 thousand kilometers.
The rollers and timing pump number 126 should also be given attention when inspecting the belt. After all, the engine bends parts even with faulty rollers. Sometimes the timing belt and its components wear out prematurely - you will know this by vibrations from the engine compartment and an unpleasant grinding noise. Engine number 126 bends the valve, so do not forget to change the timing components in time and repair this unit.
The principle of cooling the system on Priora
Like any other car, the Priora’s cooling system is based on fluid circulation through the radiator. The temperature is reduced due to airflow. There are two types of blowing:
The first, of course, is created while the car is moving at cruising speed. But the second one is turning on the fan at the moment of strong heating. It works according to the following scheme:
- Current flows to the fan winding constantly through “+”.
- “The negative contact goes to a relay controlled by the ECU.
- The unit turns the relay to ground based on a signal from its DTOZH sensor.
Features of heat exchange in cars with ECM (electronic engine control system)
The operating temperature of “injection” cars is higher than that of carburetor cars. It is equal to 102-105 degrees. Ordinary water boils when heated this way. Therefore, you can only use antifreeze or antifreeze that has a boiling point of about 115 degrees
This determines the importance of the electronic component of the cooling system
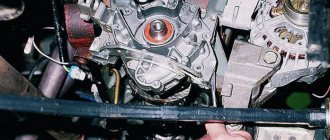
Where is the coolant sensor installed for the ECU on the Priora?
The Priora control unit needs the most accurate and up-to-date information about engine temperature. This is the main selection criterion for installing sensors. Therefore, the temperature ones are installed in the area of the engine cooling jacket itself. They are almost nearby. Only the panel sensor is screwed into the block, and for the computer, it is embedded in the body of the metal thermostat mounted on the cylinder head.
In the photo above you can clearly see both.
Checking the DTO for the Priora ECU
Like any device that is part of the engine control system via a computer, this temperature sensor, in the event of failure, first of all lights up the “Check Anger” alarm lamp on the instrument panel
One important clarification: the computer has a built-in emergency
program. This means that if the DTOZH fails, the ECU will force the radiator fan into constant operation. So, signs of a malfunctioning cooling system:
- Turning on the “Check” lamp.
- Constant operation of the Priora fan.
- High engine temperature on panel.
It must be remembered that if a signal appears on the panel, you must urgently go to computer diagnostics of the ECU. This will allow you to absolutely accurately determine the cause of the malfunction.
That is, in fact, there are no third-party ways to check these devices. After all, both their “+” and “minus” are connected to the ECU. Diagnostics only. And this is the job of a good diagnostician.
How to replace a damaged DTO for an ECU
It is better to do this on a cooled engine. Although car service specialists can, showing miracles of dexterity, perform this operation on a car that has just stopped by, an ordinary driver should not do this.
So, wait until the engine cools down to an acceptable temperature. Prepare a rag or rags. Remove the air filter housing. This is done using a shaped screwdriver. Loosen the clamp and remove the air duct. Disconnect the harness and remove the housing with rubber pads. Remove the connector from the sensor. Place a rag on the clutch cover, under it. Prepare a new one. Quickly unscrew the non-working temperature sensor with a 19 mm wrench and insert a new one. Tighten well. Do not under any circumstances unscrew the coolant tank cap before the procedure. Then the loss of antifreeze (antifreeze) will be minimal.
Well, then put everything back in place. Check the coolant level and start the engine. When the fan works, the work can be considered completed. Thematic video on replacing the temperature sensor for the ECU on a Priora.
Characteristics and features of DTOZH on Priora
Many motorists confuse the DTOZH with a cabin or ambient temperature sensor, but this is completely wrong. The purpose of the DTOZH is to monitor the temperature of the refrigerant in the cooling system.
There are two regulators in Lada Priora cars:
- One of them is installed on the cylinder head and its purpose is to display information about the engine temperature on the dashboard. Essentially, this is a pointer.
- The thermostat housing contains the DTOZH, which plays a more important role. This device transmits pulses to the control unit to activate the ventilation device. In addition, it plays an important role in the formation of the combustible mixture during startup of the power unit.
DTOZH for Priora
As for the principle of operation, it is as follows. The main regulator is located in the thermostat housing, which allows for the highest pulse accuracy. Since the DTOZH in any case comes into contact with consumables, that is, antifreeze, it instantly detects changes in temperature and sends corresponding signals to the ECU. The latter, based on the information received, adjusts the operation of the engine and changes the composition of the air-fuel mixture. If there is no or too low level of consumable fluid in the system, the controller will provide incorrect data.
Engine number on Priora 16 valves photo
An official discussion of the Lada Priora question where the engine number is located, answers from two users are available on the site. Instructions and video response are available.
Video quality: HDTVRip
The video was uploaded to the admin from the user Agafangel: for immediate viewing on the portal.
To give the correct answer to the question you need to watch the video. After viewing, you will not need to seek help from specialists. Detailed instructions will help you solve your problems. Enjoy watching.
Humor on topic: When Rosa Lvovna stopped eating after six, she began to chew on Semyon Markovich after seven.
VIN structure Improvement of manufactured products is a continuous process of any continuous production. At the same time, with the exception of cases of major changes in the design of models coming off the assembly line, the results of the modification process are not covered in the vehicle’s operating manual. However, the manufacturer draws up numbered lists of manufactured spare parts, which is why the information encoded in the vehicle identification numbers is of particular importance when purchasing the latter. When placing an order for the necessary spare part, try to provide the seller with as much information as possible about your car. Be sure to provide the model name, year of manufacture, as well as body and power unit numbers.
- The chassis number is stamped on the front panel of the car body.
- The engine number is stamped on the cylinder block.
- The transmission number plate is attached to the top of the transmission housing.
Don't confuse the transmission number with the engine number.
VEHICLES WITH 5 DOOR HATCHBACK
There is no chassis number on the front cross member (above the radiator).
On some modifications of the car, the chassis and engine numbers are duplicated on a plate that is attached to the front panel of the body.
On other modifications of the car, a plate with the chassis number is located on the front cross member of the body (above the radiator).
Some vehicle options include a certification plate located on the rear end of the driver's door.
VEHICLES WITH 5 DOOR HATCHBACK
There is no certification plate on the end of the driver's door.
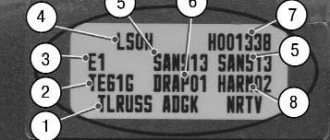
Vehicle Identification Number (VIN)
This extremely important number is stamped on the rear bulkhead of the engine compartment, as well as on a nameplate mounted on the instrument panel under the windshield on the driver's side of the car. The VIN is also entered into the vehicle title and registration certificate. The number contains information about the date/place of manufacture and body type of the car (see accompanying illustration).
Engine code and model year
The two main components of the VIN are the model year code and the assembly line/body/engine code.
Counting from left to right, the 4th, 5th and 6th positions of the number are assigned to the assembly/body/engine line code. Thus, Civic models are determined by the following combinations:
EJ6 = 3-door/D16Y7 EJ7 = 2-door/D16Y5 EJ8 = 4-door/D16Y8
Integra models are characterized by combinations:
DB7 = 4-door/B18B1 DB8 = 4-door/B18С1 DC2 = 3-door/В18С1, В18С5 DC4 = 3-door/В18В1
The tenth position of the VIN determines the year of manufacture of the model:
R = 1994 S = 1995 T = 1996 V = 1997 W = 1998
The engine number, which is impossible to do without when ordering spare parts for the power unit, is located on the right (on the passenger side of the car) on the block, next to the exhaust manifold. The first five positions of the number determine the engine code. This manual covers models equipped with the following four engine types:
D16Y5 = 1.6 l, SOHC, 16-valve, VTEC-E D16Y7 = 1.6 l, SOHC, 16-valve D16Y7 = 1.6 l, SOHC, 16-valve, VTEC
В18В1 = 1.8 l, DOHC, 16-valve В18С1 = 1.8 l, SOHC, 16-valve, VTEC В18С5 = 1.8 l, DOHC, 16-valve, VTEC
This number is required when ordering spare parts for transmission line repair. On models equipped with a manual transmission, the transmission number is stamped on the clutch dome, next to the starter. On models with AT, the number is located on the right front of the transmission housing, near the dipstick. On models equipped with CVT, the number is located on a vertical platform, also near the dipstick.
Step-by-step instructions for replacing the thermostat
You can tell that the thermostat is out of order not only by antifreeze leakage, but also by prolonged warm-up of the engine. If these obvious reasons are identified, then experts recommend replacing the failed element as quickly as possible. Since this operation is quite simple and requires only a few elements, every car owner can handle it by following the instructions:
- Since it is not possible to replace a failed thermostat without draining, then first of all you need to completely drain the coolant from the cooling system. To do this, you need to carefully unscrew the cap located on the radiator, after first placing a clean container under it, the volume of which will be approximately 8 liters.
- Next, you need to loosen the fixing clamps that connect the thermostat to the water pipes and remove them.
- The clamps are unscrewed from the thermostat, the structure is completely removed.
- To remove the protective cover from the housing, you need to unscrew the fasteners using a key of the appropriate size.
- The removed cover contains a rubber gasket. This element must be removed using tweezers to check its integrity. If even minor damage is found during the inspection, the gasket must be replaced.
- Using regular pliers, you need to remove the sensitive element, which is called a “mod”. To remove it, you need to turn the spring several times and at the same time lightly press it with pliers so that the fixing plate comes out of the so-called hook.
- A new element is installed in place of the one that has become unusable. Before installing the mod, experts recommend checking its functionality; to do this, you should do the following:
- immerse the new element in water;
- Place the container on low heat;
- if the rod on the thermostat starts a kind of movement as soon as the water temperature rises to 80ᵒ C, it means that the mod is fully functional and can be safely installed. Under other circumstances, this element will have to be replaced.
The last step is to fill in clean coolant and reassemble all components in the reverse order. Next, all that remains is to start the car engine and make sure that the antifreeze leak has been eliminated. According to these instructions, the thermostat is changed both in Lada Priora, equipped with air conditioning, and without it. Well, if the car owner does not want to disassemble the thermostat to check all the components, then you can buy a new element and replace it completely assembled. However, it is worth considering that such a process will require large financial investments, but will help reduce replacement time.
Features of cooling system malfunctions
The efficiency of the structure primarily depends on the level of antifreeze in the system and its condition (this liquid has a certain resource, usually up to three years or up to 50,000 km). The main sources of system malfunctions are the thermostat, radiator and electric fan, as well as the water pump, the principle of operation of which is described above.
The radiator most often becomes the source of antifreeze leakage. Accordingly, the liquid level in the system drops, and there is not enough of it for effective heat removal. The motor begins to overheat. It can also be clogged with garbage. And if water is used instead of antifreeze the old fashioned way, scale may form.
How to replace sensors yourself
Preparatory stage:
- Open-end wrench set to “22”;
- Additional lighting as needed;
- New DTOZH;
- Rags;
- Multimeter.
Step-by-step instructions for replacing the coolant temperature sensor:
- We install the machine within the perimeter of the repair area;
- We provide priority safety measures: squeeze the parking brake, wedge the rear row of wheels with wheel chocks;
- Open the hood, turn off the engine;
- We remove the terminals from the battery to avoid short circuits during repair work;
- We disconnect the limit switches from the DTOZH, unscrew it from its regular place;
- We carry out preventive maintenance of the thermostat, inspect the integrity of the housing, the absence of defects;
- We screw in the new measuring device and put on the power terminals.
We start the engine and check the accuracy of the temperature display. Checking the antifreeze level. We replenish the missing amount as needed. For a model with a pre-installed air conditioner, it is necessary to additionally remove the air filter housing along with the air element itself.
Design features of the LADA Priora engine cooling system
The LADA Priora engine cooling system is liquid, closed type, with forced circulation. Consists of an engine cooling jacket, a radiator with an electric fan, a thermostat, a pump, an expansion tank and connecting hoses.
Design of the LADA Priora cooling system
Cooling system: 1 — expansion tank; 2 — radiator outlet hose; 3 - inlet hose; 4 - radiator; 5 — steam exhaust hose; b — radiator supply hose; 7 — electric fan; 8 — electric fan casing; 9 — coolant temperature sensor; 10 — coolant temperature indicator sensor; 11 — throttle assembly; 12 — bracket for the coolant pump pipe; 13 — coolant pump; 14 — coolant pump pipe; 15 — heater radiator supply hose; 16 — heater radiator outlet hose; 17 — exhaust pipe; 18 — coolant pump pipe hose; 19 — thermostat housing
| Expansion tank. Coolant is poured into the system through the expansion tank. It is made of translucent plastic, which allows you to visually monitor the liquid level. To do this, the marks “MAX” and “MIN” are marked on the wall of the tank. In the upper part of the tank there are two pipes for connecting the steam removal hoses of the cooling system radiator and the heater radiator, in the lower part there is a pipe for connecting the cooling system inlet hose |
| Coolant pump - circulates coolant. It is bladed, centrifugal type, driven from the crankshaft pulley by a timing belt. It consists of a housing, a bearing assembly with a seal, an impeller and a toothed pulley. There is a control hole in the pump housing to detect fluid leakage when the pump seal fails. The pump should be replaced as an assembly. |
Comment
| Jamming of the pump pulley due to failure of its bearing assembly or due to freezing of highly diluted coolant will lead to breakage of the timing belt and, as a result, to expensive engine repairs. |
The liquid enters the pump through a supply pipe located on the rear wall of the cylinder block under the catenary collector. From the pump, liquid under pressure is supplied to the engine cooling jacket, and from there to the thermostat housing.
The cooling system consists of two so-called circulation circles:
- The small circle does not include the engine radiator, and the fluid washes only the cylinder block and cylinder head, and also flows through the throttle body channel and the heater core.
- When moving in a large circle, the coolant passes through the engine radiator, where it is cooled by the incoming air flow. The thermostat controls the direction of fluid flow in the engine cooling system.
Thermostat. Two thermostat valves - main and bypass - redistribute fluid flows in the cooling system. You will find the thermostat opening and closing temperatures below.
The heater radiator is built into the engine cooling system and is designed to heat the passenger compartment by circulating hot coolant through it.
| The radiator consists of two vertical plastic tanks (the left one with a baffle) and two horizontal rows of round aluminum tubes passing through the cooling plates. The bases of the tubes are connected to the tanks through rubber gaskets. The liquid is supplied through the upper pipe and discharged through the lower. Above the inlet pipe there is a thin pipe for the steam removal hose. There is a drain plug at the bottom of the right tank. A plastic casing with an electric fan is attached to the radiator. |
| The fan maintains the thermal operating mode of the engine and is switched on via a relay based on a signal from the engine control system controller. To monitor the coolant temperature, a temperature gauge sensor is screwed into the engine cylinder head in the instrument cluster. |
Device and features
The cooling system of the Priora internal combustion engine has a standard set of main components:
- radiator;
- thermostat;
- electric fan;
- water pump;
- heater;
- engine jacket;
- connecting hoses;
- expansion tank.
By circulating through the large and small circuits, the coolant prevents the engine from overheating, maintaining the desired temperature. Structurally, the cooling system of the Priora is simple and no different from other internal combustion engines with an injector, with the exception of small parts.
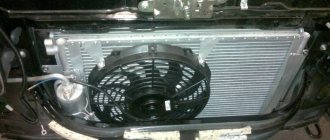
Radiator and forced cooling fan
They mainly serve to bring the working fluid to the optimal temperature for the functioning of the engine (the operating temperature of the Priora engine with 16 valves is 90–95 degrees). The predecessor of the Priora VAZ 2110 often installed a cooler made of copper alloys, but due to cheaper prices, designers switched to aluminum analogues.
The operation of the fan depends on the engine control unit.
It receives information from the DTOZH (this is a sensor that reads temperature readings) located in the water jacket of the power unit. If the permissible temperature values are exceeded, the control unit connects an electric fan to improve cooling efficiency. A faulty fan or clogged radiator can lead to a constant increase in optimal engine temperatures, which shortens the service life and can cause costly repairs.
Thermostat
Its task is to promptly open coolant access to a large circle of the engine cooling system (engine cooling system) after the engine reaches the optimal temperature. In simple terms, the thermostat allows you to quickly warm up the engine and regulates the operation of the entire system. During warming up, the thermostat valve is in the closed position, antifreeze does not flow through the large circuit (the radiator is not activated). As it warms up, the valve opens slightly under the influence of rising temperature, and antifreeze begins to move through the radiator along a larger circuit.
A thermostat malfunction can result in overheating of the power unit (if the valve is stuck closed) or, conversely, the operating temperature rises very slowly (when the valve is stuck in the open position). Overheating is much more dangerous. Beginners can identify this malfunction if the engine heats up all the time and the fan on the Priora is constantly running.
Pump (water pump) and heater
Without the first part, the coolant circulation circuit in the system is impossible. If the water pump is faulty, at best there will be a coolant leak from the system. In the worst case, the pump may jam, which will lead to a broken timing belt and subsequent problems, the solution of which will result in expensive repairs.
The heater, or simply the stove, consists of a radiator, pipes and a fan. Can additionally cool the antifreeze in the system. An indispensable unit in winter. Provides the interior with warm air.
Connecting elements and expansion tank
It serves as a receiving compartment where gases and vapors are discharged when the coolant is heated. Also, the expansion tank is the level for the entire cooling system. One of the main elements in the tank is the valve cover through which air is forced out. There is antifreeze, it begins to boil when the engine temperature rises critically.
The connecting hoses serve as a pipeline for the circulation of coolant and connecting elements of all structural units, thus creating a single looped and sealed circuit.
The design of the cooling system also includes an engine temperature sensor on the Priora and an engine jacket. The sensor constantly reads information about the current antifreeze temperature and transmits it to the ECU. The location of the power plant jacket is structurally assumed in the cylinder block housing; it serves to remove heat through the coolant.
Coolant replacement
Note that the technology for replacing the refrigerant in versions of LADA Kalina with an 8-valve engine is somewhat different from the sequence of work on variations of 16-valve engines. In the latter case, to provide access to the block drain plug, you will need to remove the starter fasteners. And before work, we’ll find out how to drain antifreeze correctly.
Procedure for 8-valve Kalinas
- We release the pressure in the previously indicated way.
- We dismantle the crankcase protection.
- We place the prepared container under the drain hole (located on the right side of the radiator).
- You can regulate the pressure of the drained stream of liquid by tightening or removing the plug on the tank. We carry out this manipulation, focusing on the situation.
- Having unscrewed the radiator cap, we wait for the liquid to completely drain.
- Now we move to the motor block.
- The drain plug is located under the ignition coil.
- To unscrew the specified plug, we use a 13-size wrench.
- We substitute the same container and collect the remaining liquid into it.
The antifreeze replacement is complete.
Flushing the cooling system of Lada Priora
It becomes dirty and clogged over time and intensity of use. Clogged SOD channels do not allow antifreeze to circulate freely, as a result, heat transfer is disrupted. The stove in the cabin begins to heat poorly, and meanwhile the engine constantly overheats. In these situations, the right solution would be to clean the cooling system. To do this, first of all you need to cool the engine.
The following is the procedure.
- Drain the coolant (not only from the radiator, but also from the engine jacket, by unscrewing the drain plug on the cylinder block).
- Fill the expansion tank with any suitable flushing fluid to the optimum level.
- Start the engine and let it idle for at least 15 minutes.
- Drain the used fluid.
Then, if necessary, the procedure is repeated. After flushing, all that remains is to fill in fresh antifreeze and remove the air lock from the system. If a more thorough flushing of the system is required, then there is nothing complicated here either. To do this, you will need a regular watering hose connected to the water supply. To flush the radiator, you need to disconnect the lower and upper pipes, insert them into the upper hose and turn on the water. All dirt and rust will come out of the bottom. To flush the engine jacket, you need to do the same steps, but the hose is inserted into the thermostat pipe.
The effectiveness of flushing the system largely depends on the product chosen as a flushing agent.
The simplest option is regular tap water. Add lemon juice to it. Carbonated drinks, such as cola, are also suitable. You can also buy special cleaning products for washing SOD in specialized stores.
Engine disassembly and repair
Repairs are carried out according to the standard procedure - we find faulty parts and replace them with working ones. The instructions below describe the process of disassembling the unit itself; before that, you need to dismantle it from the Lada Priora and thoroughly clean it of grease and dirt.
Instructions
- Using the 13th key, remove the bracket fastenings. 4 nuts hold the front cylinder block support;
- We remove the bracket and move on to the left support - it is removed in exactly the same way;
Thus, you can completely disassemble the 16-valve engine and repair and replace faulty parts. But if the unit bends the valve, then only an experienced mechanic can handle the malfunction with his own hands. In any case, you will find out whether the motor bends the valves or not after removing the head cover.
Engine operating temperature
We have learned the resource, now we move on to another important indicator. The optimal operating temperature is 90-95°C. After 97°C, engine number 126 with 16 valves will “slow down” a little, but according to the rules, temperatures up to 100°C are considered normal. If the Lada unit is operated with this indicator, then you need to be sure that the radiator fan is running at this time. When you see an indicator below +90°C on the dashboard, you need to assume that this is underheating. Of course, in cold weather the power plant needs more time for the temperature to reach normal levels.
Remember:
- Operating temperature – 90-95°C.
- Normal temperature (engine runs worse) is 97-110°C.
- Reduced temperature – 90°C and below.
Signs of the need for internal combustion engine repair
The reasons why the operation of the engine is disrupted are arranged in a small list, starting with refusal to start and ending with floating idle speed (this problem was removed on the 127 “engine”). Not all breakdowns end in capital damage - sometimes it’s enough to add oil, sometimes it’s enough to adjust the ECU settings.
Compression reduction
A decrease in cylinder compression below 16 atmospheres is a bad sign. Such a high limit corresponds to a compression ratio of 11.
Knocks in the engine
Engine knocks can come from several points. These could be hydraulic compressors, timing belt rollers or pins. The knocking noise could also be caused by low oil level. The answer to the question will be given by a thorough detailed inspection of all parts of the unit and checking the oil level.
Blue smoke from the exhaust pipe
The blue smoke that comes from the exhaust pipe appears when oil enters the combustion chamber. It can leak either from the valves or from under the piston. The result is the same: the oil is eaten up and blue smoke pours out of the chimney. Once the leak is located, half the problem will already be solved.
Troit motor
Sometimes in the cold the engine may stall - don’t be alarmed by this, because it may simply be one of the spark plugs that fails. In this case, we advise you to simply restart the engine and it will stop running.
How much does it cost to overhaul a Priora engine - average price
Self-repair of a Priora engine with 16 valves costs an average of 16-20 thousand rubles. The cost depends on the severity of the breakdown and may be lower or higher than this average range. Repairing a Priora engine can be entrusted to the wrong hands, but then you will have to pay for the work - sometimes the cost of repairs reaches as much as 40 thousand rubles.
This is an unreasonably inflated figure, because, as practice shows, you can rebuild the engine on a Priora, working at a moderate pace, in just three days - and three days of work is definitely not worth that kind of money. Don’t be afraid of not being able to cope - your Lada is easy to repair, and using the advice and “tutorials”, you will conquer even such a task that is impossible at first glance.