Features of the gearbox device
Before we talk about the causes of vibration, you should first understand the operating principle of the gear shift lever. So, in rear-wheel drive cars it directly enters the box (since it is located parallel to the car body) and its rattling is a sure sign of problems in the transmission itself.
In turn, the VAZ 2114 gearbox handle is connected to the gearbox by a system of special rods (after all, the gearbox on this car is installed perpendicular to the body) and does not have direct contact with it. The main source of sounds and rattling in this case is a small metal bushing, which connects the gear shift lever to the rod.
Its most common defects (leading to vibration) are:
- wrong size;
- poor (with backlashes) fit of parts;
- lack of gasket.
As a result of this, during movement the bushing begins to shift and hits the wings of the rod, thus causing metallic sounds and rattling.
Removal/installation of VAZ 2115 gearbox
To adjust the operation of the gearbox on a VAZ 2115, you often have to remove it from the car. In this article we will tell you how to carefully remove and then install the gearbox with your own hands.
How to remove a VAZ 2115 gearbox with your own hands
Place the vehicle on a lift or inspection ditch. Raise the engine hood and lock it in this position. Removal work carried out from inside the engine compartment:
1. Disconnect the wires from the battery, from the starter traction relay;
2. Then disconnect the ground wire from the clutch housing;
3. Now disconnect the lower part of the clutch cable as described here;
4. Unscrew the two upper bolts securing the clutch housing to the engine block and the two upper nuts securing the starter, attach a bracket for lifting the power unit to the left stud of the engine exhaust manifold;
Installing a cross member to support the power unit:
1 – cross member 67.7820.9514
5. Install the cross member 67.7820.9514 on the gutters to support the engine and hook it onto the bracket installed on the exhaust manifold stud. If there is no cross member, hang the power unit with a hoist.
Removal work carried out from below the vehicle:
1. First, remove the engine splash guard and the lower clutch housing cover;
2. Then drain the gearbox oil;
3. Now disconnect the wires from the reverse light switch;
Mounting the gearbox on the car:
1 – engine; 2 – bracket for fastening the power unit; 3 – suspension arm extension bracket; 4 – stretching; 5 – gearbox; 6 – wheel drive shaft; 7 – suspension arm; 8 – anti-roll bar; 9 – rear support of the power unit; 10 – clamp; 11 – gear shift lever drive rod; 12 – internal hinge housing
4. Loosen the clamp 10 and disconnect the rod 11 from the gear selection rod hinge;
5. Unscrew the nut of the stud securing the gearbox to the engine;
6. Disconnect the ball joints of the suspension arms from the steering knuckles;
7. Using a puller 67.7801.9524 or sharply hitting the body 12 of the internal joint with a hammer through a drift, knock out one hinge from the side gear, then fix the side gear with a technological mandrel or plug used when transporting the differential (otherwise the unfixed side gear may fall into the gearbox housing ); then knock out the second hinge;
8. Move the wheel drive shafts to the sides;
Attention.
If it is difficult to separate the wheel drive from the side gear on the car, remove the gearbox assembly with the wheel drive and on a workbench, using the same puller, press the hinge out of the side gear.
9. On the left side, unscrew the three nuts of the studs securing the gearbox to bracket 2 of the power unit suspension, and then the nut from the bolt securing the bracket itself. Having removed the bracket from the gearbox studs, remove the suspension bracket 2 from the body spar eyelets;
10. Unscrew the bolts securing the rear support 9 of the power unit suspension;
11. Unscrew the lower nut securing the starter and remove it;
12. Install a special stand with a hydraulic lift under the gearbox;
13. Lower the engine slightly by extending the support rod of the cross member or lowering the hoist, unscrew the lower bolt securing the crankcase to the engine block and move the gearbox assembly with the clutch housing away from the engine to separate the gearbox shaft and the driven clutch disc;
14. Remove the gearbox.
Attention.
When removing or installing the gearbox, do not rest the gearbox input shaft on the pressure spring petals to avoid damaging them.
Installing the gearbox on a VAZ 2115 with your own hands Install the gearbox in the reverse order of removal, tightening the bolts and nuts with the torques specified in Appendix 1, taking into account the following:
1. Before connecting the wheel drive shafts with the semi-axial gears, replace the retaining rings on the internal joints with new ones , since when installing old rings, spontaneous separation of the wheel drives and side gears is possible when the vehicle is moving;
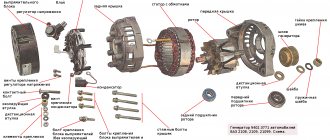
Gearbox VAZ 2115:
1 – clutch release bearing; 2 – guide sleeve; 3 – input shaft; 4 – roller bearing of the secondary shaft; 5 – secondary shaft; 6 – retaining ring; 7 – satellite axis; 8 – speedometer drive drive gear; 9 – transport plug; 10 – wheel drive oil seal; 11 – tapered roller bearing of the differential; 12 – axle gear; 13 – satellite; 14 – differential box; 15 – clutch housing; 16 – driven gear of the main gear; 17 – drain plug; 18 – adjusting ring; 19 – driven gear of the 1st gear of the secondary shaft; 20 – synchronizer for 1st and 2nd gears; 21 – driven gear of the second gear of the secondary shaft; 22 – retaining ring; 23 – persistent half ring; 24 – driven gear of the third gear of the secondary shaft; 25 – synchronizer for 3rd and 4th gears; 26 – driven gear of the fourth gear of the secondary shaft; 27 – needle bearing of the secondary shaft gears; 28 – ball bearing of the secondary shaft; 29 – thrust plate; 30 – driven gear V of the secondary shaft transmission; 31 – 5th gear synchronizer assembly; 32 – nut; 33 – thrust washer; 34 – drive gear V of the input shaft; 35 – rear cover of the gearbox housing; 36 – ball bearing of the input shaft; 37 – gearbox housing; 38 – roller bearing of the input shaft; 39 – breather; 40 – input shaft oil seal
Centering the driven disk:
1 – flywheel; 2 – clutch assembly; 3 – mandrel A. 70081
2. Before installing the gearbox, apply a thin layer of CV joint-4 grease to the outer surface of the guide sleeve 2 of the clutch release bearing. If necessary, center the clutch driven disc using drift A. 70081.
Adjusting the pedal's full travel
After installing the gearbox, adjust the full travel of the clutch pedal and the gear shift control drive in the following order:
Gear shift drive:
1 – gearbox housing; 2 – housing of the gear selection mechanism; 3 – gear selection mechanism; 4 – clutch housing; 5 – rod lever; 6 – gear selection rod; 7 – rod hinge; 8 – gearbox control drive rod; 9 – protective cover for traction; 10 – gear shift lever; 11 – spherical finger of the lever; 12 – ball joint of the lever; 13 – clamp; X is the distance between the ends of the clamp and the rod
1. Working from below the car, with the clamp bolt 13 of the rod 8 loosened, set the rod 6 to the neutral position;
2. Set lever 10 to the required position using fixture 67.7800.9513;
3. Working from the bottom of the car, select the axial play in the rear direction, acting on the hinge 7 and the angular play in the counterclockwise direction, tighten the nut of the tie clamp 13, having previously installed it at a distance of X = 1–3 mm. Select the backlashes with a light movement so as not to cause movement of the selector levers inside the gearbox. Then fill the gearbox with oil.
When connecting the gearshift drive to the gearbox, make sure that there is no twisting or deformation of the corrugations of the protective cover of the hinge 7.
Dismantling and repair of the VAZ 2114 gearbox handle
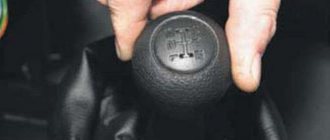
In order to eliminate the vibration of the bushing, you must first figure out how to remove the gearbox handle of the VAZ 2114. In order to do this, you only need a 13-size spanner.
The gearbox lever is removed in the following order:
- Place the car on the viewing platform and put the handbrake on.
- Remove the old handle casing (this should be done carefully, as it can easily be torn).
- At the base of the lever, find the fastening bolt connecting it to the rod, and unscrew the nut with a 13mm wrench.
- Remove the lever together with the mounting sleeve.
There is an alternative option for dismantling the handle, which must be done outside the machine.
It is done like this:
- Place the car in the pit and put on the handbrake.
- Using a 13mm wrench, unscrew the fastening nut where the tube enters the link (pipe-lever).
- Remove the cover from the cross (it is advisable to place a basin under the machine, as oil will leak out during this process).
- Unscrew the crosspiece fastener and remove the lever.
Once the shift knob is removed, you can begin to eliminate the vibration.
To do this you need:
- remove the outer braid of the plastic sleeve, freeing its steel body;
- wash off any remaining old grease;
- carefully inspect the surface of the bushing for signs of friction on the metal. Their detection will indicate that the bushing is made incorrectly and is oversized;
- constantly checking the size of the fit under the bushing, grind off excess metal from its surface with a file (as a rule, you need to grind off a little - just a couple of millimeters);
- put new grease on the bushing (in the same place where the old one was);
- choose a soft rubber gasket or wrap the surface with insulating tape (this is not necessary, but this will reduce possible vibrations);
- install the gear shift lever in its place and tighten the fasteners.
When screwing the nut, it is recommended to drop a few drops of a special lock onto the thread. This will help prevent it from unwinding on its own and will securely hold the bushing in place.
If the handle was dismantled using an alternative method, then reassembly is performed in the following order:
- install the lever in place and tighten the mounting bolt;
- turn the car into fourth gear (as a result of this, the bushing will automatically fall into place - inside the rocker tube);
- engage neutral gear and finally lock the handle. Also, at this point you can slightly adjust the position of the lever “to suit you” while in the cabin. It is advisable to do this together with a friend - one holds the handle in a comfortable position, the other tightens its fasteners.
In some cases (for example, if the bushing is too worn), there is no point in carrying out repair work, since soon the vibrations and metallic clanging will return, again spoiling the mood and causing discomfort. In this situation, it is best to replace this element with a new one, especially since it is not so expensive.
After completing the work on turning the bushing, you should start the car and check the effectiveness of the repair.
If everything was done correctly, you will notice that:
- The VAZ 2114 gear knob no longer rattles in neutral;
- there is no ringing or vibration at high speed;
- Gear shifting began to occur more tightly and at the same time more smoothly.
If minor vibrations and metallic sounds still remain, you can remove the handle again and grind off another small amount of metal from the sleeve.
If suddenly the rattling of the gear shift lever appears during a long trip, then you can temporarily eliminate this trouble by simply removing the handle cover and placing a small piece of rubber under the bushing.
Removing the gearshift lever
Before you begin dismantling the handle, you need to carefully examine the entire space next to it and understand how it comes apart. There is nothing complicated about this, the main thing is to follow our instructions exactly:
- If there are additional armrests and other elements installed independently, we dismantle them so as not to damage them during the work.
- Carefully remove the casing (plastic or leather - approx.) so as not to tear or break it.
Dismantling should be carried out carefully so as not to break anything.
If the lever does not budge, you can treat the surface with WD-40.
The old bushing is marked with a red marker.
Vibration Elimination Process
After you have the bushing with the lever in your hands, carefully inspect it visually for visible damage and signs of wear. Because if they are available, you may have to buy the same spare element, so that a little later you won’t have to do the work of dismantling, repairing and adjusting it.
The new bushing looks much better
The procedure for repair work with the bushing
- First of all, we dismantle the plastic cover on the bushing in such a way as to free its metal base.
Disassembled gear lever bushing
We went to the store and measured the new bushing there and compared it with ours!
Replacement of the gearshift knob is required only in case of mechanical damage. More often you have to remove and install it to replace a loose cardan or repair a broken lever bushing. The sequence of actions for dismantling the lever is as follows:
- remove the handle cover to open access to the handle mount;
- remove the hatch of the decorative plastic tunnel;
- unscrew the fastening screws;
- remove the plastic tunnel;
- unscrew the lever axle nut;
- remove the axle;
- remove the lever.
To install the lever in place, you need to do the following:
- insert the lever into its original place;
- apply lubricant to the lever axis or to the inner surface of the bushing;
- insert the lever shaft and tighten the nut;
- install a decorative tunnel;
- tighten the screws securing the tunnel;
- install a decorative hatch;
- put the cover on the VAZ 2114 gearbox handle and secure it.
Eliminating vibration of the gearshift lever on a VAZ 2114
The gearbox is an important link between the car's power unit and its wheels; with its help, the nature of the torque changes. This happens due to a change in the gear ratio between the gears in the unit housing. In most cases, the driver himself decides when which gear should be engaged, that is, he mechanically changes the position of the lever and thereby changes the position of the driven gear relative to the drive gear. Let's figure out why the gearshift knob rattles on front-wheel drive cars such as the VAZ 2114 and similar 13 and 15 models of this family.
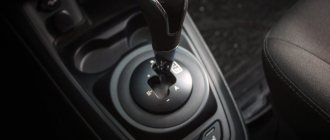
Manual transmission lever
Features and purpose of the scenes on the VAZ-2110
The easiest way to get acquainted with the principle of operation of the backstage is to study the photo drawing of the product. This functional unit is directly connected to the operation of the gearbox and, through a lever transmission, allows you to switch the gears of the driven shaft. Thus, the driver can change the gear ratio of the drive and driven shafts of the gearbox. It's no secret that thanks to this you can change the speed of the car and accordingly adjust the torque that creates traction force on the drive shaft of the wheels. Thanks to the rocker, reverse gear is also engaged and the movement of the vehicle can be completely blocked.
VAZ 2110 backdrop
Naturally, the rocker plays one of the key roles in the car control system. If the gearshift lever is faulty, full-fledged driving in real road conditions becomes difficult, and sometimes even becomes impossible. Unfortunately, this functional unit can break down quite often. Surely, you will be interested to know why this happens and how to prevent the malfunction of the link in time. The next section of our article is devoted to these issues.
GEARBOX DEVICE OF THIS MODEL
First, we need to understand why this happens, where the vibration comes from, and why it’s actually not that bad on this particular car. To do this, we need to remember which drive is here and how the engine and gearbox are located. The car is front-wheel drive, so the gearbox is located perpendicular to the direction of travel, that is, the lever in the cabin does not fit directly into the box; a rocker is used. In the classic series with rear-wheel drive, the lever is directly inserted into the box, and if it starts to rattle there, then this is a sure sign of problems with it.
REMOVE THE SHIFT LEVER
Self-repair begins with the fact that you need to figure out how to remove the gearshift knob on a VAZ 2114 . This is usually done simply and the owners of similar 15 and 13 models should do the same, if, of course, they have similar problems. So, the algorithm of actions looks like this:
- First you need to remove all the armrests and bathtubs that drivers like to furnish the space between the seats with. This must be done so as not to spoil them in the process of self-repair.
- Next, you need to carefully remove the casing from the lever, since it can simply be torn, but it still costs money, and it adds significant aesthetics.
- Now you need to find a bolt and nut under the lever, the latter is usually unscrewed with a regular open-end wrench 13, so there should be no problems with this, you just need to have the appropriate wrench. After unscrewing, take the bolt out, it is also advisable not to drop the nut.
- That's it, the lever, together with the very bushing that causes the VAZ 2114 gearbox lever to rattle, remains in our hands.
Sports
We noted that for the VAZ 2114 you can install a sports short-throw rocker. Outwardly they are quite similar, but the difference in work is felt immediately. On a sports unit, gears shift faster and smoother. It's all about the design of the backstage itself. Unfortunately, it is precisely because of this that the process of independent replacement becomes almost impossible.
If you decide to install a short-throw rocker on your VAZ 2114, contact trusted car services, or even better, a studio that specializes in tuning. Such events are classified as technical improvement, which is why no one understands this better than tuning specialists. Even official AvtoVAZ car services.
- Electrical equipment
- Engine
- Brake system
- Other
- Steering
- Transmission
- Suspension
- Tuning
- VAZ 2110 Other
- Engine
- Steering
- Electrical equipment
- Transmission
- Brake system
- Suspension
- Tuning
- Electrical equipment
- Steering
- Video publications
- VAZ tuning photo stream
- Operation and repair manuals
WE ELIMINATE VIBRATION
Now you need to carefully inspect the bushing externally, after all, it is precisely because of it that the gearbox lever 2115 rattles. If there is any external damage that is too obvious and signs of wear, then you may have to look for a new part so that you do not have to repeat these manipulations in the future . Now let’s figure out what operations need to be carried out in order to understand how to adjust the rocker on a VAZ 2114:
- We remove the outer plastic braid of the bushing to free its iron body.
- Now we need to see if there are any signs of friction on it. Their presence will indicate that the size is incorrect. They will be especially pronounced if the sleeve is slightly longer than necessary. If this is confirmed, then these extra millimeters are the reasons why the VAZ 2115 gearbox lever rattles. In this case, you need to try on how much excess is in the hole and simply grind it off with a file, usually there are only 1-2 millimeters there.
- Now you need to select some kind of gasket according to the shape of the part, or simply wrap it with electrical tape so that it fits into place more tightly and then does not move.
So it became clear how to eliminate the rattling of the VAZ 2114 gearbox lever and why this generally happens. After our simple manipulations, the vibration should completely disappear, now the lever will always be in a calm state.
The described methods do not require any special knowledge and can be performed by an ordinary person in his garage with a minimum set of suitable tools.
How to adjust the rocker on a VAZ 2110 with your own hands
Before adjusting the gearbox linkage, it is necessary to perform a number of preparatory work:
- Drive the car into the pit.
- Tighten the handbrake and install the wheel chocks.
Method No. 1 - adjusting the rocker according to the rear speed.
- Loosen the clamp.
- Engage reverse gear and position the lever as you would like it to be in this position.
- Then tighten the clamp and check how the rocker works, whether you are satisfied with the current position of the lever and the operation of the rocker.
Method No. 2 - adjusting the rocker at first speed.
This method is used, as a rule, when the first method did not produce results.
- Turn on first speed.
- Loosen the rocker clamp.
- Turn the rocker drive counterclockwise until the gearshift lever begins to rest against the plastic reverse speed stop.
- Tighten the clamp and check how everything works.
Method No. 3 - adjusting the scenes in neutral.
If you do not have a plastic stopper, the adjustment is made in neutral gear.
To adjust the neutral position of the gearshift lever, you need to accurately calculate the depth of the shift of your gearbox to the driveshaft of the VAZ 2110. Sometimes such manipulations result in the appearance of annoying rattling of the lever.
If adjusting the rocker does not lead to anything and there is still a problem with switching, replace the rocker completely or ask for help from specialists.
Sometimes cases arise when fifth suddenly disappears, reverse gear does not engage, or reverse gear is engaged instead of first. Don’t rush to remove the box, just try to adjust the bushing on the heel of the gearbox. Adjusting the rocker of a VAZ 2110 (or VAZ 2112) is quite a difficult task, as it might seem at first glance. But this is only at first glance. Somehow the reverse gear disappeared at ten, and I thought that now I would have to change the box. I decided to look on the Internet with the hope that maybe not everything was so bad, I went to a couple of auto forums, and decided to check the gearbox mount and the bushing on the heel. I started with the less difficult one. To check the pillow, I took a jack and lifted the box, I tried it - everything worked. I bought a new pillow, changed it, but the speed does not turn on again. And here it began... from the pit to the car showroom, from the car showroom to the pit, trying to re-adjust the bushing on the heel and so on for an hour, when I wasn’t tired of everything, I sat down to rest and think carefully about how to adjust the rocker on a VAZ 2110 (or VAZ 2112). During a smoke break, one bright thought came to me, which ultimately helped me tame this unit.
How to eliminate rattling gearshift lever on a VAZ 2114
A symptom for repairing the gearshift knob is obvious - you get into the car, start moving, start to pick up speed, and in response the stick begins to shake, make strange sounds and vibrate. This happens due to an ill-conceived design, as it happened with VAZ engineers, because the problem extends not only to the fourteenth model. The vibration of the gearshift lever occurs according to the following principle: we are driving, and the bushing that connects the stick and the rod begins to touch the wings of the rod. It is made of metal, which naturally leads to unpleasant metallic rattling. Fortunately, this shortcoming can be corrected in a fairly simple way, without having a brain.
How to adjust the correct operation of the scenes on a VAZ 2110 - 2112
On VAZ 2112 cars, the rocker is configured in the same way as for the tenth model (see schematic photo of the unit). The work is easy and simple for one person to do independently in their own garage. If you're lucky, the setup can be completed in literally minutes. You'll soon find out why.
By the way, the VAZ 2110 rocker also needs to be adjusted after replacing the gearbox and repairing it, as well as simply over time due to loosening of the fastening connections or after replacing the driveshaft.
The procedure for setting up the scenes using the “ten” as an example will be as follows:
- 1. Drive the car into a viewing hole, overpass, or raise the bottom with a jack. In the latter case, do not forget about reinsurance.
- 2. The first gear at the gearbox must be engaged. Make every effort possible to achieve this.
- 3. Next, we slow down the car using the handbrake. To ensure that it does not work, we place safety anti-roll bars under the rear wheels of the car.
- 4. Go down under the bottom of the car and find a fastening clamp there that holds the tip of the cardan. You loosen it up.
- 5. Now you need to push the gearshift lever knob to the extreme left position (any other displacements are not allowed). Hold the scenes in this position.
- 6. Having gone down under the bottom of the car, fix the clamp back on the tip of the hinge.
- 7. If everything is done correctly, congratulations, the setup is complete. You can check the operation of the gearbox.
Disassembly
In order for the vibration of the VAZ 2114 gearbox handle to cease to exist, you need to have a couple of tools in reserve:
- Socket wrenches 13 and 10
- New drawstring cover
- Overpass or pit in the garage
- A smart friend who will help you tune the stick
- You can stock up on thread locker, but you can do without it (this thing is attached to the side of the box itself).
It will take a little time, about half an hour to eliminate troubles and the same amount to adjust.
First way
Progress of the adjustment process:
- Sketch, remember, remove or measure, but make sure that after installation everything is in its place: namely, at a certain distance from the passenger and the console.
- Now you can crawl under the car and begin to unscrew the fasteners for inserting the bushing into the lever tube (also called the rocker) using a 13-socket, and remove the lever.
Backstage VAZ 2114
- Then, remove the cover from the cross. Be prepared for oil to pour out. You can put the container in advance if you really feel sorry for him. Then pour it back. Well, unscrew its fasteners to remove it.
Drawstring without cover for VAZ 2114
- That's it, now we need to install a new clamp - this is the bolt that secures the cross. You can, of course, clean and tighten the old one, but it is not so expensive that you need to save on it. And new things always inspire greater confidence in the future.
We will put the actions in the opposite direction with some deviations:
- After putting the stick in place, inserting the bolt and tightening it, putting the cover in place, you need to engage 4th gear. This will drive the bushing into place - into the rocker (lever).
- Then, put it in neutral. This is where a friend comes in handy: he places it, and you tighten the fasteners. At this moment, you can adjust the position of the stick, move it in the desired direction under you.
- Well, then try the result. If you are not satisfied with how the gear knob is positioned on the VAZ 2114, you need to bring the adjustment to fruition.
Second way
The second reason for the rattling is the bushing, which is located on the lever itself. In order to get rid of this nasty sound you just need:
- Open-end or socket wrench 13
- New bushing
- And a little patience
The VAZ 2109 gearshift lever is loose, what needs to be changed? | Topic Author: Taichi
In general, the problem is this... the fact that the gearbox lever dangles, I can’t control the speed... at any speed the lever dangles like in neutral... but I can’t catch 5 at all... I only drive in 4 all the time... what do I even need to change?? clip? backstage? cardan, or does something need to be changed there in this rubber band at the bottom (where is the cardan)? What needs to be changed..so that the gearbox and speed are turned on normally? ! help me please
Roman (Dhruv) is also loose on my tweeter (I changed the ball joint of the lever, it didn’t help!!!). On the new ones it’s also loose!! it's a disease!! I read an article, a guy from the inside under the lever casing stretched the usual rubber bands from his underpants, the lever stopped hanging!!! Nikita (Borys) had the same problem. I changed the backstage. and everything seems to be fine now Tima (Husam) installed a driveshaft from the viburnum, half an hour of work and everything is fine) but before it was also loose, the rear from first and fifth were generally difficult gears. Vladimir (Philipi) change the rocker Evgeny (Hawa) you need to change the choice Viktor (Aldonza) Nikolay, Exactly the same for me on 9. I installed a Kalino cardan, nothing has changed. Most likely the linkage needs to be changed. Danil (Oceanus) First, check it, put it on the lift and see, maybe the nut that secures the rocker is just loose, I had this happen, take the key to 13 and tighten it, judging by the symptoms, it is, but you need someone to hold the gearshift lever Oleg (Ebrilla) +1 The bolt on the driveshaft often comes loose, the symptoms are exactly the same, I had it on both the Pyatakh and Kalina, you pull the cover off the driveshaft and turn it to 13 with the key. For 2 minutes. Stanislav (Eris) Change the gearbox hinge and install from the viburnum Pavel (Melisenda) the linkage needs to be changed! ) Dimka (Kadin) my drawstring is the same crap Nikolay (Gavriella) should I change the assembled drawstring and everything will be fine? Vyacheslav (Maurizia) change the link, there is a bolt on the crosspiece that is constantly unscrewed and the shaft on the box may come loose Alesha (Dashratha) Nikolay, the link is assembled =) the price of the issue is less than a thousand... )) Danil (Oceanus) So, first check what you mean I wrote to you, why don’t you immediately throw away the money? Nikolay (Gavriella) the nut on the rocker is normal... I already looked at Mikhail (Setara) I just tightened the bolt on the cardan and everything stopped Stanislav (Eris) My bolt securing the gear shift mechanism and the rod inside the box has come loose. It was also dangling until it completely unscrewed :) Vladimir (Philipi) I have the same problem ((in any gear like in neutral, replacing the rocker didn’t solve the problem!!!! I just started catching gears a little better, but I feel like I’ll tear the hell out of everything there soon because that you shift from 3rd gear to 1st, and the same 3rd gear gets stuck, you panic, get nervous, and there is such a crunching sound, in short, it’s scary, what should I do????? Thanks in advance, I’m a newbie with the pelvis)
Eliminating vibration of the gearshift lever on a VAZ 2114
The gearbox is an important link between the car's power unit and its wheels; with its help, the nature of the torque changes. This happens due to a change in the gear ratio between the gears in the unit housing. In most cases, the driver himself decides when which gear should be engaged, that is, he mechanically changes the position of the lever and thereby changes the position of the driven gear relative to the drive gear. Let's figure out why the gearshift knob rattles on front-wheel drive cars such as the VAZ 2114 and similar 13 and 15 models of this family.
Manual transmission lever
Is it true that the box from the VAZ 2115 fits in the VAZ 2109?
Photo source: youtube.com/watch?v=IJDTUwSivHE
Even the best cars sometimes break down, and our beloved “nines” are not immune from this.
A breakdown of the gearbox especially hurts the pocket of a car enthusiast, because a good option for replacing it costs far from a penny. But sometimes it happens that there is money, but there is no good replacement.
There is an opinion that a gearbox from Samara could be a good option for replacing a broken part from a 9, but is this true?
Difference in characteristics
Sometimes it happens that the required part is not on sale, or the quality of those presented does not satisfy the driver’s needs. In the case of replacing a gearbox, you can often hear that VAZ gearboxes are completely interchangeable, you just need to change a few parts, and that’s it – you can install it.
But will the box from 2115 to 2109 actually fit? Before answering this question, you need to compare the characteristics of these boxes. The first thing that catches your eye when considering this option is the difference in torque, namely 120 versus 125, and the amount of lubricant - 3.5 versus 3.4.
Both indicators are higher in Samara, but it seems not critical. Another important aspect is the gear ratios, here you can also see a small difference, especially noticeable when considering the final drive: 3.937 on the nine and 3.7 on the Samara.
In general, the difference when driving is unlikely to be noticeable, even at low speeds.
GEARBOX DEVICE OF THIS MODEL
First, we need to understand why this happens, where the vibration comes from, and why it’s actually not that bad on this particular car. To do this, we need to remember which drive is here and how the engine and gearbox are located. The car is front-wheel drive, so the gearbox is located perpendicular to the direction of travel, that is, the lever in the cabin does not fit directly into the box; a rocker is used. In the classic series with rear-wheel drive, the lever is directly inserted into the box, and if it starts to rattle there, then this is a sure sign of problems with it.
The VAZ 2114 gear knob works differently and has a special rod system so that the driver can change gears comfortably. The reasons for the rattling of the gearshift knob lie in the banal little shortcomings of the engineers who developed this mechanism:
- Incorrect connection sleeve size;
- Lack of gasket;
- The parts simply didn't fit together.
All these problems are revealed by the very small metal bushing that connects the rods to each other directly under the lever. In one case, vibration of the gearshift lever begins due to the fact that it was inserted incorrectly, leaving a gap. Or maybe the bushing was initially chosen a little smaller than what was needed, and it was not inserted tightly. In addition, then it was decided to simply wrap the bushing with a rubber gasket to avoid the appearance of a gap.
It is precisely because of the constant impacts of metal on metal that that same unpleasant iron grinding and rattling of the lever appears.
REMOVE THE SHIFT LEVER
Self-repair begins with the fact that you need to figure out how to remove the gearshift knob on a VAZ 2114 . This is usually done simply and the owners of similar 15 and 13 models should do the same, if, of course, they have similar problems. So, the algorithm of actions looks like this:
- First you need to remove all the armrests and bathtubs that drivers like to furnish the space between the seats with. This must be done so as not to spoil them in the process of self-repair.
- Next, you need to carefully remove the casing from the lever, since it can simply be torn, but it still costs money, and it adds significant aesthetics.
- Now you need to find a bolt and nut under the lever, the latter is usually unscrewed with a regular open-end wrench 13, so there should be no problems with this, you just need to have the appropriate wrench. After unscrewing, take the bolt out, it is also advisable not to drop the nut.
- That's it, the lever, together with the very bushing that causes the VAZ 2114 gearbox lever to rattle, remains in our hands.
WE ELIMINATE VIBRATION
Now you need to carefully inspect the bushing externally, after all, it is precisely because of it that the gearbox lever 2115 rattles. If there is any external damage that is too obvious and signs of wear, then you may have to look for a new part so that you do not have to repeat these manipulations in the future . Now let’s figure out what operations need to be carried out in order to understand how to adjust the rocker on a VAZ 2114:
- We remove the outer plastic braid of the bushing to free its iron body.
- Now we need to see if there are any signs of friction on it. Their presence will indicate that the size is incorrect. They will be especially pronounced if the sleeve is slightly longer than necessary. If this is confirmed, then these extra millimeters are the reasons why the VAZ 2115 gearbox lever rattles. In this case, you need to try on how much excess is in the hole and simply grind it off with a file, usually there are only 1-2 millimeters there.
- Now you need to select some kind of gasket according to the shape of the part, or simply wrap it with electrical tape so that it fits into place more tightly and then does not move.
So it became clear how to eliminate the rattling of the VAZ 2114 gearbox lever and why this generally happens. After our simple manipulations, the vibration should completely disappear, now the lever will always be in a calm state.
The described methods do not require any special knowledge and can be performed by an ordinary person in his garage with a minimum set of suitable tools.
Self-adjustment of the rocker on a VAZ 2110. Adjustment of the gearbox rocker with your own hands
The gearbox linkage, like everything else in a car, requires care and timely adjustment. A misadjusted gearbox linkage can cause discomfort while driving. For example, the gear knob may rattle, the gear shift may become inaccurate, the speeds may “knock out” from time to time, and the lever itself may begin to “play.”
To get rid of all this, you need to carry out a simple procedure for adjusting the gearbox rocker, especially since adjusting the rocker will take you no more than half an hour.
The gearbox slide is necessary to prevent random switching of gears due to the simultaneous movement of the sliders. Often, the entire transmission suffers from an incorrectly adjusted rocker, and as a result, you are at risk of malfunctioning the entire gearbox. In our previous articles, we have already talked about this detail several times, for example, in the article: About how to install a short-throw rocker on a Lada Priora. and also in the article: Installing a short-throw rocker on a VAZ 2109. In addition, the issue of engaging gears and gearboxes is addressed in this article.
Adjusting the gearbox slide requires the presence of an assistant, in which case the result, and the work itself, will be of better quality. It is fashionable to adjust the slide in several ways; below we will talk about each of them in more detail.
Replacement of the gear lever housing and gear knob
First of all, it should be noted that on many cars, especially budget ones, the factory gearshift lever cover is made of leatherette. The quality of such material is average, that is, after 30-40 thousand km. After active use, this material becomes unusable.
The lever handle is often made of rubberized plastic. Although the material is more resistant to wear, replacement may also be necessary at 50-60 thousand km. mileage (especially if used carelessly).
The only thing is that when reinstalling a previously removed handle, you need to be prepared for the fact that the fit will deteriorate somewhat. The fastening is implemented in such a way that the rod has teeth for fixation, however, after twisting the handle, the material of the handle itself is damaged.
For this reason, when reinstalling an old handle (for example, after re-covering it with leather or restoration), special glue or liquid fixatives are additionally used.
- So, before installing the cover, you should separately note the position of the tie. At first glance, it may seem that the screed is in the wrong position. Do not twist the tie, pull it, or try to put it in the correct position. After the cover is turned inside out to secure the coupler to the gearshift lever, the coupler will be in the desired position.
- To remove the old cover, you need to carry out all the work in a warm garage or room, since at sub-zero or near-zero temperatures the plastic in the interior may burst as it becomes brittle.
- To remove the cover, you need to press on one of the corners in the front, then use a plastic spatula, a ruler, or simply press the latch with your finger to unhook it. After the latch is snapped off, the second corner is raised and the second latch is snapped off.
- Now the base of the cover can be pulled forward and lifted up. Next, you need to turn the case around the axis of the box handle to reveal the plastic tie lock. The lock is cut using wire cutters, and the old cover is removed from the handle.
- Next, you need to bend the staples using a chisel from the inside (you can also use a flat-head screwdriver), after which the staples are pulled out from the outside.
- In the front part of the plastic base, the latches are located at a slightly greater distance from each other than in the rear. The case will also have slots that are slightly wider at the front and narrower at the back.
- Having decided on the front and back parts, the front edge of the cover must be attached to the base, after which, placing it on a support or on a table, the cover is attached to the base with a stapler.
- Please note that if you use a cheap stapler and low quality staples, the staples may bend. To prevent this from happening, you should try to place the bracket in the existing holes.
- Having secured the case with staples in the front, back, left and right, as well as in the corners, you need to check whether the staples have pierced the plastic through. If this is the case, the protruding ends of the staples will need to be bent inward.
- Next, you need to turn the cover inside out, making sure that the tie also turns inside out and does not twist. To keep the tie in place, you need to hold it with your fingers while simultaneously turning out the gear lever cover itself.
When installing the gasket, it is important to achieve such a result that, on the one hand, the lever mechanism does not rub the cover from the inside during operation, and on the other hand, the mechanism itself works normally, that is, the gasket should not affect the performance and quality of operation of the gearbox lever mechanism.