Advantages of acoustic podiums
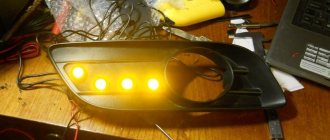
VAZ 2114 acoustic podium
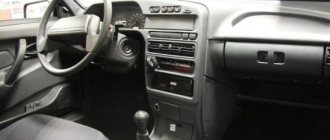
Podiums allow you to qualitatively improve acoustics, raising the sound to a new level. In this case, you can not be limited to the standard landing dimensions of 13 cm, as provided by the manufacturer of the VAZ 2114.
Among the many advantages of podiums, I would like to highlight the following:
- Podiums allow you to install speakers in car doors. Thus, rear passengers no longer feel discomfort from strong sound, as was the case before. The sound will be evenly distributed throughout the cabin.
Podiums in the doors of VAZ 2114
- Podiums make it possible to create the correct direction of sound. As you know, sounds have a clearly defined direction. In other words, the higher the frequency of a sound, the more directional it becomes. This can explain the fact that the midrange and high-frequency speakers must be correctly directed.
- Podiums are always easy to install. Attaching them is quite simple and it is not necessary to cut through the metal of the door. Often acoustic podiums are firmly fixed to the skin.
Installing podiums is easy and simple
Note. You can evaluate the effect of “podium” sound immediately after fixing this element. Previously disturbing overtones will disappear, the transparency of the sound will improve, low bass will be added and the sound will seem to “get rid of” the speakers.
- Another advantage of the podium is the spaciousness of the “pocket” where a larger speaker can be inserted.
- Leather-wrapped podiums make it easy to remove dirt and dust.
- The podiums have petals on the base. This is also considered an advantage, since it will allow the element to be firmly fixed to the door.
- The podium will fit perfectly into the interior of the VAZ 2114, making the interior richer and more beautiful.
Types and characteristics of podiums
Depending on the installation location, there are two types of elements: external and internal. Internal ones are installed if you want to preserve the factory appearance of the interior. For example, when replacing a standard speaker with a diffuser of similar diameter.
Internal parts are completely hidden under the door or ceiling trim. And it, in turn, should fit very tightly to the column. Otherwise you will get distorted sound. Internal structures are protected from damage and are easy to manufacture. And also, they do not affect the interior design of the cabin.
Car door speakersThe external (external) podium makes it possible to install any speakers in size: 20 cm or 16 cm. The head can be placed with inclinations in different directions - towards the listeners or parallel to the door. External installation helps reduce vibration due to its tight fit to the door trim.
Making podiums for acoustics
VAZ 2114 acoustic podium and its production
Let's look at how to make podiums for doors. As a rule, the standard places on the doors of a VAZ 2114 car are designed to install speakers measuring 13 cm. What should we do if we want to install larger speakers? The most suitable material from which to make good podiums is plywood. And to start the process, you need to cut out circles of a certain size from plywood for the speakers you intend to install.
Advice. When cutting, we recommend using an electric jigsaw. It will save both time and nerves. In extreme cases, you can use a drill.
To adjust the podium to the desired shape, the following materials are used:
- Polyurethane foam.
- Epoxy resin.
- Compoplast.
And now everything is in order.
Frame making
Note. To make the frame, it is recommended to use plywood, the thickness of which does not exceed 5-6 mm.
Let's get started:
- We cut out the rings with a jigsaw so that the purchased speaker sits tightly in it.
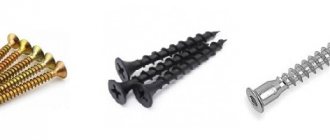
- Using spacers from bars or self-tapping screws, we create a suitable frame where the speaker will be placed.
DIY podium
Advice . If we want to get a slope of the podium, then we use spacers of different heights, as in the photo below. Be sure to use self-tapping screws to prevent the plywood from cracking.
Spacers with different heights
Note. You can make not one, but two frames for one door. Here everything will depend on creativity and individual preferences.
Creating a Form
Acoustic podium VAZ 2114 and creating the form
Once the frame is ready, it's time to start creating the mold. The simplest solution is polyurethane foam. Creating a mold from polyurethane foam:
- We take the frame and foam it.
- We wait a certain time until the foam hardens. It may take more than one hour.
- After the foam has cooled sufficiently, we begin work that makes you feel like a sculpture. In other words, we cut out everything unnecessary.
Advice. The sharper the knife we use to cut out the extra pieces of foam, the better. Therefore, you need to prepare such a tool in advance. It is advisable that the knife has a wide blade.
- Apply a layer of putty to the foam and wait until it dries.
- Take sandpaper and sand the entire part.
- The acoustic podium is ready.
Creating a mold from compoplast:
Acoustic podiums on the VAZ 2114
The mold can also be created from compoplast. This is a two-component composite plasticine designed for almost any purpose. It has many useful functions: good adhesion, no shrinkage and toxicity, etc. So:
- Mix two equal parts of white and gray matter.
- Apply the resulting mixture to the frame.
Note. Working with compoplast is similar to a modeling lesson, when different things are made from plasticine, for example, the same podiums. Only plasticine is more similar to cold welding, hardening after a certain time.
- We wait until everything dries and the form can be considered ready.
The final stage of work
So:
- We stretch old and unnecessary nylon tights onto the workpiece so that there is no sagging.
- We dilute the baksu separately and cover the resulting form with it.
Note. According to the advice of experienced people, the buck should be placed every 12 hours. The last coating should be the third and after that you need to wait a day for the glue to dry completely.
- We cover the product with anti-gravel, using one can for two podiums.
- The inner rings and foam walls can be coated with black spray paint.
Podiums for acoustics VAZ 2114
Note. The paint and aerosol will dry quickly.
- We fix the acoustic shelves to the door trim with self-tapping screws, doing this from the inside along the plywood.
- Next we hang up the original trim.
- We put the pockets in place.
- Install the speakers and enjoy high-quality sound.
Podiums for acoustics in VAZ 2114
Making acoustic podiums with your own hands makes sense if you need to get a unique shape. In normal cases, you can use ready-made options.
When working, be sure to use step-by-step instructions, useful photos and video materials. Thus, the price of purchasing and installing an acoustic podium is significantly reduced, because you only have to buy consumables: glue, screws, etc.
Making an acoustic shelf for a VAZ-2107
Standard-type acoustic shelves for the VAZ 2107 cost about 1000 wooden ones on the market, which is just over 30 Baku. Of course, there is a range in prices, but it’s a no brainer that a good shelf costs good money. And since this money is always not enough and you want to save money, but still get high-quality sound from your acoustics, you can get a little hands-on, namely, make this shelf yourself, but so that it is no worse, and even better, than those sold on markets and shops. So let's get started!
The following materials were required: 18 mm chipboard, 1 meter carpet, polyurethane foam, epoxy glue, and some other little things. We take a standard plastic shelf, put it on a sheet of chipboard, outline it and cut it out, taking into account the cutouts for the seat belts:
We mark and make templates for ovals. One is included in the kit - this is the internal diameter, for the external one we make it ourselves (MS Word, Photoshop or some other editor will help you with this)
We make the base of future podiums from chipboard (you need a jigsaw):
We make spacers from timber (20*40 mm) for structural rigidity and attach them to self-tapping screws:
We attach the podiums to the shelf blank and trace them. We mark round holes for air flow into the trunk and cut them out:
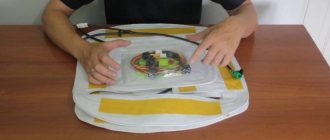
We fill the voids of the podium with polyurethane foam, lay cardboard inside so that the foam does not spread before it dries, and leave to dry:
When the foam has dried, carefully cut it off and sand it with sandpaper:
To strengthen the structure, we wrap it with nylon impregnated with epoxy glue:
The podiums are ready. We return to the shelf. We make a box for the seat belts (as you can see in the photo, the belts go into the box from the side):
Let's put everything in place and see what happens. And the result is already starting to look like a factory shelf:
It seems that everything is as planned and now we are starting to cover the structure with carpet. To attach the carpet I used small nails. If you have a furniture stapler, then everything is much simpler and faster:
To cover the boxes for the belts with carpet, I used clothespins:
We screw the boxes into place under the belts and the shelf is ready!
Now, satisfied with ourselves, we run to install the shelf in the car. For me it is bolted to the metal, the nuts are tightened from the trunk side:
Connect and install acoustics:
As you can see, our homemade shelf is very similar to the store shelf, which costs 1000 rubles, but it cost us much less. I don't know about you, but I'm happy. The permanent address of the topic on the forum is where you can express your opinion, ask questions, make suggestions, thank the author, in general, whatever your heart desires within reason