To diagnose a VAZ 2114, 2113 or update the ECU firmware, car owners, diagnosticians or mechanics need to know the location of the OBD2 diagnostic connector, as well as its pinout and type. To flash the electronic unit or replace it, you also need to know the location of the ECU and the purpose of the pins.
For a VAZ 2114 car, the type of block depends on the year of manufacture and the type of ECU:
Where is the diagnostic connector for VAZ 2114?
VAZ diagnostic connectors
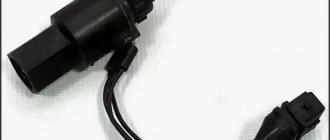
There are several types of connectors for diagnosing VAZ cars, including EURO 3 (4). To connect a car to a computer or laptop, you need to purchase or manufacture a communication interface between the COM port and the K-LINE diagnostic connector. It looks something like the picture below.
VAZ diagnostic connector for models after 2002 with an OBD-II connector
B L-line diagnostics
D CO potentiometer (not always diluted)
H Power supply +12V (not always wired)
G Fuel pump control (not always connected
M K-line engine diagnostics
Diagnostic connector for VAZ cars
H - 12V. Constant with battery via fuse A - GND B - L-Line M - K-Line G - Fuel pump control.
Diagnostic connector EURO 3
2 - J1850 Bus+ 4 - Chassis Ground 5 - Signal Ground 6 - CAN High (J-2284) 7 - ISO 9141-2 K Line 14 - CAN Low (J-2284) 15 - ISO 9141-2 L Line 16 - Battery Power
Location of diagnostic pads
VOLGA - under the hood, on the wall of the engine compartment, on the passenger side VAZ 2110 - to the right of the driver, next to the steering column of the VAZ 2109 Low panel - on the shelf under the glove compartment, next to the VAZ 2109 ECU High panel - behind the center console. VAZ 2108-2115 “Europanel” - on the dashboard, closed with a hatch. Chevrolet Niva - OBD-II, near the ignition switch. partially covered by the steering cover. VAZ 11183 “Kalina” - Under the niche for small items next to the gearshift knob. VAZ 21126 Priora - behind the glove compartment.
Pinout and where is the diagnostic connector for VAZ-2112
Diagnostics of modern car models is carried out using a special diagnostic connector. It connects to a computer, which analyzes the current state of the vehicle, determines the malfunction and indicates it. If you have the appropriate equipment, you can look for breakdowns even at home. However, not all VAZ-2112 owners can find the diagnostic connector right away. Today we’ll talk about its location on the classic panel and on the Europanel. In which part of the car should I look for the required socket?
ELM327
Separately, we will introduce you to the ELM327 adapter, with the help of which many VAZ 2110 owners perform full diagnostics on their own.
https://youtube.com/watch?v=kfkZlvjIz4Y
ELM327 is one of the latest OBD developments. This scanner is used to check cars using a computer. The key advantage is that the device supports all known OBD protocols and interacts with many diagnostic programs. A USB cable is used to connect the device to a computer.
ELM327
The software for the ELM327 is mostly free, although some software is available only for a fee.
The adapter can work on computers with different OS. Namely:
- DOS;
- Windows;
- MacOS;
- Linux;
- PalmOS;
The full capabilities of the scanner can only be fully realized through properly selected software. For self-diagnosis, software for scanning the transmission and engine is available free of charge. Commercial versions of the programs allow you to additionally check other components of the car.
Key Features
Let's take a look at the capabilities that the ELM327 chip provides:
- Reads error codes and vehicle malfunctions;
- Displays codes and their descriptions;
- Exports data for printing, if necessary;
- Removes error codes;
- Displays data in metric and US measurement systems;
- Records, saves data, builds graphs;
- It has an acceleration counter from 0 to 100 km/h, which allows diagnostics on the go.
Many vehicle operating parameters must be checked while driving.
Not all adapters are suitable for this, so it is important to choose equipment that meets your requirements
Where to look for the connector
It is important to know that on different cars the required socket is located in different parts of the car. Moreover, on some AvtoVAZ models it may be in a completely different place compared to another car. Let's look at several VAZ cars as an example:
- on the VAZ-2112, as well as on the 2110, as well as 2111, the socket is located to the right of the driver’s seat, immediately under the column;
- on models 2108, 2109 and 21099, the socket you need is located under the glove compartment, on a special shelf;
- on cars with a europanel it can be found in the center of the console, near the cigarette lighter. A special decorative cover is used to disguise it;
- on Lada Kalina cars, the connector can be found near the gear shift lever. As is the case with cars with a Europanel, it is hidden under a special cover;
- on a Priora you need to look for it right behind the glove compartment, on the wall.
Thus, on the VAZ-2112 the diagnostic connector is located on the right side of the driver’s seat. It is located immediately under the steering column and, in principle, is not so difficult to find. Inspect the bottom of the panel.
Pinout
Knowledge of pinouts may be required if a car enthusiast wants to make an adapter for computer diagnostics with his own hands, or if you need to connect without one. Experts recommend buying ready-made devices without the need to make a plug yourself. However, if you do not have such an opportunity, and diagnostics need to be carried out urgently, we will consider two main pinout options used on VAZ cars of various years of manufacture. Until 2002, AvtoVAZ products used the following pinout option:
- The 4th and 5th pins are GND outputs.
- Pin 16 – +12 V (power line).
- The 7th contact is the diagnostic line itself.
Since 2002, the pinout scheme has changed significantly. Now it looks like this:
- Pin H – +12 V (power line).
- Contact G – +12 V for the fuel pump.
- Pin A – GND output.
- Contact M – diagnostic line.
There is one important note to note regarding this diagram.
If you connect the connector without a block, but directly, it is recommended to use the charge from the cigarette lighter as a source of electricity. The peculiarity of this pinout is that contact H is not always routed in the car. The use of G is also not recommended because high frequency current is supplied. This can have a negative impact on the adapter, even to the point of burning it out. However, cases of burning out the fuel pump connector are quite rare. Therefore, if you wish, you can also use this option. As you can see, the pinout on VAZ cars of different ages is sometimes very different. Therefore, we advise you to look at the registration certificate of your car and find out what year it is made. On older vehicles you will not find the new pinout design as it did not exist yet and on newer vehicles the old design was no longer used.
- Other
- Engine
- Steering
- Electrical equipment
- Transmission
- Brake system
- Suspension
- Tuning
- VAZ 2110 Other
- Engine
- Steering
- Electrical equipment
- Transmission
- Brake system
- Suspension
- Tuning
- Electrical equipment
- Steering
- Video publications
- VAZ tuning photo stream
- Operation and repair manuals
Selection of diagnostic equipment
Demand creates supply. Online stores are full of advertisements for diagnostic devices that check all kinds of car brands of different years of production. Adapters that satisfy a wide range of untrained users are considered. The buyer makes the choice. Some car enthusiasts want to perform periodic monitoring, maintain the operating condition of the vehicle, and use a laptop or tablet. Others like to be an airline pilot, constantly monitoring changes in dozens of parameters on a smartphone by connecting a test device permanently. The diagnostic devices produced will satisfy various wishes.
VAZ car owners should pay attention to devices designed to test VAG Group vehicles (48 automobile manufacturing enterprises producing branded cars in 21 countries around the world). In an effort to enter the global market, VAZ developers focused on electronic units with the logic for constructing tires from the VAG concern
The scanner must support the required protocol. Vehicles manufactured before 2007 are checked using the K-Line bus. New cars operate via a CAN bus; the K-Line bus is not provided on the connector.
The leader in popularity is the ELM 327 adapter with firmware version 1.5 for wired (USB) and wireless (WiFi, Bluetooth) versions. Wired communication works more stable, a working scanner reads information the first time. It is advisable to choose a device built on an original chip (the main chip is indicated in the description). Supports 5 test protocols for passenger cars equipped with injectors manufactured after 1996.
Brief device features:
- reads, clears errors, turns off the Check Engine light,
- displays parameters of the engine, fuel system, valve position in real time,
- saves data in files of different formats, prints them out,
- Comes with disk media containing free diagnostic programs.
An addition is an adapter that allows you to connect an OBD2 scanner to the GM12 interface. There are several options for resolving this issue.
- The most civilized. Order a universal adapter cable from the online store. Wait a few days (domestic suppliers), 3-4 weeks (Ali Express). Connect, use.
- More troublesome. Stock up on patience, time, spare parts, tools. Replace the on-board GM12 with a female connector (in simple terms, mother) of the OBD2 standard.
- Least reliable. Connect the diagnostic adapter using wires. It has negative aspects: unreliable contacts, the possibility of connection errors during the next testing, difficulty of use while on the move.
Wiring diagram for a 16-pin block instead of a 12-pin one: GM12 OBD2; A – mass 4; 5H – plus 16; M – K-Line 7
The Internet offers various connection methods that may have been used previously. The provided version of the scheme is guaranteed to work.
Successful connection of the test device allows the test to begin. The adapter user manual is included on electronic media.
- You must first prepare a computer and smartphone.
- Download and install programs.
- Connect the adapter (wired USB option).
- Turn on the power with the ignition key.
- Launch the program, select the type of diagnostics.
- Follow the instructions for the program. Codes of detected errors are deciphered using tables attached to the program and found on the Internet.
Software developed for diagnostic equipment can be paid, shareware (the commercial version contains more functions), or free. The first is supplied to specialized service centers and service stations. Contains the ability to control and change operating modes of the engine, components, and mechanisms. The other two are suitable for ordinary car owners, making it possible to maintain the performance of the vehicle.
Schematic electrical diagrams, connecting devices and pinouts of connectors
Self-diagnosis of VAZ 2110: pinout, connector location, features
Inside every modern car there is a lot of electronic stuffing. This also applies to the new generation of VAZ, which includes the Lada 2110. If there is electronics, then it can be tested. Today, this task is performed by computer diagnostics, which quickly and effectively finds all problems with the car. Testing can be done by yourself, but this requires an adapter.
Diagnosis requires experience in working with computers.
Computer diagnostics are divided into 2 types:
- Suspension testing. Performed when knocking or uneven tire wear is detected. Testing is also carried out if drift of the front or rear axle occurs during sharp turns.
- Diagnostics of the power plant. Performed when problems are detected in the engine: increased fuel consumption, the engine is difficult to start, low or high idle speed, the presence of black or white smoke, etc.
Recovery
Is it possible to restore a broken sensor? This can be done only in one case - if the cause of the malfunction is poor contact and the sensor itself is working normally. You can also try removing the carbon deposits inside. But to do this, you need to take the sensor out and lower it into an aggressive environment (white spirit or gasoline)
Please note: do not use sandpaper, needle files or other rough objects for cleaning. To avoid damaging the tip, use a soft cloth soaked in solvent.
By treating the sensitive element with white spirit, you can restore the functionality of the sensor. But it is not a fact that after cleaning it will take accurate measurements. Ideally, this element should be changed entirely. Fortunately, the operation is simple, you can do it yourself. We’ll tell you exactly how below.
Connector location
So, we plan to check our car and we even have the necessary equipment. Now you need to find the connector - it is located at the bottom of the steering column, to the right of the driver. This connector is also called OBD. Knowing this name, it will be easier to find a suitable adapter.
If you believe the reviews, the K-Line connection device is considered the most successful adapter for VAZ cars. It has a lot of free space, so you can connect almost any testing equipment to it.
As for the main diagnostic device, it will be a computer. Of course, it is easiest to work with a laptop, since the process can be performed right behind the wheel of a car. But if there is only a stationary option, then you should take care of a long cord connecting the computer to the adapter.
Performing diagnostics yourself
Adapter for connecting a computer to the electronics of a VAZ 2110 car.
Many motorists believe that having a computer and an adapter is quite enough to perform a high-quality test of their VAZ 2110. But the main “component” for a successful and extensive test is the presence of a competent specialist. Of course, you can complete the task yourself, but to do this you need to install special software, which is publicly available on the Internet. A good option is Motor-Scan.
Also, the presence of the Internet is necessary in order to decipher the received error codes and abbreviations. The work is performed in the following sequence:
- The adapter is inserted into the OBD connector (located where the steering block is), and the computer must be turned on.
- When the block has received the adapter, the ignition is turned on, since without power the program will not be able to read anything.
- Now the testing program starts on the laptop.
- If the block and other elements are in working order, then the electronics of the VAZ 2110 will be displayed on the monitor. Now you can start checking.
Basic blocking methods
Today, blocking the diagnostic connector is one of the main options for protecting your vehicle from theft. Thanks to the blocking, the car owner will be able to prevent illegal connection to various car systems and avoid possible bypass of the anti-theft system using software. If the engine is blocked, the criminal will not be able to check the blocked motor elements.
There can be several options for blocking a device:
- The first of them is the transfer of the AR itself to another place. So an attacker who tries to steal a car will be faced with the problem of finding an AR that can be installed anywhere. The car owner can move the device to the engine compartment or hide it somewhere in the cabin.
- Re-pinning the DR contacts and making a special adapter for its use. In this case, you only need to reassign a few wires on the device. But in order to use such an DR, you will need a special adapter, where the contacts will also be re-pinned. Otherwise, diagnosing the vehicle will be impossible.
- Complete removal of the AR and installation of a non-standard device in its place. In the future, to carry out diagnostics, you will need a counterpart from such an DR with a block of wires, that is, essentially the same adapter.
- Another method that has recently become widespread is the use of the so-called secret. The secret is a device designed to enhance the functions of the installed immobilizer. As a rule, most modern manufacturers manufacture secret components in such a way that the design of the DR remains the same, and no adapters are needed for its operation. In the event of an attempted theft, the wiring that comes from the DR in the passenger compartment and in the engine compartment is blocked, and a control circuit is placed in the resulting gap. As for control, it all depends on the device manufacturer. For example, an additional DR can be installed, which will be displayed in another location, and sometimes control can be carried out via SMS commands.
Loading …
Pinout
The remaining contacts are empty, but their number differs depending on the year of manufacture.
If you plan to diagnose it yourself, then you need to know what the block includes. Pinout is the purpose of all the contacts that are in any connector. We are interested in the OBD pinout.
We will analyze the notation using a diagram. The pinout is as follows:
- Contact “A” is responsible for connecting the ground;
- Contact “B” is needed to connect the L-Line (some cars do not have this contact);
- "M" is needed for K-Line;
- “G” is responsible for controlling the fuel pump;
- “H” is +12V power supply.
Diagnostics with ELM-327 scanner
Diagnostic connector for Lada Kalina and Priora, car diagnostics via laptop
Thanks to Chinese engineers, car diagnostics have become much easier and cheaper. Not long ago, a universal internal combustion engine scanner appeared on Chinese websites, which is suitable for almost all cars with OBD-2 connectors.
The ELM 327 scanner on the AliExpress website costs from 5 to 10 dollars, depending on the version.
This gadget is divided into two types and you should pay special attention to this when purchasing. ELM 327 works with our domestic cars only on version 1.5
Therefore, you need to purchase an ELM-327 v1.5 scanner. If you purchase version 2.1, then work with domestic cars is not guaranteed.
It should also be noted that this scanner only works in conjunction with a smartphone. If you have an Android smartphone, then you just need to buy a scanner with Bluetooth only.
If your smartphone is based on iOS, then you need to purchase a scanner with a Wi-Fi module, since Apple smartphones do not allow connecting third-party devices via Bluetooth.
Self-diagnosis of VAZ 2114 and 2115: golden rules
On any vehicle, various problems are possible during operation. Owners of cars with injection engines have the opportunity to carry out diagnostics themselves. For this purpose, a diagnostic connector is installed on vehicles from the factory. The article describes where the diagnostic connector of the VAZ 2114 and VAZ 2115 is installed, when diagnostics are carried out, instructions are given for its implementation.
Connector location and features
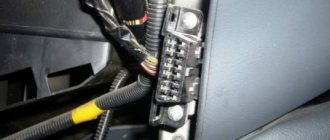
On VAZ 2114 and 2115 cars, where a Europanel is installed, the diagnostic connector (DR) is located on the central control panel under the cigarette lighter. It is closed by a decorative plug. To access the connector, just pry off the plug and it can be easily removed.
Location on VAZ 2114
VAZs can be equipped with a 12-pin rectangular connector of the old style OBD 1 (GM-12) or a 16-pin OBD-II connector in the form of a trapezoid USB-KKL. If the adapter is intended for OBD-II AR, you can buy an adapter.
When is diagnosis necessary?
Many car enthusiasts are frightened by the “Check Engine” signal appearing on the panel, which reports malfunctions in the operation of the vehicle systems. The easiest way out in this case is to visit a service station. But this is associated with both financial costs and loss of time. Thanks to the DR that has appeared on modern cars, computer diagnostics of the VAZ 2114 and VAZ 2115 has become possible, which you can do yourself. To do this, you need to purchase a diagnostic adapter and have a device to which it can be connected: a computer, laptop or other device.
The ability to independently diagnose a car will allow you to:
- quickly identify vehicle malfunctions;
- obtain the necessary information from sensors;
- change settings;
- save on visiting a service station.
The need for diagnostics arises primarily when the “Check Engine” sign is displayed, but it is not a bad idea to carry out regular diagnostics for prevention.
"Check Engine" sign
You can carry out additional diagnostics using a compression meter and a multimeter. During an additional check, you should check the level of fluids in the car systems, do a visual inspection of the car body and components for mechanical damage. Next, you need to check the compression in the cylinders, the battery charge, the condition of the valves, high voltages and spark plugs. Having made a preliminary diagnosis, you can begin computer diagnostics.
How to diagnose a car
- Connect contact “B”, which has the diagnostic block and “ground”;
- Turn the ignition key to the third position, do not start the car;
- First, the “CHECK ENGINE” lamp displays code 12 with 3 flashes. It shows that the diagnostic programs are working. On the VAZ 2110 this happens in this order: the lamp blinks briefly 1 time (which should be considered the designation of number 1). After a pause lasting at least 2 seconds, it flashes 2 times in a row (two). So we got the number two. And this is repeated 3 times so that the driver understands these signs;
- After the diagnostic program has declared its serviceability, it will begin to display error codes, if there are any, of course. In the same way - flashes and pauses.
Instructions for performing diagnostics via a laptop with your own hands
For diagnostics you will need a laptop and a diagnostic adapter. The laptop can be of any power, it does not matter for diagnosis. The adapter is universal and suitable for all VAZ models (the author of the video is KV Avtoservis).
There may be a mismatch between the diagnostic pads. In this case, you can buy an adapter. A diagnostic program is supplied with the adapter, but the software can be downloaded from the Internet on specialized sites. They have the same set of functions, but may differ in unique features.
When connecting a laptop, the ignition must be turned off.
One end of the adapter is inserted into the DR, and the other directly into the USB port of the laptop. After connecting the adapter, turn on the ignition. At the next stage, we launch the program and begin diagnostic work. When the program starts, the computer connects to the electronic control unit.
How to diagnose a car
- Connect contact “B”, which has the diagnostic block and “ground”;
- Turn the ignition key to the third position, do not start the car;
- First, the “CHECK ENGINE” lamp displays code 12 with 3 flashes. It shows that the diagnostic programs are working. On the VAZ 2110 this happens in this order: the lamp blinks briefly 1 time (which should be considered the designation of number 1). After a pause lasting at least 2 seconds, it flashes 2 times in a row (two). So we got the number two. And this is repeated 3 times so that the driver understands these signs;
- After the diagnostic program has declared its serviceability, it will begin to display error codes, if there are any, of course. In the same way - flashes and pauses.
Where is the diagnostic connector on the VAZ-2114
Any machine will sooner or later experience all sorts of problems during operation.
Car owners of an iron horse with an injection engine have the opportunity to carry out diagnostics on their own. For convenience, cars, and the VAZ-2114 is no exception, have a diagnostic connector. We will describe where this connector is located, how to perform diagnostics and talk about the intricacies of the 2114 model. The location of the diagnostic connector may differ depending on the model or make of the vehicle. Basically, in modern iron horses, the diagnostic connector is located in the area of the steering column, often to the left and below it.
Placement of the diagnostic connector: features
In the 2114th model, which has a Europanel, the connector is located on the main control panel, under the cigarette lighter. The latter is closed with a decorative plug. To get to the connector, you just need to carefully pry off the plug, after which it is simply removed.
In general, VAZ cars are equipped with a 12-pin rectangular connector of the old OBD-1 type or a 16-pin OBD-2 connector, presented as a USB-KKL trapezoid. In the case where the adapter is provided for the OBD-2 DR, it makes sense to purchase an adapter.
How to diagnose a car
- Connect contact “B”, which has the diagnostic block and “ground”;
- Turn the ignition key to the third position, do not start the car;
- First, the “CHECK ENGINE” lamp displays code 12 with 3 flashes. It shows that the diagnostic programs are working. On the VAZ 2110 this happens in this order: the lamp blinks briefly 1 time (which should be considered the designation of number 1). After a pause lasting at least 2 seconds, it flashes 2 times in a row (two). So we got the number two. And this is repeated 3 times so that the driver understands these signs;
- After the diagnostic program has declared its serviceability, it will begin to display error codes, if there are any, of course. In the same way - flashes and pauses.
When is diagnostics required?
Car owners often perceive with horror the Check Engine sign appearing on the dashboard. It indicates any flaws in the system of the 2114th model. The easiest way out in this situation is to visit a service station. However, this involves both financial and temporary expenses. Meanwhile, thanks to the diagnostic connector installed on current cars, it is quite possible to perform computer diagnostics on the VAZ-2114 and 2115 yourself. For this procedure, you will need to buy a diagnostic adapter and have a device that connects to a laptop, computer, tablet or phone.
Self-diagnosis of your vehicle allows you to:
- quickly detect faults in the car;
- acquire the necessary data from sensors;
- change settings;
- Save money by not visiting a service station.
So, initially diagnostics are required when the Check Engine combination lights up, but it would not be superfluous to perform regular diagnostics as a preventative measure. It’s a good idea to carry out additional diagnostics using a multimeter/compressometer. During the extraordinary inspection, your task is to examine the fluid levels in the system of the fourteenth model, conducting a visual body inspection of the car, as well as components for mechanical problems. Then you should check:
- compression in cylinders;
- what condition are the valves in?
- spark plug;
- high voltage wires;
- charging the battery.
Only when a preliminary diagnosis has been made should you proceed to a computer study.
Selecting equipment for diagnosing Niva Chevrolet
The first step when choosing a cable for reading information from an on-board computer is determining the type of connector.
The main difference between OBDI and OBDII (besides the year of manufacture of the vehicle in which it is installed) is the shape of the connector. How to determine what type of pinout is used in a particular car is described in detail above. It is also possible to connect the K-Line connector to the OBD connector on the Niva Chevrolet. In this way, special diagnostic equipment is installed.
To read information from the OCU you will need:
- a scanning device that supports the required type of connections (currently, in addition to traditional equipment operating via a USB cable, there are items that support wi-fi and bluetooth functions);
- laptop;
- adapter (if necessary);
- appropriate software for diagnostics (for the Russian automotive industry, the ScanMaster ELM 2.1 and OpenDiagPro programs are recommended).
There is a wide range of diagnostic equipment on the modern market. It is divided into the following types:
- "amateur" equipment;
- multi-brand (multifunctional) devices;
- professional equipment.
The last two categories are used for work at service stations and dealerships. For self-diagnosis, it is enough to purchase a simple adapter for beginners based on the ELM327 chip.
Even the most minimally functional equipment is capable of performing all basic tasks (detecting an error, correcting it, transmitting information about the state of the ECU to the PC screen). Such a service in service centers costs up to 1,500 rubles. Purchasing an adapter will save the Niva owner from the need to contact specialists and save money.
Self-diagnosis
The function involves shutting down the system in which the breakdown occurred, followed by enabling a bypass program. A "Check Engine" light on the dashboard should worry the owner of a Chevrolet Niva. The developers have provided a standard self-diagnosis function. This option is useful in cases where there is a short-term failure in the program, but the machine continues to operate as normal. You can identify an “accident” using self-diagnosis.
The motorist needs to perform the following algorithm of actions:
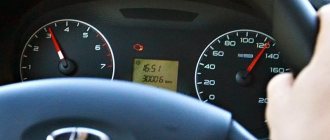
- Press and hold the odometer button.
- Insert and turn the ignition key so that the arrows on the panel move up.
- Press the odometer again. The BC firmware version will be displayed on the screen under the speedometer.
- Press the button again. An error code is displayed.
- To reset the information, you must press the odometer again.
Each number indicates specific errors read by the vehicle’s on-board computer. To determine the exact cause of the malfunction, you need to decipher the code that appears on the screen.
Diagnostics using a laptop: instructions
During diagnostics, you will need to use a diagnostic adapter and a laptop.
The latter is suitable for any power. The adapter, as a rule, is universal, so it is suitable for any VAZ model. Sometimes the diagnostic pads don't match. Then you will need to purchase an adapter. A diagnostic program is included with the adapter. However, it is quite possible to download software support on the Internet on thematic sites. They have an identical functional set, sometimes differing in features. When connecting the laptop, you must turn off the ignition. The end of the adapter should be inserted into the connector, the opposite end into the USB port of the computer. When the adapter itself is connected, you can turn on the ignition. The next step will be to launch the program, after which it is time to begin diagnostic work. When the program starts, the computer will connect to the ECU.
So, the interface depends directly on the program that is downloaded. This is a list with indicators or graphs with parameters. Based on these readings, it will be possible to draw initial conclusions regarding the operation of the engine and the main systems of the car.
As soon as the list of detected errors lights up, you can find their decryption in the test file (attached to the program). By the way, the file decrypts all types of errors that appear during problems.
So, the error codes found have been deciphered. Now it's time to eliminate them. Initially, you need to check the sensors, since the operation of the ECU and the correctness of the readings depend on their operation. Problems with the sensor can cause the error to light up. To make a more accurate diagnosis, you will need auxiliary monitoring of vehicle components. After troubleshooting, a check will certainly need to be made to make sure that the system is functioning without errors.
Errors generated by the ECU
The electronic on-board computer is a complex and at the same time very sensitive device. It is considered a kind of “brain” in the design of any car, as it is responsible for all processes occurring in the systems
Therefore, it is very important to periodically diagnose the “well-being” of your “on-board vehicle” so that all the errors it produces are not ignored
What is an ECU error
As mentioned above, modern control units detect a variety of errors: from a lack of voltage in the network to the failure of a particular mechanism.
In this case, a signal about a malfunction is sent to the driver in encrypted form. All error data immediately enters the ECU memory and is stored there until deleted through a scanner at a service station
It is important that existing errors cannot be deleted until the cause of their occurrence is eliminated
Errors on the VAZ 2107 instrument panel, displayed in the form of icons, are quite understandable to the driver
Deciphering error codes
The VAZ 2107 ECU can detect several hundred different errors. The driver does not need to know the decoding of each of them; it is enough to have a reference book or a gadget connected to the Internet at hand.
Table: list of VAZ 2107 error codes and their interpretation
| Error code | Meaning |
| P0036 | The oxygen sensor heater circuit (bank 1, sensor 2) is faulty. |
| P0363 | Cylinder 4, misfire detected, fuel supply to idle cylinders cut off. |
| P0422 | The efficiency of the neutralizer is below the threshold. |
| P0500 | Incorrect vehicle speed sensor signal. |
| P0562 | Reduced voltage of the on-board network. |
| P0563 | Increased voltage of the on-board network. |
| P1602 | Loss of on-board power supply voltage in the controller. |
| P1689 | Incorrect code values in the controller error memory. |
| P0140 | The oxygen sensor circuit after the converter is inactive. |
| P0141 | The oxygen sensor after the neutralizer, the heater is faulty. |
| P0171 | The fuel supply system is too lean. |
| P0172 | The fuel system is too rich. |
| P0480 | Fan relay, control circuit open. |
| P0481 | Cooling fan 2 circuit malfunction. |
| P0500 | The vehicle speed sensor is faulty. |
| P0506 | Idle system, low engine speed. |
| P0507 | Idle system, high engine speed. |
| P0511 | Idle air control control circuit faulty. |
| P0627 | Fuel pump relay, control circuit open. |
| P0628 | Fuel pump relay, control circuit shorted to ground. |
| P0629 | Fuel pump relay, control circuit shorted to the on-board network. |
| P0654 | Instrument cluster tachometer, control circuit faulty. |
| P0685 | Main relay, control circuit open. |
| P0686 | Main relay, control circuit shorted to ground. |
| P1303 | Cylinder 3, misfire detected, critical for the converter. |
| P1602 | Engine control system controller, power supply loss. |
| P1606 | Rough road sensor circuit, signal out of acceptable range. |
| P0615 | Checking for open circuit. |
Using this table, you can accurately determine the cause of the error signal.
It is important that the on-board computer rarely makes mistakes, so you can safely rely on the received codes