How to remove and replace the cigarette lighter on a Lada Granta
The device has become popular in recent years. Now even non-smoking car owners use the cigarette lighter. Indeed, in addition to its nominal purpose, the device performs a lot of functions. For example, various devices are connected to the cigarette lighter socket:
- power bank for mobile phones or tablets;
- charging for laptop and electronics;
- DVR;
- navigation system;
- electric pump that inflates the wheels.
When used correctly, the device works for a long time, but due to certain features it may fail. Read on to find out why the breakdown occurs, how to recognize the cause of the malfunction, replace the cigarette lighter or repair it on the Lada Granta model.
Design and purpose of the cigarette lighter
The device is designed simply:
- metal cartridge with a nichrome spiral;
- button;
- plastic handle.
There is a special socket on the dashboard into which the cigarette lighter is inserted. When you press the handle, the device connects to the vehicle's on-board network. A current passes through the nichrome spiral and it heats up. As soon as the temperature reaches its maximum, the thermostat is activated, a click occurs, and the cigarette lighter returns to its original position.
Heated coil for lighting
In the first car models, the device was used directly for lighting cigarettes, but with the development of technology its use has expanded significantly. Currently, all external electronic devices are connected through it: vacuum cleaners, navigators, chargers, radar detectors, mobile phones.
Today, the 12-volt socket of a car has become indispensable; its breakdown immediately causes a number of inconveniences.
Where is the cigarette lighter fuse located?
A common reason why a device stops working is a burnt-out protective element. The current strength in the circuit itself is precisely fixed, and its value should not exceed 15 amperes. When connecting powerful devices or a short circuit, the fuse blows, causing the VAZ cigarette lighter to stop working.
The fact that this particular element needs to be changed will be indicated by indirect reasons. The fuse is responsible for:
- sound signal;
- trunk lock;
- immobilizer, this means that if it fails, the owner will not start the car.
To change a non-working cigarette lighter fuse, you need to get to the mounting block. It is located in the cabin under the decorative panel, to the left of the steering column. The cigarette lighter fuse is held in place by five plastic clips.
- We disconnect them and get to the rear space.
- We take out the plug that attaches to the luggage compartment opening button. Now you can completely remove the panel.
- We gain access to the mounting block, where tweezers are also located, allowing you to quickly pull out the protective elements.
The Lada Granta model has two versions of the fuse box - old and new. If the car is from the first years of production, then you will need to replace the element number F20. The mounting block diagram of newer models of the cigarette lighter fuse differs from its predecessor. Here you should change element F27. The fuse must be rated 15 amps. When installing a protective element with high resistance, problems may arise. If the current in the circuit exceeds the maximum permissible value, the cables will melt, which can result in a short circuit or fire in the wiring and a blown fuse.
Reasons for failure of the cigarette lighter on the Lada Grant
A malfunction can occur due to various circumstances. Among the most common reasons why the cigarette lighter on a Lada Granta car does not work are:
- Blown fuse. This happens due to connecting a large number of devices to the connector. The total power of connected devices should not exceed 180 Watts (15*12=180). Otherwise the cigarette lighter fuse will blow. AvtoVAZ models have different protective elements (Granta - F20/F27, Kalina - F18, Priora - F13). The fuse rating must correspond to the value specified by the manufacturer.
- Poor contact. Over time, oxides or rust develop on the tendrils of the metal cartridge, resulting in a poor connection. To correct the situation, it is enough to remove the cigarette lighter, inspect the condition of its contacts, and treat them with a file to remove rust or oxides.
- Broken wiring. Three wires come to the device, the soldering of which disappears over time. To identify the malfunction, you will need a multitester.
What is needed for self-repair
To replace the lamp on the cigarette lighter of the Kalina model, you will need a suitable tool. During the repair process you will need:
- protective gloves;
- standard screwdriver with a thin blade.
To restore the operation of the cigarette lighter or lamp, depending on the malfunction, the following may be useful:
- soldering iron and solder (tin, rosin);
- insulating tape or heat shrink tubing;
- connection tester;
- wires of the required cross-section, suitable core diameter - 1.5-2 mm.
Below is a table providing information about typical cigarette lighter malfunctions and a possible way to eliminate them.
| Breakdown option | Repair |
| Faulty cigarette lighter contact points | Adjust the metal clips using a flat-head screwdriver. |
| Appearance of rust or oxide stains | Rub the rusty areas with a file or sandpaper down to the metal base. |
| Faulty protective element | Change the cigarette lighter fuse in the mounting block marked F6 with a rating of 20 Amps. |
| Broken cables | Check the integrity of the cables using a tester, solder or replace broken cords. |
| Burnt out nichrome thread inside the device | Replacing the cigarette lighter with a new one. |
| Broken lamp | Installing a new lamp. |
Read also: Territorial coefficients for compulsory motor insurance
Repairing a burnt out cigarette lighter
Sometimes it is not necessary to change the Lada Granta device. You can carry out the repair yourself. After removing the device, it is worth inspecting the condition of the contacts. The fallen wires should be soldered, and the oxidized contacts should be treated with a needle file. After this, the device can restore functionality.
Inside the cigarette lighter there is a small mica plate. This is a semiconductor that often fails. It needs to be removed. After this, it is worth assembling the device and then checking that it is working correctly.
Which cigarette lighter should I replace the burned out one?
There are many different options available on the market. When choosing, you need to pay attention to how much the Lada Granta cigarette lighter costs. A price that is too low indicates that low-quality materials were used in the production process; such a device will not work for a long time. The normal cost of the device is 600 – 1200 rubles.
You can buy a short European cigarette lighter. There are no uniform size standards for parts. Therefore, they will differ in length or diameter. You must select a plug of the appropriate size. If the diameter does not match, the device will short out, which can lead to a fire.
How to remove the cigarette lighter on a Grant
Before work, you will need to stock up on the necessary tools. To remove the cigarette lighter on a Grant, you need:
- protective gloves;
- Screwdriver Set.
To troubleshoot you will need:
- soldering iron with solder;
- diagnostic tester;
- needle file to remove oxides or rust.
Detailed video instructions
After preparation, you can begin the dismantling process.
- Turn off the ignition, open the hood and remove the terminal from the battery. The negative contact must be removed - this will de-energize the system and eliminate the possibility of a short circuit.
- We remove the metal cartridge from its seat.
- Using a thin screwdriver, bend the latches inside the socket.
- We take it out and disconnect the wire block.
- Remove the green filter.
Now you can repair the part or replace it. Assembly is carried out in the reverse order described earlier. Detailed instructions on how to change the cigarette lighter on a Lada Granta car are shown in the video.
We disassemble, repair the cigarette lighter and replace its socket.
An option such as a car cigarette lighter is relevant not only for heavy smokers. For example, to connect a portable compressor to inflate tires, you cannot do without a working cigarette lighter socket. But what if it doesn't work? With a little knowledge, you can make this simple repair yourself.
Required tool for repair.
- Forceps, small size;
- Solder;
- Soldering iron;
- Carrying or flashlight;
- Pliers;
- PVC tape
Let's move on to repairing the cigarette lighter directly.
- The first step is to de-energize the car by removing the negative wire from the battery.
- Open the car door and find the cigarette lighter socket.
- We remove the heating coil (the cigarette lighter itself) from the socket.
- We apply a beam of light into the formed nest; if foreign objects are detected, they must be removed using forceps or tweezers.
- Let's move on to checking the fuses. We find the fuse block, open the cover and pull out the required fuse from the socket (see the technical instructions of the car, or the inside of the cover). If the fuse has a blown jumper, it needs to be replaced.
- The next step, if the previous steps were in vain, remove the cigarette lighter from the hole. We take pliers in our hands and carefully, holding the rim, pull it towards ourselves without any effort. Under no circumstances should we make sudden jerks; you need to pull smoothly, otherwise you may damage the wires.
- After removing the element, we inspect the place where the wire is soldered to the cigarette lighter body. If a break or the slightest disconnect is found, it should be soldered. You also need to pay attention to the integrity of the wire insulation. Identified abrasions should be isolated with PVC tape.
- After making sure that the cigarette lighter is working normally, with a gentle movement, without effort, we immerse the repaired element into the hole.
Repair and replacement of cigarette lighter socket
- Disconnecting the battery
- unplug the cigarette lighter from the socket,
- use a thin screwdriver to bend the fasteners,
- pry off the steel inner part of the socket,
- carefully disconnect the connector,
- we replace the socket,
- install everything in reverse order,
- reconnect the battery
If you need to replace the cigarette lighter light bulb, you need to pry the socket holder with a screwdriver and remove it, replacing the light bulb.
Photo of the correct replacement
After carrying out the work, it is advisable to check the proper operation of the device.
- The car cigarette lighter should fit tightly in the socket, and there should be no oxides or rust on the contacts.
- You should measure the voltage on the battery, and then check again by turning on the ignition. If the drawdown is more than 0.5 volts, then there is a short circuit somewhere.
- All soldered wires must be insulated and shrink-wrapped.
Cigarette lighter selection
Not many motorists and Lada Granta owners know that in addition to the standard VAZ cigarette lighter, there are several more analogues of this part.
Cigarette lighter assembly
Let's look at the catalog numbers and names of the spare parts:
- The original article number for the cigarette lighter is divided into 3 parts: 1. Movable part of the cigarette lighter (21230-3725200-00); 2. Cigarette lighter socket (21230-3725100-00); 3. Cigarette lighter illumination ring (21230-3725400-00). As you can see from the catalog number, the Lada Granta has a part from the Niva Taiga installed.
Both parts fit perfectly into the seat and do not require modifications or modifications to the fastening.
Reasons for cigarette lighter failure
There are several reasons for the failure of the Lada Grant cigarette lighter:
- Short circuit caused by a failure of the on-board network.
Melted cigarette lighter (remember that in the first versions of the Lada Grant you cannot insert anything into the cigarette lighter except the cigarette lighter itself)
Toyota cigarette lighter illumination
Unpleasant minor faults can irritate the eye, although they do not interfere with driving. An illuminated cigarette lighter socket is now in every car. A meticulous driver will immediately notice the missing dim light of the cigarette lighter ring. What problems can occur with the backlight?
The Toyota lamp socket is installed on a transparent orange light guide using a pair of latches
The design of the cigarette lighter is simple, similar to many cars. The lighting system of such a device is also of the same type.
Power supply for Toyota cigarette lighter illumination and the cigarette lighter itself
Is no exception -
Cigarette lighter replacement process
In order to change the cigarette lighter from the tool, we only need a flat screwdriver, which has an SL 5.5 or SL 7 type attachment. Now we can proceed directly to the dismantling process:
- Disconnect the negative terminal. This is necessary so as not to accidentally short-circuit the on-board network during the process.
- We take out the moving part of the cigarette lighter.
- Using a screwdriver, press the latch that holds the cartridge and remove it from its seat.
Disconnect the power supply clamp
Step by step replacement
1. Take out the cigarette lighter cylinder.
2. Using a flat-head screwdriver, pry up and remove the metal core of the cigarette lighter. It is best to do this from the inside so as not to damage the plastic.
If it doesn't come out, there may be clips on the inside of the core. They are most often metal. The photo below shows the location of the metal clips. Using a flathead screwdriver, you can bend them and remove the core.
If you are changing the cigarette lighter assembly, I think there is no risk of damaging something on it.
3. Remove the plastic bezel that is illuminated. This can be done using a flat-head screwdriver.
If your bezel backlight works and the bezel itself is not damaged, then you do not need to change it. Simply disconnect the non-working cigarette lighter core, connect a new one and put everything back together.
Power to the cigarette lighter comes through the terminal block. This means it is not difficult to replace it.
4. The backlight bulb is assembled with a plastic rim. To replace the light bulb, remove the small plastic cover.
Next, insert a flat-head screwdriver as shown below and pull the edge toward you. There is a small groove on the body and the light bulb is held in place by it. I think everything will be clear from the photo below, but if you have any difficulties, watch the video tutorial.
5. Remove the lamp from the socket and install a new one. The light bulb simply pulls out towards itself.
6. Install the socket with the new lamp into the rim. Be sure to align the grooves so that the cartridge snaps into place.
7. Install the small plastic cover.
8. Put the rim in place. There is a groove in the floor tunnel and a corresponding groove on the rim body. When installed, they must match and the light bulb must face backwards.
Simple folk method
Required
: screwdriver, awl, remove the negative terminal from the battery or pull out the cigarette lighter fuse.
- Remove the metal cartridge by squeezing out the antennae with an awl.
- Disconnect the connector with wires from the socket by pressing the latch.
- Remove the illuminated plastic ring by squeezing the antennae.
- Disconnect the connector with wires from the lamp socket.
For those who like to repair their car themselves, collections of technological instructions (for Granta and Kalina) will be useful.
We remove and change the Lada Granta fuses ourselves
If you are the owner of a Lada Granta car and you have problems with electrical equipment, then first of all you will need to check the fuses. In most cases, replacing one of the elements is enough.
If the fuse is intact, then it is likely that you will need to contact the services of a service station. Or, in order to save money and time, troubleshoot the problem yourself. Remember - the main thing in such situations is to slowly figure out what the problem is.
An electrical fuse or relay is a small device that is designed to protect the specific electrical circuit in which it is installed. In fact, all consumers of the Lada Grant are protected by fuses, not counting the battery charging circuit, generator and starter.
Car Lada Granta
Any Lada Granta circuit that is protected by a fuse is designed for the maximum current flowing through it. Taking this indicator into account, a safety element is installed. If a situation arises when one of the elements of the circuit fails and the current exceeds the design norm for this circuit, the conductive part in the fuse will burn out and the system will be de-energized. This is what guarantees the safety of the car's electrical wiring and prevents fire.
Where are the fuses for the Lada Grant?
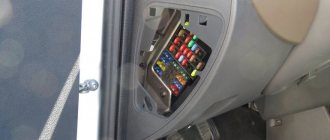
The developers decided to place the main block with electrical fuses and relays in the Lada Granta to the left of the steering wheel, next to the light switches. This is a very good solution, the elements are located at hand and there is no need to remove any additional components. All work can be done without getting up from the seat.
Location of the compartment located in the cabin
The second power fuse block is located in the engine compartment next to the battery. It looks like an ordinary black box.
Location of the compartment located under the hood
Removal and replacement instructions
All car mechanics, without exception, recommend disconnecting the “-” terminal of the battery when working with the vehicle’s electrical equipment.
Preparation
Work on replacing electrical fuses or relays can be carried out anywhere. The main thing is that the place should be well lit. Before starting work, be sure to turn off the car.
Video about replacing the fuel pump fuse on a Lada Granta - to help you.
The work of replacing fuses in the cabin and engine compartment is almost identical. With minor differences.
Cover removal diagram
- Let's start with the first one. To gain access to the fuses and relays located to the left of the driver's feet, you need to remove the cover.
- This must be done according to a certain scheme. First you need to pull the cover by the lower left corner, it is designated as number 1 in the diagram. Next, release the left locking point. Then the middle one at number 2. Next are points 3 and 6. Now all that remains is to free the top points 4 and 5. The entire cover has been removed.
- Visually inspect the block. There should be no burning or melting in it. There should also be no burning smell.
- In the decoding we find the consumer we need and according to the diagram we find its location.
- Using tweezers located in the block, remove the problematic element. We inspect it visually or check it using a device.
- If it is burnt out, then we put a new one in its place.
- The cover of the interior unit is installed in the following order: first of all, you need to snap the right part, then the bottom, and finally the top. It is necessary to ensure that the fastening parts of the cover and the latches match exactly.
- If the element we need is located in the engine compartment, then we proceed somewhat differently, namely, we open the hood itself.
- Find where the block is located.
- Slide the cover up and remove. We determine the burnt out element, just like in the cabin unit.
- We put the cover in place.
- Connect the “-” terminal of the battery.
- Turn the ignition key.
- If the consumer earns money, then everything is in order.
If the fuse blows again, the problem may be more serious and you will need to call a professional to help.
Recommendations for use
Video “Interior mounting block”
This video shows how to open the compartment located in the cabin and how to correctly replace the elements in it.
Why doesn't the cigarette lighter work?
The cigarette lighter on a Lada Granta car may not work for various reasons. The most common faults are:
- blown cigarette lighter fuse;
- poor contact;
- broken wiring.
Fuses often fail and blow when using many electrical devices. To prevent this, the maximum power of all electrical appliances should be up to 180 W.
Rust and oxides form on the antennae of a cartridge made of metal during operation. This prevents good connection between the elements (electrical contact). Therefore, it is recommended to periodically clean the contacts from oxides and rust using a needle file.
To detect a broken electrical wiring, a special device, a multimeter, is used. Broken wires are replaced or soldered.
Toyota cigarette lighter illumination.
Using the example of the Avensis cigarette lighter illumination, we will consider possible malfunctions :
- Faulty wiring/plug to backlight
- Burnt out cigarette lighter lamp
- Unreliable electrical contact of the base
- Destruction of plastic parts of the cigarette lighter socket
WIRING - PLUG
I recommend starting diagnostics with the wiring (plug), where the “plus” comes. The plug is easy to disconnect, but further disassembly of the fragile plastic parts of the cigarette lighter illumination can lead to breakdowns, followed by unnecessary repairs to the cigarette lighter socket.
Fuse problem
A blown protective component (fuse) is the main reason why a car cigarette lighter stops working. The electrical network must have a current of 15 A. In the event of a short circuit or the connection of powerful electrical appliances, the fuses will blow. To eliminate the malfunction, it is necessary to change the protective element and remove the excess load, otherwise it will burn out again.
Where is
The 2021 Granta Liftback has fuses located near the driver’s left foot.
To change the protective element, first remove the plastic cover of the unit, which is held in place by steel clips.
On the inner surface of the protective cover there is a diagram, the number of all fuses with information about what each of them is responsible for.
Which one can I put in place?
The new fuse is selected with a rating of 15 A. If you install a product with high resistance, problems will arise. For example, if a current flows through an electrical circuit exceeding the permissible value, the wires will melt. And this contributes to cable fires, short circuits, and, accordingly, burnout of protective components.
Replacing fuses on a Lada Granta car
The Lada Granta car has two mounting blocks: the first is located in the cabin and protects almost all electrical circuits of the car, except for the power ones; they are protected by the fuses of the power unit, which is located under the hood.
Let's consider replacing the fuses in the cabin unit.
Firstly, experts recommend disconnecting the negative terminal of the battery whenever tampering with the car’s electrical equipment. Then you need to remove the cover on the instrument panel, it is located near the headlight control unit. No special tools are required here, you just need to gently pull the upper left part of the cover with your hand and remove it from the latches one by one:
In the Norma and Luxury trim levels, below the headlight control unit there is a trunk opening button; when removing the cover, you need to carefully disconnect it from the plug:
To do this, simply grab the plug with your fingers and lightly pull it up. Of course, when reinstalling, do not forget to connect it back - the simplest mechanism will not allow you to reverse the polarity of the wires:
So, the cover is removed, you can proceed directly to replacing the fuses.
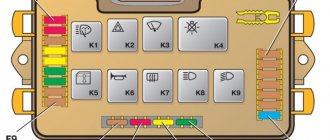
The mounting block looks like this:
On the back of the cover, as in the instruction manual, there is a diagram of the location of the fuses, the current rating and which circuit they protect:
Electrical circuits protected by fuses installed in the mounting block located on the instrument panel
| Fuse no. | Current strength, A | Protected electrical circuits |
| F1 | 15 | Controller, engine cooling fan relay, short circuit 2x2, injectors |
| F2 | 30 | Window lifters |
| F3 | 15 | Emergency Signal |
| F4 | 20 | Windshield wiper, airbag |
| F5 | 7.5 | 15 terminal |
| F6 | 7.5 | Reversing light |
| F7 | 7.5 | Canister valve, mass air flow sensor, DC1/2, speed sensor |
| F8 | 30 | Heated rear window |
| F9 | 5 | Side light right |
| F10 | 5 | Side light left |
| F11 | 5 | Rear fog light |
| F12 | 7.5 | Low beam right |
| F13 | 7.5 | Low beam left |
| F14 | 10 | High beam right |
| F15 | 10 | High beam left |
| F16 | — | — |
| F17 | — | — |
| F18 | — | — |
| F19 | — | — |
| F20 | 15 | Horn, trunk lock, gearbox, cigarette lighter, diagnostic connector |
| F21 | 15 | Gasoline pump |
| F22 | 15 | central locking |
| F23 | 10 | DRL |
| F24 | — | — |
| F25 | 10 | Interior lighting, brake light |
| F26 | — | — |
| F27 | — | — |
| F28 | — | — |
| F29 | — | — |
| F30 | — | — |
| F31 | — | — |
| F32 | 30 | Heater, EUR |
Accordingly, we determine which fuse has failed, remove it, and if the thread is really burned out, replace it with a new one of the same current rating. This means that the problem of constantly blowing the same fuse is not recommended to be solved by installing a fuse with a higher rated current: such a fuse does not protect the circuit, and in the event of a short circuit, all the wiring and electrical appliances that it powers will burn out; a fire cannot be ruled out.
Let's look at the power fuse box. It is located under the hood:
Remove the cover by pulling it up. Determine which fuse has failed:
Electrical circuits protected by fuses installed in a mounting block located under the hood of the car
| Fuse no. | Current strength, A | Protected electrical circuits |
| F1 | 50 | Electric power steering |
| F2 | 30 | Heater fan |
| F3 | 60 | Generator |
| F4 | 60 | Generator |
| F5 | 30 | dipped headlights |
So, we looked at replacing fuses on the Lada Granta, but fuses may not always be the cause of electrical equipment failure. Before directly replacing the fuse, it is necessary to check the condition of the entire electrical circuit that was protected by the blown fuse, including the condition of the wiring and electrical appliances. Only after identifying and eliminating the cause of the problem, you need to change the fuse and continue operating the car.
One of the common reasons for the failure of fuse No. F20, which powers the cigarette lighter in particular, may be the use of non-standard plugs for a video recorder, radar detector and other electrical devices powered through the cigarette lighter, that is, it has a certain shape, and the plug for additional equipment can close the circuit at a certain position in the cigarette lighter socket. Thus, when purchasing such equipment, you need to pay attention to the plug; If you have already purchased a radar detector or video recorder and have problems with their operation, replace the plug.
Also, the cause of blowing of fuse No. F20, if the audio system is powered from it, as well as fuses No. F2 and No. F22, may be due to the ingress of water due to insufficient factory sealing of seams and technological holes in the doors and engine compartment. Experts recommend carefully studying the entire electrical circuit route to avoid subsequent malfunctions and taking appropriate measures.
Cigarette lighter repair
The car's cigarette lighter does not always need to be changed immediately. Minor faults allow this device to be repaired and continue to be used. For example, it contains a mica plate - a semiconductor. It is often the cause of malfunction. Therefore, it is enough to change this element and the device will start working.
How to remove the cigarette lighter
Before you remove the device yourself, you need to prepare protective gloves and special tools:
- screwdriver set;
- needle file;
- soldering iron;
- solder;
- diagnostic tester.
Before dismantling the cigarette lighter, turn off the car's ignition, open the hood, and remove the negative terminal from the battery. This procedure will help de-energize the car's electrical wiring and prevent a short circuit in the system.
After completing the preparatory work, the metal cartridge is directly removed from the seat. To do this, use a screwdriver to bend the part clamps inside the socket. All wires are disconnected from the cartridge, and it is removed from its place.
Next, the green filter is removed and the component is repaired or replaced.
Diagnostics
After removing the device, contact diagnostics are performed. Detected rust and oxides are protected. If there are loose wires, they need to be soldered.
How to replace with a new one
Replacement and assembly of the cigarette lighter is carried out in the reverse order of dismantling this device. After this, the functionality of the device is checked. The contacts must be clean, the device itself must fit tightly in the socket.
The voltage on the battery is first checked with the engine off, then with the ignition on. If there is a voltage drop of more than 0.5 V, it means there is a short circuit in the network. The electrical wiring is checked again. All joints must be carefully insulated and placed on a special shrink film.
When purchasing a new cigarette lighter for your car to replace an old device, it is recommended to consider the cost of the device. Manufacturers make cheap products from low quality materials. Therefore, such devices will not last long. It is recommended to purchase devices in the price range of 600-1200 rubles.
When purchasing a Euro cigarette lighter, you need to take into account the diameter and length of the product, since there are no size standards for them. If the diameter of the plug does not match, the device may short out during operation and cause a fire in the electrical wiring.
Cigarette lighter repair steps
If the described tips on not connecting powerful devices to the cigarette lighter were ignored and it does not function, then use the detailed instructions described below. In it you will find all the information about troubleshooting.
The electrical socket may stop working if the fuse is blown. Before drawing any conclusions, carefully inspect the part with the inscription “sigar” or with an image of a smoking cigarette. This symbol can be found: under the hood, near the driver’s feet, under the dashboard, in the trunk. Whatever one may say, this device can be found in the area where the fuse is located and even near the relay block. If you want to repair the socket in a vehicle yourself, you must remember that you should not install a high-power fuse, as the socket may be damaged another time. Otherwise, you will need to change the entire cigarette lighter because it may burn out. It is not advisable to install low-quality plugs into the equipment connector, which are poorly fixed in the socket and dangle. This may cause a short circuit and require replacement of the cigarette lighter.
If the fuse is not damaged, then everything is completely different, you need to get to the cigarette lighter from the inside. To do this, make a little effort and carefully disassemble the console, it is under it that the cigarette lighter is located
Then pay attention to the condition of the fusible part. It is most likely torn or damaged
Here it is recommended to change it, but if a new part is not available, you can use wire of a similar size. Today you can easily find even a self-healing fuse-link in the markets. Its work includes timely disconnection of the connection at the moment of overheating, but when it cools down, it is re-established.
The cigarette lighter may not function mainly for two reasons, and they need to be approached differently.
If you decide to carry out the repairs not with your own hands, but turn to a service station for help, then professionals will quickly determine the cause and fix everything. This option is the most effective, but you will have to spend a little money. Also at the technical inspection station, you can have your cigarette lighter replaced completely.
Be that as it may, this is an instantly fixable malfunction, but it brings inconvenience to the driver.
“>