Two configurations and two schemes
In the “Norma” version, if it has a central locking system, you can use two control wires.
Ground is supplied to one of them if the locks need to be opened, and to the second one if the locks need to be closed. The period of connection to ground should take 0.7 seconds, and most alarms have such a setting. If we talk about the “Lux” configuration, the control wires will not help us here. The relay contacts built into the alarm will have to be connected to the breaks in the power cords. Despite all the complexity, there were no complaints about this scheme, and we will consider it right now.
The “luxury” option is the most complex
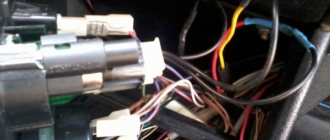
First you need to make sure that the central locking system in the car is really connected according to the “Lux” scheme. The control button located on the door must be trigger (non-latching). If you have exactly this type of car, you will have to tinker. It will be necessary to extend 4 power cables to the signaling unit. These cords, in turn, must go from the break point of the two standard wires (yellow-white and yellow-black). Find them in the bundle under the threshold.
Any alarm system is supplied with two relays, one of which is activated for closing, the second for unlocking the locks. Power cables drawn from the break points are connected to the relay contacts.
The part of the yellow-white wire that goes to the actuators is connected to the common contact. Another relay contact (normally closed) is connected to the second half of the cable. They connect to the yellow-black wire in a similar way, but here an opening relay is used, not a locking one. Each of the normally open contacts receives power.
Any power wiring is supplied with power through a fuse.
In our case, the rating “15 Amperes” is used. Immediately before installation, you need to call the pair of wires that are directed to the actuators. The probe should show a value of 1.2 - 1.3 Ohms. And of course, when performing installation work, you first need to remove the negative terminal from the battery. Be careful!
Connection option for “Norma”
Let's say there is a switch in the driver's door, but it has two fixed positions. Then it will be easy to connect the alarm. You will need to make not 4, but 2 taps, and not from the power cords, but from two signal cords. There is no need to make breaks, just make a T-shaped connection. The diagram here looks standard:
Recommendations for both cases
First of all, we note that when connecting the relay to the power wiring, you cannot make the control pulse too long. Setting the value for more than a second can burn out the actuators. Here we were talking about programming, and now let's talk about the electrical part. As you know, before installation you need to open the hood and disconnect the negative terminal.
This advice should not be ignored in any case.
As for installation, it will be better if the power wire taps are carried out by an auto electrician. With signal wiring, everything is simpler, but the rules will be the same in each case:
The last tip concerns power wiring. And the ability to twist is a whole art.
You cannot learn this art in one day.
When connecting any equipment, you should strive to make as few changes as possible to the standard wiring.
There must be an opportunity to do the following: return everything as it was. Sometimes it happens that one or more signaling parameters do not take a value that is suitable for the car. And then, the alarm system is changed or they refuse to use it altogether. This needs to be taken into account.
Features and principle of operation of the alarm
Today, a huge number of security systems are produced, designed for a variety of needs. The standard Lada Kalina alarm system, as a rule, is installed directly during vehicle assembly, which explains its name. I would like to draw attention to the not entirely pleasant aspects associated with the operation of the standard Kalina alarm, which consist in its inadequate operation. That is, the system can turn on at any time by itself. If you examine such problems in detail, it turns out that all of them are not causeless.
According to the principle of operation, the standard alarm system on a Lada Kalina car is practically no different from similar devices. The functions of the system also include actions such as locking and unlocking, which are carried out using a special remote control. The device is installed in a key fob on a bunch of keys. It is possible to lock the doors. This is done by turning the key in the driver's side door. In addition, locking and unlocking can be done from inside the cabin by pressing a special button. The alarm turns on when strangers try to break into the car.
As for the problem of false alarms, such malfunctions often occur when car owners try to install shock or vehicle tilt sensors on their car.
As practice shows, most often false alarms occur in cars painted in dark colors. Dark colors are known to attract heat. When the machine is left in an open place under the sun's rays for a long time, a large amount of thermal energy accumulates. The result may be surface deformation due to excessive heat, which triggers the shock sensor.
Features of the Lada Kalina alarm system
As practice has shown, the protection system can be equipped without problems by connecting a shock and vehicle tilt sensor. According to observations, such or a similar addition can cause idle alarms. There is also an opinion that with a dark car color, under the influence of heating under the sun, the body and certain parts expanded and were in some way deformed. The most vulnerable place for an alarm is the hood. Strong heating of the connection point on the hood by the sun disrupts the connection contact of the hood limit switch, which ultimately activates the protection.
When installing an optional shock and tilt sensor, it must be adjusted correctly. As a rule, this is done by qualified specialists who have all the necessary tools and equipment for configuration.
In addition, specialists know the nuances of the operation of a particular alarm system and can predict such cases of unstable operation. If you configure it yourself, the sensitivity may not be accurate, which will cause an idle alarm. The alarm control point remote control has a high-quality electronic board. If the contacts in this diagram are broken, the key fob becomes inoperable, and then the alarm functions are disrupted. Also, if the board is violated, there may be no feed commands from the key fob, or instead of one command, another will be issued.
DIY security system installation
The installation of an alarm system in Kalina is carried out after removing the dashboard and disassembling the steering column to make it easier to install the wires.
Keychain for standard Kalina alarm system
From the wires located under the dashboard you will need:
You will also need instructions describing all the steps, which must be studied very carefully. The operations are performed in the following order.
Return to contents
Kalina 2 alarm connection points starline
So I decided to write because... Nothing really written anywhere.
Connect to the ignition switch:
Behind the instrument panel:
turn signals
- blue and blue/black
handbrake
- brown/blue
in the left threshold:
fuel pump
- gray
limit switch of the front doors
- red/green (break through the diode, stripe to minus)
central locking.
- yellow and red/blue (the center lock is controlled by two wires, when a minus is applied to any of the two wires, the locks open, and when a plus is applied, the locks close, so we connect the locks on the signal to the minus, and do it through a relay to the opening wire, which if the minus from the signaling signal would come to the relay and the plus would go out to either of the two wires when closing, make the closing of the wire through the diode)
— brown/red (on the block above the gas pedal)
Source
Alarm connection point options
Once you have decided to start installing the alarm yourself, you need to make a choice. Don't choose the latest model with the latest bells and whistles. It is enough to turn your attention to a strong middle peasant whose brand has long established itself in this market. Consider installation on a popular car alarm model from Starline .
Depending on the model, equipment may vary.
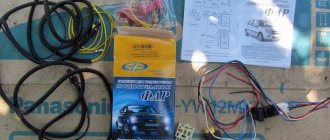
Since the manufacturer equipped the car from the factory with a limit switch only for the driver’s door, you should purchase new elements for the remaining three, as well as connection blocks, from the store.
In addition, you should purchase about 10 meters of wire, as well as an alarm bell (siren) if one is not included in the kit.
Step-by-step installation process
- First of all, we install the alarm siren under the hood.
It is worth choosing a place for fixing it where there is no possibility of water ingress.
A European-type end cap (additional option) will easily fit into the base location.
After the wires are in the cabin, check the plug for secure fixation.
Not far from the shock sensor, we place a service button.
In most cases, the transmitter is attached using double-sided tape.
We fix the indicator on the stand body with glue.
From the end switch of the driver's door, we stretch the “positive” wires to the other doors.
We connect the alarm approximately according to this scheme:
| Chain | Color | Polarity | Location |
| + 12V | Pink | Positive | Egnition lock |
| IGN_1 | Blue | Positive | Egnition lock |
| Start | Red | Positive | Egnition lock |
| +12 V (constant) | Pink | Positive | Ignition relay |
| +12 V (from ignition) | Blue | Positive | |
| Turns | Blue ; Blue/ black | Positive | Left threshold |
| Gasoline pump | Grey | Positive | |
| Driver limit switch | Red Green | Negative | |
| Handbrake | Brown/Blue or Red/ Black (Luxury) | Negative | |
| Driver limit switch | Red Green | Negative | Instrument cluster |
| Handbrake | Brown/blue | Negative | |
| Trunk | White black | Negative | Harness in the trunk (install the diode) |
| Tachometer | Brown/red | Impulses | In the configuration, the standard can be taken on the EUR block |
Two configurations and two schemes
In the “Norma” version, if it has a central locking system, you can use two control wires. Ground is supplied to one of them if the locks need to be opened, and to the second one if the locks need to be closed. The period of connection to ground should take 0.7 seconds, and most alarms have such a setting.
If we talk about the “Lux” configuration, the control wires will not help us here. The relay contacts built into the alarm will have to be connected to the breaks in the power cords. Despite all the complexity, there were no complaints about this scheme, and we will consider it right now.
The driver's actuator toggle switch is damaged
Alarm system "Lada-Kalina", part two. Password!
What should a motorist do if his anti-theft system suddenly fails - he is confused in determining the reasons, and he has been waiting for a long time for help or there is no one from anyone?
There is a reserve for this case. The developers have provided the ability to start the engine without reading the code key: you need to tell the controller a certain password. On Kalina it is asked by pressing the gas pedal. The algorithm is recorded in the non-volatile memory of the controller. Of course, initially this password is not activated: if the ignition is turned on and the engine is not running, then the “Check Engine” symbol on the instrument panel, without blinking, lights up. If the password is activated, then a minute after turning on the ignition the symbol will go out: enter the required numbers and start.
The procedure for recording a password is similar to training an APS.
1. Having inserted the training key into the lock, turn the ignition on and off, then remove it: the APS indicator flashes for 6 seconds - during this time you need to…
2. ...turn on the ignition with the working key. Three buzzer beeps sound, then two more - turn off the ignition and remove the key. The indicator blinks again for 6 seconds - you need to be in time...
3. ...turn on the ignition with the training key... Three beeps, then two - turn off the ignition, but do not remove the key. Soon, one beep will sound and the indicator will flash faster.
4. Turn on the ignition - the “Check Engine” symbol flashes. After about a minute it will go out - it’s time to enter the password. It must consist of six digits. The limits are 111111 and 999999. Choose to your taste. For this…
5. Press the gas pedal all the way. The "Check Engine" light will come on. Hold for no more than 3 s, release - the lamp will go out.
6. Enter the code numbers. Let's say the first one is "3". To do this, we do the following three times: we press the pedal - the “Check Engine” light is on, immediately (hold for no longer than 3 seconds!) we release the pedal, the lamp goes out - this is how we entered three units of three. For the fourth time, press the pedal, hold it for about 5 seconds until the lamp goes out on its own - now the first digit of the code (“3”) is recorded in the controller’s memory. It's up to the other five numbers.
Management and use
The process of managing a standard car alarm will not cause much trouble to its owners. A key fob with a three-button key does not have a huge number of functions and will not force the lucky owner of a Lada Kalina to re-read the technical instructions for its operation. The set of alarm management capabilities included in the key fob is simple and clear. It does not need to be programmed or encrypted using complex passwords. His tasks include:
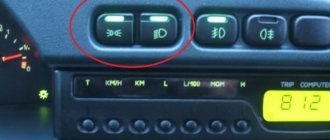
- When you press the right button on the key fob, the standard alarm system is armed and the car doors are locked. At the same time, the immobilizer lamp begins to blink, and the turning lights of the Lada Kalina will blink 1 time;
- When you press or hold the right button of the key fob, the car doors are locked without going into security mode. The turn signals of the Lada Kalina will blink 3 times;
- When you press the left button of the key fob, the car will be disarmed and the driver's door will be unlocked. The turning lights of the Lada Kalina will blink 2 times;
- to open the remaining doors of the car, additionally press the left button of the key fob;
- You can open the trunk by pressing the central button of the standard alarm key fob 2 times or by holding it. At the same time, Lada Kalina will remain in security mode. If after 25 seconds the trunk is not opened, it will be locked again;
- You can lock the trunk of the car by pressing the middle button of the key fob;
- The central locking mechanism can be controlled either from inside the Lada Kalina or by turning the key in the door lock.
Important: turning the key in the lock of any front door of the car will reliably unlock that particular door.
Recommendations for both cases
First of all, we note that when connecting the relay to the power wiring, you cannot make the control pulse too long. Setting the value for more than a second can burn out the actuators. Here we were talking about programming, and now let's talk about the electrical part. As you know, before installation you need to open the hood and disconnect the negative terminal.
This advice should not be ignored in any case.
As for installation, it will be better if the power wire taps are carried out by an auto electrician. With signal wiring, everything is simpler, but the rules will be the same in each case:
The last tip concerns power wiring. And the ability to twist is a whole art.
You cannot learn this art in one day.
When connecting any equipment, you should strive to make as few changes as possible to the standard wiring.
There must be an opportunity to do the following: return everything as it was. Sometimes it happens that one or more signaling parameters do not take a value that is suitable for the car. And then, the alarm system is changed or they refuse to use it altogether. This needs to be taken into account.
Features and principle of operation of the alarm
Today, a huge number of security systems are produced, designed for a variety of needs. The standard Lada Kalina alarm system, as a rule, is installed directly during vehicle assembly, which explains its name. I would like to draw attention to the not entirely pleasant aspects associated with the operation of the standard Kalina alarm, which consist in its inadequate operation. That is, the system can turn on at any time by itself. If you examine such problems in detail, it turns out that all of them are not causeless.
Protection Features
The standard Kalina alarm system is not endowed with any supernatural abilities. It is easy to operate and understandable to most ordinary car owners. She, on command from the key fob, opens and closes the doors in order, puts it under protection and even blocks the trunk. The standard alarm monitors the status of the car's hood lock and carries out the authorized start of its engine.
- Distinctive features of a standard car alarm system include:
- simplicity of its management and accessibility when solving problem situations;
- installation of the standard alarm system of the reliable Lada Kalina, of any modification, was carried out at the manufacturer's car plant. The reliability of such an installation is beyond doubt. Any other installation of this car alarm in makeshift conditions, by “jack of all trades” specialists, threatens with low quality and possible problems when operating the Lada;
- The industrial installation of a standard alarm, in addition to reliability, also has negative aspects. The clone installation of a standard alarm system on most Kalina cars does not present any difficulties for an attacker when searching for it;
- the release of unregistered standard alarms makes it easy for car thieves to take advantage of the Lada Kalina for personal gain;
- installation of any other, more reliable and functional car alarm is possible only in service centers. This is especially true for Lada Kalina cars during the warranty period.
Important: installation of shock sensors is possible only when using models recommended by the car manufacturer.
Removing and installing the standard alarm remote control unit on Kalina
Disconnect the negative terminal from your vehicle's battery.
To perform this repair, you will need a minimum of equipment and tools. The list of what you need is given below:
So, first you need to unscrew the 4 bolts securing the plastic sill trim:
After this, freely remove this decorative trim:
Now you can start removing the floor covering, but there is no need to remove it completely. Simply lift it halfway to gain access to the alarm unit.
Now that you can remove it, you must first disconnect the plug with the wires. To do this, on the left side you need to press the plastic lock of the plug and pull it to the side:
In the end, this is the final result:
Now all that remains is to unscrew the two nuts securing the alarm unit itself through the holes, as shown in the photo below:
And the final step in this repair will be to remove the module from its seat:
If replacement is necessary, install this part in the reverse order of removal. This work is completed within 10 minutes and is not difficult.
AutoNews / Reviews / Tests
Where is the standard alarm on Kalina?
Office for installing standard alarm Lada Kalina
Throughout the entire time that the world's population has existed, its individual representatives have sought to enrich themselves at the expense of others, not disdaining even criminal actions. As a result, other respectable citizens have to protect not only their lives, but also their property by all possible methods. The standard Lada Kalina alarm system .
How to setup
Setting up the standard Lada Kalina alarm system involves registering the keys in the car's ECU. In other words, familiarize the immobilizer, ECU and remote control key fob with each other. For this purpose, the set of keys contains a special training key with a CHIP embedded in it. It is best if all manipulations related to the activation of the standard alarm system are carried out in a car dealership.
But there are still suspicions that the dishonest seller did not register another key. If you carry out the registration and configuration process yourself, the configuration order will look like this:
- it is necessary to insert the training key, with the insert, into the ignition switch. The starter should not be turned on. If the indicator in the instrument panel turns on but does not blink, the car alarm is not trained. If it doesn’t turn on, it’s already trained. Flashes briefly (20 seconds) – there is a malfunction in the standard alarm system;
- remove the key from the lock - the indicator should flash;
- you should insert a regular key - the buzzer sounds three times and after a while (6 seconds) twice more;
- pull out the regular key and immediately (within 6 seconds) insert the training key. They should turn on the ignition of the Lada Kalina - the buzzer sounds three times and after a while (6 seconds) twice more;
- Turn off the ignition with the key inserted, but do not remove the key itself. The buzzer should sound once. The indicator on the instrument panel should begin to flash quickly. You will have to wait a little (15 seconds);
- Now you can turn on the ignition itself. The buzzer should sound once, then the turn signals should turn on three times and at the same time the buzzer and horn will sound;
- at this time, the standard Lada Kalina alarm system remembers all recorded codes. You can turn off the ignition after 3 affirmative beeps from the buzzer. They must sound after an interval of 5 seconds;
- The standard car alarm system of the Kalina car has been configured and the training key can be removed from the ignition switch.
Important: if an error was made during the setup process, the entire alarm training will have to be repeated again.
The standard Lada Kalina alarm system is quite simple to set up and not burdened with an excess of additional functions. In this regard, it should be quite reliable and durable. At the same time, there are still some shortcomings in the manufacture of the electronics themselves. Which somewhat reduces the reliability of the alarm and the authority of the automaker.
DIY security system installation
The installation of an alarm system in Kalina is carried out after removing the dashboard and disassembling the steering column to make it easier to install the wires.
Keychain for standard Kalina alarm system
From the wires located under the dashboard you will need:
You will also need instructions describing all the steps, which must be studied very carefully. The operations are performed in the following order.
Return to contents
Module connection
Connecting the module will be successful and quick if you follow the correct algorithm. The first thing you need to do is remove the airbag and unsolder the wires from the ignition switch, through which the engine starts.
In this case, the actions performed must be extremely careful so as not to damage the trim of either the instrument panel or the steering wheel, so it is very important to monitor the working tool used.
Next, the main wires of the automatic start system are connected to the ignition switch according to the special diagrams included with the specific device.
Connecting the module to the ignition switch of Lada Kalina 2
In the case of the Lada Kalina 2, you cannot do without a lineman, since this model is equipped with a standard immobilizer. The crawler is an additional module with a digital chip that allows you to avoid a “conflict” between the autostart and the anti-theft system.
Thinking about buying an AUDI car? Great choice! I advise you to visit the website https://audi.msk.ru, where you will find a lot of useful information.
It is a spare ignition key with a built-in immobilizer deactivation chip. As a result, at the moment the engine starts (automatic or remote), information will be read from this key and then transmitted to the ignition switch.
The next step is to connect the autostart control wire to the tachometer, oil sensor or car generator. Programming of the autorun unit is carried out according to the instructions. To provide the possibility of emergency shutdown of the installed system, another wire is connected to the hand or main brake. At this point, the operation of installing the module can be considered complete.
In order to install the autostart module, no special physical effort is required - the main attention should be paid to the electronics.
Ignition key with built-in immobilizer deactivation chip
Do-it-yourself autostart for Kalina
Autostart technology, previously used only on trucks in harsh climates, is now gaining popularity among owners of passenger cars such as the second generation Lada Kalina. This is due to the fact that the use of such technology ensures that the engine is automatically turned on at a given time and warmed up to the most optimal temperature; in addition, the car interior is also warmed up in parallel with the engine.
The automatic start device is a plastic block containing an electronic board with microcircuits (relays) that regulate certain sensors. Included with this module is a set of wires designed to connect the unit to the electrical wiring of Kalina 2.
Automatic start device
Due to the compact size of the device, it can be installed anywhere in the cabin where standard electrical wiring runs.
The autorun unit can have the following operating modes:
- automatic - the start time is set using a timer programmed based on the air temperature of the cabin or engine;
- remote – the launch is controlled by the car owner using an alarm key fob or mobile phone (SMS message, GPS command).
You can install autorun yourself. To do this, you will need an automatic start module, as well as an immobilizer bypass unit.
Module connection
Connecting the module will be successful and quick if you follow the correct algorithm. The first thing you need to do is remove the airbag and unsolder the wires from the ignition switch, through which the engine starts.
In this case, the actions performed must be extremely careful so as not to damage the trim of either the instrument panel or the steering wheel, so it is very important to monitor the working tool used.
Next, the main wires of the automatic start system are connected to the ignition switch according to the special diagrams included with the specific device.
Connecting the module to the ignition switch of Lada Kalina 2
In the case of the Lada Kalina 2, you cannot do without a lineman, since this model is equipped with a standard immobilizer. The crawler is an additional module with a digital chip that allows you to avoid a “conflict” between the autostart and the anti-theft system. It is a spare ignition key with a built-in immobilizer deactivation chip. As a result, at the moment the engine starts (automatic or remote), information will be read from this key and then transmitted to the ignition switch.
The next step is to connect the autostart control wire to the tachometer, oil sensor or car generator. Programming of the autorun unit is carried out according to the instructions. To provide the possibility of emergency shutdown of the installed system, another wire is connected to the hand or main brake. At this point, the operation of installing the module can be considered complete.
In order to install the autostart module, no special physical effort is required - the main attention should be paid to the electronics.
Ignition key with built-in immobilizer deactivation chip
Proper use of autorun
Compliance with the correct operation of the autostart will eliminate the occurrence of such unforeseen situations as the car moving independently. The sequence of using autostart for a manual gearbox Kalina 2:
- Engage neutral gear.
- Engage the handbrake (parking brake).
- Get out of the car and close all doors.
- Turn on the alarm.
- Activate engine autostart.
It often happens that car owners, when turning off the engine, leave the gear in gear. You will have to get used to this, since in this situation the autorun module simply does not activate. However, some manufacturers have found a solution to this very common problem: they equipped the device with “soft neutral” - a function that does not allow the engine to be turned off until the driver engages neutral gear.
please, when copying information from the website kalina-2.ru, set a back link
Working with the glass unit control unit
Window control unit Kalina Sport
After reading the manual, you should start by connecting the hood and trunk wire ends. The color of these wires is the same - black and white. How can you tell them apart? The wire transmitting the signal to the trunk is always located on the right, the hood wire is located to the left. We connect to the luggage wire. To avoid making mistakes during installation, remember that the trunk wire is the outermost. Then you need to connect the limit switches from the door wires in such a way that the doors then close. To do this you will need 3 1 Ohm diode bulbs.
Source
Installation of alarm system on Lada Kalina
Today, every car owner is trying to protect his property by installing alarms of various types and levels. Therefore, today we will tell you how to install an alarm on a Lada Kalina with your own hands.
The first step is to disassemble the steering column and remove the dashboard in order to get to the wires we need, I will attach a photo below.
We take an 18-pin connector, we don’t need as many wires there as there are.
1) 2 wires for turn signals 2) Trunk end switch 3) Hood end switch 4) Door end switches (there will be a separate story about them because everything is very neglected there) 5) Plus 6) Accordingly, minus. 7) Handbrake and generator.
Attentively
we read the instructions and take 2 wires that should go to the turn signals, and look into the wiring harness that goes straight to the tidy. There we look for blue and blue/black and connect 2 wires from the alarm to them.
There, I mean in the same harness, the handbrake is connected, it is needed for autostart, a little theory: by lowering the handbrake the car stalls if there are no keys in the ignition, stopping the car and putting the handbrake on the car will not stall immediately, preparation for autostart, so that just to turn it off, you first need to turn the key, turning off the ignition, then lift the handbrake, but then you won’t be able to start with autostart.
So. Let's continue with the handbrake. We look for the brown/blue wire and connect the handbrake to it. It's simple.
The next stage is monitoring the operation of the engine, I did it using the generator, that is, when the car starts up, voltage appears there, which signals a successful start. We look for the brown/white wire and connect to it. Everything needs to be soldered and well insulated.
At this stage, we leave the tidy area and go down to the threshold of the driver's door and to the BUS (glass unit control unit), it is located under the rear seat on the left.
We only need 2 wires in the threshold. Unlocking and locking doors. The minus of this system must be connected to some bolt in the body.
We are looking for the pink/black wire - it is responsible for unlocking the doors, we connect to it with the appropriate wire.
Next is pink/white - locking the doors.
Be careful not to confuse it with red/black because they are very similar, for example, as was the case with me, there wasn’t enough light and please, it’s the wrong wire.
Here you can also take the hood switch, the white/black wire, but I didn’t take it, but took it under the rear seat, i.e. in BUS.
We have come to the same BUS and here we have a little more work to do, namely, let's start with a simple one, connect the trunk and hood switch, both wires are white/black. How to distinguish them? The one that is responsible for the trunk is located on the very right edge if you look at the BUS so that the wires go straight to you. Let's connect to it. The hood wire comes out a little to the left, but the main thing you just need to know is that for the trunk it is from the very edge, and you can’t go wrong further.
This is where the fun begins, to connect the door limit switches in such a way that you can safely close the doors and arm without waiting for the lamp to go out, then you need 3 diodes with a resistance of 1 Ohm, these are 1N4007, if my memory serves me correctly, I didn’t find them and I did it differently for now, if you have diodes read on. If not, below I will explain how to do it differently.
There is one wire from the signaling to the door limit switches, and there are 3 of them in the BUS, for the front right, front left and rear. We take the wire from the signaling and branch it into 3 by soldering 3 short wires to it, a diode is soldered to the ends of these wires and then these wires go to the end of the front right door, it has a brown/red color.
There is white/blue for the front left door end and white/red for the rear ones. The diagram of this connection is below.
If you don’t have these diodes, but really want to connect them, then we take and drag the wire that is responsible for the door limit switches under the roof trim and drag it to the ceiling lamp, remove it, disassemble it and look for the green wire, connect to it, but there is minus, if you close the doors before the lamp goes out, the alarm will think that some door is open and after that the lamp will gradually go out, it will think that someone is opening the door and will start yelling. Therefore, you need to wait until it goes out or set the alarm to be delayed. That's all. Go ahead!
Let's finish with the wires a little. We'll come back later because there's autostart ahead.
We connect the LED to the rack on the left by making a hole; you can secure it with something on the reverse side. We glue the antenna 5mm from the end of the windshield, approximately where the rear view mirror is. I installed the shock sensor under the pedals behind the mat on metal; you should not place it on plastic because it heats up and cools down, which can cause false alarms.
The wires under the hood, and there are at least 2 of them, 1 from the autostart - plus, and the plus from the siren, I ran almost at the top under the tidy, it’s difficult to see, you just need to look for the light by looking from below, then stick a stiff wire there to use it as a fishing rod. We fix everything in place, cut the wire (loop) for the manual transmission in the alarm unit. connect the Valet button and hide it well. We put everything in its place and connect it, and now it’s time to connect what this alarm system was bought for after all.
In fact, autostart is very simple, no matter how it might seem at first glance.
One wire is +, two ignition wires and a wire to the starter.
If your immo is activated, then you need to buy another bypass unit for the standard immobilizer and hide it well. It is connected to the break in the white wire, you can find it to the right of the steering wheel closer to the partition of the stove or beard, the center console, whichever is convenient for you, in general, look for this wire there, and all the others that I will talk about too.
The starter is connected to a gap in two wires from the signaling system, at least it was in my case. We cut the red wire and connect an alarm wire to each end of the wire.
Next you need to connect the ignition. It’s interesting, but you are given 1 wire, but in Kalina there are 2 of them at once, both identical, blue. I didn’t check and played the “intuition show”, without fully understanding which one should be connected to and whether there is a difference, I know one thing, when you turn the key, 12V should appear on the wire. Are you connected? Great, it’s a small matter, we connect the plus, you can drag it under the hood and connect it to the positive terminal of the battery, or you can connect a permanent plus there to the brown wire there.
Actually, you can try it now. We start, put the handbrake on, take the keys out of the lock, the engine should continue to run and the LED should be constantly on. We get out of the car and press the button to close the doors. The locks close, the car stalls, and now you can try to start it remotely.
Phew, I don’t think I forgot anything, but in any case, if you have any questions, write and I will answer them, so to speak, I will help in any way I can. Thanks to those who mastered so many letters. Good luck with the installation and on the road of course.
Added: For Kalina luxury packages, the door switches are a slightly different story, the driver's door switch on the switch block connector is brown-red, and the rest are also white-red and brown-red in the BUS, and the connection is similar to the diagram that I described above, only from the driver's The door wire appears in a different place.
If you connect the yellow-white and yellow-black wires to the left threshold control harness, then ALL doors will close, and ONLY the driver's door will open!
To implement step-by-step door opening, you need to follow the diagram below.
I hope everything worked out for you. If you have any questions, ask them below in the comments. I also advise you to read the article about installing parking sensors on a Lada Kalina with your own hands.