- Design features and principle of operation of the VAZ 2114 windshield wiper
- VAZ 2114 washer reservoir: features of the reservoir operation
- Windshield washer system replacement and repair
- Useful video
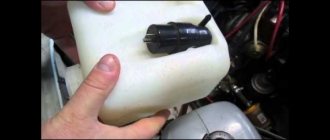
The car glass cleaning system is an extremely important component that ensures proper visibility of the road space. It consists of several elements. The VAZ 2114 washer reservoir is nothing more than a container that is made of plastic and can hold up to 5 liters of windshield washer fluid. Outwardly, it resembles an ordinary white canister. When you open the hood, the reservoir immediately catches your eye. It is located on the left side, and immediately to the right of it is the car engine.
Operation, repair and replacement of the VAZ 2114 washer reservoir are extremely simple, and the price of the VAZ 2114 washer reservoir varies from one hundred to four hundred rubles.
How to remove the washer reservoir and replace it
Driving in rainy weather is always associated with risk - visibility through the windshield deteriorates, the risk of losing control when entering a puddle increases, and the quality of contact between the tire and the road decreases. But the situation gets worse when the glass washer system fails.
How to remove the washer reservoir
There can be many reasons - the electric pump has failed, the washer reservoir is damaged, or it has run out of washer fluid. In such a situation, dirt from under the wheels of the cars in front clogs the windshield, and if the system is not working, there is nothing to wash it with.
The result is reduced visibility and the risk of an accident. In such a situation, it is important to diagnose the device and fix the problem, namely, add fluid or replace the washer reservoir. Where this container is located and how to replace it will be discussed below.
Mechanical reasons for the malfunction of the windshield washer of the VAZ 2114
Reason 1: sand or dirt gets in, and, as a result, the windshield wiper pipe becomes clogged.
Solution: remove and blow out the washer fluid pipes. Note that for preventive purposes, it is important to fill the washer fluid into the tank through a special mesh filter; this will protect both the fluid from getting contaminants into it at the time of filling, and the pump from the possibility of jamming.
Reason 2 - the tank has run out of windshield washer fluid.
The solution to the problem is very simple - just pour washer fluid or water into the tank (note that at sub-zero temperatures plain water cannot be used).
Reason 3 - clogged windshield wiper nozzles (nozzles).
Solution to the issue: cleaning the holes of the windshield wiper nozzles using a thin needle.
Reason 4 – the washer fluid has frozen.
If liquid that is inappropriate for weather conditions is poured into the tank, it may freeze in the pipes and the tank itself. If there are no special heaters, then you need to put the car in a warm garage and thereby solve this problem (the liquid will freeze), more details.
Reason 5 - rupture of the pressure main pipeline.
It can occur if the nozzles are clogged with debris or small stones, since such circumstances can lead to the formation of excess pressure inside the system, which, in turn, leads to rupture.
Solution to the problem: find the rupture and repair it - replacing part of the worn pipeline using special conductors.
Reason 6 - the hose has come off the feed pump.
Solution: installing a hose on the pump and then tightening it with a clamp.
Reason 7 – a crushed hose supplying washer fluid to the injectors.
Solution to the issue: Most often this happens due to the incorrect transition of the hose on the hood to the windshield wiper nozzles. Find the location of the bend and eliminate it.
Design features of the washer reservoir
A tank with water or “anti-freeze” is a white container installed in the engine compartment and intended for storing washer fluid. Moreover, the tank itself is one of the elements of the windshield washer system.
In addition to this, the device includes the following components:
- Washer jets (nozzles).
- A pressure pump that pumps liquid to the windshield from a container.
- Tubes between the jet and the motor (they supply water or an antifreeze compound).
- A special sensor that monitors the fluid level in the system and issues a corresponding signal to the driver.
- Mounting bracket, as well as tank plug.
- Special tee.
What does the washer consist of?
This element of the car is quite simple in design and consists of:
- tank;
- pump with motor;
- hose;
- nozzles;
- washer fluid level sensor.
As you can see, nothing overly complicated, however, even here malfunctions occur. Read our article about the reasons for this and how to neutralize them without contacting a service center.
Damage to the washer can be mechanical or electrical. The former are much more common than the latter.
Where is the washer fluid container located?
Novice car owners often do not know where the washer reservoir is located. They often confuse it with a coolant or brake fluid container. In fact, finding the tank you are interested in is not difficult.
Let’s say in VAZ cars it is located under the hood, on the left or right side of the engine, depending on the model, and there may also be two of them, on the rear and front windows. And on foreign cars it can be located under the front bumper.
If the level of water or antifreeze in the tank is insufficient, it is enough to top up. But what to do when the windshield washer reservoir bursts? In such a situation, the only salvation is to replace the failed device.
How to replace the washer reservoir:
Lift the hood and find the sensor that monitors the washer fluid level (not found on all cars). Disconnect the connector that fits this device. Also, disconnect the connectors from the wires from the electric pump that pumps up the washer fluid. At the same time, remove the wires from both pumps - for the windshield and for the rear.
Then remove the washer reservoir from its mounting and remove the tubes from the fittings of both pumps. Remove electric pumps from the container. To do this job, you will have to overcome a certain force created by the sealing bushings.
Carefully pry the said sleeve (you can use a flat head screwdriver or something similar) and then remove it from the hole in the container. Assess the condition of the bushing for elasticity. If it is damaged, replace it.
Unscrew the cap and remove from the container the sensor that controls the level of windshield washer fluid (if, of course, your car has one). Check the functionality of the sensor. To perform this task, connect a test lamp to its connectors, then power the device with 12 Volts.
If the float is at the bottom (that is, it signals the absence of liquid), the light should light. Now lift the float up and control the behavior of the light bulb - there should be no glow. If the algorithm is not the same as described above, the sensor needs to be replaced.
Washer fluid level sensor
This completes the removal of the washer reservoir. Next, you need to decide whether you will change the device or try to make a repair, that is, seal it. The first option is more preferable. And the cost of the product is not so high as to save.
Now replace the container and follow the reverse order. If problems arise with the installation of electric motors, and they are difficult to fit through the seals, use soap to lubricate the edges.
Once the tank and motors are mounted, return the nozzle pipes to their place. To simplify the process of installing the tube on an electric motor, heat the tip of the tube with a lighter, after which they can be easily put on. During installation, ensure that the motor is securely fixed.
How to change a plastic tank
To replace or install a new plastic tank, you need an algorithm of five simple steps:
- Lift the hood up
- We drain the remaining liquid from the tank into a separate container, sequentially removing the pipes on the motors. Don't forget that they have polarity: white is positive and black is negative.
- Having freed the tank, we take out the liquid level sensor
- We take out the tank itself, carefully but forcefully, pulling it up
- Using a straight-slotted screwdriver, remove the electric motors
Removing windshield washer motors for VAZ 2114
This is the procedure for removing the tank. If you need to install a new windshield washer reservoir, the steps will be the same, but in reverse order. If during installation difficulties arise with the electric motors, it means that the rubber seals are interfering with them. In such a situation, regular soap will help.
After installing the tank and electric motors, there may be a problem with installing the injector pipes. They are difficult to fit onto the motors. The process will be easier if you heat the tip of the tube with a flame from a regular lighter. When heated, the walls of the pipes will become softer and more flexible.
Electrical tape is suitable for tightly fixing the motor. It should create additional volume.
How and what to fill in the washer reservoir?
Above we looked at how to remove the washer reservoir, check the system sensor and change the container (if it is damaged). But there are situations when the container body is intact, and the only thing that needs to be done is to add liquid.
In such a situation, proceed as follows:
- Pull the hood handle located in the cabin.
- Open and secure the hood.
- Unscrew the cap that is installed on the tank. In this case, unscrew only the cover that does not have wires.
- Add liquid (water or anti-freeze). If the container is empty, it holds about five liters.
How to remove the washer reservoir of a VAZ 2114
When I bought the car, I didn’t understand at all what else was what (now I have a little more knowledge, but far from perfection of course)), but the leaking washer reservoir was terribly annoying.
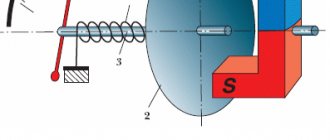
It was decided to buy new rubber seals for the motors. Bottom line: it didn’t help. I decided to remove the tank and look for a leak. Removing it is not a problem, we disconnect all the wires and just lift it up. Having washed the tank of dirt and the area under it, I plugged the holes from the motors and filled it completely with water, looking for cracks. There weren’t any, then all the shoals flew onto the rubber seals under the motors. I thought about it for a long time, but found a solution in a medical tourniquet. Unfortunately there are no photos, so I will again resort to my art of drawing in paint. ))))
There were layers of electrical tape on the motors from the old owners, apparently for sealing, so I removed them for nothing and threw them away.
And now, in order. Figure I shows how the rubber seal is attached to the tank. Figure II schematically shows a piece of medical tourniquet. We take this tourniquet, select the strip on the spot, I don’t remember. Fold it in half and, as shown with a cross, make a cross-shaped cut with a stationery knife, you don’t need too much, otherwise when putting it on, the elastic will not fit tightly and will come off, but you can’t do too little, otherwise it will break. Then, as in Figure III, we take and put the elastic band on the seal, it turns out that we put the lower cut hole on the lower part of the elastic, but not too much, but so that it remains on the cone and does not jump into the recess. Then, as in Figure IV, having first placed the tourniquet on the rubber band from below, insert the rubber band into the tank and then, as in the picture, wrap the upper piece of the rubber band with a slot over the hole in the seal and insert the motor until it stops. The result is not long in coming. I had the procedure done about 5 months ago and there is still not a drop left.
I hope I wrote and showed everything clearly and I hope this helps you. ) Until we meet again, beaver everyone! )
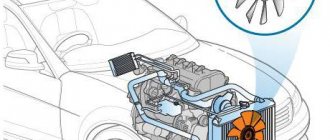
The car glass cleaning system is an extremely important component that ensures proper visibility of the road space. It consists of several elements.
The VAZ 2114 washer reservoir is nothing more than a container that is made of plastic and can hold up to 5 liters of windshield washer fluid. Outwardly, it resembles an ordinary white canister. When you open the hood, the reservoir immediately catches your eye. It is located on the left side, and immediately to the right of it is the car engine.
Operation, repair and replacement of the VAZ 2114 washer reservoir are extremely simple, and the price of the VAZ 2114 washer reservoir varies from one hundred to four hundred rubles.
Design features and principle of operation of the VAZ 2114 windshield wiper
The reservoir is just one element of the windshield wiper system. It includes the following main parts:
- container for liquid;
- washer jets;
- injection pumps;
- hoses between the pump and jets;
- liquid level sensor;
- tee;
- mounting bracket.
The washer reservoir sensor on the VAZ 2114 reports the fluid level in the container and helps control its timely topping up if necessary.
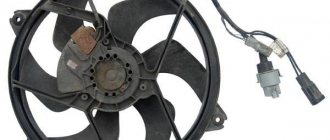
Pressure pumps have motors. In the “Samara” model they are located on the body of the tank in the amount of two pieces. The motors increase the pressure of the fluid in the tank and ensure its supply to the windshield through special hoses. One of them is responsible for washing the front part (windshield), and the other is responsible for cleaning the rear window of the car.
DESIGN FEATURES AND PRINCIPLE OF OPERATION OF THE VAZ 2114 WASHER
The windshield washer reservoir is a plastic container shaped like a regular canister. The tank can be filled with both plain water and a special liquid for cleaning the windshield.
The cost of a windshield washer container varies from 100 to 400 rubles. The cost depends on whether the VAZ 2114 washer reservoir is equipped with a motor for pumping liquid. Tanks that come with a motor are usually almost twice as expensive.
The VAZ washer reservoir is only a component of the windshield cleaning system, which, in addition to the container, includes:
- Liquid supply pump;
- Hose for transporting liquid;
- Tee;
- Windshield washer jet;
- A sensor that measures the current liquid level in the tank;
- Bracket for fixing the tank;
- Fastening screws.
The VAZ 2114 windshield wiper motor is necessary to build up fluid pressure and supply it to the windshield. The motors are located on the body of the windshield washer reservoir. In the fourteenth there are two such motors: the first is for supplying fluid to the windshield, the second is for the rear.
Components of the tank
Finding where the washer reservoir is located is quite simple - it is located under the hood of the fourteenth, on the left side. The large white canister is noticeable immediately when you open the hood, so it’s difficult to make a mistake here.
Let's figure out where to fill the windshield washer water. To fill in the working fluid, you need to open and lock the hood, unscrew the reservoir cap, and fill it with water or glass cleaner to the required level. As a rule, standard fourteenth windshield washer containers hold about 5 liters of water.
Features of tank operation
Operating the tank does not require special skills. The main task is to add washer fluid in a timely manner. As such, you can use either ordinary water with a special cleaning additive or antifreeze washer.
The choice of a specific type of cleaning fluid depends on the time of year. So, for the summer period, when there is a sufficient amount of contaminants in the air (dust, gasoline vapors, soot), it is better to use water with a cleaning additive. However, in winter this type of cleaner is no longer suitable. Negative temperatures will cause the water in the tank to freeze and expand, which will lead to its rupture. Therefore, a washer with an antifreeze additive is ideal for the winter period.
VAZ 2114 washer reservoir: features of the reservoir operation
Operating the tank does not require special skills. The main task is to add washer fluid in a timely manner. As such, you can use either ordinary water with a special cleaning additive or antifreeze washer.
The choice of a specific type of cleaning fluid depends on the time of year. So, for the summer period, when there is a sufficient amount of contaminants in the air (dust, gasoline vapors, soot), it is better to use water with a cleaning additive. However, in winter this type of cleaner is no longer suitable. Negative temperatures will cause the water in the tank to freeze and expand, which will lead to its rupture. Therefore, a washer with an antifreeze additive is ideal for the winter period.
Windshield washer system replacement and repair
But even with proper use of the tank and careful attention to the type of liquid being filled, it can fail.
see also
There may be several reasons for this.
- The liquid has run out. In this case, you just need to top it up by unscrewing the tank cap.
- The container body is damaged. These can be either cracks or through holes. If there are such liquids, the liquid does not linger in the tank. This means that in this case the tank needs to be repaired.
- Problems in the functioning of the motor. If this element stops working, then most likely this is due to the fact that the contacts, which are also located on the container body, have come loose. In this case, they need to be cleaned.
- The problem is in the washer supply hose. This element is subject to wear and tear during operation. If this is the cause of the washer malfunction, the hoses must be replaced.
Many owners of the Samara model are interested in the question of how to change/remove the washer reservoir of a VAZ 2114. This procedure is extremely simple and does not require special tools. Only the presence of a screwdriver.
The container itself is attached using a special bracket and groove and is removed by lifting it up.
The algorithm of actions is as follows:
- Open the hood and secure its position.
- Drain the liquid from the reservoir. This can be done using part of the hose.
- The structure is removed from the grooves and set aside slightly to the side so as not to interfere with further dismantling.
- To remove the motor, you need to lift it with a screwdriver and pull it upward.
Installing the washer fluid reservoir is done in the same way, only in reverse order.
Car enthusiasts often complain that when installing a tank, difficulties arise in installing the hose on the pipe. In this case, you can use a lighter or other heating element, for example, an electric hair dryer. When heated, the rubber will become softer and more pliable, which means installation of the hose will be easier.
REPLACEMENT AND REPAIR OF WINDOWS WASHER VAZ 2114
There may be several reasons why the VAZ 2114 windshield washer does not work. Let's look at each of them separately:
- It’s trite - you’ve run out of water, here you just need to check the liquid level and add it if necessary;
- Damage to the body of the container - possibly due to wear, some cracks or through holes have appeared on the body of the canister through which the working fluid flows. This will require repair of the washer reservoir;
- Problem with the motor - if the windshield washer, filled to the top with cleaning liquid, does not work, the reason must be sought in the electric motor. As a rule, most often the contacts that come off in motors are located on the top of their body. In this case, the contact must be cleaned;
- There is a problem with the fluid supply hose - there are two hoses running from the motors on the windshield washer reservoir to the windshield and rear windows, through which water is supplied to the windows. During the operation of the car, they can fray or break and become the reason why the VAZ 2114 windshield washers do not work - such hoses need to be changed.
Replacing the windshield washer reservoir does not require any special tools, since the container itself is fixed solely on the grooves - you can remove it with your own hands, for which you just need to pull the canister up. A screwdriver may be required to remove the motors from the reservoir body.
To remove the tank yourself, you need to perform the following sequence of actions:
- We open the hood of the fourteenth. Let's fix it;
- Drain the remaining water in the canister using a piece of hose;
- We remove the container from the grooves (just pull it up) and place it so that it is convenient to work with the motors;
- We remove the contacts and hoses for supplying fluid from the motors;
- We dismantle the motors themselves from the tank body - to do this, just pry them out with a screwdriver and pull them up.
All steps for installing a new container are similar to the technology for dismantling it, but are performed in the reverse order. If, during the installation of a new windshield washer tank, you have problems installing the motors - VAZ-2114 owners often complain that installing hoses on the pipes of new motors is quite problematic - they either do not fit on, or fit, but not tightly, you need to use improvised ones facilities.
If the hose does not fit onto the pipe, heat the rubber with a lighter or an electric hair dryer, and it will become more pliable; if the hoses are not fixed tightly, rewind them with electrical tape.
Sealing the walls of the tank from cracks and damage is done with a regular soldering iron.
Useful video
You can see the process of removing the washer reservoir in the video below:
The washer fluid reservoir is a fairly simple design and is part of the overall vehicle system. Operation and repair of this element does not require special training. Removal and installation of the tank, as well as its partial repair, can be done on our own.
Latest comments:
- Igor: I don’t have a fitting, the throttle is electronic, what should I do?
- Denis: Hello everyone. On the ventilators, what should the wires be attached to?
- Vova: I did everything as in the picture, except I didn’t install a new cigarette lighter. P [. ]
- Mukhtar: Guys, salamaleikum to everyone, I have such a problem with the arrows on the panel and im [. ]
- Vitaly: Hello, I have a VAZ 2115. I recently encountered such a problem with [. ]
Removing and installing the washer reservoir
1. Disconnect the connector with the wire from the washer fluid level sensor.
2. Disconnect the connectors with wires from the electric pumps for the windshield and tailgate washer.
3. Remove the washer reservoir from the bracket and disconnect the hoses from the fittings of the electric pumps.
4. Overcoming the resistance of the sealing bushings, remove the electric pumps from the tank.
5. Carefully pry off the sealing sleeve...
6. ...and remove it from the hole in the tank. If the bushing has lost elasticity or is torn, replace it.
7. Unscrew the cap and remove the washer fluid level sensor from the tank.
8. Connect a test lamp to the sensor terminals and apply a voltage of 12 V. When the float is lowered, the lamp should be on.
9. Then lift the float - the lamp should go out. Otherwise, the sensor is faulty and must be replaced.
10. Install the washer reservoir and all removed parts in the reverse order of removal.
We find out why the VAZ 2114 windshield washer does not work
Sometimes car enthusiasts are faced with the fact that the VAZ 2114 washer does not work. This seemingly harmless problem can actually lead to very serious consequences. After all, the washer is designed to clean the windshield from dirt and various debris that gets on it, which is sometimes impossible to remove with the help of wipers alone.
Such pollution significantly impairs visibility through the windshield, and this, in turn, can make driving on the road unsafe.
It should be remembered that according to the law, driving a car whose washer has failed is strictly prohibited. It will also not be possible to pass a technical inspection with a faulty washer.
The washer itself is quite simple, and its most important components are:
- tank;
- pump with motor;
- hose;
- nozzles;
- washer fluid level sensor.
We’ll tell you below why breakdowns happen even in such a simple unit and how to fix them yourself.
How it works and where it is located
The tank is a plastic container.
The price for this container can range from 100 to 400 rubles. This different price is determined by the configuration. It can be equipped with a special motor that pumps liquid.
The VAZ washer reservoir is only part of a larger system. In addition to this reservoir, the design includes a pump that supplies liquid, a hose, a tee, windshield washer nozzles, a liquid level sensor, and fasteners.
The container is located under the hood, on the left. You can immediately see a large white plastic canister - that’s it.
Frequently asked questions from car owners
How and where to add windshield washer water?
- In the cabin, open the hood handle
- Finally open and secure the hood
- Unscrew the large cap on the windshield wiper reservoir, the one without wires
- Pour liquid into the tank. Approximately five liters will fit in this canister
What liquid is recommended to be poured into the washer reservoir of the VAZ 2114?
Pouring anti-freeze
Different times of the year require different windshield wipers to clean glass. In winter, at low temperatures, it is recommended to fill in an antifreeze additive. It will protect the tank from freezing, and with it the parts of the windshield wiper system will not burst from temperature overloads. In summer, it is recommended to add a cleaning additive to the water. During this period, abundant sediment of exhaust gases, oils, and car paint care products accumulates on the glass.
Advice: for the best effect, you should first pour the additive into the tank, and only then ordinary water. This will allow the liquids to mix better.
How can you heat the windshield wiper reservoir in winter?
Option one: homemade
Materials: 1 meter of 8 mm copper tube, 2 meters of 8 mm wrapped hose, 2 reservoir cuffs and 4 clamps.
Heating installation technology: two holes for cuffs are drilled in the tank lid. A copper tube is already inserted into them, which must be given the reliefs of the tank in advance. At the exit, the tube should be in a horizontal position. The hoses are connected to the throttle body and thermostat.
Option two: in the form of a coil
Technology: the same copper tube as in the first option. But here it is given the shape of a coil using a soldering iron. The resulting coil is not attached, as usual, to the tank instead of a lid. It is soldered to a textolite plate. Afterwards, the homemade coil is installed in the tank as low as possible so as not to interfere with the liquid level sensor.
Holes for the thermal device are cut using a soldering iron. This way they turn out neat. Their diameter is 3 millimeters. The edges should be lubricated with sealant. The best fastening for the device is stainless steel screws. When installing, they should be heated with a soldering iron - this way they will be better fixed in the windshield washer reservoir.
Option three: ready
This is a ready-made heating system for the Geyser tank washer. Operating principle: as it passes through the coil, the temperature of the coolant begins to rise. Accordingly, the degree of liquid in the tank also increases.
Price is an issue
You can find out how much a VAZ 2114 washer reservoir costs in local stores in your city, or through an Internet search engine. The average price in online stores for a windshield washer reservoir is 250 rubles.
Replacing the windshield washer reservoir
If suddenly for some reason there is a need to replace the tank, it is very easy to do it yourself. No special skills or tools are required here. All work can be done with almost bare hands.
Before removing the windshield washer reservoir, be sure to disconnect the hose and power cables from the motor and level sensor. Then use a 10mm socket to remove the bolts that secure the reservoir to the slots. Now this part will come off easily if you pull it up.
Don't forget to remove the electric pumps from the tank. The sealing sleeve can be easily pryed with a screwdriver and removed from its seat. If this part is no longer flexible or has any damage, it should be replaced.
After this, you need to remove the level sensor from the tank. To do this, you must unscrew the plug and remove the sensor. Now all work is completely finished.
Washer reservoirs: repair
If your tank suddenly develops a crack for unknown or known reasons, you have several options. Either it’s a repair or buying a new container, since its price is low. If you are on the highway, then definitely a repair.
If temporary measures are needed, then prepare several food bags and place the washer reservoir in them. This will stop the water leakage for a while. It is advisable that these bags are approximately the same size as your container.
You can also perform simple repairs using a soldering iron. For such repairs you will need an ordinary soldering iron. It needs to be cleaned, but there is no need to tin it. Use a plastic food bag as solder. Twist it to make a rope with a diameter of 5 mm. Solder one end of it below the crack, and then slowly solder the entire crack and even a little higher.
Be careful not to overheat the soldering iron. Then heat the tourniquet until it becomes transparent, but heat it carefully so as not to damage the tank body. After cooling, you will get a reliable seam.
Lada Priora washer reservoir
These cars have very fragile tanks.
There are many different offers in the stores. So, you can use a model for two pumps. This way you can ensure the glass is clean both front and back. This container has a slightly larger volume when compared with that installed by the manufacturer.
When replacing, you need to take into account that on the Lada Priora in hatchback and station wagon bodies, you buy containers for two pumps. If you have a sedan, then this option will not suit you.
Removing the tank
At the first stage, the liquid is drained from the reservoir. Then you need to disconnect the terminals from the battery. To do this, you can use a 10mm wrench. The stand to which the tank is attached can be unscrewed with a 13mm wrench. Work as carefully as possible, otherwise you will drop the nut. After this, you need to dismantle the battery. If there is an air conditioner, remove the air conditioner mounting block as well.
Before removing pumps from the reservoir, prepare a large amount of rags. Near the optics, unscrew the nuts that secure the container to the stand. Now you can remove the old element and install the new one. Now you know how to remove the washer reservoir.